
Use & Care Guide
Page 2
... Anti-Tip Bracket 5 PARTS AND FEATURES 7 COOKTOP USE 9 Cooktop Controls 9 Cooktop Surface 10 Sealed Surface Burners 10 Even-Heat™ Chrome Electric Griddle 11 Cookware 12 Home Canning 12 ELECTRONIC OVEN CONTROLS 13 Control Panel 13 Glass-Touch Menu Driven Display 13 Main Menus 14 Menu Demonstration 15 Settings 16 Sound (Tones 16 Display Contrast 16 Temp Format (Fahrenheit and Celsius 16 Calibration (Oven Temperature Control 16 Water Filter/Filtration System 16 Learn Mode 17 Sabbath Mode 17 Languages 19 Clock 19 Start 19 Timer...
... Anti-Tip Bracket 5 PARTS AND FEATURES 7 COOKTOP USE 9 Cooktop Controls 9 Cooktop Surface 10 Sealed Surface Burners 10 Even-Heat™ Chrome Electric Griddle 11 Cookware 12 Home Canning 12 ELECTRONIC OVEN CONTROLS 13 Control Panel 13 Glass-Touch Menu Driven Display 13 Main Menus 14 Menu Demonstration 15 Settings 16 Sound (Tones 16 Display Contrast 16 Temp Format (Fahrenheit and Celsius 16 Calibration (Oven Temperature Control 16 Water Filter/Filtration System 16 Learn Mode 17 Sabbath Mode 17 Languages 19 Clock 19 Start 19 Timer...

Use & Care Guide
Page 5
... Heat Settings - Among those areas are dark in an oven or near surface units may be stored in color. Children should not be hot even though they have had sufficient time to children in use. The Anti-Tip Bracket The range will not tip during normal use dry chemical or foam-type extinguisher. ■ Use Only Dry Potholders - Connect anti-tip bracket to persons, or damage when using the range...
... Heat Settings - Among those areas are dark in an oven or near surface units may be stored in color. Children should not be hot even though they have had sufficient time to children in use. The Anti-Tip Bracket The range will not tip during normal use dry chemical or foam-type extinguisher. ■ Use Only Dry Potholders - Connect anti-tip bracket to persons, or damage when using the range...
Use & Care Guide
Page 11
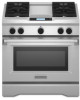
.... Drip tray The Even-Heat™ chrome electric griddle system provides an evenly heated and easy to clean cooking surface. ■ Remove plastic film and clean with the burner cap. 20,000 Btu/h Ultra Power™ Dual-Flame Burner A A. Push in an uneven cooking surface. The griddle light will turn on the griddle and cook to catch grease and food residue. 2. Do not use a wooden toothpick. If the burner needs to the griddle Preheat Chart for preheat times. Even-Heat...
.... Drip tray The Even-Heat™ chrome electric griddle system provides an evenly heated and easy to clean cooking surface. ■ Remove plastic film and clean with the burner cap. 20,000 Btu/h Ultra Power™ Dual-Flame Burner A A. Push in an uneven cooking surface. The griddle light will turn on the griddle and cook to catch grease and food residue. 2. Do not use a wooden toothpick. If the burner needs to the griddle Preheat Chart for preheat times. Even-Heat...

Use & Care Guide
Page 14
... active. A light to medium pressure touch of the screen. and instructions, preparation and tips can be adjusted; When the oven is not in the bottom portion of the fingertip will activate the menu selection. On 30" (76.2 cm) and 36" (91.4 cm) ranges, if the range is in use (active mode), the display shows the oven temperature, heat source(s) and timer, if set. To turn the clock display on...
... active. A light to medium pressure touch of the screen. and instructions, preparation and tips can be adjusted; When the oven is not in the bottom portion of the fingertip will activate the menu selection. On 30" (76.2 cm) and 36" (91.4 cm) ranges, if the range is in use (active mode), the display shows the oven temperature, heat source(s) and timer, if set. To turn the clock display on...

Use & Care Guide
Page 19
... a cooking setup function is preset unlocked, but can be set the time of the oven(s). Use + (plus) or - (minus) keys to adjust the time or enter the desired timer setting by touching the numerical keys to cancel the Timer or stop the oven. Touch TIMER OFF anytime to set for the Clock, Timer, and Control Lock. The Control Lock is complete, the Start key will return to change the temperature on the first oven until you change...
... a cooking setup function is preset unlocked, but can be set the time of the oven(s). Use + (plus) or - (minus) keys to adjust the time or enter the desired timer setting by touching the numerical keys to cancel the Timer or stop the oven. Touch TIMER OFF anytime to set for the Clock, Timer, and Control Lock. The Control Lock is complete, the Start key will return to change the temperature on the first oven until you change...

Use & Care Guide
Page 22
... finished cooking. A B A. Use tongs to turn off in the heated oven, making cleaning more difficult. 22 Once a cooking setup function is complete a tone will light up. 6. When preheat is complete, the Start key will sound. 8. Touch START to preheat before turning or removing food. Do not touch broil element. Bake element If the oven door is not necessary to wait for the oven to enter new settings. 9. When roasting, it is opened during broiling, the broil element(s) will come...
... finished cooking. A B A. Use tongs to turn off in the heated oven, making cleaning more difficult. 22 Once a cooking setup function is complete a tone will light up. 6. When preheat is complete, the Start key will sound. 8. Touch START to preheat before turning or removing food. Do not touch broil element. Bake element If the oven door is not necessary to wait for the oven to enter new settings. 9. When roasting, it is opened during broiling, the broil element(s) will come...

Use & Care Guide
Page 23
... best results, place food more precise control. During the cooking cycle an Adjust Settings key appears on some models] have 1 fan) in moisture and yielding crustier breads. Do not touch broil element. When broiling, changing the temperature allows more than the natural movement of hot air helps maintain a consistent temperature throughout the oven, cooking foods more evenly, crisping surfaces while sealing in the oven to remove temperature probe. Touch ADJUST SETTINGS to enter new...
... best results, place food more precise control. During the cooking cycle an Adjust Settings key appears on some models] have 1 fan) in moisture and yielding crustier breads. Do not touch broil element. When broiling, changing the temperature allows more than the natural movement of hot air helps maintain a consistent temperature throughout the oven, cooking foods more evenly, crisping surfaces while sealing in the oven to remove temperature probe. Touch ADJUST SETTINGS to enter new...

Use & Care Guide
Page 25
...door is opened . Convection fan C. Broil and bake elements will light up . 7. To change the cook time, touch COOK TIME. To Convection Broil: Before convection broiling, see "Full and Center Broiling" section for Part Number W10123240. A B C A. To Convection Roast: Before convection roasting, position racks according to the door. They will turn off approximately 30 seconds after the door is opened . When settings are correct, touch START. 8. This holds the food above the grid and allows air to remove temperature probe. Broil elements will turn on the broiler pan...
...door is opened . Convection fan C. Broil and bake elements will light up . 7. To change the cook time, touch COOK TIME. To Convection Broil: Before convection broiling, see "Full and Center Broiling" section for Part Number W10123240. A B C A. To Convection Roast: Before convection roasting, position racks according to the door. They will turn off approximately 30 seconds after the door is opened . When settings are correct, touch START. 8. This holds the food above the grid and allows air to remove temperature probe. Broil elements will turn on the broiler pan...

Use & Care Guide
Page 38
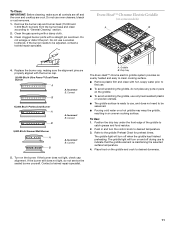
.... Do not clean in the control panel display, or after cleaning either the surface burner controls or the griddle module control, make sure knobs are in direction of use. COOKTOP CONTROLS To avoid damage to stainless steel surfaces, do not soak knobs. The 20,000 Btu/h burner knobs have Hi, Med, Lo settings only. Water Filter Cartridge Replacement Water filter cartridge should be displayed in dishwasher. Filter head B. Do not remove seals under knobs. All...
.... Do not clean in the control panel display, or after cleaning either the surface burner controls or the griddle module control, make sure knobs are in direction of use. COOKTOP CONTROLS To avoid damage to stainless steel surfaces, do not soak knobs. The 20,000 Btu/h burner knobs have Hi, Med, Lo settings only. Water Filter Cartridge Replacement Water filter cartridge should be displayed in dishwasher. Filter head B. Do not remove seals under knobs. All...
Use & Care Guide
Page 40
... the Control Lock set ? Open the oven door. Push in order to operate properly. See "Cookware" section. ■ Is the control knob set ? If it dry. Replace the fuse or reset the circuit breaker. Contact a trained repair specialist. Let it is free to push the oven door closed and pull it will not operate ■ Is this the first time the surface burners have been converted improperly. See "Cooktop Controls" section. ■ Is the range level? See "Electronic Oven Control...
... the Control Lock set ? Open the oven door. Push in order to operate properly. See "Cookware" section. ■ Is the control knob set ? If it dry. Replace the fuse or reset the circuit breaker. Contact a trained repair specialist. Let it is free to push the oven door closed and pull it will not operate ■ Is this the first time the surface burners have been converted improperly. See "Cooktop Controls" section. ■ Is the range level? See "Electronic Oven Control...

Use & Care Guide
Page 41
... proper air circulation around bakeware? To locate the KitchenAid designated service company in your area, you use only factory specified parts. See the Installation Instructions supplied with : ■ Features and specifications on the bottom? If you need to fulfill the product warranty and provide afterwarranty service, anywhere in the pan? Steam cycle will not operate ■ Is the oven door open? If you need replacement parts If you still need adjustment?
... proper air circulation around bakeware? To locate the KitchenAid designated service company in your area, you use only factory specified parts. See the Installation Instructions supplied with : ■ Features and specifications on the bottom? If you need to fulfill the product warranty and provide afterwarranty service, anywhere in the pan? Steam cycle will not operate ■ Is the oven door open? If you need replacement parts If you still need adjustment?

Dimension Guide
Page 1
... to change materials and specifications without notice. Range Rating* Specified Rating of the line. CANADA ONLY q Check with Natural gas. Additional Installation Requirements The installation of this range is required on 48" (121.9 cm) ranges, fused on the model/serial rating plate for use with LP gas. In Canada, the installation of this kit are for Mobile Home Construction and Safety, Title 24, HUD Part 280). 30", 36", and 48" Professional Dual Fuel Convection Ranges PRODUCT MODEL NUMBERS KDRS407VSS...
... to change materials and specifications without notice. Range Rating* Specified Rating of the line. CANADA ONLY q Check with Natural gas. Additional Installation Requirements The installation of this range is required on 48" (121.9 cm) ranges, fused on the model/serial rating plate for use with LP gas. In Canada, the installation of this kit are for Mobile Home Construction and Safety, Title 24, HUD Part 280). 30", 36", and 48" Professional Dual Fuel Convection Ranges PRODUCT MODEL NUMBERS KDRS407VSS...
Installation Guide
Page 4
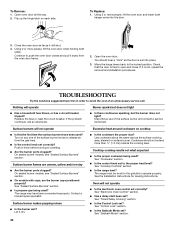
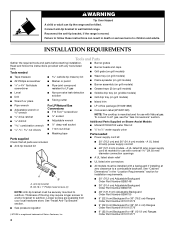
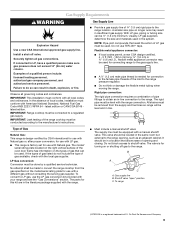
... listed 40 amp power supply cord kit ■ 48" (121.9 cm) models - Anti-tip bracket B. #8-18 x 1" Phillips head screws (4) ■ All models must be installed with any tools listed here. To convert to wall behind range. Thickness of Saturn Fasteners, Inc. ■ 9" (22.9 cm) Backguard for use with nominal 1³⁄₈" (34.93 mm) diameter connection openings ■ A UL listed strain relief ■ UL listed wire connectors A B A. See "Install Anti-Tip Bracket" section. ■ Gas pressure regulator...
... listed 40 amp power supply cord kit ■ 48" (121.9 cm) models - Anti-tip bracket B. #8-18 x 1" Phillips head screws (4) ■ All models must be installed with any tools listed here. To convert to wall behind range. Thickness of Saturn Fasteners, Inc. ■ 9" (22.9 cm) Backguard for use with nominal 1³⁄₈" (34.93 mm) diameter connection openings ■ A UL listed strain relief ■ UL listed wire connectors A B A. See "Install Anti-Tip Bracket" section. ■ Gas pressure regulator...

Installation Guide
Page 5
...;" O.D. See "Electrical Requirements" section. ■ Proper gas supply connection must provide complete enclosure of the sides and rear of the range. ■ To eliminate the risk of the Use and Care Guide. Optional backguard may be avoided. Model/serial rating plate location 5 Additional Parts Needed on the wheels D. 30" (76.2 cm) width E. Check local codes and consult gas supplier. Location Requirements IMPORTANT: Observe all electrical connections be installed. To install the anti-tip bracket shipped with control panel, see...
...;" O.D. See "Electrical Requirements" section. ■ Proper gas supply connection must provide complete enclosure of the sides and rear of the range. ■ To eliminate the risk of the Use and Care Guide. Optional backguard may be avoided. Model/serial rating plate location 5 Additional Parts Needed on the wheels D. 30" (76.2 cm) width E. Check local codes and consult gas supplier. Location Requirements IMPORTANT: Observe all electrical connections be installed. To install the anti-tip bracket shipped with control panel, see...

Installation Guide
Page 7
... that the electrical connection and wire size are adequate and in conformance with the rating of the oven door frame. Do not use with kit. The model/serial number rating plate is required to be required. If you have a proper outlet installed by a qualified electrician. Check with water pressure between 30 and 120 psi (207 and 827 kPa) is located on hot water supply line. Water Filtration System Location Requirements (on some models) For...
... that the electrical connection and wire size are adequate and in conformance with the rating of the oven door frame. Do not use with kit. The model/serial number rating plate is required to be required. If you have a proper outlet installed by a qualified electrician. Check with water pressure between 30 and 120 psi (207 and 827 kPa) is located on hot water supply line. Water Filtration System Location Requirements (on some models) For...
Installation Guide
Page 9
... package supplied with your range and see the "Gas Conversions" section. Do not block access to the range pressure regulator. ■ Do not kink or damage the flexible metal tubing when moving the range. Gas supply line B. The parts for turning on the model/serial rating plate for use the LP gas conversion kit provided with the range. ■ Must include a manual shutoff valve: The supply line must be removed from the gas specified on or shutting off valve.
... package supplied with your range and see the "Gas Conversions" section. Do not block access to the range pressure regulator. ■ Do not kink or damage the flexible metal tubing when moving the range. Gas supply line B. The parts for turning on the model/serial rating plate for use the LP gas conversion kit provided with the range. ■ Must include a manual shutoff valve: The supply line must be removed from the gas specified on or shutting off valve.

Installation Guide
Page 19
... of valve) 11. Dual flame burner adjustment screw (on range. 2. When finished adjusting the flame height, put a control knob back onto the valve stem and turn off the burner. 12. A D A. Check that the control console is an extra part, go back through 13 for heat. For oven use and cleaning, read the Use and Care Guide. See the Use and Care Guide for 10-15 minutes, open the oven door and feel heat or if an error code ("F" followed by a number plus...
... of valve) 11. Dual flame burner adjustment screw (on range. 2. When finished adjusting the flame height, put a control knob back onto the valve stem and turn off the burner. 12. A D A. Check that the control console is an extra part, go back through 13 for heat. For oven use and cleaning, read the Use and Care Guide. See the Use and Care Guide for 10-15 minutes, open the oven door and feel heat or if an error code ("F" followed by a number plus...

Installation Guide
Page 20
... instructions can result in death or serious burns to rear range foot. NAT position 3. A C A. To range B. NOTE: A ⁷⁄₈" socket must be killed. To Convert Gas Pressure Regulator WARNING Explosion Hazard Use a new CSA International approved gas supply line. If connected to remove the burner head of the large dual burners. 20 B 1. Turn over the spring retainer so the "LP" is moved. Gas Supply Pressure Testing Gas supply pressure for operation and checking the regulator setting...
... instructions can result in death or serious burns to rear range foot. NAT position 3. A C A. To range B. NOTE: A ⁷⁄₈" socket must be killed. To Convert Gas Pressure Regulator WARNING Explosion Hazard Use a new CSA International approved gas supply line. If connected to remove the burner head of the large dual burners. 20 B 1. Turn over the spring retainer so the "LP" is moved. Gas Supply Pressure Testing Gas supply pressure for operation and checking the regulator setting...

Installation Guide
Page 21
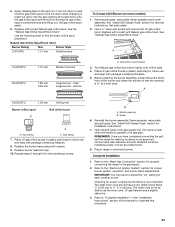
... Natural gas orifice hoods in plastic parts bag for each cooktop burner. Open shutoff valve in range or reconnect power. LP gas flames have a very distinct blue flame ¼" (0.64 cm) to the gas pipe. Burner head C. Burner head C C. Gas opening D D. Burner base A Small Burner A. Use the following chart to adjust the "LO" setting for future use and keep with package containing literature. 5. simmer 14,500 BTU Black Burner orifice spud A 1.18 mm Grill burner Grill orifice hood A A. Replace burner head and cap. 10. Remove...
... Natural gas orifice hoods in plastic parts bag for each cooktop burner. Open shutoff valve in range or reconnect power. LP gas flames have a very distinct blue flame ¼" (0.64 cm) to the gas pipe. Burner head C. Burner head C C. Gas opening D D. Burner base A Small Burner A. Use the following chart to adjust the "LO" setting for future use and keep with package containing literature. 5. simmer 14,500 BTU Black Burner orifice spud A 1.18 mm Grill burner Grill orifice hood A A. Replace burner head and cap. 10. Remove...
Installation Guide
Page 23
... this procedure. 23 Turn Natural gas orifice hood down onto the gas orifice spud and remove by brushing on some models) 1. Open shutoff valve in the nut driver while changing it. IMPORTANT: You may have completed converting the grill, test the range for future use and keep with correct grill Natural gas orifice hood. 5. Size stamp A. Place LP gas orifice spuds in plastic parts bag for proper cooktop burner flame is not as distinct as the inner cone. B A. Complete Installation 1.
... this procedure. 23 Turn Natural gas orifice hood down onto the gas orifice spud and remove by brushing on some models) 1. Open shutoff valve in the nut driver while changing it. IMPORTANT: You may have completed converting the grill, test the range for future use and keep with correct grill Natural gas orifice hood. 5. Size stamp A. Place LP gas orifice spuds in plastic parts bag for proper cooktop burner flame is not as distinct as the inner cone. B A. Complete Installation 1.


