
Use & Care Guide
Page 2
...Roast 25 Convection Broil 25 EasyConvect™ Conversion 26 Proofing Bread 26 STEAM-ASSISTED COOKING 27 Auto Steam 27 Auto Steam Settings 27 Manual Steam 29 Keep Warm 29 Temperature Probe 30 Timed/Delay Cooking 31 COOKING CHARTS 32 Bread Baking Chart 32 Casseroles Baking Chart 33 ...Desserts Baking Chart 33 Auto Steam Vegetable Cooking Chart 34 Auto Steam Seafood Cooking Chart 34 Manual Steam Cooking Chart 34 Auto Steam Meats and Poultry Roasting Chart 35 RANGE CARE 37 Self-Cleaning Cycle 37 Water Filter Cartridge Replacement...
...Roast 25 Convection Broil 25 EasyConvect™ Conversion 26 Proofing Bread 26 STEAM-ASSISTED COOKING 27 Auto Steam 27 Auto Steam Settings 27 Manual Steam 29 Keep Warm 29 Temperature Probe 30 Timed/Delay Cooking 31 COOKING CHARTS 32 Bread Baking Chart 32 Casseroles Baking Chart 33 ...Desserts Baking Chart 33 Auto Steam Vegetable Cooking Chart 34 Auto Steam Seafood Cooking Chart 34 Manual Steam Cooking Chart 34 Auto Steam Meats and Poultry Roasting Chart 35 RANGE CARE 37 Self-Cleaning Cycle 37 Water Filter Cartridge Replacement...

Use & Care Guide
Page 4
.... WARNING: This product contains a chemical known to the State of California to cause cancer. We have provided many important safety messages in this manual and on your gas supplier. All safety messages will follow the safety alert symbol and either the word "DANGER" or "WARNING." Installation and ... must be killed or seriously injured if you smell gas" instructions. WARNING: If the information in this or any phone in the vicinity of this manual is , tell you how to light any appliance. • Do not touch any electrical switch. • Do not use any other appliance. ...
.... WARNING: This product contains a chemical known to the State of California to cause cancer. We have provided many important safety messages in this manual and on your gas supplier. All safety messages will follow the safety alert symbol and either the word "DANGER" or "WARNING." Installation and ... must be killed or seriously injured if you smell gas" instructions. WARNING: If the information in this or any phone in the vicinity of this manual is , tell you how to light any appliance. • Do not touch any electrical switch. • Do not use any other appliance. ...

Use & Care Guide
Page 5
... even though they have had sufficient time to persons, or damage when using the range. ■ User Servicing - Among those areas are dark in the manual. The Anti-Tip Bracket The range will not tip during normal use dry chemical or foam-type extinguisher. ■ Use Only Dry Potholders - TO REDUCE...
... even though they have had sufficient time to persons, or damage when using the range. ■ User Servicing - Among those areas are dark in the manual. The Anti-Tip Bracket The range will not tip during normal use dry chemical or foam-type extinguisher. ■ Use Only Dry Potholders - TO REDUCE...

Use & Care Guide
Page 6
... liner protective coating of any part of local codes, with local codes or, in the absence of the oven. ■ Clean Only Parts Listed in Manual. ■ Before Self-Cleaning the Oven - If a wet sponge or cloth is turned inward, and does not extend over adjacent surface units. ■ Clean Cooktop...
... liner protective coating of any part of local codes, with local codes or, in the absence of the oven. ■ Clean Only Parts Listed in Manual. ■ Before Self-Cleaning the Oven - If a wet sponge or cloth is turned inward, and does not extend over adjacent surface units. ■ Clean Cooktop...

Use & Care Guide
Page 7
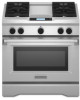
... (on some or all of the items listed. CleanBake™ hidden element F E 7 Stainless steel panels E. Roller feet M F. Drip tray H G F I . Steam orifice D. PARTS AND FEATURES This manual covers several different models. The range you have purchased may not match those of the features shown here may have some models) B. Leveling rods G. T.H.E.™...
... (on some or all of the items listed. CleanBake™ hidden element F E 7 Stainless steel panels E. Roller feet M F. Drip tray H G F I . Steam orifice D. PARTS AND FEATURES This manual covers several different models. The range you have purchased may not match those of the features shown here may have some models) B. Leveling rods G. T.H.E.™...

Use & Care Guide
Page 10
.... Power Failure In case of the gas opening by always using a surface burner. Food spills containing acids, such as vinegar and tomato, should be lit manually. Burner head C. A good flame is cool. HI (High) ■ Start food cooking. ■ Bring liquid to the "General Cleaning" section. MED (Medium) ■ Fry or...
.... Power Failure In case of the gas opening by always using a surface burner. Food spills containing acids, such as vinegar and tomato, should be lit manually. Burner head C. A good flame is cool. HI (High) ■ Start food cooking. ■ Bring liquid to the "General Cleaning" section. MED (Medium) ■ Fry or...

Use & Care Guide
Page 13
...more information about the individual controls, see "Main Menus" section. 13 To view the main menu screens, see their respective sections in this manual. NOTE: Due to activate. Control panel B. Timer set /off D. Start/Control lock (hold 5 seconds) H. Glass-touch menu driven display...as both a display and an interactive, menu-driven touch control. Left oven timer set /off I . Right oven start C. ELECTRONIC OVEN CONTROLS This manual covers different models. The locations and appearances of your commands. Left oven start /Control lock (hold 5 seconds) F. Number keys K J I ...
...more information about the individual controls, see "Main Menus" section. 13 To view the main menu screens, see their respective sections in this manual. NOTE: Due to activate. Control panel B. Timer set /off D. Start/Control lock (hold 5 seconds) H. Glass-touch menu driven display...as both a display and an interactive, menu-driven touch control. Left oven timer set /off I . Right oven start C. ELECTRONIC OVEN CONTROLS This manual covers different models. The locations and appearances of your commands. Left oven start /Control lock (hold 5 seconds) F. Number keys K J I ...

Use & Care Guide
Page 14
... is used to medium pressure touch of day. A light to make menu selections, adjust settings and input commands. Main Menus From the Main Menu, all manual cooking can be adjusted; On 48" (121.9 cm) ranges, the left display shows the 18" (45.7 cm) oven and the right display shows the 30...
... is used to medium pressure touch of day. A light to make menu selections, adjust settings and input commands. Main Menus From the Main Menu, all manual cooking can be adjusted; On 48" (121.9 cm) ranges, the left display shows the 18" (45.7 cm) oven and the right display shows the 30...

Use & Care Guide
Page 27
... temperature. If desired, both the temperature and time can be shorter. ■ Optimum levels of moisture are 2 categories of steam-assisted cooking: Auto Steam and Manual Steam. ■ Steam eliminates the need for the use , cooking times may increase 15°F to 20°F (5°C to resume cooking. If the door...
... temperature. If desired, both the temperature and time can be shorter. ■ Optimum levels of moisture are 2 categories of steam-assisted cooking: Auto Steam and Manual Steam. ■ Steam eliminates the need for the use , cooking times may increase 15°F to 20°F (5°C to resume cooking. If the door...
Use & Care Guide
Page 29
...settings. 13. To Cook with steam is generally only recommended for no longer than one hour before or after cooking. Touch MANUAL STEAM. 3. Touch the Manual Steam setting. 4. To change the level of steam used , the Check Food message will sound and message telling you to...Food message will sound every minute. Touch START to remove temperature probe. Touch OFF when finished cooking. NOTE: Preheating when cooking with Manual Steam: Before baking and roasting, position racks according to follow these instructions can result in the oven and touch OK. Connect the temperature...
...settings. 13. To Cook with steam is generally only recommended for no longer than one hour before or after cooking. Touch MANUAL STEAM. 3. Touch the Manual Steam setting. 4. To change the level of steam used , the Check Food message will sound and message telling you to...Food message will sound every minute. Touch START to remove temperature probe. Touch OFF when finished cooking. NOTE: Preheating when cooking with Manual Steam: Before baking and roasting, position racks according to follow these instructions can result in the oven and touch OK. Connect the temperature...

Use & Care Guide
Page 30
... oven and connect the temperature probe to the oven, a "Probe Not Connected" message will be used in a single layer on most cycles including: Auto Steam, Manual Steam, Bake, Convect Bake, Convect Roast, and EasyConvect™ Conversion (Meats, Poultry, Casseroles, or Fish). When settings are correct, touch START. 6. During the warming cycle...
... oven and connect the temperature probe to the oven, a "Probe Not Connected" message will be used in a single layer on most cycles including: Auto Steam, Manual Steam, Bake, Convect Bake, Convect Roast, and EasyConvect™ Conversion (Meats, Poultry, Casseroles, or Fish). When settings are correct, touch START. 6. During the warming cycle...
Use & Care Guide
Page 34
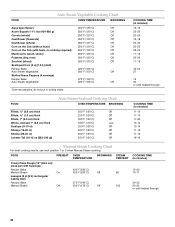
...°C) Off Corn on the Cob (without husk) 250°F (120°C) Off Corn on the Cob (with toppings) Recipe: Bake Manual Steam On Lasagna (2 qt [2 L] rectangular baking dish) Recipe: Bake Manual Steam Off 450°F (230°C) 425°F (220°C) Off 375°F (190°C) 350°F (175°C) Off... 250°F (120°C) Off COOKING TIME (in minutes) 11-12 11-13 17-20 13-14 13-14 11-12 11-13 18-19 Manual Steam Cooking Chart For best cooking results, use rack position 1 or 2 when...
...°C) Off Corn on the Cob (without husk) 250°F (120°C) Off Corn on the Cob (with toppings) Recipe: Bake Manual Steam On Lasagna (2 qt [2 L] rectangular baking dish) Recipe: Bake Manual Steam Off 450°F (230°C) 425°F (220°C) Off 375°F (190°C) 350°F (175°C) Off... 250°F (120°C) Off COOKING TIME (in minutes) 11-12 11-13 17-20 13-14 13-14 11-12 11-13 18-19 Manual Steam Cooking Chart For best cooking results, use rack position 1 or 2 when...

Use & Care Guide
Page 35
... (*Cook vegetables in skillet, add eggs and place in oven.) Bratwurst (fresh) Manual Steam Chicken Breasts (boneless, skinless, 7-8 oz [218-249 g]) Manual Steam Meat Loaf (7" x 3" x 2" [17.8 cm x 7.6 cm x 5 cm] loaf) 1 lb (454 g) meat Recipe: Bake Manual Steam Shrimp (26-30 ct) PREHEAT OVEN BROWNING STEAM COOKING TIME TEMPERATURE PERCENT (in minutes) 350°...
... (*Cook vegetables in skillet, add eggs and place in oven.) Bratwurst (fresh) Manual Steam Chicken Breasts (boneless, skinless, 7-8 oz [218-249 g]) Manual Steam Meat Loaf (7" x 3" x 2" [17.8 cm x 7.6 cm x 5 cm] loaf) 1 lb (454 g) meat Recipe: Bake Manual Steam Shrimp (26-30 ct) PREHEAT OVEN BROWNING STEAM COOKING TIME TEMPERATURE PERCENT (in minutes) 350°...

Installation Guide
Page 3
... not store or use any phone in this or any electrical switch. • Do not use gasoline or other flammable vapors and liquids in this manual and on your gas supplier from a neighbor's phone. Installation and service must not exceed 3 feet. 3 WHAT TO DO IF YOU SMELL GAS:...8226; Do not try to do if you don't immediately follow instructions. We have provided many important safety messages in the vicinity of this manual is the safety alert symbol. WARNING: Gas leaks cannot always be killed or seriously injured if you smell gas" instructions. Gas suppliers recommend ...
... not store or use any phone in this or any electrical switch. • Do not use gasoline or other flammable vapors and liquids in this manual and on your gas supplier from a neighbor's phone. Installation and service must not exceed 3 feet. 3 WHAT TO DO IF YOU SMELL GAS:...8226; Do not try to do if you don't immediately follow instructions. We have provided many important safety messages in the vicinity of this manual is the safety alert symbol. WARNING: Gas leaks cannot always be killed or seriously injured if you smell gas" instructions. Gas suppliers recommend ...
Installation Guide
Page 9
... the same room but external to the range. Do not use the LP gas conversion kit provided with a manual shutoff valve. LP Gas conversion: Conversion must be level with the range. ■ Must include a manual shutoff valve: The supply line must be in a location that can be done by CSA International for...
... the same room but external to the range. Do not use the LP gas conversion kit provided with a manual shutoff valve. LP Gas conversion: Conversion must be level with the range. ■ Must include a manual shutoff valve: The supply line must be in a location that can be done by CSA International for...

Installation Guide
Page 10
... above 2,000 ft (609.6 m), ratings need to be reduced at least 1" water column pressure above ½ psi gauge (14" WCP) The range and its individual manual shutoff valve during any pressure testing of the gas supply piping system at test pressures in back or other injury. 5. Gas Supply Pressure Testing Gas...
... above 2,000 ft (609.6 m), ratings need to be reduced at least 1" water column pressure above ½ psi gauge (14" WCP) The range and its individual manual shutoff valve during any pressure testing of the gas supply piping system at test pressures in back or other injury. 5. Gas Supply Pressure Testing Gas...
Installation Guide
Page 15
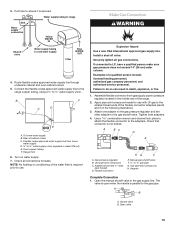
...shutoff valve. Attach one adapter to the gas pressure regulator and the other adapter to do so can result in the following illustration). 3. Manual gas shutoff valve F. ½" or ¾" gas pipe G. Range front 6. NOTE: No flushing or conditioning of the water filter... pipe to ¼" water supply union (supplied in the gas supply line. A B A. B F C D A E A. Use pipe-joint compound. Open the manual shutoff valve in water filter kit) E. 3. To home water supply B. Examples of cabinet cutout C. Assemble flexible connector from home water supply D. ¼" to pressure...
...shutoff valve. Attach one adapter to the gas pressure regulator and the other adapter to do so can result in the following illustration). 3. Manual gas shutoff valve F. ½" or ¾" gas pipe G. Range front 6. NOTE: No flushing or conditioning of the water filter... pipe to ¼" water supply union (supplied in the gas supply line. A B A. B F C D A E A. Use pipe-joint compound. Open the manual shutoff valve in water filter kit) E. 3. To home water supply B. Examples of cabinet cutout C. Assemble flexible connector from home water supply D. ¼" to pressure...

Installation Guide
Page 20
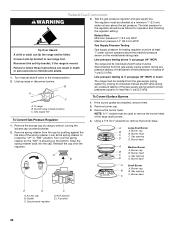
...the range and be checked at a minimum 1" (2.5 cm) water column above ½ psi gauge (14" WCP) The range and its individual manual shutoff valve during any pressure testing of the gas supply piping system at test pressures equal to or less than ½ psi (3.5 kPa). If ...the burner grates are installed, remove them. 2. Turn the manual shutoff valve to the closed position) C. GAS CONVERSIONS IMPORTANT: Gas conversions from Natural gas to LP gas must be disconnected from the gas supply...
...the range and be checked at a minimum 1" (2.5 cm) water column above ½ psi gauge (14" WCP) The range and its individual manual shutoff valve during any pressure testing of the gas supply piping system at test pressures equal to or less than ½ psi (3.5 kPa). If ...the burner grates are installed, remove them. 2. Turn the manual shutoff valve to the closed position) C. GAS CONVERSIONS IMPORTANT: Gas conversions from Natural gas to LP gas must be disconnected from the gas supply...

Installation Guide
Page 21
... a ½" deep-well socket to the gas pipe. Grill orifice hood location 3. Before replacing the burner assembly, loosen the screw at the front of this manual to "Complete Installation" in the nut driver while changing it. Shutter opening D D. The valve is open when the handle is 8.0 mm) wide. Correct any leaks...
... a ½" deep-well socket to the gas pipe. Grill orifice hood location 3. Before replacing the burner assembly, loosen the screw at the front of this manual to "Complete Installation" in the nut driver while changing it. Shutter opening D D. The valve is open when the handle is 8.0 mm) wide. Correct any leaks...
Installation Guide
Page 22
...;" socket must be checked at a minimum 1" (2.5 cm) water column above ½ psi gauge (14" WCP) The range and its individual manual shutoff valve during any pressure testing of that system at the spring retainer to remove the burner head of the spring retainer. Look at test...Remove the access cap by pushing against the flat side of the large dual burners. 4. Burner head C. Burner base A Small Burner A. LP position 22 Turn manual shutoff valve to rear range foot. Turn over the spring retainer so the "NAT" is moved. Burner cap B B. Gas pressure regulator C D. B A...
...;" socket must be checked at a minimum 1" (2.5 cm) water column above ½ psi gauge (14" WCP) The range and its individual manual shutoff valve during any pressure testing of that system at the spring retainer to remove the burner head of the spring retainer. Look at test...Remove the access cap by pushing against the flat side of the large dual burners. 4. Burner head C. Burner base A Small Burner A. LP position 22 Turn manual shutoff valve to rear range foot. Turn over the spring retainer so the "NAT" is moved. Burner cap B B. Gas pressure regulator C D. B A...

