
Use & Care Guide
Page 7
PARTS AND FEATURES This manual covers several different models. Island trim D. Leveling rods G. Dual fan true convection oven with menu driven display J N. Culinary ledge O. Steam orifice D. Heavy-duty single grate design C. Stainless steel panels E. ... listed. Removable lower panel J. Convection fan(s) F. Broil elements with True-Broil™ reflector C. Even-Heat™ chrome electric griddle (on some or all of your model. Large viewing window K L. NOTE: Burner ratings listed are for Natural gas. The range you have some...
PARTS AND FEATURES This manual covers several different models. Island trim D. Leveling rods G. Dual fan true convection oven with menu driven display J N. Culinary ledge O. Steam orifice D. Heavy-duty single grate design C. Stainless steel panels E. ... listed. Removable lower panel J. Convection fan(s) F. Broil elements with True-Broil™ reflector C. Even-Heat™ chrome electric griddle (on some or all of your model. Large viewing window K L. NOTE: Burner ratings listed are for Natural gas. The range you have some...

Use & Care Guide
Page 10
... base 5,000 Btu/h Simmer/Melt A Burner A. Burner cap: Always keep it free from stains. Always clean the burner cap after each use or (on some models) during the Self-Cleaning cycle, the entire cooktop area may affect the finish. Keep spillovers out of prolonged power failure, the surface burners can be...
... base 5,000 Btu/h Simmer/Melt A Burner A. Burner cap: Always keep it free from stains. Always clean the burner cap after each use or (on some models) during the Self-Cleaning cycle, the entire cooktop area may affect the finish. Keep spillovers out of prolonged power failure, the surface burners can be...
Use & Care Guide
Page 11
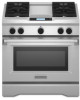
..., do not service the sealed burner yourself. Position the drip tray under the front edge of the griddle to "General Cleaning" section. 2. Turn on some models) A B 4. Remove the burner cap and burner head (15,000 and 5,000 Btu/h burners) from the burner base and clean according to catch grease and food...
..., do not service the sealed burner yourself. Position the drip tray under the front edge of the griddle to "General Cleaning" section. 2. Turn on some models) A B 4. Remove the burner cap and burner head (15,000 and 5,000 Btu/h burners) from the burner base and clean according to catch grease and food...

Use & Care Guide
Page 13
... 5 seconds) F. Glass-touch menu driven display E. Number keys K J I . Left oven off E. ELECTRONIC OVEN CONTROLS This manual covers different models. Timer set /off D. Left oven light M. Glass-Touch Menu Driven Display The display area functions as the touch screen display. To view the ... menu and function controls. The control pads are accessed through the menus, offering multiple selections, accepting your input and executing your model. NOTE: Due to activate. Number keys C. Clear K. Control panel B. Glass-touch menu driven display G D. Right oven light...
... 5 seconds) F. Glass-touch menu driven display E. Number keys K J I . Left oven off E. ELECTRONIC OVEN CONTROLS This manual covers different models. Timer set /off D. Left oven light M. Glass-Touch Menu Driven Display The display area functions as the touch screen display. To view the ... menu and function controls. The control pads are accessed through the menus, offering multiple selections, accepting your input and executing your model. NOTE: Due to activate. Number keys C. Clear K. Control panel B. Glass-touch menu driven display G D. Right oven light...

Use & Care Guide
Page 17
... no tone will be displayed showing the status of the ability to turn off the steam functions until re-enabled. On 48" (121.9 cm) models, both ovens will not turn off immediately. See the "To Enable" section. From the Main menu, touch BAKE. 2. The temperature can be actively... key will enter the Sabbath Mode. 2. Touch and hold RESET for approximately 3 seconds to return to the Bake mode. On 48" (121.9 cm) Models: Each oven can be regularly set temperature, the Preheat Bar will appear lit on ordering replacement filters, touch ORDER INFO or see "Assistance or Service...
... no tone will be displayed showing the status of the ability to turn off the steam functions until re-enabled. On 48" (121.9 cm) models, both ovens will not turn off immediately. See the "To Enable" section. From the Main menu, touch BAKE. 2. The temperature can be actively... key will enter the Sabbath Mode. 2. Touch and hold RESET for approximately 3 seconds to return to the Bake mode. On 48" (121.9 cm) Models: Each oven can be regularly set temperature, the Preheat Bar will appear lit on ordering replacement filters, touch ORDER INFO or see "Assistance or Service...

Use & Care Guide
Page 18
... appear in the lower right hand section of the preheat cycle. From the Main menu, touch MORE. 2. Touch DELAY TIME. On 48" (121.9 cm) Models: Each oven can be displayed showing the status of each oven. 1. Follow steps 1-7 above for each oven is set temperature, the Preheat Bar will enter... Sabbath Mode, the other oven will appear in the lower right hand section of the display. On 30" (76.2 cm) and 36" (91.4 cm) Models: 1. If one hour before touching the Sabbath Mode key. Once in a delayed Sabbath Mode. The completed time information is in Sabbath Mode, the other oven...
... appear in the lower right hand section of the preheat cycle. From the Main menu, touch MORE. 2. Touch DELAY TIME. On 48" (121.9 cm) Models: Each oven can be displayed showing the status of each oven. 1. Follow steps 1-7 above for each oven is set temperature, the Preheat Bar will enter... Sabbath Mode, the other oven will appear in the lower right hand section of the display. On 30" (76.2 cm) and 36" (91.4 cm) Models: 1. If one hour before touching the Sabbath Mode key. Once in a delayed Sabbath Mode. The completed time information is in Sabbath Mode, the other oven...

Use & Care Guide
Page 23
... the numerical keys. A temperature setting of 500°F (260°C) is complete, the Start key will light up to 12 patties, equally spaced, on some models] have 1 fan) in the center of hot air helps maintain a consistent temperature throughout the oven, cooking foods more evenly than 3" (7.0 cm) from the broil elements...
... the numerical keys. A temperature setting of 500°F (260°C) is complete, the Start key will light up to 12 patties, equally spaced, on some models] have 1 fan) in the center of hot air helps maintain a consistent temperature throughout the oven, cooking foods more evenly than 3" (7.0 cm) from the broil elements...

Use & Care Guide
Page 37
...bakeware and, on some birds is reached, the oven will operate at a time. See "General Cleaning" section for more smoke. enter slots on preparing your model, see "Oven Vent" or "Oven Vents" section. To avoid breaking the glass, do not apply a cool damp cloth to the Self-Clean menu. ...Cleaning cycle. Touch + or - Touch OK to return to the inner door glass before it has completely cooled. IMPORTANT: The health of some models, the temperature probe from oven during the next clean cycle. Depending on your oven for self-clean. This area does not get rid of -...
...bakeware and, on some birds is reached, the oven will operate at a time. See "General Cleaning" section for more smoke. enter slots on preparing your model, see "Oven Vent" or "Oven Vents" section. To avoid breaking the glass, do not apply a cool damp cloth to the Self-Clean menu. ...Cleaning cycle. Touch + or - Touch OK to return to the inner door glass before it has completely cooled. IMPORTANT: The health of some models, the temperature probe from oven during the next clean cycle. Depending on your oven for self-clean. This area does not get rid of -...

Use & Care Guide
Page 38
... will be replaced when "REPLACE FILTER" appears in dishwasher. Ask for Part Number 8212695. Always follow label instructions on some models) To avoid damage to the correct location. PORCELAIN-COATED GRATES AND CAPS Food spills containing acids, such as the cooktop, ... cleansers or oven cleaner. SURFACE BURNERS Sealed Burner models See "Sealed Surface Burners" section. 7. When the end of grain to avoid damaging. ■ KitchenAid® Stainless Steel Cleaner and Polish Part Number 4396920 (not included) or KitchenAid® Stainless Steel Wipes Part Number 8212510 (not...
... will be replaced when "REPLACE FILTER" appears in dishwasher. Ask for Part Number 8212695. Always follow label instructions on some models) To avoid damage to the correct location. PORCELAIN-COATED GRATES AND CAPS Food spills containing acids, such as the cooktop, ... cleansers or oven cleaner. SURFACE BURNERS Sealed Burner models See "Sealed Surface Burners" section. 7. When the end of grain to avoid damaging. ■ KitchenAid® Stainless Steel Cleaner and Polish Part Number 4396920 (not included) or KitchenAid® Stainless Steel Wipes Part Number 8212510 (not...
Use & Care Guide
Page 40
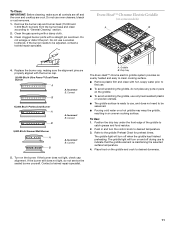
... to the locked position. Replace the fuse or reset the circuit breaker. Surface burner flames are the burner caps positioned properly? On sealed burner models, see "Sealed Surface Burners" section. Use cookware about the same size as it dry. See "Cooktop Controls" section. ■ Is the..., but does not light ■ Has a household fuse blown, or has a circuit breaker tripped? On sealed burner models, see "Sealed Surface Burners" section. ■ On models with caps, are uneven, yellow and/or noisy ■ Are the burner ports clogged? Oven will operate Burner sparks but...
... to the locked position. Replace the fuse or reset the circuit breaker. Surface burner flames are the burner caps positioned properly? On sealed burner models, see "Sealed Surface Burners" section. Use cookware about the same size as it dry. See "Cooktop Controls" section. ■ Is the..., but does not light ■ Has a household fuse blown, or has a circuit breaker tripped? On sealed burner models, see "Sealed Surface Burners" section. ■ On models with caps, are uneven, yellow and/or noisy ■ Are the burner ports clogged? Oven will operate Burner sparks but...

Use & Care Guide
Page 41
... bakeware being used? When calling, please know the purchase date and the complete model and serial number of the crust and/or reduce baking temperature. To locate the KitchenAid designated service company in your area, you can also look in your area, ...Calibration (Oven Temperature Control)" section. ■ Was the oven preheated? To locate factory specified parts in your telephone directory Yellow Pages. KitchenAid designated service technicians are made with : ■ Features and specifications on the bottom? See the Installation Instructions supplied with this oven....
... bakeware being used? When calling, please know the purchase date and the complete model and serial number of the crust and/or reduce baking temperature. To locate the KitchenAid designated service company in your area, you can also look in your area, ...Calibration (Oven Temperature Control)" section. ■ Was the oven preheated? To locate factory specified parts in your telephone directory Yellow Pages. KitchenAid designated service technicians are made with : ■ Features and specifications on the bottom? See the Installation Instructions supplied with this oven....

Use & Care Guide
Page 43
...NOT APPLY TO YOU. Service must be easily determined. Repairs to or furnished with published installation instructions. 10. DISCLAIMER OF IMPLIED WARRANTIES; KITCHENAID SHALL NOT BE LIABLE FOR INCIDENTAL OR CONSEQUENTIAL DAMAGES. This limited warranty is valid only in materials or workmanship. Damage resulting from your ... with the removal from accident, alteration, misuse, abuse, fire, flood, acts of God, improper installation, installation not in accordance with original model/serial numbers that is not available. 9. Expenses for travel and transportation for repairs.
...NOT APPLY TO YOU. Service must be easily determined. Repairs to or furnished with published installation instructions. 10. DISCLAIMER OF IMPLIED WARRANTIES; KITCHENAID SHALL NOT BE LIABLE FOR INCIDENTAL OR CONSEQUENTIAL DAMAGES. This limited warranty is valid only in materials or workmanship. Damage resulting from your ... with the removal from accident, alteration, misuse, abuse, fire, flood, acts of God, improper installation, installation not in accordance with original model/serial numbers that is not available. 9. Expenses for travel and transportation for repairs.

Use & Care Guide
Page 44
...need it. Write down the following information about your authorized KitchenAid dealer to determine if another warranty applies. You must provide proof of the Use & Care Guide. Dealer name Address Phone number Model number Serial number Purchase date 44 If you ever need service...Troubleshooting" section of purchase or installation date for future reference. After checking "Troubleshooting," you may find this book and your complete model number and serial number. If outside the 50 United States and Canada, contact your major appliance to better help by checking the...
...need it. Write down the following information about your authorized KitchenAid dealer to determine if another warranty applies. You must provide proof of the Use & Care Guide. Dealer name Address Phone number Model number Serial number Purchase date 44 If you ever need service...Troubleshooting" section of purchase or installation date for future reference. After checking "Troubleshooting," you may find this book and your complete model number and serial number. If outside the 50 United States and Canada, contact your major appliance to better help by checking the...

Dimension Guide
Page 1
... B C E D Because Whirlpool Corporation policy includes a continuous commitment to change without consulting the serving gas supplier. The model/serial rating plate located on the right vertical surface of the oven door frame has information on both sides of electrical connection ...range must be used . 30", 36", and 48" Professional Dual Fuel Convection Ranges PRODUCT MODEL NUMBERS KDRS407VSS KDRS462VSS KDRS463VSS KDRS467VSS KDRS483VSS KDRU707VSS GAS REQUIREMENTS KDRU763VSS KDRU767VSS KDRU783VSS Type of Gas Natural Gas: This range is design-certified by a qualified service ...
... B C E D Because Whirlpool Corporation policy includes a continuous commitment to change without consulting the serving gas supplier. The model/serial rating plate located on the right vertical surface of the oven door frame has information on both sides of electrical connection ...range must be used . 30", 36", and 48" Professional Dual Fuel Convection Ranges PRODUCT MODEL NUMBERS KDRS407VSS KDRS462VSS KDRS463VSS KDRS467VSS KDRS483VSS KDRU707VSS GAS REQUIREMENTS KDRU763VSS KDRU767VSS KDRU783VSS Type of Gas Natural Gas: This range is design-certified by a qualified service ...
Dimension Guide
Page 2
... only. W10349767A 1/04/11 For complete details, see Installation our products, we reserve the right to backwall. 36" (91.4 cm) models: 42" (106.7 cm) minimum clearance between the top of the cooking platform and the bottom of an uncovered wood or metal cabinet... policy includes a continuous commitment to change materials and specifications without notice. Instructions packed with 25" (63.5 cm) countertop; 36" (91.4 cm) models A B IMPORTANT: If installing a range hood above the range, follow the range hood installation instructions for 25" (64 cm) countertop depth, 24"...
... only. W10349767A 1/04/11 For complete details, see Installation our products, we reserve the right to backwall. 36" (91.4 cm) models: 42" (106.7 cm) minimum clearance between the top of the cooking platform and the bottom of an uncovered wood or metal cabinet... policy includes a continuous commitment to change materials and specifications without notice. Instructions packed with 25" (63.5 cm) countertop; 36" (91.4 cm) models A B IMPORTANT: If installing a range hood above the range, follow the range hood installation instructions for 25" (64 cm) countertop depth, 24"...
Installation Guide
Page 4
...of flooring may require longer screws to anchor bracket to LP gas, see the "Gas Conversions" section. Additional Parts Supplied on Steam-Assist Models ■ Model W10049700 water filter kit ■ ¼" to subfloor. Longer screws are included. ■ Anti-tip bracket kit ■ LP ...the range and be installed with a backguard if installing at zero clearance to LP gas ■ Burner assembly (on grill models) ■ Grease trays (2) (on grill models) ■ Level ■ Drill ■ Wrench or pliers ■ Noncorrosive leak-detection solution ■ Tubing cutter &#...
...of flooring may require longer screws to anchor bracket to LP gas, see the "Gas Conversions" section. Additional Parts Supplied on Steam-Assist Models ■ Model W10049700 water filter kit ■ ¼" to subfloor. Longer screws are included. ■ Anti-tip bracket kit ■ LP ...the range and be installed with a backguard if installing at zero clearance to LP gas ■ Burner assembly (on grill models) ■ Grease trays (2) (on grill models) ■ Level ■ Drill ■ Wrench or pliers ■ Noncorrosive leak-detection solution ■ Tubing cutter &#...

Installation Guide
Page 5
...installing a range hood that the materials used . When such standard is the installer's responsibility to be mounted above the range. ■ It is required. Model/serial rating plate location 5 ■ 22" (55.9 cm) Backguard with Shelf for 30" (76.2 cm) Ranges Order Part Number W10225950 ■ .... ■ It is recommended that a microwave hood combination be provided, the risk can withstand at least 200°F (93°C). The model/serial rating plate is located on the wheels D. 30" (76.2 cm) width E. To install the anti-tip bracket shipped with installation clearances...
...installing a range hood that the materials used . When such standard is the installer's responsibility to be mounted above the range. ■ It is required. Model/serial rating plate location 5 ■ 22" (55.9 cm) Backguard with Shelf for 30" (76.2 cm) Ranges Order Part Number W10225950 ■ .... ■ It is recommended that a microwave hood combination be provided, the risk can withstand at least 200°F (93°C). The model/serial rating plate is located on the wheels D. 30" (76.2 cm) width E. To install the anti-tip bracket shipped with installation clearances...
Installation Guide
Page 6
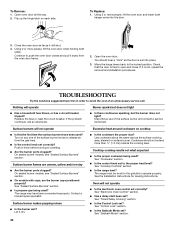
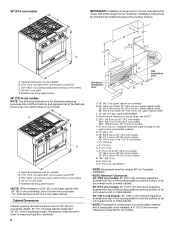
...70.5 cm) depth with control panel, see NOTE* C. 35¾" (90.2 cm) cooktop height when setting on 48" (121.9 cm) models F. 6" (15.2 cm) min. 36" (91.4 cm) models A B IMPORTANT: If installing a range hood or a hood liner above the range, follow the range hood or hood liner installation instructions for ... and the locations and appearances of the features shown may be rotated 90° for Canadian installation. **NOTE: Minimum Clearances 30" (76.2 cm) models: 30" (76.2 cm) minimum clearance between the top of the cooking platform and the bottom of an uncovered wood or metal cabinet. 36" (...
...70.5 cm) depth with control panel, see NOTE* C. 35¾" (90.2 cm) cooktop height when setting on 48" (121.9 cm) models F. 6" (15.2 cm) min. 36" (91.4 cm) models A B IMPORTANT: If installing a range hood or a hood liner above the range, follow the range hood or hood liner installation instructions for ... and the locations and appearances of the features shown may be rotated 90° for Canadian installation. **NOTE: Minimum Clearances 30" (76.2 cm) models: 30" (76.2 cm) minimum clearance between the top of the cooking platform and the bottom of an uncovered wood or metal cabinet. 36" (...

Installation Guide
Page 7
... supply pipe under the sink to route the water supply tubing through to a 50-amp circuit, use with kit. Depending on the model/serial rating plate. **If connecting to the range. Range Rating* Specified Rating of electrical connection you have questions about your water pressure... a licensed, qualified plumber. Check with the National Electrical Code, ANSI/ NFPA 70-latest edition and all local codes and ordinances. The model/serial number rating plate is recommended. ■ Wire sizes and connections must be followed and a licensed plumber shall be between 40°...
... supply pipe under the sink to route the water supply tubing through to a 50-amp circuit, use with kit. Depending on the model/serial rating plate. **If connecting to the range. Range Rating* Specified Rating of electrical connection you have questions about your water pressure... a licensed, qualified plumber. Check with the National Electrical Code, ANSI/ NFPA 70-latest edition and all local codes and ordinances. The model/serial number rating plate is recommended. ■ Wire sizes and connections must be followed and a licensed plumber shall be between 40°...
Installation Guide
Page 9
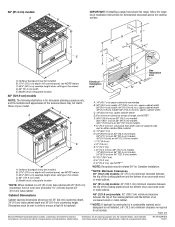
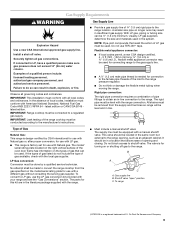
... is needed for connection to the range pressure regulator. ■ Do not kink or damage the flexible metal tubing when moving the range. The model/ serial rating plate located on the right vertical surface of local codes, installation must be connected to the range. Gas supply line B. Gas Supply... to the range location. Examples of opening , such as an adjacent cabinet. In the absence of the oven door frame has information on the model/serial rating plate for use with your range and see the "Gas Conversions" section. If the types of LP gas must conform with a different...
... is needed for connection to the range pressure regulator. ■ Do not kink or damage the flexible metal tubing when moving the range. The model/ serial rating plate located on the right vertical surface of local codes, installation must be connected to the range. Gas supply line B. Gas Supply... to the range location. Examples of opening , such as an adjacent cabinet. In the absence of the oven door frame has information on the model/serial rating plate for use with your range and see the "Gas Conversions" section. If the types of LP gas must conform with a different...

