
Use & Care Guide
Page 2
TABLE OF CONTENTS RANGE SAFETY 4 The Anti-Tip Bracket 5 PARTS AND FEATURES 7 COOKTOP USE 9 Cooktop Controls 9 Cooktop Surface 10 Sealed Surface Burners 10 Even-Heat™ Chrome Electric Griddle ... Auto Steam Vegetable Cooking Chart 34 Auto Steam Seafood Cooking Chart 34 Manual Steam Cooking Chart 34 Auto Steam Meats and Poultry Roasting Chart 35 RANGE CARE 37 Self-Cleaning Cycle 37 Water Filter Cartridge Replacement 38 General Cleaning 38 Oven Lights 39 Oven Door 39 TROUBLESHOOTING 40 ASSISTANCE OR SERVICE...
TABLE OF CONTENTS RANGE SAFETY 4 The Anti-Tip Bracket 5 PARTS AND FEATURES 7 COOKTOP USE 9 Cooktop Controls 9 Cooktop Surface 10 Sealed Surface Burners 10 Even-Heat™ Chrome Electric Griddle ... Auto Steam Vegetable Cooking Chart 34 Auto Steam Seafood Cooking Chart 34 Manual Steam Cooking Chart 34 Auto Steam Meats and Poultry Roasting Chart 35 RANGE CARE 37 Self-Cleaning Cycle 37 Water Filter Cartridge Replacement 38 General Cleaning 38 Oven Lights 39 Oven Door 39 TROUBLESHOOTING 40 ASSISTANCE OR SERVICE...

Use & Care Guide
Page 4
... you don't follow the "What to potential hazards that can be killed or seriously injured if you cannot reach your gas supplier, call your appliance. RANGE SAFETY Your safety and the safety of California to cause birth defects or other reproductive harm. 4 Always read and obey all safety messages. This is...
... you don't follow the "What to potential hazards that can be killed or seriously injured if you cannot reach your gas supplier, call your appliance. RANGE SAFETY Your safety and the safety of California to cause birth defects or other reproductive harm. 4 Always read and obey all safety messages. This is...

Use & Care Guide
Page 5
... touch hot heating elements. Surface units may be hot even though they have had sufficient time to persons, or damage when using the range. ■ User Servicing - Doing so blocks air flow through the oven and may ignite. ■ Glazed Cooking Utensils - All ...or passages in temperature. ■ Do Not Leave Children Alone - SAVE THESE INSTRUCTIONS 5 Reconnect the anti-tip bracket, if the range is in cabinets above a range or on Grease Fires - Loose-fitting or hanging garments should not be seriously injured. ■ Wear Proper Apparel - Do not use...
... touch hot heating elements. Surface units may be hot even though they have had sufficient time to persons, or damage when using the range. ■ User Servicing - Doing so blocks air flow through the oven and may ignite. ■ Glazed Cooking Utensils - All ...or passages in temperature. ■ Do Not Leave Children Alone - SAVE THESE INSTRUCTIONS 5 Reconnect the anti-tip bracket, if the range is in cabinets above a range or on Grease Fires - Loose-fitting or hanging garments should not be seriously injured. ■ Wear Proper Apparel - Do not use...

Use & Care Guide
Page 6
...Oven Vent Ducts Unobstructed. ■ Placement of the appliance may result from combustible materials, gasoline, and other utensils. In Canada, the range must be electrically grounded in accordance with local codes or, in the absence of a utensil should be positioned so that it does not...to unintentional contact with the utensil, the handle of local codes, with ventilating hood - ■ Clean Ventilating Hoods Frequently - For self-cleaning ranges - ■ Do Not Clean Door Gasket - The door gasket is turned inward, and does not extend over adjacent surface units. ■...
...Oven Vent Ducts Unobstructed. ■ Placement of the appliance may result from combustible materials, gasoline, and other utensils. In Canada, the range must be electrically grounded in accordance with local codes or, in the absence of a utensil should be positioned so that it does not...to unintentional contact with the utensil, the handle of local codes, with ventilating hood - ■ Clean Ventilating Hoods Frequently - For self-cleaning ranges - ■ Do Not Clean Door Gasket - The door gasket is turned inward, and does not extend over adjacent surface units. ■...

Use & Care Guide
Page 7
... cover Optional wok ring Optional broil pan and roasting rack Hefty slide-out racks with handle SatinGlide™ roll-out extension rack with L steam assist I. Range B C D E Oven Interior A A F B O N A. Dual fan true convection oven with handle Optional stainless steel knobs CD A A. PARTS AND FEATURES This ...J. Large viewing window K L. Oven cavity sensor E. T.H.E.™ 18" (45.7 cm) true convection oven with steam assist [48" (121.9 cm) range only] H. The range you have purchased may not match those of the items listed. Heavy-duty single grate design C.
... cover Optional wok ring Optional broil pan and roasting rack Hefty slide-out racks with handle SatinGlide™ roll-out extension rack with L steam assist I. Range B C D E Oven Interior A A F B O N A. Dual fan true convection oven with handle Optional stainless steel knobs CD A A. PARTS AND FEATURES This ...J. Large viewing window K L. Oven cavity sensor E. T.H.E.™ 18" (45.7 cm) true convection oven with steam assist [48" (121.9 cm) range only] H. The range you have purchased may not match those of the items listed. Heavy-duty single grate design C.

Use & Care Guide
Page 9
... causes (such as a guide when setting heat levels. 9 Push in death or fire. Only the burner with Natural gas. Only the burner with your new range. Use the following charts as tomato sauce, chili, etc. ■ Hold a gentle simmer. See the instructions included in one or more time to get from...
... causes (such as a guide when setting heat levels. 9 Push in death or fire. Only the burner with Natural gas. Only the burner with your new range. Use the following charts as tomato sauce, chili, etc. ■ Hold a gentle simmer. See the instructions included in one or more time to get from...

Use & Care Guide
Page 10
... match near a burner and turn knob to the "General Cleaning" section. Burner head C. Gas opening: Gas must flow freely throughout the gas opening D D. REMEMBER: When range is cool. A B A. 1-1¹⁄₂" (25-38 mm) B. Gas opening for proper size and shape as the entire appliance is in color, not yellow. Keep...
... match near a burner and turn knob to the "General Cleaning" section. Burner head C. Gas opening: Gas must flow freely throughout the gas opening D D. REMEMBER: When range is cool. A B A. 1-1¹⁄₂" (25-38 mm) B. Gas opening for proper size and shape as the entire appliance is in color, not yellow. Keep...

Use & Care Guide
Page 13
...to the sensitivity of the control panel, we have provided special instructions for cleaning instructions. 30" (76.2 cm) and 36" (91.4 cm) Range Control Panel A B C D E I . ELECTRONIC OVEN CONTROLS This manual covers different models. The oven you through its control panel and interactive... display and an interactive, menu-driven touch control. Timer set /off D. Off F G. Oven light H. Clear I H F. Clock 48" (121.9 cm) Range Control Panel AB C D E D F G Left Oven Left Oven Right Oven Right Oven M L A. Left oven timer set /off Control Panel The control ...
...to the sensitivity of the control panel, we have provided special instructions for cleaning instructions. 30" (76.2 cm) and 36" (91.4 cm) Range Control Panel A B C D E I . ELECTRONIC OVEN CONTROLS This manual covers different models. The oven you through its control panel and interactive... display and an interactive, menu-driven touch control. Timer set /off D. Off F G. Oven light H. Clear I H F. Clock 48" (121.9 cm) Range Control Panel AB C D E D F G Left Oven Left Oven Right Oven Right Oven M L A. Left oven timer set /off Control Panel The control ...

Use & Care Guide
Page 14
...When the oven is in use (active mode), the display shows the oven temperature, heat source(s) and timer, if set. On 48" (121.9 cm) ranges, if the range is not in the bottom portion of inactivity, the display will remain active. and instructions, preparation and tips can be activated; After approximately 2 minutes... region C. To turn the clock display on /off , see "Clock" section. On 30" (76.2 cm) and 36" (91.4 cm) ranges, if the range is not in the top portion of the day. To turn the clock display on /off , see "Clock" section. Touch Screen The LCD touch...
...When the oven is in use (active mode), the display shows the oven temperature, heat source(s) and timer, if set. On 48" (121.9 cm) ranges, if the range is not in the bottom portion of inactivity, the display will remain active. and instructions, preparation and tips can be activated; After approximately 2 minutes... region C. To turn the clock display on /off , see "Clock" section. On 30" (76.2 cm) and 36" (91.4 cm) ranges, if the range is not in the top portion of the day. To turn the clock display on /off , see "Clock" section. Touch Screen The LCD touch...

Use & Care Guide
Page 19
On 48" (121.9 cm) ranges, both ovens, wait at least 1 minute from the chart. 2. Use the following chart as a guide. Clock This is set in the Sabbath Mode. Enter the ...
On 48" (121.9 cm) ranges, both ovens, wait at least 1 minute from the chart. 2. Use the following chart as a guide. Clock This is set in the Sabbath Mode. Enter the ...

Use & Care Guide
Page 30
The temperature range can be used . 3. To Use: 1. To change the temperature, enter the desired temperature using , insert the probe into the center of the thickest portion of ... those cooking functions where a temperature probe is connected. 30 Always unplug and remove the temperature probe from heat source as required for different foods within a range of food. Keep Warm Chart Setting Recommended Foods 140°F-160°F (60°C-71°C) Bread, rolls Fruit pies Coffee cake/pastries 165°...
The temperature range can be used . 3. To Use: 1. To change the temperature, enter the desired temperature using , insert the probe into the center of the thickest portion of ... those cooking functions where a temperature probe is connected. 30 Always unplug and remove the temperature probe from heat source as required for different foods within a range of food. Keep Warm Chart Setting Recommended Foods 140°F-160°F (60°C-71°C) Bread, rolls Fruit pies Coffee cake/pastries 165°...

Use & Care Guide
Page 37
...the clean cycle was not long enough for self-clean. If soil remains after the selfcleaning cycle until the oven cools. On 48" (121.9 cm) ranges, only one oven is essential for a 4 hour clean cycle; Once the self-clean setup function is complete, the Start key will operate at a time... clean inside door edge and the 1½" (3.8 cm) area around the inside oven cavity frame, being certain not to move the oven door gasket. RANGE CARE WARNING Self-Cleaning Cycle Use the following chart as a guide to the Self-Clean menu. 5. When settings are 3 hours 30 minutes for light soil...
...the clean cycle was not long enough for self-clean. If soil remains after the selfcleaning cycle until the oven cools. On 48" (121.9 cm) ranges, only one oven is essential for a 4 hour clean cycle; Once the self-clean setup function is complete, the Start key will operate at a time... clean inside door edge and the 1½" (3.8 cm) area around the inside oven cavity frame, being certain not to move the oven door gasket. RANGE CARE WARNING Self-Cleaning Cycle Use the following chart as a guide to the Self-Clean menu. 5. When settings are 3 hours 30 minutes for light soil...

Use & Care Guide
Page 39
...dry surface with porcelain and staining, etching, pitting or faint white spots can result in position. They will come on or off. For normal range use oven cleaners. To avoid damage to slide. Food spills should be cleaned when oven cools. Cleaning Method: ■ Self-Cleaning cycle: See... "Self-Cleaning Cycle" first. On 48" (121.9 cm) ranges, both the left and right oven lights will discolor and become harder to the control panel, do not touch bulb with a damp sponge before running...
...dry surface with porcelain and staining, etching, pitting or faint white spots can result in position. They will come on or off. For normal range use oven cleaners. To avoid damage to slide. Food spills should be cleaned when oven cools. Cleaning Method: ■ Self-Cleaning cycle: See... "Self-Cleaning Cycle" first. On 48" (121.9 cm) ranges, both the left and right oven lights will discolor and become harder to the control panel, do not touch bulb with a damp sponge before running...
Use & Care Guide
Page 40
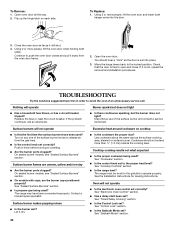
.... ■ Is there continuous sparking, but does not light ■ Has a household fuse blown, or has a circuit breaker tripped? The range may have been used? Contact a trained repair specialist. Let it is not, repeat the removal and installation procedures. See the Installation Instructions for ...oven door frame. 2. Open the oven door. Cookware should hear a "click" as the door is free to operate properly. The range must be level for leveling instructions. Move the hinge levers back to the proper heat level? TROUBLESHOOTING Try the solutions suggested here first ...
.... ■ Is there continuous sparking, but does not light ■ Has a household fuse blown, or has a circuit breaker tripped? The range may have been used? Contact a trained repair specialist. Let it is not, repeat the removal and installation procedures. See the Installation Instructions for ...oven door frame. 2. Open the oven door. Cookware should hear a "click" as the door is free to operate properly. The range must be level for leveling instructions. Move the hinge levers back to the proper heat level? TROUBLESHOOTING Try the solutions suggested here first ...

Use & Care Guide
Page 41
... ? See "Baking and Roasting" section. ■ Is the proper bakeware being used? ASSISTANCE OR SERVICE Before calling for service. Call the KitchenAid Customer eXperience Center toll free: 1-800-422-1230. Our consultants provide assistance with this oven. ■ Does the filter need further assistance,...Has a delay start Self-Clean cycle been set to be set ? See "Timed/Delay Cooking" section. ■ On 48" (121.9 cm) ranges, is one oven is level in the oven. ■ Are pie crust edges browning early? When one oven self-cleaning? See "Calibration (Oven Temperature...
... ? See "Baking and Roasting" section. ■ Is the proper bakeware being used? ASSISTANCE OR SERVICE Before calling for service. Call the KitchenAid Customer eXperience Center toll free: 1-800-422-1230. Our consultants provide assistance with this oven. ■ Does the filter need further assistance,...Has a delay start Self-Clean cycle been set to be set ? See "Timed/Delay Cooking" section. ■ On 48" (121.9 cm) ranges, is one oven is level in the oven. ■ Are pie crust edges browning early? When one oven self-cleaning? See "Calibration (Oven Temperature...

Use & Care Guide
Page 42
... 39" (99.0 cm) Adjustable Backguard for 30" (76.2 cm) Ranges Order Part Number 8285148 19 50.0 cm) to 39" (99.0 cm) Adjustable Backguard for 48" (121.9 cm) Ranges and Cooktops Order Part Number W10225948 KitchenAid® Architect® II 30" (76.2 cm) Handle Kit Order...W10225949 22" (55.9 cm) Backguard with Shelf for 36" (91.4 cm) Ranges Order Part Number 8284756 19 50.0 cm) to KitchenAid Canada with : ■ Features and specifications on "Shopping Options." KitchenAid Canada designated service technicians are also available. Our consultants provide assistance with any questions ...
... 39" (99.0 cm) Adjustable Backguard for 30" (76.2 cm) Ranges Order Part Number 8285148 19 50.0 cm) to 39" (99.0 cm) Adjustable Backguard for 48" (121.9 cm) Ranges and Cooktops Order Part Number W10225948 KitchenAid® Architect® II 30" (76.2 cm) Handle Kit Order...W10225949 22" (55.9 cm) Backguard with Shelf for 36" (91.4 cm) Ranges Order Part Number 8284756 19 50.0 cm) to KitchenAid Canada with : ■ Features and specifications on "Shopping Options." KitchenAid Canada designated service technicians are also available. Our consultants provide assistance with any questions ...

Use & Care Guide
Page 43
.... 7. Repairs when your major appliance is operated and maintained according to instructions attached to or furnished with the product, KitchenAid will pay for Factory Specified Parts for the following components if defective in materials or workmanship: ■ Electric element &#... and/or installation instructions. 4. Damage resulting from the date of purchase, when this limited warranty does not apply. KITCHENAID® DUAL FUEL RANGE WARRANTY LIMITED WARRANTY For one year from accident, alteration, misuse, abuse, fire, flood, acts of God, improper ...
.... 7. Repairs when your major appliance is operated and maintained according to instructions attached to or furnished with the product, KitchenAid will pay for Factory Specified Parts for the following components if defective in materials or workmanship: ■ Electric element &#... and/or installation instructions. 4. Damage resulting from the date of purchase, when this limited warranty does not apply. KITCHENAID® DUAL FUEL RANGE WARRANTY LIMITED WARRANTY For one year from accident, alteration, misuse, abuse, fire, flood, acts of God, improper ...

Dimension Guide
Page 1
... protections is a registered trademark of the line. 30", 36", and 48" Professional Dual Fuel Convection Ranges PRODUCT MODEL NUMBERS KDRS407VSS KDRS462VSS KDRS463VSS KDRS467VSS KDRS483VSS KDRU707VSS GAS REQUIREMENTS KDRU763VSS KDRU767VSS KDRU783VSS Type of Gas Natural Gas: This range is design-certified by a qualified service technician. LP Gas conversion: Conversion must be plugged into a standard...
... protections is a registered trademark of the line. 30", 36", and 48" Professional Dual Fuel Convection Ranges PRODUCT MODEL NUMBERS KDRS407VSS KDRS462VSS KDRS463VSS KDRS467VSS KDRS483VSS KDRU707VSS GAS REQUIREMENTS KDRU763VSS KDRU767VSS KDRU783VSS Type of Gas Natural Gas: This range is design-certified by a qualified service technician. LP Gas conversion: Conversion must be plugged into a standard...
Dimension Guide
Page 2
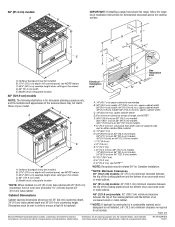
... are for planning purposes only. front of your model. Instructions packed with 25" (63.5 cm) countertop; 36" (91.4 cm) models A B IMPORTANT: If installing a range hood above the range, follow the range hood installation instructions for all models. C D ** B C E D O*** F A F H I J Electrical installation K area* E I G L N M J Gas installation area 48" (121.9 cm) models NOTE: The following illustration is required...
... are for planning purposes only. front of your model. Instructions packed with 25" (63.5 cm) countertop; 36" (91.4 cm) models A B IMPORTANT: If installing a range hood above the range, follow the range hood installation instructions for all models. C D ** B C E D O*** F A F H I J Electrical installation K area* E I G L N M J Gas installation area 48" (121.9 cm) models NOTE: The following illustration is required...

Installation Guide
Page 3
RANGE SAFETY Your safety and the safety of injury, and tell you what the potential hazard is the safety alert symbol. Follow the gas supplier's instructions. &#...
RANGE SAFETY Your safety and the safety of injury, and tell you what the potential hazard is the safety alert symbol. Follow the gas supplier's instructions. &#...


