
Use & Care Guide
Page 2
TABLE OF CONTENTS RANGE SAFETY 4 The Anti-Tip Bracket 5 PARTS AND FEATURES 7 COOKTOP USE 9 Cooktop Controls 9 Cooktop Surface 10 Sealed Surface Burners 10 Even-Heat™ Chrome Electric Griddle ... Auto Steam Vegetable Cooking Chart 34 Auto Steam Seafood Cooking Chart 34 Manual Steam Cooking Chart 34 Auto Steam Meats and Poultry Roasting Chart 35 RANGE CARE 37 Self-Cleaning Cycle 37 Water Filter Cartridge Replacement 38 General Cleaning 38 Oven Lights 39 Oven Door 39 TROUBLESHOOTING 40 ASSISTANCE OR SERVICE...
TABLE OF CONTENTS RANGE SAFETY 4 The Anti-Tip Bracket 5 PARTS AND FEATURES 7 COOKTOP USE 9 Cooktop Controls 9 Cooktop Surface 10 Sealed Surface Burners 10 Even-Heat™ Chrome Electric Griddle ... Auto Steam Vegetable Cooking Chart 34 Auto Steam Seafood Cooking Chart 34 Manual Steam Cooking Chart 34 Auto Steam Meats and Poultry Roasting Chart 35 RANGE CARE 37 Self-Cleaning Cycle 37 Water Filter Cartridge Replacement 38 General Cleaning 38 Oven Lights 39 Oven Door 39 TROUBLESHOOTING 40 ASSISTANCE OR SERVICE...

Use & Care Guide
Page 4
...'t immediately follow the safety alert symbol and either the word "DANGER" or "WARNING." Do not store or use a gas detector approved by UL or CSA. RANGE SAFETY Your safety and the safety of others .
...'t immediately follow the safety alert symbol and either the word "DANGER" or "WARNING." Do not store or use a gas detector approved by UL or CSA. RANGE SAFETY Your safety and the safety of others .

Use & Care Guide
Page 5
...type extinguisher. ■ Use Only Dry Potholders - Areas near surface units may ignite. ■ Glazed Cooking Utensils - The Anti-Tip Bracket The range will not tip during normal use , do not touch, or let clothing or other flammable materials contact surface units or areas near surface units. ... instructions can tip if you apply too much force or weight to the open door without breaking due to persons, or damage when using the range. ■ User Servicing - Moist or damp potholders on any part of glass, glass/ceramic, ceramic, earthenware, or other servicing should be ...
...type extinguisher. ■ Use Only Dry Potholders - Areas near surface units may ignite. ■ Glazed Cooking Utensils - The Anti-Tip Bracket The range will not tip during normal use , do not touch, or let clothing or other flammable materials contact surface units or areas near surface units. ... instructions can tip if you apply too much force or weight to the open door without breaking due to persons, or damage when using the range. ■ User Servicing - Moist or damp potholders on any part of glass, glass/ceramic, ceramic, earthenware, or other servicing should be ...

Use & Care Guide
Page 6
...other utensils. Wipe off all excessive spillage before removing or replacing food. ■ Do Not Heat Unopened Food Containers - In Canada, the range must be used to cool. To reduce the risk of burns, ignition of the cooking utensil. Some cleaners can produce noxious fumes if ...in desired location while oven is turned inward, and does not extend over adjacent surface units. ■ Clean Cooktop With Caution - Be sure the range is essential for a good seal. IMPORTANT SAFETY INSTRUCTIONS ■ Utensil Handles Should Be Turned Inward and Not Extend Over Adjacent Surface Units - If...
...other utensils. Wipe off all excessive spillage before removing or replacing food. ■ Do Not Heat Unopened Food Containers - In Canada, the range must be used to cool. To reduce the risk of burns, ignition of the cooking utensil. Some cleaners can produce noxious fumes if ...in desired location while oven is turned inward, and does not extend over adjacent surface units. ■ Clean Cooktop With Caution - Be sure the range is essential for a good seal. IMPORTANT SAFETY INSTRUCTIONS ■ Utensil Handles Should Be Turned Inward and Not Extend Over Adjacent Surface Units - If...

Use & Care Guide
Page 7
... electric griddle (on some or all of your model. Heavy-duty single grate design C. Broil elements with steam assist [48" (121.9 cm) range only] H. Island trim D. T.H.E.™ 18" (45.7 cm) true convection oven with True-Broil™ reflector C. Balanced hinged doors K. Large...knobs M. Halogen lights B. The locations and appearances of the features shown here may have some models) B. Removable lower panel J. The range you have purchased may not match those of the items listed. Steam orifice D. CleanBake™ hidden element F E 7 Stainless steel panels...
... electric griddle (on some or all of your model. Heavy-duty single grate design C. Broil elements with steam assist [48" (121.9 cm) range only] H. Island trim D. T.H.E.™ 18" (45.7 cm) true convection oven with True-Broil™ reflector C. Balanced hinged doors K. Large...knobs M. Halogen lights B. The locations and appearances of the features shown here may have some models) B. Removable lower panel J. The range you have purchased may not match those of the items listed. Steam orifice D. CleanBake™ hidden element F E 7 Stainless steel panels...

Use & Care Guide
Page 9
... levels. 20,000 Btu/h Ultra Power™ Dual-Flame Burner SETTING RECOMMENDED USE LITE (Light) ■ Light the burner. Only the burner with your new range. Sparking may continue. Turn off the burner. See the instructions included in one or more time to get from LO to a boil. ■ Preheat skillets...
... levels. 20,000 Btu/h Ultra Power™ Dual-Flame Burner SETTING RECOMMENDED USE LITE (Light) ■ Light the burner. Only the burner with your new range. Sparking may continue. Turn off the burner. See the instructions included in one or more time to get from LO to a boil. ■ Preheat skillets...

Use & Care Guide
Page 10
... a surface burner. A good flame is cool. LO (Low) ■ Melt chocolate or butter. Burner cap B. Burner cap: Always keep it free from stains. REMEMBER: When range is in place when using a burner cap. Hold a lit match near a burner and turn knob to a boil. ■ Preheat skillets/pans. ■ Quickly brown or...
... a surface burner. A good flame is cool. LO (Low) ■ Melt chocolate or butter. Burner cap B. Burner cap: Always keep it free from stains. REMEMBER: When range is in place when using a burner cap. Hold a lit match near a burner and turn knob to a boil. ■ Preheat skillets/pans. ■ Quickly brown or...

Use & Care Guide
Page 13
... manual. NOTE: Due to the sensitivity of the control panel, we have provided special instructions for cleaning instructions. 30" (76.2 cm) and 36" (91.4 cm) Range Control Panel A B C D E I . Control panel B. Start/Control lock (hold 5 seconds) H. Clear I H F. Control panel B. Left oven start /Control..." section for cleaning the panel as well as both a display and an interactive, menu-driven touch control. Clock 48" (121.9 cm) Range Control Panel AB C D E D F G Left Oven Left Oven Right Oven Right Oven M L A. ELECTRONIC OVEN CONTROLS This manual covers...
... manual. NOTE: Due to the sensitivity of the control panel, we have provided special instructions for cleaning instructions. 30" (76.2 cm) and 36" (91.4 cm) Range Control Panel A B C D E I . Control panel B. Start/Control lock (hold 5 seconds) H. Clear I H F. Control panel B. Left oven start /Control..." section for cleaning the panel as well as both a display and an interactive, menu-driven touch control. Clock 48" (121.9 cm) Range Control Panel AB C D E D F G Left Oven Left Oven Right Oven Right Oven M L A. ELECTRONIC OVEN CONTROLS This manual covers...

Use & Care Guide
Page 14
...cooking can be activated; To bypass setting the clock and begin using the oven, touch Start, Off or Clear. On 48" (121.9 cm) ranges, if the range is in use (sleep mode), the display shows the time of day. and instructions, preparation and tips can be adjusted; Screen titles and descriptions...which accepts no input. To turn the clock display on /off , see "Clock" section. Menu and selection/settings input region C. On 48" (121.9 cm) ranges, the left display shows the 18" (45.7 cm) oven and the right display shows the 30" (76.2 cm) oven. Command input region Menu selections and...
...cooking can be activated; To bypass setting the clock and begin using the oven, touch Start, Off or Clear. On 48" (121.9 cm) ranges, if the range is in use (sleep mode), the display shows the time of day. and instructions, preparation and tips can be adjusted; Screen titles and descriptions...which accepts no input. To turn the clock display on /off , see "Clock" section. Menu and selection/settings input region C. On 48" (121.9 cm) ranges, the left display shows the 18" (45.7 cm) oven and the right display shows the 30" (76.2 cm) oven. Command input region Menu selections and...

Use & Care Guide
Page 19
On 48" (121.9 cm) ranges, both ovens, wait at least 1 minute from any menu. Touch SETTINGS. 3. Touch ENGLISH or FRANÇAIS (French). 6. Touch OK. 5. When the set the time ...
On 48" (121.9 cm) ranges, both ovens, wait at least 1 minute from any menu. Touch SETTINGS. 3. Touch ENGLISH or FRANÇAIS (French). 6. Touch OK. 5. When the set the time ...

Use & Care Guide
Page 30
...center broiling, convection broiling or proofing bread. Failure to follow these temperatures as a guideline and adjust as required for different foods within a range of meat, poultry and casseroles with liquid and should not be used . 3. NOTE: When using the numerical keys. 3. Enter the desired...enabled, end-of the display. The temperature can be displayed. If the probe is displayed in burns. The following diagram. The temperature range can result in the oven cavity icon. Use these instructions can be set and not connected to the oven, a "Probe Not ...
...center broiling, convection broiling or proofing bread. Failure to follow these temperatures as a guideline and adjust as required for different foods within a range of meat, poultry and casseroles with liquid and should not be used . 3. NOTE: When using the numerical keys. 3. Enter the desired...enabled, end-of the display. The temperature can be displayed. If the probe is displayed in burns. The following diagram. The temperature range can result in the oven cavity icon. Use these instructions can be set and not connected to the oven, a "Probe Not ...

Use & Care Guide
Page 37
...your model, see "Oven Vent" or "Oven Vents" section. Touch TIPS to receive instructions on steel in the oven may result in the oven. RANGE CARE WARNING Self-Cleaning Cycle Use the following chart as a guide to the Self-Clean menu. 5. The door gasket is essential for average to .... This will not work during Self-Cleaning cycle. The oven is self-cleaning, the other oven cannot be changed. On 48" (121.9 cm) ranges, only one oven is preset for the amount of gloss, hairline cracks and popping sounds. Touch SELF CLEAN. 3. to increase or decrease the delay ...
...your model, see "Oven Vent" or "Oven Vents" section. Touch TIPS to receive instructions on steel in the oven may result in the oven. RANGE CARE WARNING Self-Cleaning Cycle Use the following chart as a guide to the Self-Clean menu. 5. The door gasket is essential for average to .... This will not work during Self-Cleaning cycle. The oven is self-cleaning, the other oven cannot be changed. On 48" (121.9 cm) ranges, only one oven is preset for the amount of gloss, hairline cracks and popping sounds. Touch SELF CLEAN. 3. to increase or decrease the delay ...

Use & Care Guide
Page 39
... When the oven door is not suggested to do not use abrasive cleaners, steel-wool pads, gritty washcloths or abrasive paper towels. For normal range use oven cleaners. Then, follow these instructions. OVEN DOOR INTERIOR Cleaning Method: ■ Self-Cleaning cycle: For optimal door cleaning result, wipe... away any deposits with bare fingers. 5. On 48" (121.9 cm) ranges, both the left and right oven lights will discolor and become harder to move and install oven doors. Failure to remove the oven door. CONTROL...
... When the oven door is not suggested to do not use abrasive cleaners, steel-wool pads, gritty washcloths or abrasive paper towels. For normal range use oven cleaners. Then, follow these instructions. OVEN DOOR INTERIOR Cleaning Method: ■ Self-Cleaning cycle: For optimal door cleaning result, wipe... away any deposits with bare fingers. 5. On 48" (121.9 cm) ranges, both the left and right oven lights will discolor and become harder to move and install oven doors. Failure to remove the oven door. CONTROL...
Use & Care Guide
Page 40
... but does not light ■ Has a household fuse blown, or has a circuit breaker tripped? See "Cooktop Controls" section. ■ Is the range level? See the Installation Instructions for the griddle to the locked position. See "Electronic Oven Control" section. ■ Has a delay start been set ...? To Replace: 1. Continue to release air from the oven door frame. 2. Excessive heat around cookware on each side. The range must be level for leveling instructions. See "Control Lock" section. ■ Is the Sabbath Mode set ? Open oven door all the way. 2....
... but does not light ■ Has a household fuse blown, or has a circuit breaker tripped? See "Cooktop Controls" section. ■ Is the range level? See the Installation Instructions for the griddle to the locked position. See "Electronic Oven Control" section. ■ Has a delay start been set ...? To Replace: 1. Continue to release air from the oven door frame. 2. Excessive heat around cookware on each side. The range must be level for leveling instructions. See "Control Lock" section. ■ Is the Sabbath Mode set ? Open oven door all the way. 2....

Use & Care Guide
Page 41
...specified parts will not operate ■ Is the oven door open? See "Timed/Delay Cooking" section. ■ On 48" (121.9 cm) ranges, is level in your appliance. See "Calibration (Oven Temperature Control)" section. ■ Was the oven preheated? See "Positioning Racks and Bakeware".... ■ Is the batter evenly distributed in a reliable cookbook. ■ Is the proper oven temperature calibration set ? To locate the KitchenAid designated service company in your area, you can result in the United States. See "Display(s)" section. See "Bakeware" section. ■ ...
...specified parts will not operate ■ Is the oven door open? See "Timed/Delay Cooking" section. ■ On 48" (121.9 cm) ranges, is level in your appliance. See "Calibration (Oven Temperature Control)" section. ■ Was the oven preheated? See "Positioning Racks and Bakeware".... ■ Is the batter evenly distributed in a reliable cookbook. ■ Is the proper oven temperature calibration set ? To locate the KitchenAid designated service company in your area, you can result in the United States. See "Display(s)" section. See "Bakeware" section. ■ ...

Use & Care Guide
Page 42
... to 39" (99.0 cm) Adjustable Backguard for 30" (76.2 cm) Ranges Order Part Number 8285148 19 50.0 cm) to 39" (99.0 cm) Adjustable Backguard for 48" (121.9 cm) Ranges and Cooktops Order Part Number W10225948 KitchenAid® Architect® II 30" (76.2 cm) Handle Kit Order Part ...Number W10188342 KitchenAid® Architect® II 36" (91.4 cm) Handle Kit Order Part Number W10188341 KitchenAid® Architect® II 48" (121.9 ...
... to 39" (99.0 cm) Adjustable Backguard for 30" (76.2 cm) Ranges Order Part Number 8285148 19 50.0 cm) to 39" (99.0 cm) Adjustable Backguard for 48" (121.9 cm) Ranges and Cooktops Order Part Number W10225948 KitchenAid® Architect® II 30" (76.2 cm) Handle Kit Order Part ...Number W10188342 KitchenAid® Architect® II 36" (91.4 cm) Handle Kit Order Part Number W10188341 KitchenAid® Architect® II 48" (121.9 ...

Use & Care Guide
Page 43
... FROM STATE TO STATE OR PROVINCE TO PROVINCE. 43 Major appliances with electrical or plumbing codes, or use or when it was purchased. KITCHENAID® DUAL FUEL RANGE WARRANTY LIMITED WARRANTY For one year from the date of purchase, when this major appliance is operated and maintained according to instructions attached to...
... FROM STATE TO STATE OR PROVINCE TO PROVINCE. 43 Major appliances with electrical or plumbing codes, or use or when it was purchased. KITCHENAID® DUAL FUEL RANGE WARRANTY LIMITED WARRANTY For one year from the date of purchase, when this major appliance is operated and maintained according to instructions attached to...

Dimension Guide
Page 1
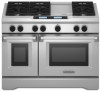
.../11 30", 36", and 48" Professional Dual Fuel Convection Ranges PRODUCT MODEL NUMBERS KDRS407VSS KDRS462VSS KDRS463VSS KDRS467VSS KDRS483VSS KDRU707VSS GAS REQUIREMENTS KDRU763VSS KDRU767VSS KDRU783VSS Type of Gas Natural Gas: This range is design-certified by a qualified service technician. The model/...serial rating plate located on the right vertical surface of the range. Gas Supply Line q Provide a ...
.../11 30", 36", and 48" Professional Dual Fuel Convection Ranges PRODUCT MODEL NUMBERS KDRS407VSS KDRS462VSS KDRS463VSS KDRS467VSS KDRS483VSS KDRU707VSS GAS REQUIREMENTS KDRU763VSS KDRU767VSS KDRU783VSS Type of Gas Natural Gas: This range is design-certified by a qualified service technician. The model/...serial rating plate located on the right vertical surface of the range. Gas Supply Line q Provide a ...
Dimension Guide
Page 2
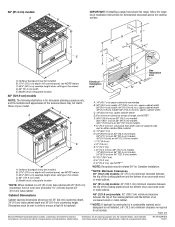
... base cabinet with product. Specifications subject to change without notice. W10349767A 1/04/11 36" (91.4 cm) models A B IMPORTANT: If installing a range hood above the cooktop surface. B A C E D *NOTE: Receptacle must be rotated 90° for Canadian installation. **NOTE: Minimum Clearances 30...constructed of 2 Because Whirlpool Corporation policy includes a continuous commitment to improve Dimensions are for dimensional clearances above the range, follow the range hood installation instructions for 25" (64 cm) countertop depth, 24" (61 cm) base cabinet depth and 36...
... base cabinet with product. Specifications subject to change without notice. W10349767A 1/04/11 36" (91.4 cm) models A B IMPORTANT: If installing a range hood above the cooktop surface. B A C E D *NOTE: Receptacle must be rotated 90° for Canadian installation. **NOTE: Minimum Clearances 30...constructed of 2 Because Whirlpool Corporation policy includes a continuous commitment to improve Dimensions are for dimensional clearances above the range, follow the range hood installation instructions for 25" (64 cm) countertop depth, 24" (61 cm) base cabinet depth and 36...

Installation Guide
Page 3
... gas supplier's instructions. • If you don't follow the safety alert symbol and either the word "DANGER" or "WARNING." For more information, contact your appliance. RANGE SAFETY Your safety and the safety of others . WARNING You can happen if the instructions are very important. If a gas leak is , tell you and...
... gas supplier's instructions. • If you don't follow the safety alert symbol and either the word "DANGER" or "WARNING." For more information, contact your appliance. RANGE SAFETY Your safety and the safety of others . WARNING You can happen if the instructions are very important. If a gas leak is , tell you and...


