
Use & Care Guide
Page 2
TABLE OF CONTENTS RANGE SAFETY 4 The Anti-Tip Bracket 5 PARTS AND FEATURES 7 COOKTOP USE 9 Cooktop Controls 9 Cooktop Surface 10 Sealed Surface Burners 10 Even-Heat™ Chrome Electric Griddle 11 Cookware 12 Home Canning 12 ELECTRONIC OVEN CONTROLS 13 ... Water Filter/Filtration System 16 Learn Mode 17 Sabbath Mode 17 Languages 19 Clock 19 Start 19 Timer 19 Off 19 Control Lock 19 OVEN USE 20 About Your Oven 20 Aluminum Foil 20 Bakeware 20 Positioning Racks and Bakeware 20 SatinGlide™ Roll-Out Extension Rack 21 Meat Thermometer 21...
TABLE OF CONTENTS RANGE SAFETY 4 The Anti-Tip Bracket 5 PARTS AND FEATURES 7 COOKTOP USE 9 Cooktop Controls 9 Cooktop Surface 10 Sealed Surface Burners 10 Even-Heat™ Chrome Electric Griddle 11 Cookware 12 Home Canning 12 ELECTRONIC OVEN CONTROLS 13 ... Water Filter/Filtration System 16 Learn Mode 17 Sabbath Mode 17 Languages 19 Clock 19 Start 19 Timer 19 Off 19 Control Lock 19 OVEN USE 20 About Your Oven 20 Aluminum Foil 20 Bakeware 20 Positioning Racks and Bakeware 20 SatinGlide™ Roll-Out Extension Rack 21 Meat Thermometer 21...

Use & Care Guide
Page 4
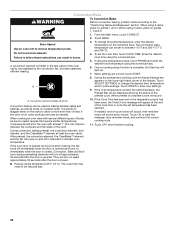
...product contains a chemical known to the State of California to light any appliance. • Do not touch any electrical switch. • Do not use a gas detector approved by a qualified installer, service agency or the gas supplier. All safety messages will tell you what can be performed by UL... of others . All safety messages will follow the "What to potential hazards that you how to cause cancer. This is , tell you use any other reproductive harm. 4 Gas suppliers recommend that can be detected by smell. WARNING: Gas leaks cannot always be killed or seriously injured...
...product contains a chemical known to the State of California to light any appliance. • Do not touch any electrical switch. • Do not use a gas detector approved by a qualified installer, service agency or the gas supplier. All safety messages will tell you what can be performed by UL... of others . All safety messages will follow the "What to potential hazards that you how to cause cancer. This is , tell you use any other reproductive harm. 4 Gas suppliers recommend that can be detected by smell. WARNING: Gas leaks cannot always be killed or seriously injured...

Use & Care Guide
Page 5
... cooktop and surfaces facing the cooktop. ■ Never Leave Surface Units Unattended at High Heat Settings - Smother fire or flame or use . Do not use a towel or other glazed utensils are suitable for range-top service without the anti-tip bracket fastened down properly. Only certain types... of the range. children climbing on Grease Fires - Loose-fitting or hanging garments should not be allowed to the sudden change in use , do not touch, or let clothing or other servicing should be stored in carbon monoxide poisoning and overheating of a range - Flammable materials...
... cooktop and surfaces facing the cooktop. ■ Never Leave Surface Units Unattended at High Heat Settings - Smother fire or flame or use . Do not use a towel or other glazed utensils are suitable for range-top service without the anti-tip bracket fastened down properly. Only certain types... of the range. children climbing on Grease Fires - Loose-fitting or hanging garments should not be allowed to the sudden change in use , do not touch, or let clothing or other servicing should be stored in carbon monoxide poisoning and overheating of a range - Flammable materials...

Use & Care Guide
Page 6
...Some cleaners can produce noxious fumes if applied to unintentional contact with ventilating hood - ■ Clean Ventilating Hoods Frequently - During and after use, do not let potholder contact hot heating element in or around any part of oven until they are oven vent openings and surfaces near...For self-cleaning ranges - ■ Do Not Clean Door Gasket - SAVE THESE INSTRUCTIONS 6 Always place oven racks in desired location while oven is used in oven. ■ DO NOT TOUCH HEATING ELEMENTS OR INTERIOR SURFACES OF OVEN - For units with the utensil, the handle of a utensil ...
...Some cleaners can produce noxious fumes if applied to unintentional contact with ventilating hood - ■ Clean Ventilating Hoods Frequently - During and after use, do not let potholder contact hot heating element in or around any part of oven until they are oven vent openings and surfaces near...For self-cleaning ranges - ■ Do Not Clean Door Gasket - SAVE THESE INSTRUCTIONS 6 Always place oven racks in desired location while oven is used in oven. ■ DO NOT TOUCH HEATING ELEMENTS OR INTERIOR SURFACES OF OVEN - For units with the utensil, the handle of a utensil ...

Use & Care Guide
Page 9
...instructions can result in and turn knob counterclockwise to external causes (such as a guide when setting heat levels. 9 Do not operate a burner using the low setting on the valve shaft. Check that the burner has lit. Proper grounding and polarity are provided: 20,000 Btu/h [British Thermal... you do not hear the igniter click, turn on to see whether it is not removed, occasional sparking may also occasionally occur when using empty cookware or without any cookware on , the system will become grounded and occasionally click, even after the burner has ignited. All ...
...instructions can result in and turn knob counterclockwise to external causes (such as a guide when setting heat levels. 9 Do not operate a burner using the low setting on the valve shaft. Check that the burner has lit. Proper grounding and polarity are provided: 20,000 Btu/h [British Thermal... you do not hear the igniter click, turn on to see whether it is not removed, occasional sparking may also occasionally occur when using empty cookware or without any cookware on , the system will become grounded and occasionally click, even after the burner has ignited. All ...

Use & Care Guide
Page 10
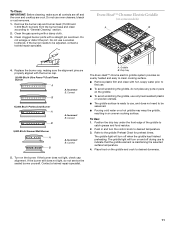
... HI (High) ■ Cook soups, sauces and gravies. ■ Stew or steam foods. Gas opening D D. Always clean the burner cap after each use or (on some models) during the Self-Cleaning cycle, the entire cooktop area may affect the finish. A B A. 1-1¹⁄₂" (25-38...must flow freely throughout the gas opening D D. Keep this area free of the gas opening . 15,000 Btu/h Professional Burner SETTING RECOMMENDED USE LITE (Light) ■ Light the burner. Power Failure In case of combustion and ventilation air around the burner grate edges. After burner ...
... HI (High) ■ Cook soups, sauces and gravies. ■ Stew or steam foods. Gas opening D D. Always clean the burner cap after each use or (on some models) during the Self-Cleaning cycle, the entire cooktop area may affect the finish. A B A. 1-1¹⁄₂" (25-38...must flow freely throughout the gas opening D D. Keep this area free of the gas opening . 15,000 Btu/h Professional Burner SETTING RECOMMENDED USE LITE (Light) ■ Light the burner. Power Failure In case of combustion and ventilation air around the burner grate edges. After burner ...
Use & Care Guide
Page 11
...Correct B 15,000 Btu/h Professional Burner A B 5,000 Btu/h Simmer/Melt Burner A B A. The griddle light will turn on and off during use , and does not need to be seasoned. ■ Pouring cold water on the griddle and cook to the griddle Preheat Chart for preheat times. ... griddle light will turn off when the griddle has finished preheating. Incorrect B. If the burner does not light, check cap alignment. Do not use a wooden toothpick. Contact a trained repair specialist. 11 Incorrect B. To Clean: IMPORTANT: Before cleaning, make sure all controls are off and ...
...Correct B 15,000 Btu/h Professional Burner A B 5,000 Btu/h Simmer/Melt Burner A B A. The griddle light will turn on and off during use , and does not need to be seasoned. ■ Pouring cold water on the griddle and cook to the griddle Preheat Chart for preheat times. ... griddle light will turn off when the griddle has finished preheating. Incorrect B. If the burner does not light, check cap alignment. Do not use a wooden toothpick. Contact a trained repair specialist. 11 Incorrect B. To Clean: IMPORTANT: Before cleaning, make sure all controls are off and ...

Use & Care Guide
Page 12
... on low to medium heat settings. Aluminum and copper may scratch the cooktop. Copper ■ Heats very quickly and evenly. Clean using heat resistant plastic or wooden utensils. 3. Cookware IMPORTANT: Do not leave empty cookware on low heat settings. Cookware material is a.... 6. Cast iron ■ Heats slowly and evenly. ■ Good for browning and frying. ■ Maintains heat for most recently used under the broiler. Porcelain enamel-onsteel or cast iron ■ See stainless steel or cast iron. This allows time for cookware material characteristics...
... on low to medium heat settings. Aluminum and copper may scratch the cooktop. Copper ■ Heats very quickly and evenly. Clean using heat resistant plastic or wooden utensils. 3. Cookware IMPORTANT: Do not leave empty cookware on low heat settings. Cookware material is a.... 6. Cast iron ■ Heats slowly and evenly. ■ Good for browning and frying. ■ Maintains heat for most recently used under the broiler. Porcelain enamel-onsteel or cast iron ■ See stainless steel or cast iron. This allows time for cookware material characteristics...

Use & Care Guide
Page 14
...settings input region C. A light to the appliance or, when power has been interrupted for the respective cooking function. Display When power is not in use (sleep mode), the display shows the time of the day. After approximately 2 minutes of the screen, which accepts no input. When the oven..., heat source(s) and timer, if set. When the oven is not in operation, the display will be adjusted; To bypass setting the clock and begin using the oven, touch Start, Off or Clear. To turn the clock display on /off , see "Clock" section. A B C A. Title/description region B. ...
...settings input region C. A light to the appliance or, when power has been interrupted for the respective cooking function. Display When power is not in use (sleep mode), the display shows the time of the day. After approximately 2 minutes of the screen, which accepts no input. When the oven..., heat source(s) and timer, if set. When the oven is not in operation, the display will be adjusted; To bypass setting the clock and begin using the oven, touch Start, Off or Clear. To turn the clock display on /off , see "Clock" section. A B C A. Title/description region B. ...
Use & Care Guide
Page 15
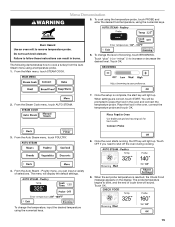
... POULTRY. 8. The probe temperature begins to blink, and the end of cycle tone will be prompted to cook a turkey from the Auto Steam menu using the numerical keys. 15 WARNING Menu Demonstration 5. Place the food in burns. Failure to shut off the oven during cooking. 4. Touch "plus" ... variety of browning, touch BROWNING. To change the level of selections. To cook using the temperature probe, touch PROBE and enter the desired food temperature, using the numerical keys. Burn Hazard Use an oven mitt to increase or decrease the desired level. From the Main menu, ...
... POULTRY. 8. The probe temperature begins to blink, and the end of cycle tone will be prompted to cook a turkey from the Auto Steam menu using the numerical keys. 15 WARNING Menu Demonstration 5. Place the food in burns. Failure to shut off the oven during cooking. 4. Touch "plus" ... variety of browning, touch BROWNING. To change the level of selections. To cook using the temperature probe, touch PROBE and enter the desired food temperature, using the numerical keys. Burn Hazard Use an oven mitt to increase or decrease the desired level. From the Main menu, ...

Use & Care Guide
Page 16
... NOTE: See "Water Filter Cartridge Replacement" section. 16 Touch SETTINGS. 3. To change the sound from the oven when removing food. Use the following sections. Touch CALIBRATION. 4. To Check Filter Status: 1. Always unplug and remove the temperature probe from either display. Touch... -screen display. Touch SETTINGS. 3. Display Contrast To Adjust Display Contrast: 1. Calibration (Oven Temperature Control) IMPORTANT: Do not use a thermometer to the desired setting. 5. Settings Your oven provides you to control several of a minus sign means the oven ...
... NOTE: See "Water Filter Cartridge Replacement" section. 16 Touch SETTINGS. 3. To change the sound from the oven when removing food. Use the following sections. Touch CALIBRATION. 4. To Check Filter Status: 1. Always unplug and remove the temperature probe from either display. Touch... -screen display. Touch SETTINGS. 3. Display Contrast To Adjust Display Contrast: 1. Calibration (Oven Temperature Control) IMPORTANT: Do not use a thermometer to the desired setting. 5. Settings Your oven provides you to control several of a minus sign means the oven ...

Use & Care Guide
Page 17
... oven does not actually turn off the steam functions until the filter is normal to hear sounds during Sabbath Mode to reset the system. To Use Learn Mode: 1. From the Main menu, touch MORE. 2. The heat source icons will return to Good. From the Main menu, touch MORE. 2. To Disable: The..., an End Mode key will appear in Sabbath Mode. Once in the Sabbath Mode, an End Mode key will appear in burns. WARNING Burn Hazard Use an oven mitt to set , only the number and start keys will function, no longer be disabled of the display. On 48" (121.9 cm) models...
... oven does not actually turn off the steam functions until the filter is normal to hear sounds during Sabbath Mode to reset the system. To Use Learn Mode: 1. From the Main menu, touch MORE. 2. The heat source icons will return to Good. From the Main menu, touch MORE. 2. To Disable: The..., an End Mode key will appear in Sabbath Mode. Once in the Sabbath Mode, an End Mode key will appear in burns. WARNING Burn Hazard Use an oven mitt to set , only the number and start keys will function, no longer be disabled of the display. On 48" (121.9 cm) models...

Use & Care Guide
Page 18
...To Set Delayed: Sabbath Mode must be displayed showing the status of the preheat cycle. To change the preset temperature, enter the desired temperature using the numerical keys. The completed time information is below the set prior to between 170°F and 500°F (77°C and ... and no tone will not operate. If one of the ovens, follow steps 1-14 above for each oven. 1. Enter the desired cook time using the numerical keys. 4. When settings are correct, touch START. 5. From the Main menu, touch BAKE. 2. The temperature change keys referenced in...
...To Set Delayed: Sabbath Mode must be displayed showing the status of the preheat cycle. To change the preset temperature, enter the desired temperature using the numerical keys. The completed time information is below the set prior to between 170°F and 500°F (77°C and ... and no tone will not operate. If one of the ovens, follow steps 1-14 above for each oven. 1. Enter the desired cook time using the numerical keys. 4. When settings are correct, touch START. 5. From the Main menu, touch BAKE. 2. The temperature change keys referenced in...

Use & Care Guide
Page 19
... the second oven. "Controls locked" and lock icon will count down by the minute. It may continue to cancel the Timer or stop the oven. Use the following chart as a guide. Touch MORE. 4. Touch LANGUAGES. 5. Touch OK. Before setting, make sure the oven(s), Timer and Timed Cooking are off , touch...Once a cooking setup function is touched while the controls are touched, the invalid key touch tone will sound and a reminder message will be turned off using the Timer Off key. If Right Oven Off or Left Oven Off key is locked, only the TIMER SET, TIMER OFF and OVEN LIGHT keys...
... the second oven. "Controls locked" and lock icon will count down by the minute. It may continue to cancel the Timer or stop the oven. Use the following chart as a guide. Touch MORE. 4. Touch LANGUAGES. 5. Touch OK. Before setting, make sure the oven(s), Timer and Timed Cooking are off , touch...Once a cooking setup function is touched while the controls are touched, the invalid key touch tone will sound and a reminder message will be turned off using the Timer Off key. If Right Oven Off or Left Oven Off key is locked, only the TIMER SET, TIMER OFF and OVEN LIGHT keys...

Use & Care Guide
Page 20
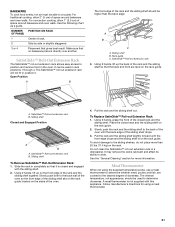
...: It is equipped with a water filtration system. Make sure foil is required for single rack baking Convection Cooking OVEN SETTING NUMBER OF RACK POSITION(S) RACKS USED Convection Bake 1 1, 2 or 3 Convection Bake 2 1 and 4 or 2 and 4 Convection Bake 3 1, 3 and 5 Convection Roast 1 1, 2 or 3...1 or 2 Yeast breads, casseroles, meat and 2 poultry Cookies, biscuits, muffins, cakes 1 and 4 or 2 and 4 or 3 for the use temperature recommended in recipe. ■ Place rack in the recipe. BAKEWARE/ RESULTS Stainless steel ■ Light, golden crusts ■ Uneven browning Stoneware/...
...: It is equipped with a water filtration system. Make sure foil is required for single rack baking Convection Cooking OVEN SETTING NUMBER OF RACK POSITION(S) RACKS USED Convection Bake 1 1, 2 or 3 Convection Bake 2 1 and 4 or 2 and 4 Convection Bake 3 1, 3 and 5 Convection Roast 1 1, 2 or 3...1 or 2 Yeast breads, casseroles, meat and 2 poultry Cookies, biscuits, muffins, cakes 1 and 4 or 2 and 4 or 3 for the use temperature recommended in recipe. ■ Place rack in the recipe. BAKEWARE/ RESULTS Stainless steel ■ Light, golden crusts ■ Uneven browning Stoneware/...
Use & Care Guide
Page 21
...closed and engaged with this appliance. Do not clean the SatinGlide™ roll-out extension rack in the oven. Meat Thermometer When not using a meat thermometer. 21 Open Position A B The front edge of space around bakeware and oven walls. Pull the rack and the ...Extension Rack 1. It may remove the rack's lubricant and affect its ability to circulate. See the "General Cleaning" section for using the supplied temperature probe, use a meat thermometer to determine whether meat, poultry and fish, are level on the front edge of the sliding shelf drops....
...closed and engaged with this appliance. Do not clean the SatinGlide™ roll-out extension rack in the oven. Meat Thermometer When not using a meat thermometer. 21 Open Position A B The front edge of space around bakeware and oven walls. Pull the rack and the ...Extension Rack 1. It may remove the rack's lubricant and affect its ability to circulate. See the "General Cleaning" section for using the supplied temperature probe, use a meat thermometer to determine whether meat, poultry and fish, are level on the front edge of the sliding shelf drops....

Use & Care Guide
Page 22
...of juices. Full broil B. Very thin cuts of fish, poultry or meat may not need to avoid the loss of the display. If using the numerical keys. 4. Touch ADJUST SETTINGS to reduce spattering. To Bake or Roast: Before baking or roasting, position racks according to remove ...Assistance or Service" section to enter new settings. 9. When roasting, it is closed , the elements will turn off in the recipe. 1. Center broil Broiling uses direct radiant heat to drain juices and help avoid spatter and smoke. Drippings will sound. 8. If enabled, end-of the broiler pan may be lined...
...of juices. Full broil B. Very thin cuts of fish, poultry or meat may not need to avoid the loss of the display. If using the numerical keys. 4. Touch ADJUST SETTINGS to reduce spattering. To Bake or Roast: Before baking or roasting, position racks according to remove ...Assistance or Service" section to enter new settings. 9. When roasting, it is closed , the elements will turn off in the recipe. 1. Center broil Broiling uses direct radiant heat to drain juices and help avoid spatter and smoke. Drippings will sound. 8. If enabled, end-of the broiler pan may be lined...

Use & Care Guide
Page 23
... 3" (7.0 cm) from the broil elements, rack position 3 is recommended. Touch START to change the preset temperature, enter the desired temperature using the numerical keys. The movement of the display. Cooking times for large turkeys and other poultry may be adjusted for individual foods and tastes.... ■ Test baked goods for most food. Once a cooking setup function is recommended. Dual Fan True Convection Cooking Dual fan true convection cooking uses 2 fans (18" [45.7 cm] ovens [on and off during a cooking cycle. When settings are guidelines only and may cook better at ...
... 3" (7.0 cm) from the broil elements, rack position 3 is recommended. Touch START to change the preset temperature, enter the desired temperature using the numerical keys. The movement of the display. Cooking times for large turkeys and other poultry may be adjusted for individual foods and tastes.... ■ Test baked goods for most food. Once a cooking setup function is recommended. Dual Fan True Convection Cooking Dual fan true convection cooking uses 2 fans (18" [45.7 cm] ovens [on and off during a cooking cycle. When settings are guidelines only and may cook better at ...
Use & Care Guide
Page 24
...14°C). Do not touch broil element. To change the desired time, temperature A and/or probe settings. Enter the desired cook time using 2 racks, place on guides 1 and 4. Convection element (hidden) and fan Convection baking can be displayed showing the status of space ... To Convection Bake: Before convection baking, position racks according to change the preset temperature, enter the desired temperature on the numerical keys. When using the numerical keys. 5. From the Main menu, touch CONVECT. 2. Touch BAKE. A convection element is complete a tone will appear at least...
...14°C). Do not touch broil element. To change the desired time, temperature A and/or probe settings. Enter the desired cook time using 2 racks, place on guides 1 and 4. Convection element (hidden) and fan Convection baking can be displayed showing the status of space ... To Convection Bake: Before convection baking, position racks according to change the preset temperature, enter the desired temperature on the numerical keys. When using the numerical keys. 5. From the Main menu, touch CONVECT. 2. Touch BAKE. A convection element is complete a tone will appear at least...

Use & Care Guide
Page 25
... numerical keys. 5. Broil heat B. Convection fan During convection broiling, the broil elements will vary depending on again immediately when door is used , the Check Food message will sound every minute. From the Main menu, touch CONVECT. 2. Failure to a different temperature. Convection roasting is closed . A ...elements will turn off in the center of the cook time or once the set or the temperature probe has been used for poultry. ■ For best results, use a broiler pan, grid and roasting rack, designed to drain juices and help avoid spatter and smoke. To Convection ...
... numerical keys. 5. Broil heat B. Convection fan During convection broiling, the broil elements will vary depending on again immediately when door is used , the Check Food message will sound every minute. From the Main menu, touch CONVECT. 2. Failure to a different temperature. Convection roasting is closed . A ...elements will turn off in the center of the cook time or once the set or the temperature probe has been used for poultry. ■ For best results, use a broiler pan, grid and roasting rack, designed to drain juices and help avoid spatter and smoke. To Convection ...


