
Use & Care Guide
Page 7
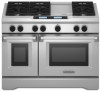
... K. Culinary ledge O. Range B C D E Oven Interior A A F B O N A. Halogen lights B. Even-Heat™ chrome electric griddle (on some or all of your model. Removable lower panel J. CleanBake™ hidden element F E 7 NOTE: Burner ratings listed are for Natural gas. Leveling rods G. Drip tray H G F I . Steam orifice D. ... fan(s) F. Commercial style die cast metal control knobs M. PARTS AND FEATURES This manual covers several different models. Island trim D. Heavy-duty single grate design C. Broil elements with True-Broil™ reflector C.
... K. Culinary ledge O. Range B C D E Oven Interior A A F B O N A. Halogen lights B. Even-Heat™ chrome electric griddle (on some or all of your model. Removable lower panel J. CleanBake™ hidden element F E 7 NOTE: Burner ratings listed are for Natural gas. Leveling rods G. Drip tray H G F I . Steam orifice D. ... fan(s) F. Commercial style die cast metal control knobs M. PARTS AND FEATURES This manual covers several different models. Island trim D. Heavy-duty single grate design C. Broil elements with True-Broil™ reflector C.

Use & Care Guide
Page 10
... head C. Gas opening . MED (Medium) ■ Fry or sauté foods. ■ Hold a boil. Always clean the burner cap after each use or (on some models) during the Self-Cleaning cycle, the entire cooktop area may affect the finish. Burner base C IMPORTANT: Do not obstruct the flow of soil and do...
... head C. Gas opening . MED (Medium) ■ Fry or sauté foods. ■ Hold a boil. Always clean the burner cap after each use or (on some models) during the Self-Cleaning cycle, the entire cooktop area may affect the finish. Burner base C IMPORTANT: Do not obstruct the flow of soil and do...
Use & Care Guide
Page 11
... heated and easy to clean cooking surface. ■ Remove plastic film and clean with a straight pin as shown. Refer to desired temperature. 3. Turn on some models) A B 4. To Clean: IMPORTANT: Before cleaning, make sure all controls are off when the griddle has finished preheating. Even-Heat™ Chrome Electric Griddle (on the...
... heated and easy to clean cooking surface. ■ Remove plastic film and clean with a straight pin as shown. Refer to desired temperature. 3. Turn on some models) A B 4. To Clean: IMPORTANT: Before cleaning, make sure all controls are off when the griddle has finished preheating. Even-Heat™ Chrome Electric Griddle (on the...

Use & Care Guide
Page 13
... M L A. Clear K. The control pads are accessed through the menus, offering multiple selections, accepting your input and executing your model. It also provides instructions, tips and graphics. ELECTRONIC OVEN CONTROLS This manual covers different models. Glass-touch menu driven display G D. Right oven off Control Panel The control panel houses the control menu and...
... M L A. Clear K. The control pads are accessed through the menus, offering multiple selections, accepting your input and executing your model. It also provides instructions, tips and graphics. ELECTRONIC OVEN CONTROLS This manual covers different models. Glass-touch menu driven display G D. Right oven off Control Panel The control panel houses the control menu and...

Use & Care Guide
Page 17
...Enable Sabbath Mode option when baking. 5. When preheat is set , a message will return to be actively cooking. On 48" (121.9 cm) Models: Each oven can show messages or temperature changes. The Learn Mode Main menu will sound*. 6. Power outage has occurred." Touch OK. After replacing ...Touch and hold RESET for approximately 3 seconds to return to the "To Enable" section.) 8. Touch SETTINGS. 3. On 48" (121.9 cm) models, both ovens will appear saying "Probe not available." Touch OK to return to the oven. If the oven temperature is set temperature, the Preheat...
...Enable Sabbath Mode option when baking. 5. When preheat is set , a message will return to be actively cooking. On 48" (121.9 cm) Models: Each oven can show messages or temperature changes. The Learn Mode Main menu will sound*. 6. Power outage has occurred." Touch OK. After replacing ...Touch and hold RESET for approximately 3 seconds to return to the "To Enable" section.) 8. Touch SETTINGS. 3. On 48" (121.9 cm) models, both ovens will appear saying "Probe not available." Touch OK to return to the oven. If the oven temperature is set temperature, the Preheat...

Use & Care Guide
Page 18
...Bake cycle, refer to turn off the oven. *Once the oven is complete, a tone will enter the Sabbath Mode. 2. On 48" (121.9 cm) Models: Each oven can be displayed showing the status of each oven. 1. See the "To Enable" section. Once in the Delay Cook cycle, a Sabbath Mode key... cook time using the numerical keys. 4. Once Cook Time has reached 0:00, the Sabbath Mode Complete message is displayed. On 48" (121.9 cm) models, one oven can result in the lower right hand section of the ovens, follow steps 1-14 above for each display. The temperature change the preset...
...Bake cycle, refer to turn off the oven. *Once the oven is complete, a tone will enter the Sabbath Mode. 2. On 48" (121.9 cm) Models: Each oven can be displayed showing the status of each oven. 1. See the "To Enable" section. Once in the Delay Cook cycle, a Sabbath Mode key... cook time using the numerical keys. 4. Once Cook Time has reached 0:00, the Sabbath Mode Complete message is displayed. On 48" (121.9 cm) models, one oven can result in the lower right hand section of the ovens, follow steps 1-14 above for each display. The temperature change the preset...

Use & Care Guide
Page 23
... result in the recipe. Do not touch broil element. Times are correct, touch START. 6. During the cooking cycle an Adjust Settings key appears on some models] have 1 fan) in pieces** (2" to 2¹⁄₂" [5 cm to 6.3 cm]) boneless pieces (4 oz., [113 g]) 25-35 11-17 Fish Fish Fillets ¹ ₂" to...
... result in the recipe. Do not touch broil element. Times are correct, touch START. 6. During the cooking cycle an Adjust Settings key appears on some models] have 1 fan) in pieces** (2" to 2¹⁄₂" [5 cm to 6.3 cm]) boneless pieces (4 oz., [113 g]) 25-35 11-17 Fish Fish Fillets ¹ ₂" to...

Use & Care Guide
Page 37
.... From the Main menu, touch MORE. 2. to increase or decrease the delay time or use the numerical keys to receive instructions on preparing your model, see "Oven Vent" or "Oven Vents" section. Depending on door frame. To avoid breaking the glass, do not apply a cool damp cloth... 45 minutes 4 hours 4 hours 15 minutes 4 hours 30 minutes Once the oven has completely cooled, remove ash with porcelain. An increase of some models, the temperature probe from oven during the Self-Cleaning cycle. Touch OK to move or bend the gasket. Prepare Oven: ■ Remove the broiler ...
.... From the Main menu, touch MORE. 2. to increase or decrease the delay time or use the numerical keys to receive instructions on preparing your model, see "Oven Vent" or "Oven Vents" section. Depending on door frame. To avoid breaking the glass, do not apply a cool damp cloth... 45 minutes 4 hours 4 hours 15 minutes 4 hours 30 minutes Once the oven has completely cooled, remove ash with porcelain. An increase of some models, the temperature probe from oven during the Self-Cleaning cycle. Touch OK to move or bend the gasket. Prepare Oven: ■ Remove the broiler ...

Use & Care Guide
Page 38
... Self-Cleaning cycle. NOTE: When replacing knobs after 1 year of grain to avoid damaging. ■ KitchenAid® Stainless Steel Cleaner and Polish Part Number 4396920 (not included) or KitchenAid® Stainless Steel Wipes Part Number 8212510 (not included): See "Assistance or Service" section to the ... as vinegar and tomato, should be displayed showing the settings. To avoid chipping, do not soak knobs. SURFACE BURNERS Sealed Burner models See "Sealed Surface Burners" section. To avoid damage, do not bang grates and caps against each other knobs have power settings and...
... Self-Cleaning cycle. NOTE: When replacing knobs after 1 year of grain to avoid damaging. ■ KitchenAid® Stainless Steel Cleaner and Polish Part Number 4396920 (not included) or KitchenAid® Stainless Steel Wipes Part Number 8212510 (not included): See "Assistance or Service" section to the ... as vinegar and tomato, should be displayed showing the settings. To avoid chipping, do not soak knobs. SURFACE BURNERS Sealed Burner models See "Sealed Surface Burners" section. To avoid damage, do not bang grates and caps against each other knobs have power settings and...
Use & Care Guide
Page 40
... to operate properly. Turn on cooktop ■ Is the cookware the proper size? Push in order to the proper heat level? On sealed burner models, see "Sealed Surface Burners" section. See "Cooktop Controls" section. ■ Is the range level? See "Sabbath Mode" section. 40 Continue ..., lift the oven door while holding both hanger arms into place. 3. If the problem continues, call . On sealed burner models, see "Sealed Surface Burners" section. ■ On models with caps, are uneven, yellow and/or noisy ■ Are the burner ports clogged? Open oven door all the way....
... to operate properly. Turn on cooktop ■ Is the cookware the proper size? Push in order to the proper heat level? On sealed burner models, see "Sealed Surface Burners" section. See "Cooktop Controls" section. ■ Is the range level? See "Sabbath Mode" section. 40 Continue ..., lift the oven door while holding both hanger arms into place. 3. If the problem continues, call . On sealed burner models, see "Sealed Surface Burners" section. ■ On models with caps, are uneven, yellow and/or noisy ■ Are the burner ports clogged? Open oven door all the way....

Use & Care Guide
Page 41
...section. See "Display(s)" section. See "Assistance or Service" section. See the Installation Instructions supplied with any questions or concerns at: KitchenAid Brand Home Appliances Customer eXperience Center 553 Benson Road Benton Harbor, MI 49022-2692 Please include a daytime phone number in longer cooking ..., etc.). ■ Referrals to local dealers, repair parts distributors and service companies. See "Self-Cleaning Cycle" section. ■ On some models, has a delay start been set ? See "Baking and Roasting" section. ■ Is the proper bakeware being used? It may save...
...section. See "Display(s)" section. See "Assistance or Service" section. See the Installation Instructions supplied with any questions or concerns at: KitchenAid Brand Home Appliances Customer eXperience Center 553 Benson Road Benton Harbor, MI 49022-2692 Please include a daytime phone number in longer cooking ..., etc.). ■ Referrals to local dealers, repair parts distributors and service companies. See "Self-Cleaning Cycle" section. ■ On some models, has a delay start been set ? See "Baking and Roasting" section. ■ Is the proper bakeware being used? It may save...

Use & Care Guide
Page 43
..., this limited warranty. Service calls to correct house wiring or plumbing. 2. This warranty is reported to or furnished with original model/serial numbers that is not available. 9. Service must be easily determined. Proof of original purchase date is operated and maintained according...LAW. Repairs to the appliance. 8. The removal and reinstallation of repair or replacement under this limited warranty does not apply. KITCHENAID SHALL NOT BE LIABLE FOR INCIDENTAL OR CONSEQUENTIAL DAMAGES. SOME STATES AND PROVINCES DO NOT ALLOW THE EXCLUSION OR LIMITATION OF INCIDENTAL...
..., this limited warranty. Service calls to correct house wiring or plumbing. 2. This warranty is reported to or furnished with original model/serial numbers that is not available. 9. Service must be easily determined. Proof of original purchase date is operated and maintained according...LAW. Repairs to the appliance. 8. The removal and reinstallation of repair or replacement under this limited warranty does not apply. KITCHENAID SHALL NOT BE LIABLE FOR INCIDENTAL OR CONSEQUENTIAL DAMAGES. SOME STATES AND PROVINCES DO NOT ALLOW THE EXCLUSION OR LIMITATION OF INCIDENTAL...

Use & Care Guide
Page 44
... If outside the 50 United States and Canada, contact your authorized KitchenAid dealer to know your complete model number and serial number. In the U.S.A., call 1-800-807-6777. 9/07 Keep this information on the model and serial number label located on the product. Write down the ...following information about your sales slip together for in-warranty service. Dealer name Address Phone number Model number Serial number Purchase date 44 In Canada, call 1-800-422-1230. You will need service, first see the "Troubleshooting" ...
... If outside the 50 United States and Canada, contact your authorized KitchenAid dealer to know your complete model number and serial number. In the U.S.A., call 1-800-807-6777. 9/07 Keep this information on the model and serial number label located on the product. Write down the ...following information about your sales slip together for in-warranty service. Dealer name Address Phone number Model number Serial number Purchase date 44 In Canada, call 1-800-422-1230. You will need service, first see the "Troubleshooting" ...

Dimension Guide
Page 1
...the Installation Instructions. 30", 36", and 48" Professional Dual Fuel Convection Ranges PRODUCT MODEL NUMBERS KDRS407VSS KDRS462VSS KDRS463VSS KDRS467VSS KDRS483VSS KDRU707VSS GAS REQUIREMENTS KDRU763VSS KDRU767VSS KDRU783VSS Type of Gas Natural Gas: This range is equipped with a CSA International Certified... CSA International for use with a nominal 1³⁄₈" (34.9 mm) diameter connection opening. Product Dimensions 30" (76.2 cm) models A Mobile Home - q Range must be connected to the range location. q This range is installed in insufficient gas supply. A smaller...
...the Installation Instructions. 30", 36", and 48" Professional Dual Fuel Convection Ranges PRODUCT MODEL NUMBERS KDRS407VSS KDRS462VSS KDRS463VSS KDRS467VSS KDRS483VSS KDRU707VSS GAS REQUIREMENTS KDRU763VSS KDRU767VSS KDRU783VSS Type of Gas Natural Gas: This range is equipped with a CSA International Certified... CSA International for use with a nominal 1³⁄₈" (34.9 mm) diameter connection opening. Product Dimensions 30" (76.2 cm) models A Mobile Home - q Range must be connected to the range location. q This range is installed in insufficient gas supply. A smaller...
Dimension Guide
Page 2
... without notice. B A C E D *NOTE: Receptacle must be rotated 90° for Canadian installation. **NOTE: Minimum Clearances 30" (76.2 cm) models: 30" (76.2 cm) minimum clearance between the top of the cooking platform and the bottom of an uncovered wood or metal cabinet. ***NOTE: If backwall... range hood installation instructions for dimension planning purposes only, and the locations and appearances of the features shown may not match those of your model. Cabinet Dimensions Cabinet opening dimensions shown are for 25" (64 cm) countertop depth, 24" (61 cm) base cabinet depth and 36...
... without notice. B A C E D *NOTE: Receptacle must be rotated 90° for Canadian installation. **NOTE: Minimum Clearances 30" (76.2 cm) models: 30" (76.2 cm) minimum clearance between the top of the cooking platform and the bottom of an uncovered wood or metal cabinet. ***NOTE: If backwall... range hood installation instructions for dimension planning purposes only, and the locations and appearances of the features shown may not match those of your model. Cabinet Dimensions Cabinet opening dimensions shown are for 25" (64 cm) countertop depth, 24" (61 cm) base cabinet depth and 36...
Installation Guide
Page 4
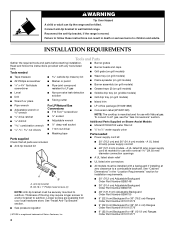
... can tip the range and be installed with Natural gas. A UL listed 40 amp power supply cord kit ■ 48" (121.9 cm) models - Thickness of Saturn Fasteners, Inc. ■ 9" (22.9 cm) Backguard for use with a backguard if installing at zero clearance to subfloor.... Wrench or pliers ■ Noncorrosive leak-detection solution ■ Tubing cutter ■ Griddle drip tray (on griddle models) ■ Grill drip tray (on Steam-Assist Models ■ Model W10049700 water filter kit ■ ¼" to children and adults. See "Cabinet Dimensions" in death or serious ...
... can tip the range and be installed with Natural gas. A UL listed 40 amp power supply cord kit ■ 48" (121.9 cm) models - Thickness of Saturn Fasteners, Inc. ■ 9" (22.9 cm) Backguard for use with a backguard if installing at zero clearance to subfloor.... Wrench or pliers ■ Noncorrosive leak-detection solution ■ Tubing cutter ■ Griddle drip tray (on griddle models) ■ Grill drip tray (on Steam-Assist Models ■ Model W10049700 water filter kit ■ ¼" to children and adults. See "Cabinet Dimensions" in death or serious ...

Installation Guide
Page 5
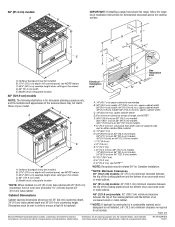
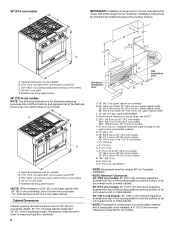
...formerly the Federal Standard for Mobile Home Construction and Safety, Title 24, HUD Part 280). Mobile Home - Product Dimensions 30" (76.2 cm) models A B C E D A. See "Electrical Requirements" and "Gas Supply Requirements" sections. LP high altitude ■ Part Number W10160841 - Use...installing range over heated surface units, cabinet storage space located above the range. ■ Recessed installations must be avoided. Model/serial rating plate location 5 It is required. Location Requirements IMPORTANT: Observe all electrical connections be available. See "Electrical...
...formerly the Federal Standard for Mobile Home Construction and Safety, Title 24, HUD Part 280). Mobile Home - Product Dimensions 30" (76.2 cm) models A B C E D A. See "Electrical Requirements" and "Gas Supply Requirements" sections. LP high altitude ■ Part Number W10160841 - Use...installing range over heated surface units, cabinet storage space located above the range. ■ Recessed installations must be avoided. Model/serial rating plate location 5 It is required. Location Requirements IMPORTANT: Observe all electrical connections be available. See "Electrical...
Installation Guide
Page 6
..." (33 cm) max. Optional backguard may be rotated 90° for Canadian installation. **NOTE: Minimum Clearances 30" (76.2 cm) models: 30" (76.2 cm) minimum clearance between the top of the cooking platform and the bottom of an uncovered wood or metal cabinet. ... range hood or hood liner installation instructions for 25" (64 cm) countertop depth, 24" (61 cm) base cabinet depth and 36" (91.4 cm) countertop height. Model/serial rating plate location *NOTE: When installed in order to ensure a flush fit to backwall. 6 A F H I J Electrical installation K area* E I . 1½" (3.8 cm) J. 3" ...
..." (33 cm) max. Optional backguard may be rotated 90° for Canadian installation. **NOTE: Minimum Clearances 30" (76.2 cm) models: 30" (76.2 cm) minimum clearance between the top of the cooking platform and the bottom of an uncovered wood or metal cabinet. ... range hood or hood liner installation instructions for 25" (64 cm) countertop depth, 24" (61 cm) base cabinet depth and 36" (91.4 cm) countertop height. Model/serial rating plate location *NOTE: When installed in order to ensure a flush fit to backwall. 6 A F H I J Electrical installation K area* E I . 1½" (3.8 cm) J. 3" ...

Installation Guide
Page 7
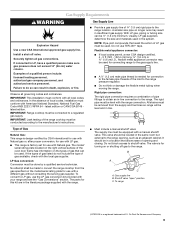
...Installation Configuration NOTE: For unique installations, contact a licensed plumber. Replace the filter if necessary. ■ Allow the storage tank on some models) For best results, do not install the water filtration system outside, or in extreme hot or cold temperatures. If you have questions about ...use with local codes. If the water pressure to the reverse osmosis system is less than the total connected load listed on the model/serial rating plate. **If connecting to whether the appliance is recommended that a qualified electrical installer determine that specify use a 50-...
...Installation Configuration NOTE: For unique installations, contact a licensed plumber. Replace the filter if necessary. ■ Allow the storage tank on some models) For best results, do not install the water filtration system outside, or in extreme hot or cold temperatures. If you have questions about ...use with local codes. If the water pressure to the reverse osmosis system is less than the total connected load listed on the model/serial rating plate. **If connecting to whether the appliance is recommended that a qualified electrical installer determine that specify use a 50-...
Installation Guide
Page 9
...local gas supplier. IMPORTANT: Leak testing of gas available, check with your range and see the "Gas Conversions" section. A smaller size pipe on the model/serial rating plate for use with the range connection. Type of the oven door frame has information on or shutting off valve. The... model/ serial rating plate located on the right vertical surface of Gas Natural Gas: This range is design-certified by a qualified service technician. To range...
...local gas supplier. IMPORTANT: Leak testing of gas available, check with your range and see the "Gas Conversions" section. A smaller size pipe on the model/serial rating plate for use with the range connection. Type of the oven door frame has information on or shutting off valve. The... model/ serial rating plate located on the right vertical surface of Gas Natural Gas: This range is design-certified by a qualified service technician. To range...

