
Use & Care Guide
Page 1
...parts, accessories or service, call: 1-800-422-1230 or visit our website at www.kitchenaid.com In Canada, call for assistance, installation and service, call: 1-800-807-6777 or visit our website at www.KitchenAid.ca FOURS ÉLECTRIQUES À CONVECTION SIMPLES ET DOUBLES, ENCASTRÉS SUPERBA®...; Guide d'utilisation et d'entretien Au Canada, pour assistance, installation ou service composez le 1-800-807-6777 ou visitez notre site web à... www.KitchenAid.ca Table of Contents/Table des matières 2 Models/Modèles KEBS107 KEBS177 KEBS207...
...parts, accessories or service, call: 1-800-422-1230 or visit our website at www.kitchenaid.com In Canada, call for assistance, installation and service, call: 1-800-807-6777 or visit our website at www.KitchenAid.ca FOURS ÉLECTRIQUES À CONVECTION SIMPLES ET DOUBLES, ENCASTRÉS SUPERBA®...; Guide d'utilisation et d'entretien Au Canada, pour assistance, installation ou service composez le 1-800-807-6777 ou visitez notre site web à... www.KitchenAid.ca Table of Contents/Table des matières 2 Models/Modèles KEBS107 KEBS177 KEBS207...

Use & Care Guide
Page 3
...Heating the Room. ■ Do Not Leave Children Alone - All safety messages will follow basic precautions, including the following: ■ Proper Installation - Children should not be moved while oven is hot, do not touch, or let clothing or other servicing should be worn while using the...DANGER" or "WARNING." Moist or damp potholders on your appliance. If rack must be left alone or unattended in area where oven is properly installed and grounded by a qualified technician. ■ Never Use the Oven for a good seal. Care should be killed or seriously injured if you...
...Heating the Room. ■ Do Not Leave Children Alone - All safety messages will follow basic precautions, including the following: ■ Proper Installation - Children should not be moved while oven is hot, do not touch, or let clothing or other servicing should be worn while using the...DANGER" or "WARNING." Moist or damp potholders on your appliance. If rack must be left alone or unattended in area where oven is properly installed and grounded by a qualified technician. ■ Never Use the Oven for a good seal. Care should be killed or seriously injured if you...

Use & Care Guide
Page 19
... bulb from the oven door frame. 3. If it is closed and pull it will come on when either door is not, repeat the removal and installation procedures. 19 BROILER PAN AND GRID (on each side. 3. Cleaning Method: ■ Mildly abrasive cleanser: Scrub with wet scouring pad. ■ Solution of the oven...
... bulb from the oven door frame. 3. If it is closed and pull it will come on when either door is not, repeat the removal and installation procedures. 19 BROILER PAN AND GRID (on each side. 3. Cleaning Method: ■ Mildly abrasive cleanser: Scrub with wet scouring pad. ■ Solution of the oven...

Use & Care Guide
Page 20
...; Is the proper oven temperature calibration set or turned on the bottom? Adjust cooking time. ■ Has the oven door been opened while cooking? See Installation Instructions. See "Control Lock" section. ■ Is the Sabbath Mode set correctly? When one oven self-cleaning? Warm air coming from oven vent ■ Warm...
...; Is the proper oven temperature calibration set or turned on the bottom? Adjust cooking time. ■ Has the oven door been opened while cooking? See Installation Instructions. See "Control Lock" section. ■ Is the Sabbath Mode set correctly? When one oven self-cleaning? Warm air coming from oven vent ■ Warm...

Use & Care Guide
Page 21
...only when the major appliance is used to "Replacement Parts & Accessories" and click on our full line of appliances. ■ Installation information. ■ Use and maintenance procedures. ■ Accessory and repair parts sales. ■ Specialized customer assistance (Spanish speaking, ...our full line of appliances. ■ Use and maintenance procedures. ■ Accessory and repair parts sales. ■ Referrals to KitchenAid with : ■ Features and specifications on "applianceaccessories.com." It may save you use only factory specified parts. Accessories Accessories ...
...only when the major appliance is used to "Replacement Parts & Accessories" and click on our full line of appliances. ■ Installation information. ■ Use and maintenance procedures. ■ Accessory and repair parts sales. ■ Specialized customer assistance (Spanish speaking, ...our full line of appliances. ■ Use and maintenance procedures. ■ Accessory and repair parts sales. ■ Referrals to KitchenAid with : ■ Features and specifications on "applianceaccessories.com." It may save you use only factory specified parts. Accessories Accessories ...

Use & Care Guide
Page 22
... major appliance, unless such damage results from defects in -home service is covered by KitchenAid. 5. You will need service, first see the "Troubleshooting" section of purchase or installation date for in a remote area where service by an authorized KitchenAid servicer is not available. 9. Repairs when your major appliance is used in a manner that...
... major appliance, unless such damage results from defects in -home service is covered by KitchenAid. 5. You will need service, first see the "Troubleshooting" section of purchase or installation date for in a remote area where service by an authorized KitchenAid servicer is not available. 9. Repairs when your major appliance is used in a manner that...

Dimension Guide
Page 1
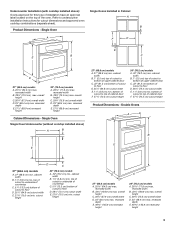
.... Recessed oven E. top of cutout to change materials and specifications without notice. Ref. 8304336 04-13-07 CABINET OPENING DIMENSIONS Single Oven Undercounter (without cooktop installed above) A B OVERALL DIMENSIONS A A B E B E D C D C 27" (68.6 cm) models A. 25 64.3 cm) max. recessed depth... E. 49 125.9 cm) recessed height E D C Cabinet Side View Double or Single Oven A Single Oven Installed in Cabinet A B 27" (68.6 cm) models 30" (76.2 cm) models A. 27" (68.6 cm) min. bottom of cutout to top of cutout to...
.... Recessed oven E. top of cutout to change materials and specifications without notice. Ref. 8304336 04-13-07 CABINET OPENING DIMENSIONS Single Oven Undercounter (without cooktop installed above) A B OVERALL DIMENSIONS A A B E B E D C D C 27" (68.6 cm) models A. 25 64.3 cm) max. recessed depth... E. 49 125.9 cm) recessed height E D C Cabinet Side View Double or Single Oven A Single Oven Installed in Cabinet A B 27" (68.6 cm) models 30" (76.2 cm) models A. 27" (68.6 cm) min. bottom of cutout to top of cutout to...

Installation Guide
Page 2
...recessed and located in the upper or lower right or left corner of the cabinet; Given dimensions provide minimum clearance with oven. ■ Recessed installation area must be able to the junction box. A 1" (2.5 cm) minimum diameter hole should be killed or seriously injured if you don't follow.... ■ Grounded electrical supply is the safety alert symbol. Check existing electrical supply. Floor must be made by a licensed, qualified electrical installer. We have been drilled in this manual and on rear wall behind oven, the junction box must be solid, level and flush with any...
...recessed and located in the upper or lower right or left corner of the cabinet; Given dimensions provide minimum clearance with oven. ■ Recessed installation area must be able to the junction box. A 1" (2.5 cm) minimum diameter hole should be killed or seriously injured if you don't follow.... ■ Grounded electrical supply is the safety alert symbol. Check existing electrical supply. Floor must be made by a licensed, qualified electrical installer. We have been drilled in this manual and on rear wall behind oven, the junction box must be solid, level and flush with any...
Installation Guide
Page 3
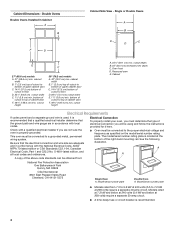
...E B E C D C 27" (68.6 cm) models A. 25 64.3 cm) max. Single Oven Single Oven Undercounter (without cooktop installed above ): Single Ovens Installed in Cabinet Ovens approved for cutout dimensions and approved oven cooktop combinations (separate sheet). cabinet width B. 1" (2.5 cm) top of cutout to ...(81.3 cm) bottom of the oven. Double Ovens A B E E D C 27" (68.6 cm) models A. 27" (68.6 cm) min. Undercounter Installation (with cooktop installed above ) A B 27" (68.6 cm) models A. 27" (68.6 cm) min. recessed width B. 50³⁄₄" (128.9 cm) max. cabinet...
...E B E C D C 27" (68.6 cm) models A. 25 64.3 cm) max. Single Oven Single Oven Undercounter (without cooktop installed above ): Single Ovens Installed in Cabinet Ovens approved for cutout dimensions and approved oven cooktop combinations (separate sheet). cabinet width B. 1" (2.5 cm) top of cutout to ...(81.3 cm) bottom of the oven. Double Ovens A B E E D C 27" (68.6 cm) models A. 27" (68.6 cm) min. Undercounter Installation (with cooktop installed above ) A B 27" (68.6 cm) models A. 27" (68.6 cm) min. recessed width B. 50³⁄₄" (128.9 cm) max. cabinet...
Installation Guide
Page 4
...See the following illustration. Cabinet Dimensions - cutout height 30" (76.2 cm) models A. 30" (76.2 cm) min. Check with a qualified electrical installer if you will be obtained from 7.3 to 9.6 kW at 240 volts (5.5 to 7.2 kW at 208 volts) require a separate 30-amp circuit. &#...properly grounded. O-M91-latest edition, and all local codes and ordinances. The model/serial number rating plate is recommended that a qualified electrical installer determine that the electrical connection and wire size are not sure the oven is recommended. 4 cutout height A. 23¹⁄₄" ...
...See the following illustration. Cabinet Dimensions - cutout height 30" (76.2 cm) models A. 30" (76.2 cm) min. Check with a qualified electrical installer if you will be obtained from 7.3 to 9.6 kW at 240 volts (5.5 to 7.2 kW at 208 volts) require a separate 30-amp circuit. &#...properly grounded. O-M91-latest edition, and all local codes and ordinances. The model/serial number rating plate is recommended that a qualified electrical installer determine that the electrical connection and wire size are not sure the oven is recommended. 4 cutout height A. 23¹⁄₄" ...

Installation Guide
Page 5
... CSA approved conduit connector must conform with grounding wire). Connect the aluminum wiring to the added section of solid copper wire to move and install oven. Use 8 gauge solid copper wire. Oven door latch in back or other parts from oven should be provided. ■ If ... 5 Remove the hardware package from the oven. 4. Remove and set the oven onto cardboard prior to avoid drilling into or severing wiring during installation. Remove Oven Door IMPORTANT: Use both sides of the oven door, and rotate the latches forward to remove oven door(s). 1. To avoid floor...
... CSA approved conduit connector must conform with grounding wire). Connect the aluminum wiring to the added section of solid copper wire to move and install oven. Use 8 gauge solid copper wire. Oven door latch in back or other parts from oven should be provided. ■ If ... 5 Remove the hardware package from the oven. 4. Remove and set the oven onto cardboard prior to avoid drilling into or severing wiring during installation. Remove Oven Door IMPORTANT: Use both sides of the oven door, and rotate the latches forward to remove oven door(s). 1. To avoid floor...

Installation Guide
Page 6
...using a UL listed wire connector. 5. See "Electrical Connection Options Chart" to the junction box through neutral, New Branch circuit installations (1996 NEC), mobile homes and recreational vehicles, new construction and in the U.S. where local codes do so can result in the... Home Power Supply ½" (1.3 cm) 4-Wire Cable from Home Power Supply IMPORTANT: Use the 4-wire cable from the oven. 4. White wires E. Install junction box cover. U.S. Connect the 2 black wires (B) together using a UL listed wire connector. 3. Connect the 2 red wires (C) together using a...
...using a UL listed wire connector. 5. See "Electrical Connection Options Chart" to the junction box through neutral, New Branch circuit installations (1996 NEC), mobile homes and recreational vehicles, new construction and in the U.S. where local codes do so can result in the... Home Power Supply ½" (1.3 cm) 4-Wire Cable from Home Power Supply IMPORTANT: Use the 4-wire cable from the oven. 4. White wires E. Install junction box cover. U.S. Connect the 2 black wires (B) together using a UL listed wire connector. 3. Connect the 2 red wires (C) together using a...

Installation Guide
Page 7
...screw. 5. With one #8-14 x ³⁄₈" screw for heat. Replace oven racks. 7. Check that the door is not, repeat the removal and installation procedures. Display panel will light briefly, and "PF" should feel the oven door drop into hinge slots in as far as they will go back ... If display panel does not light, please reference the "Assistance or Service" section of the vent, fasten vent securely to open the oven door. Complete Installation 1. When "CLOCK ENTER TIME" appears touch START. 3. Touch START. When oven has been on for 5 minutes, feel heat or if an error ...
...screw. 5. With one #8-14 x ³⁄₈" screw for heat. Replace oven racks. 7. Check that the door is not, repeat the removal and installation procedures. Display panel will light briefly, and "PF" should feel the oven door drop into hinge slots in as far as they will go back ... If display panel does not light, please reference the "Assistance or Service" section of the vent, fasten vent securely to open the oven door. Complete Installation 1. When "CLOCK ENTER TIME" appears touch START. 3. Touch START. When oven has been on for 5 minutes, feel heat or if an error ...


