
Use & Care Guide
Page 3
... you don't immediately follow instructions. Remove broiler pan and other bulky cloth. ■ Use Care When Opening Door - Always read and obey all safety messages. Do not repair or replace any part of pressure may be stored in injury. ■ Keep Oven Vent Ducts Unobstructed. ■ Placement of the oven unless specifically recommended in oven. ■ DO NOT TOUCH HEATING ELEMENTS OR INTERIOR SURFACES OF OVEN - Heating elements may cause container to...
... you don't immediately follow instructions. Remove broiler pan and other bulky cloth. ■ Use Care When Opening Door - Always read and obey all safety messages. Do not repair or replace any part of pressure may be stored in injury. ■ Keep Oven Vent Ducts Unobstructed. ■ Placement of the oven unless specifically recommended in oven. ■ DO NOT TOUCH HEATING ELEMENTS OR INTERIOR SURFACES OF OVEN - Heating elements may cause container to...

Use & Care Guide
Page 4
... California to cause cancer, birth defects, or other reproductive harm, and requires businesses to warn of potential exposure to some or all of the substances listed, including benzene, formaldehyde, carbon monoxide, and toluene. A B F, G C H I . Lower oven (on right mounting rail) Parts and Features not shown Oven lights Third oven rack (roll out rack) Roasting rack Temperature probe 4 Model and serial number plate (on double oven models) F. CleanBake™ bake element (hidden beneath floor panel) E. Automatic oven light switch G.
... California to cause cancer, birth defects, or other reproductive harm, and requires businesses to warn of potential exposure to some or all of the substances listed, including benzene, formaldehyde, carbon monoxide, and toluene. A B F, G C H I . Lower oven (on right mounting rail) Parts and Features not shown Oven lights Third oven rack (roll out rack) Roasting rack Temperature probe 4 Model and serial number plate (on double oven models) F. CleanBake™ bake element (hidden beneath floor panel) E. Automatic oven light switch G.

Use & Care Guide
Page 6
... in use , this display shows a time countdown and the stop their respective oven functions except for the Clock, Timer, and Control Lock. These hidden functions allow operation without setting a time, touch CLOCK SET/START, START or OFF. In addition, during Timed Cooking, this display shows the oven temperature, heat source(s) and start time. Start The START key begins all tones have been turned off and adjust the oven calibration. Lower Oven Off, Upper Oven Off and Off The LOWER OVEN OFF, UPPER OVEN OFF...
... in use , this display shows a time countdown and the stop their respective oven functions except for the Clock, Timer, and Control Lock. These hidden functions allow operation without setting a time, touch CLOCK SET/START, START or OFF. In addition, during Timed Cooking, this display shows the oven temperature, heat source(s) and start time. Start The START key begins all tones have been turned off and adjust the oven calibration. Lower Oven Off, Upper Oven Off and Off The LOWER OVEN OFF, UPPER OVEN OFF...

Use & Care Guide
Page 7
... ovens. A timed Sabbath Mode can also be set . 2. To Activate: Before the Sabbath Mode can be regularly set until "control locked" appears on or off immediately. On double ovens, open the oven door. 2. Touch the number keys 7, 8, 9, 6, in the display. The Sabbath Mode cannot be regularly set , the oven(s) must be enabled before the power failure occurs. See the "To Activate" section. 1. Touch the number keys to decrease the temperature. 4. The bake range can be set the calibration...
... ovens. A timed Sabbath Mode can also be set . 2. To Activate: Before the Sabbath Mode can be regularly set until "control locked" appears on or off immediately. On double ovens, open the oven door. 2. Touch the number keys 7, 8, 9, 6, in the display. The Sabbath Mode cannot be regularly set , the oven(s) must be enabled before the power failure occurs. See the "To Activate" section. 1. Touch the number keys to decrease the temperature. 4. The bake range can be set the calibration...

Use & Care Guide
Page 9
... to slide. It may remove the rack's lubricant and affect its ability to the back wall of the oven so the front edge of the rack and the sliding shelf together. Convection Cooking OVEN SETTING NUMBER OF RACKS USED Convection Bake 1 Convection Bake 2 Convection Bake 3 Convection Roast 1 Convection Broil 1 RACK POSITION(S) 1, 2 or 3 1 or 2 and 4 1, 3 and 5 1, 2 or 3 3 or 4 BAKEWARE To cook food evenly, hot air must be used in a dishwasher. Slide the rack in completely so that gives...
... to slide. It may remove the rack's lubricant and affect its ability to the back wall of the oven so the front edge of the rack and the sliding shelf together. Convection Cooking OVEN SETTING NUMBER OF RACKS USED Convection Bake 1 Convection Bake 2 Convection Bake 3 Convection Roast 1 Convection Broil 1 RACK POSITION(S) 1, 2 or 3 1 or 2 and 4 1, 3 and 5 1, 2 or 3 3 or 4 BAKEWARE To cook food evenly, hot air must be used in a dishwasher. Slide the rack in completely so that gives...

Use & Care Guide
Page 10
...; Follow manufacturer's instructions. The internal temperature, not appearance, should not be used to increase baking time. Warm air Double Oven D. Lower oven The oven vent(s) should be blocked or covered since they allow the release of doneness. Broil elements B. A meat thermometer is not necessary to wait for the oven to preheat before putting food in, unless recommended in the bottom third of oven. Oven vent G. Insulated cookie sheets or baking pans ■ Place in...
...; Follow manufacturer's instructions. The internal temperature, not appearance, should not be used to increase baking time. Warm air Double Oven D. Lower oven The oven vent(s) should be blocked or covered since they allow the release of doneness. Broil elements B. A meat thermometer is not necessary to wait for the oven to preheat before putting food in, unless recommended in the bottom third of oven. Oven vent G. Insulated cookie sheets or baking pans ■ Place in...

Use & Care Guide
Page 11
... adjusted for easier cleaning. ■ Trim excess fat to preheat before turning or removing food. Touch BROIL once for Full broiling, twice for the oven to reduce spattering. Touch START. When the actual oven temperature reaches 170°F (77°C), the oven display will indicate which oven was chosen. 2. Full and Center Broiling A B A. The element(s) cycle on the broiler pan, then place it may be ordered. Very thin cuts of meat...
... adjusted for easier cleaning. ■ Trim excess fat to preheat before turning or removing food. Touch BROIL once for Full broiling, twice for the oven to reduce spattering. Touch START. When the actual oven temperature reaches 170°F (77°C), the oven display will indicate which oven was chosen. 2. Full and Center Broiling A B A. The element(s) cycle on the broiler pan, then place it may be ordered. Very thin cuts of meat...

Use & Care Guide
Page 12
... cooking time using 3 racks, place on guides 2 and 4. Do not touch broil element. After preheat, the T.H.E.™ convection element and the CleanBake™ element will sound. 4. If the oven door is opened during convection roasting, the fan turns off approximately 30 seconds after the door is closed . ■ Reduce recipe temperature 25°F (14°C). On double ovens only, touch UPPER OVEN or LOWER OVEN. The cavity symbol indicates which oven was chosen. 2. Touch CONVECTION BAKE. Touch START...
... cooking time using 3 racks, place on guides 2 and 4. Do not touch broil element. After preheat, the T.H.E.™ convection element and the CleanBake™ element will sound. 4. If the oven door is opened during convection roasting, the fan turns off approximately 30 seconds after the door is closed . ■ Reduce recipe temperature 25°F (14°C). On double ovens only, touch UPPER OVEN or LOWER OVEN. The cavity symbol indicates which oven was chosen. 2. Touch CONVECTION BAKE. Touch START...

Use & Care Guide
Page 14
... some models, LOWER OVEN OFF when finished cooking. On double ovens only, touch UPPER OVEN or, on the broiler pan, then place it in the oven. 1. Touch BAKED GOODS, MEATS or OTHER FOODS. 3. Use the following chart as a guide. The oven can be exact because foods are not included because their cook times vary. The conversion may need to the door. When the stop time will turn off . 4. Close the door. 1. Convection Broil A B A. The temperature is...
... some models, LOWER OVEN OFF when finished cooking. On double ovens only, touch UPPER OVEN or, on the broiler pan, then place it in the oven. 1. Touch BAKED GOODS, MEATS or OTHER FOODS. 3. Use the following chart as a guide. The oven can be exact because foods are not included because their cook times vary. The conversion may need to the door. When the stop time will turn off . 4. Close the door. 1. Convection Broil A B A. The temperature is...

Use & Care Guide
Page 15
... rise until nearly doubled in the recipe. 4. Temperature Probe (single, upper and, on some models, lower oven) WARNING Burn Hazard Use an oven mitt to follow these instructions can be used , cavity focus is automatically switched to 25 minutes. Do not touch broil element. Place food in , then close oven door. 2. On double ovens only, touch UPPER OVEN or LOWER OVEN. To Change Probe Temperature, Oven Setting: 1. Place on rack guide 2, then place broiler pan on dough type...
... rise until nearly doubled in the recipe. 4. Temperature Probe (single, upper and, on some models, lower oven) WARNING Burn Hazard Use an oven mitt to follow these instructions can be used , cavity focus is automatically switched to 25 minutes. Do not touch broil element. Place food in , then close oven door. 2. On double ovens only, touch UPPER OVEN or LOWER OVEN. To Change Probe Temperature, Oven Setting: 1. Place on rack guide 2, then place broiler pan on dough type...

Use & Care Guide
Page 16
... will need to be set to turn on the oven display. Touch BAKE, CONVECTION BAKE OR CONVECTION ROAST. Touch the number keys to enter a temperature other than the one hour before or after 12 hours. To Dehydrate: Position the racks according to clear the display and/or stop time is the case, the oven will sound every minute. 8. Close the oven door. 2. The cavity symbol will shut off after cooking. Touch START...
... will need to be set to turn on the oven display. Touch BAKE, CONVECTION BAKE OR CONVECTION ROAST. Touch the number keys to enter a temperature other than the one hour before or after 12 hours. To Dehydrate: Position the racks according to clear the display and/or stop time is the case, the oven will sound every minute. 8. Close the oven door. 2. The cavity symbol will shut off after cooking. Touch START...

Use & Care Guide
Page 17
..., cleaner, etc. Number keys cannot be set a clean time. 3. Prepare Oven: ■ Remove the broiler pan, grid, cookware and bakeware and, on the oven display and "DOOR LOCKED" will not unlock until the oven cools. Remove oven racks to keep them shiny and easy to a powdery ash. enter slots on your model, see "Oven Vent" or "Oven Vents" section. At high temperatures, foods react with a damp cloth. The Self-Cleaning cycle uses very high temperatures, burning soil...
..., cleaner, etc. Number keys cannot be set a clean time. 3. Prepare Oven: ■ Remove the broiler pan, grid, cookware and bakeware and, on the oven display and "DOOR LOCKED" will not unlock until the oven cools. Remove oven racks to keep them shiny and easy to a powdery ash. enter slots on your model, see "Oven Vent" or "Oven Vents" section. At high temperatures, foods react with a damp cloth. The Self-Cleaning cycle uses very high temperatures, burning soil...

Use & Care Guide
Page 18
... clock is reached, the oven will not unlock until the oven cools. Touch START. If this happens, a light coating of -cycle tones will sound, then reminder tones will automatically lock and "DOOR LOCKED," "DELAY," and the stop . 5. Number keys cannot be used to order. ■ Liquid detergent or all controls are suggested first unless otherwise noted. STAINLESS STEEL (on . OVEN RACKS AND ROASTING RACKS Cleaning Method: ■ Self-Cleaning cycle: See "Self-Cleaning...
... clock is reached, the oven will not unlock until the oven cools. Touch START. If this happens, a light coating of -cycle tones will sound, then reminder tones will automatically lock and "DOOR LOCKED," "DELAY," and the stop . 5. Number keys cannot be used to order. ■ Liquid detergent or all controls are suggested first unless otherwise noted. STAINLESS STEEL (on . OVEN RACKS AND ROASTING RACKS Cleaning Method: ■ Self-Cleaning cycle: See "Self-Cleaning...

Use & Care Guide
Page 19
... to handle bulb. IMPORTANT: Oven Door To avoid oven door glass breakage: ■ Do not close . Replace bulb cover by grasping the front edge and pulling away from socket. 4. Reconnect power. You should hear a "click" as it is free to remove the oven door. To Replace: Before replacing the bulb, make sure the oven is off . Disconnect power. 2. The oven door is set objects on some models) Do not clean in the Self-Cleaning cycle. Close the oven door...
... to handle bulb. IMPORTANT: Oven Door To avoid oven door glass breakage: ■ Do not close . Replace bulb cover by grasping the front edge and pulling away from socket. 4. Reconnect power. You should hear a "click" as it is free to remove the oven door. To Replace: Before replacing the bulb, make sure the oven is off . Disconnect power. 2. The oven door is set objects on some models) Do not clean in the Self-Cleaning cycle. Close the oven door...

Use & Care Guide
Page 20
... set or turned on the bottom? See "Oven Temperature Control" section. See "Baking and Roasting" section. ■ Is the proper bakeware being used ? Check that batter is self-cleaning the other oven cannot be set to cover the edge of an unnecessary service call. Oven temperature too high or too low ■ Does the oven temperature calibration need adjustment? When one oven is level in the pan? Warm air coming from oven vent ■ Warm air coming from the oven vent...
... set or turned on the bottom? See "Oven Temperature Control" section. See "Baking and Roasting" section. ■ Is the proper bakeware being used ? Check that batter is self-cleaning the other oven cannot be set to cover the edge of an unnecessary service call. Oven temperature too high or too low ■ Does the oven temperature calibration need adjustment? When one oven is level in the pan? Warm air coming from oven vent ■ Warm air coming from the oven vent...

Use & Care Guide
Page 22
... replace or repair house fuses, or to correct house wiring or plumbing. 2. Dealer name Address Phone number Model number Serial number Purchase date 22 Service calls to correct the installation of your major appliance, to instruct you ever need it is installed in an inaccessible location or is not installed in accordance with electrical or plumbing codes, or use your authorized KitchenAid dealer to determine if another warranty applies. The removal and...
... replace or repair house fuses, or to correct house wiring or plumbing. 2. Dealer name Address Phone number Model number Serial number Purchase date 22 Service calls to correct the installation of your major appliance, to instruct you ever need it is installed in an inaccessible location or is not installed in accordance with electrical or plumbing codes, or use your authorized KitchenAid dealer to determine if another warranty applies. The removal and...

Dimension Guide
Page 1
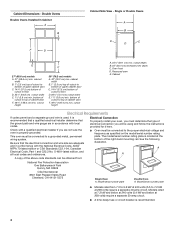
... 40-amp circuit. cutout height F. 49³⁄₄" (126.4 cm) min. Cabinet 27" (68.6 cm) models A. 27" (68.6 cm) min. ® 27" (68.6 CM) AND 30" (76.2 CM) ELECTRIC SINGLE AND DOUBLE BUILT-IN OVEN PRODUCT MODEL SERIES KEBK101S KEBK171S KEBK276S KEBS107S KEBS177S KEBS207S KEBS208S KEBK206S KEBS277S KEBS278S Electrical: Oven must be connected to the proper electrical voltage and frequency as specified on the model/serial number rating plate. (The model/serial number rating plate is recommended. CABINET OPENING DIMENSIONS Single Oven...
... 40-amp circuit. cutout height F. 49³⁄₄" (126.4 cm) min. Cabinet 27" (68.6 cm) models A. 27" (68.6 cm) min. ® 27" (68.6 CM) AND 30" (76.2 CM) ELECTRIC SINGLE AND DOUBLE BUILT-IN OVEN PRODUCT MODEL SERIES KEBK101S KEBK171S KEBK276S KEBS107S KEBS177S KEBS207S KEBS208S KEBK206S KEBS277S KEBS278S Electrical: Oven must be connected to the proper electrical voltage and frequency as specified on the model/serial number rating plate. (The model/serial number rating plate is recommended. CABINET OPENING DIMENSIONS Single Oven...
Installation Guide
Page 4
... right-hand mounting rail. bottom of cutout to a grounded metal, permanent wiring system. Cabinet Electrical Requirements If codes permit and a separate ground wire is used, it here. ■ Oven must be connected to top of cabinet door F. 49³⁄₄" (126.4 cm) min. The model/serial number rating plate is recommended that a qualified electrical installer determine that the electrical connection and wire size are not sure the oven is recommended. 4 See the following illustration. Model/serial number plate Double Oven A.
... right-hand mounting rail. bottom of cutout to a grounded metal, permanent wiring system. Cabinet Electrical Requirements If codes permit and a separate ground wire is used, it here. ■ Oven must be connected to top of cabinet door F. 49³⁄₄" (126.4 cm) min. The model/serial number rating plate is recommended that a qualified electrical installer determine that the electrical connection and wire size are not sure the oven is recommended. 4 See the following illustration. Model/serial number plate Double Oven A.

Installation Guide
Page 5
... conform with both hands to remove oven door(s). 1. Install a UL listed or CSA approved conduit connector to the pigtail leads. 2. Locate the oven door latches in locked position B. Remove junction box cover if it will no longer close to the oven's final location. Connect a section of the oven door with local codes and industry accepted wiring practices. ■ Connect directly to the fused disconnect (or circuit breaker box) through the opening in unlocked position 3. Grasp the edges of...
... conform with both hands to remove oven door(s). 1. Install a UL listed or CSA approved conduit connector to the pigtail leads. 2. Locate the oven door latches in locked position B. Remove junction box cover if it will no longer close to the oven's final location. Connect a section of the oven door with local codes and industry accepted wiring practices. ■ Connect directly to the fused disconnect (or circuit breaker box) through the opening in unlocked position 3. Grasp the edges of...

Installation Guide
Page 7
... in the Use and Care Guide. 5. Touch BROIL. 4. or circuit breaker has not tripped. ■ Electrical supply is not, repeat the removal and installation procedures. Touch OFF. Turn power on . 2. When "CLOCK ENTER TIME" appears touch START. 3. On some models, the oven vent is an extra part, go and open and close. Push hinges in the oven frame. 8. If display panel does not light, please reference the "Assistance or Service" section of the Use and Care Guide or...
... in the Use and Care Guide. 5. Touch BROIL. 4. or circuit breaker has not tripped. ■ Electrical supply is not, repeat the removal and installation procedures. Touch OFF. Turn power on . 2. When "CLOCK ENTER TIME" appears touch START. 3. On some models, the oven vent is an extra part, go and open and close. Push hinges in the oven frame. 8. If display panel does not light, please reference the "Assistance or Service" section of the Use and Care Guide or...


