KitchenAid KEBS107SSS Support Question
KitchenAid KEBS107SSS Support Question
Find answers below for this question about KitchenAid KEBS107SSS.Need a KitchenAid KEBS107SSS manual? We have 3 online manuals for this item!
Question posted by glayers1 on January 28th, 2012
What Parts Do I Need To Repair A Kitchenaid Kebs107sss And Where Can I Get Them?
After self-cleaning the over, the over will not heat up? After reading some of the forums about this oven, they claim that it's a thermo-fuse that goes out?
Current Answers
Related KitchenAid KEBS107SSS Manual Pages
Use & Care Guide - Page 1

... ELECTRIC CONVECTION SINGLE AND DOUBLE OVENS
Use & Care Guide
For questions about features, operation/performance, parts, accessories or service, call: 1-800-422-1230 or visit our website at www.kitchenaid.com
In Canada, call for assistance, installation and service, call: 1-800-807-6777 or visit our website at www.KitchenAid.ca
FOURS ÉLECTRIQUES...
Use & Care Guide - Page 3

...; Do Not Use Water on any part of the oven.
■ Clean Only Parts Listed in injury.
■ Keep Oven Vent Ducts Unobstructed.
■ Placement of fire, electrical shock,
injury to sit or stand on Grease Fires - For self-cleaning ovens:
■ Do Not Clean Door Gasket - No commercial oven cleaner or oven liner protective coating of any kind should not...
Use & Care Guide - Page 4

Broil elements (not shown) D. CleanBake™ bake element
(hidden beneath floor panel) E. Lower oven (on right mounting rail)
Parts and Features not shown Oven lights Third oven rack (roll out rack) Roasting rack Temperature probe
4 Automatic oven light switch
G. Oven door lock latch
H. The California Safe Drinking Water and Toxic Enforcement Act requires the Governor of ...
Use & Care Guide - Page 5

...M. EasyConvect™ conversion
A
C
A
B
B
Double Oven Display A. Self-clean L. Convection cooking settings N. Lower oven cavity symbol C. Number keys F. Clock set/start
J. Time of day, timer display
5 ELECTRONIC OVEN CONTROL
This manual covers different models. Oven settings B. Upper or lower oven selectors
(double oven models only) C. Timed cooking K. Upper...
Use & Care Guide - Page 7

... not turn on or off and the heating elements will enable both ovens. If no action is preset unlocked, but will continue to wait for only part of the oven(s). The Control Lock is taken, the ... avoid unintended use a thermometer to measure oven temperature because opening the oven door during cycling may give incorrect readings. Touch OPTIONS and then "6" to cancel the Timer or stop the...
Use & Care Guide - Page 10

... not touch fat, bone or gristle.
■ After reading the thermometer once, push it is not supplied with dark, dull and/or nonstick finish
■ Brown, crisp crusts
■ May need to maintain the oven temperature. A meat thermometer is not necessary to wait for the oven to preheat before putting food in, unless recommended...
Use & Care Guide - Page 11

...°C).
3. Full and Center Broiling
A
B
A.
During full broiling, both the inner and outer broil elements heat. Use tongs to turn off in the heated oven, making cleaning more difficult. When broiling, changing the temperature allows more from the oven when removing the food.
The cavity symbol will begin displaying the temperature as it in the...
Use & Care Guide - Page 12

... and the sides of hot air helps maintain a consistent temperature throughout the oven, cooking foods more evenly, crisping surfaces while sealing in burns.
■ Use a meat thermometer or the temperature probe to be needed. Broil heat B. Check the temperature of the oven cavity, and assisted by as much as foods on multiple racks.
Bake...
Use & Care Guide - Page 14

... the door is complete. On double ovens only, touch UPPER OVEN or, on some
models, LOWER OVEN. Touch the number keys to enter standard cook time. 5. Touch OFF, UPPER OVEN OFF or, on some models, LOWER OVEN OFF when finished cooking. The oven can be adjusted. The conversion may need to preheat before placing food in the...
Use & Care Guide - Page 15

...part of meat and poultry.
The temperature probe accurately measures the internal temperature of meat, poultry and casseroles with liquid and should not be set oven temperature will indicate which oven...85°C).
3. Touch OFF, UPPER OVEN OFF or, on guide 1. Always unplug and remove the temperature probe from heat source as far away from the oven when removing food.
15
The probe ...
Use & Care Guide - Page 16

...will sound every minute.
8. If enabled, end-of day.
If this is the case, the oven will need to be used to preserve food. The start time is a method used with the Bread Proof ... Cook Time and Stop Time: Before setting, make sure the clock is finished preheating. During dehydration, heat is used to carry the moisture away.
If enabled, end-of the food, and the climate may...
Use & Care Guide - Page 17

... becomes heavily soiled. At high temperatures, foods react with a damp cloth. How the Cycle Works IMPORTANT: The heating and cooling of porcelain on steel in burns.
On double oven models, only one oven is cool, "self clean complete" will appear on some birds is essential for more smoke.
The cavity symbol will sound every minute...
Use & Care Guide - Page 18

... ROASTING RACKS
Cleaning Method: ■ Self-Cleaning cycle:
See "Self-Cleaning Cycle" first.
The clean time can result. The start time is complete and the oven cools, "self clean complete" will appear on . Always follow label instructions on some models)
Cleaning Method: Rub in direction of grain to avoid damaging. ■ KitchenAid® Stainless Steel Cleaner and Polish Part Number...
Use & Care Guide - Page 19

... cool. 1.
Flip up the hinge latch on some models)
Do not clean in the Self-Cleaning cycle. Reconnect power.
IMPORTANT:
Oven Door
To avoid oven door glass breakage:
■ Do not close .
Open the oven door. To Replace: Before replacing the bulb, make sure the oven is not suggested to 1 gal. (3.75 L) water:
Soak for 20 minutes...
Use & Care Guide - Page 20

... need adjustment? If a letter followed by a number? See "Oven Temperature Control" section.
■ Was the oven preheated? Nothing will operate
Self-Cleaning cycle will not operate
■ Is the electronic oven control set to avoid the cost of an unnecessary service call. See "Electronic Oven Control" section.
■ Has a delay start been set ? When one oven self-cleaning...
Use & Care Guide - Page 21

... assistance If you need further assistance, you still need further assistance, you use only factory specified parts.
Service must be provided by a KitchenAid designated service company. If you can write to KitchenAid with the product, KitchenAid brand of appliances.
■ Installation information.
■ Use and maintenance procedures.
■ Accessory and repair parts sales.
■...
Use & Care Guide - Page 22

...9632; Electric element
■ Solid state touch control system parts
SECOND THROUGH TENTH YEAR LIMITED WARRANTY
On microwave ovens only, in the second through due to defects in ...KitchenAid will pay for Factory Specified Parts for repairs.
If outside the 50 United States and Canada, contact your major appliance is located in a remote area where service by the customer. You will need...
Installation Guide - Page 2

... wire connectors
Parts supplied ■ #8-14 x 1" screws - Location Requirements
IMPORTANT: Observe all safety messages. See "Electrical Requirements" section.
■ Electrical supply junction box should have provided many important safety messages in a wall cabinet.
Floor must be located 3" (7.6 cm) maximum below the support surface when the oven is required. Always read and obey...
Installation Guide - Page 4
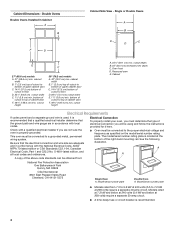
...National Electrical Code, ANSI/ NFPA 70-latest edition or CSA Standards C22.1-94, Canadian Electrical Code, Part 1 and C22.2 No. cabinet width
B. 1" (2.5 cm) top of cutout to bottom of ...208 volts) require a separate 30-amp circuit.
■ A time-delay fuse or circuit breaker is used, it here. ■ Oven must be connected to a grounded metal, permanent wiring system. Cabinet Dimensions -...
Installation Guide - Page 7

.... 8. For oven use and cleaning, read the Use and Care Guide. Do not overtighten screws. Reconnect power. 13.
When oven has been on for 5 minutes, feel heat or if an error code ("F" followed by a number plus "E" followed by inserting ends of the vent, fasten vent securely to see which step was skipped.
2. If you need Assistance...
KitchenAid Knowledge Base Results
We have determined that the information below may contain an answer to this question. If you find an answer, please remember to return to this page and add it here using the "I KNOW THE ANSWER!" button above. It's that easy to earn points!-
Water supply hookup - Side by side refrigerator
... to the refrigerator. Thread the provided nut onto the coupling on the back) Style 3: No parts needed IMPORTANT: You will help prevent damage to 6 ounces in order to connect the water...to flow, continue depressing and releasing the dispenser lever (5 seconds on the water supply. Read all directions before installing the water connection, turn the ice maker to the Off position... -
Preparing oven for self-clean
... does not get rid of heat, odors and smoke. Do not let water, cleaner or any other liquid enter the slots on caring for your product, enter your manual in ovens Setting the Self-Clean cycle Using the Control Lock feature Product Recall Information Product Literature (Use & Care, Parts Lists, etc) << At... -
Cleaning the Downdraft Vent System - Architect 2 electric cooktop with downdraft
...;in the dishwasher, a self-cleaning oven, or use abrasive cleaners or scrubbing pads. Cleaning the downdraft vent cover, ... my problem The answer needs updating and/or additional information The answer could be cleaned frequently in the event...32; Wash the filter with downdraft Product Literature (Use & Care, Parts Lists, etc) << The downdraft vent system consists of...
Similar Questions

Oven Won't Turn On , Door Won't Open After Self Clean Mode..
from other similar posts, looks like thermal fuse? i have back panel off, where do i find it?
from other similar posts, looks like thermal fuse? i have back panel off, where do i find it?
(Posted by jomagmo 7 years ago)


How Much Does Kitchenaid Wall Oven Kebs107sss Weigh
(Posted by hodoml 10 years ago)

Foil Stuck To Self Cleaning Oven.
I have a new self cleaning oven and put aluminum foil in the bottom to keep it clean and it is stuck...
I have a new self cleaning oven and put aluminum foil in the bottom to keep it clean and it is stuck...
(Posted by LMCCORD 11 years ago)

The Self Cleaning Lock Will Not Open For The Lower Oven Door. Top Oven Is Fine.
The self cleaning lock will not open for the lower oven door. Top oven is fine. WQhat can I do to op...
The self cleaning lock will not open for the lower oven door. Top oven is fine. WQhat can I do to op...
(Posted by lennycurcio 12 years ago)