
Use & Care Guide
Page 3
... never be stored in the manual. Do not let potholder touch hot heating elements. Build-up of Oven Racks - Remove broiler pan and other reproductive harm. 3 Always read and obey all safety messages. Other surfaces of California to persons, or damage when using the oven. ■ User Servicing - SAVE THESE INSTRUCTIONS State of California Proposition 65 Warnings: WARNING: This product contains one or more...
... never be stored in the manual. Do not let potholder touch hot heating elements. Build-up of Oven Racks - Remove broiler pan and other reproductive harm. 3 Always read and obey all safety messages. Other surfaces of California to persons, or damage when using the oven. ■ User Servicing - SAVE THESE INSTRUCTIONS State of California Proposition 65 Warnings: WARNING: This product contains one or more...

Use & Care Guide
Page 5
... your model. Oven settings C. Stop time M. In addition, during Timed Cooking, this display shows the oven temperature, heat source(s) and start time. If the Start key is first supplied to the oven, the timer display will flash "12:00", and "Clock-Enter Time" will be canceled. Before setting, make sure the oven(s), Kitchen Timer and Timed Cooking are not in use this display will appear on the oven temperature. Convection cooking settings D. Clock set . Self clean A C A B B Double Oven Display A. On double oven models, this display shows the time of...
... your model. Oven settings C. Stop time M. In addition, during Timed Cooking, this display shows the oven temperature, heat source(s) and start time. If the Start key is first supplied to the oven, the timer display will flash "12:00", and "Clock-Enter Time" will be canceled. Before setting, make sure the oven(s), Kitchen Timer and Timed Cooking are not in use this display will appear on the oven temperature. Convection cooking settings D. Clock set . Self clean A C A B B Double Oven Display A. On double oven models, this display shows the time of...

Use & Care Guide
Page 6
... to manually scroll through the various tools, starting at 1 and ending automatically at low, but can be entered. 2. Control Lock The Control Lock shuts down the set time. When the control is locked, only the SET/START, TIMER OFF and OVEN LIGHT keys will scroll through the list of tools. To Unlock Control: Repeat to avoid unintended use of time to high. "Control Unlocked" appears on , but can be turned off , adjust the oven calibration, change the oven temperature between...
... to manually scroll through the various tools, starting at 1 and ending automatically at low, but can be entered. 2. Control Lock The Control Lock shuts down the set time. When the control is locked, only the SET/START, TIMER OFF and OVEN LIGHT keys will scroll through the list of tools. To Unlock Control: Repeat to avoid unintended use of time to high. "Control Unlocked" appears on , but can be turned off , adjust the oven calibration, change the oven temperature between...

Use & Care Guide
Page 7
... Adjust Oven Temperature Calibration: 1. Sabbath Mode The Sabbath Mode sets the oven(s) to keep the oven on or off . When the oven door is set, the oven(s) will not turn off. If a power failure occurs when the Sabbath Mode is opened or closed, the oven light will not turn on the oven display for only part of Sabbath Mode time, up to normal operating mode (non-Sabbath Mode, not cooking). To Enable: Before the Sabbath Mode can be adjusted. "SABBATH MODE ON" will appear on or off and the heating elements...
... Adjust Oven Temperature Calibration: 1. Sabbath Mode The Sabbath Mode sets the oven(s) to keep the oven on or off . When the oven door is set, the oven(s) will not turn off. If a power failure occurs when the Sabbath Mode is opened or closed, the oven light will not turn on the oven display for only part of Sabbath Mode time, up to normal operating mode (non-Sabbath Mode, not cooking). To Enable: Before the Sabbath Mode can be adjusted. "SABBATH MODE ON" will appear on or off and the heating elements...

Use & Care Guide
Page 10
... a temperature probe, use the bakeware size recommended in the recipe. Upper oven F. Blocking or covering vents will turn on the model, if the oven door is opened. Depending on again approximately 30 seconds after the door is opened during the Bake mode. They will indicate which oven was chosen. 2. On double ovens only, touch UPPER OVEN or LOWER OVEN. Bakeware The bakeware material affects cooking results. Oven Vent(s) A B C E D F G Single and Double Oven A. Control panel B. Oven vent C. Broil elements B. To Bake or Roast: Before baking or roasting, position racks...
... a temperature probe, use the bakeware size recommended in the recipe. Upper oven F. Blocking or covering vents will turn on the model, if the oven door is opened. Depending on again approximately 30 seconds after the door is opened during the Bake mode. They will indicate which oven was chosen. 2. On double ovens only, touch UPPER OVEN or LOWER OVEN. Bakeware The bakeware material affects cooking results. Oven Vent(s) A B C E D F G Single and Double Oven A. Control panel B. Oven vent C. Broil elements B. To Bake or Roast: Before baking or roasting, position racks...

Use & Care Guide
Page 11
... the oven display until the oven is opened during broiling, the broil element will bake on the broiler pan, then place it in the heated oven, making cleaning more difficult. When broiling, changing the temperature allows more from the oven when removing the food. A temperature setting of the display. "Lo°" will appear in intervals to have a well seared exterior and rare interior, use a broiler pan and grid. If the oven door is turned off. 4. The broil range can be used...
... the oven display until the oven is opened during broiling, the broil element will bake on the broiler pan, then place it in the heated oven, making cleaning more difficult. When broiling, changing the temperature allows more from the oven when removing the food. A temperature setting of the display. "Lo°" will appear in intervals to have a well seared exterior and rare interior, use a broiler pan and grid. If the oven door is turned off. 4. The broil range can be used...

Use & Care Guide
Page 12
... when using 2 racks, place on multiple racks. During convection baking preheat, the convection element, broil element and the CleanBake™ element all heat the oven cavity. Convection, Bake and Broil elements will turn on and off immediately when the door is closed . ■ Reduce recipe temperature 25°F (14°C). The cook time may be reduced also. Touch the number keys to choose whether or not to enter a cook time. The convection bake range can be adjusted. Touch START. When...
... when using 2 racks, place on multiple racks. During convection baking preheat, the convection element, broil element and the CleanBake™ element all heat the oven cavity. Convection, Bake and Broil elements will turn on and off immediately when the door is closed . ■ Reduce recipe temperature 25°F (14°C). The cook time may be reduced also. Touch the number keys to choose whether or not to enter a cook time. The convection bake range can be adjusted. Touch START. When...

Use & Care Guide
Page 13
..., and the adjusted cook time will appear on some models) CONVECTION ROASTING CHART A FOOD/RACK COOK TIME OVEN TEMP. Touch the number keys to choose whether or not to the "Positioning Racks and Bakeware" section. The cook time will automatically be set oven temperature will appear on immediately when the door is closed . Convection fan C. If the oven door is opened during convection roasting, the fan turns off immediately when the door is opened . Bake, broil, and convect elements will not be used for the...
..., and the adjusted cook time will appear on some models) CONVECTION ROASTING CHART A FOOD/RACK COOK TIME OVEN TEMP. Touch the number keys to choose whether or not to the "Positioning Racks and Bakeware" section. The cook time will automatically be set oven temperature will appear on immediately when the door is closed . Convection fan C. If the oven door is opened during convection roasting, the fan turns off immediately when the door is opened . Bake, broil, and convect elements will not be used for the...

Use & Care Guide
Page 14
... convection broil range can be set oven temperature will show the temperature increasing. Place on rack guide 2, then place broiler pan on dough type and quantity. 4. Close door. 1. Display will appear on the oven display throughout cooking. Do not touch broil element. NOTE: The temperature probe must be used with shortening. Touch number keys to the door. If the oven door is opened during convection broiling, fan turns off immediately when the door is opened . Close the door. 1. Proofing time may need to enter a probe temperature. The temperature probe...
... convection broil range can be set oven temperature will show the temperature increasing. Place on rack guide 2, then place broiler pan on dough type and quantity. 4. Close door. 1. Display will appear on the oven display throughout cooking. Do not touch broil element. NOTE: The temperature probe must be used with shortening. Touch number keys to the door. If the oven door is opened during convection broiling, fan turns off immediately when the door is opened . Close the door. 1. Proofing time may need to enter a probe temperature. The temperature probe...

Use & Care Guide
Page 15
... shut off during the High Temp Self-Cleaning cycle. Prepare Oven: ■ Remove the broiler pan, grid, cookware and bakeware and, on your model, see "Oven Vent" or "Oven Vents" section. Touch CANCEL for a set to clear the display and/or stop reminder tones. 6. To Change Probe Temperature During a Cooking Cycle: 1. Timed Cooking allows the oven(s) to be used at a certain time of day, cook for the selected oven, or open and close the oven door to turn on the oven display. On double ovens...
... shut off during the High Temp Self-Cleaning cycle. Prepare Oven: ■ Remove the broiler pan, grid, cookware and bakeware and, on your model, see "Oven Vent" or "Oven Vents" section. Touch CANCEL for a set to clear the display and/or stop reminder tones. 6. To Change Probe Temperature During a Cooking Cycle: 1. Timed Cooking allows the oven(s) to be used at a certain time of day, cook for the selected oven, or open and close the oven door to turn on the oven display. On double ovens...

Use & Care Guide
Page 16
... heating and cooling of gloss, hairline cracks and popping sounds. The oven lights will not begin . 1. On double oven models, only one oven is too high, the door will appear on . An increase in discoloring, loss of porcelain on door frame. To Start High-Temp Self-Cleaning: Before high temp self-cleaning, make sure the door is reached. The clean time can be used to clear the oven display and/or stop . 5. Opening the door...
... heating and cooling of gloss, hairline cracks and popping sounds. The oven lights will not begin . 1. On double oven models, only one oven is too high, the door will appear on . An increase in discoloring, loss of porcelain on door frame. To Start High-Temp Self-Cleaning: Before high temp self-cleaning, make sure the door is reached. The clean time can be used to clear the oven display and/or stop . 5. Opening the door...

Use & Care Guide
Page 17
... power. 2. OVEN DOOR INTERIOR Cleaning Method: ■ Self-Cleaning cycle: For optimal door cleaning result, wipe away any deposits with porcelain and staining, etching, pitting or faint white spots can result. If this happens, a light coating of vegetable oil applied to the rack guides will come on panel. ■ affresh™ Kitchen and Appliance Cleaner Part Number W10355010 (not included): See "Assistance or Service" section to handle bulb. Remove glass light cover by...
... power. 2. OVEN DOOR INTERIOR Cleaning Method: ■ Self-Cleaning cycle: For optimal door cleaning result, wipe away any deposits with porcelain and staining, etching, pitting or faint white spots can result. If this happens, a light coating of vegetable oil applied to the rack guides will come on panel. ■ affresh™ Kitchen and Appliance Cleaner Part Number W10355010 (not included): See "Assistance or Service" section to handle bulb. Remove glass light cover by...

Use & Care Guide
Page 19
... Installation Instructions. See "Timed Cooking" section. ■ Is the Control Lock set ? See "Oven Temperature Control" section. See "Self-Cleaning Cycle" section. ■ Has a delay start been set ? See "Oven Temperature Control" section. ■ Was the oven preheated? See "Positioning Racks and Bakeware" section. ■ Is the batter evenly distributed in the pan? Adjust cooking time. ■ Has the oven door been opened while cooking? See "Baking and Roasting" section. ■ Is the proper bakeware being used ? See "Sabbath Mode" section. ■ On double oven models...
... Installation Instructions. See "Timed Cooking" section. ■ Is the Control Lock set ? See "Oven Temperature Control" section. See "Self-Cleaning Cycle" section. ■ Has a delay start been set ? See "Oven Temperature Control" section. ■ Was the oven preheated? See "Positioning Racks and Bakeware" section. ■ Is the batter evenly distributed in the pan? Adjust cooking time. ■ Has the oven door been opened while cooking? See "Baking and Roasting" section. ■ Is the proper bakeware being used ? See "Sabbath Mode" section. ■ On double oven models...

Use & Care Guide
Page 20
... in your area, call . affresh™ Stainless Steel Cleaning Wipes (stainless steel models) Order Part Number W10355049 affresh™ Kitchen and Appliance Cleaner Order Part Number W10355010 Porcelain Broiler Pan and Grid Order Part Number 4396923 Premium Broiler Pan and Roasting Rack Order Part Number W10123240 www.maytag.com/broilerpan In Canada Call the KitchenAid Canada Customer eXperience Centre toll free: 1-800-807-6777 or visit our website at...
... in your area, call . affresh™ Stainless Steel Cleaning Wipes (stainless steel models) Order Part Number W10355049 affresh™ Kitchen and Appliance Cleaner Order Part Number W10355010 Porcelain Broiler Pan and Grid Order Part Number 4396923 Premium Broiler Pan and Roasting Rack Order Part Number W10123240 www.maytag.com/broilerpan In Canada Call the KitchenAid Canada Customer eXperience Centre toll free: 1-800-807-6777 or visit our website at...

Use & Care Guide
Page 21
... installation, installation not in accordance with original model/serial numbers that is designed to published user or operator instructions and/or installation instructions. 4. Cosmetic damage, including scratches, dents, chips or other than normal, single-family household use of purchase. 6. This major appliance is contrary to be provided by KitchenAid. 5. The removal and reinstallation of repair or replacement under this limited warranty. Major appliances with published installation instructions. 10. This warranty...
... installation, installation not in accordance with original model/serial numbers that is designed to published user or operator instructions and/or installation instructions. 4. Cosmetic damage, including scratches, dents, chips or other than normal, single-family household use of purchase. 6. This major appliance is contrary to be provided by KitchenAid. 5. The removal and reinstallation of repair or replacement under this limited warranty. Major appliances with published installation instructions. 10. This warranty...

Dimension Guide
Page 1
...) max. B C A A A D E Single Oven Double Oven A. recessed depth E. 30" (76.2 cm) overall width Dimensions are for planning purposes only. recessed width C. 48 124.0 cm) recessed height D. 23¹⁄₄" (59.1 cm) max. W10351242B 7/26/12 q Connect directly to the ends of copper wire using and follow the procedure below at 208 volts) require a separate 40-amp circuit. The model/serial number rating plate is located under the control panel on single ovens and...
...) max. B C A A A D E Single Oven Double Oven A. recessed depth E. 30" (76.2 cm) overall width Dimensions are for planning purposes only. recessed width C. 48 124.0 cm) recessed height D. 23¹⁄₄" (59.1 cm) max. W10351242B 7/26/12 q Connect directly to the ends of copper wire using and follow the procedure below at 208 volts) require a separate 40-amp circuit. The model/serial number rating plate is located under the control panel on single ovens and...

Installation Guide
Page 2
... electrical connections be located in a wall cabinet. A 1" (2.5 cm) minimum diameter hole should be used will not discolor, delaminate or sustain other damage. IMPORTANT: To avoid damage to your cabinets, check with your builder or cabinet supplier to the junction box. bottom vent trim ■ Four #8-18 x ³⁄₈" screws - INSTALLATION REQUIREMENTS Tools and Parts Gather the required tools and parts before starting installation. double oven ■ Two front feet - single oven...
... electrical connections be located in a wall cabinet. A 1" (2.5 cm) minimum diameter hole should be used will not discolor, delaminate or sustain other damage. IMPORTANT: To avoid damage to your cabinets, check with your builder or cabinet supplier to the junction box. bottom vent trim ■ Four #8-18 x ³⁄₈" screws - INSTALLATION REQUIREMENTS Tools and Parts Gather the required tools and parts before starting installation. double oven ■ Two front feet - single oven...

Installation Guide
Page 5
...; Do not cut the conduit. Check with a qualified electrical installer if you are not sure the oven is located under the control panel on single ovens and under the control panel on the upper oven cavity on the model/serial number rating plate. Electrical Connection To properly install your oven, you will be connected to the following illustrations. Connect a section of solid copper wire to the ends of electrical connection you must be using special connectors and...
...; Do not cut the conduit. Check with a qualified electrical installer if you are not sure the oven is located under the control panel on single ovens and under the control panel on the upper oven cavity on the model/serial number rating plate. Electrical Connection To properly install your oven, you will be connected to the following illustrations. Connect a section of solid copper wire to the ends of electrical connection you must be using special connectors and...

Installation Guide
Page 13
... the "Prepare Built-In Oven" section. 13. If the display panel does not light, reference the "Assistance or Service" section of the oven, the bottom vent trim must also be installed. Bottom vent trim E. #8-18 x ³⁄₈" screw 13 Oven frame B. 7. Push the hinges in the oven frame. 10. Check that the door is not, repeat the removal and installation procedures. The display panel will go and open and close.
... the "Prepare Built-In Oven" section. 13. If the display panel does not light, reference the "Assistance or Service" section of the oven, the bottom vent trim must also be installed. Bottom vent trim E. #8-18 x ³⁄₈" screw 13 Oven frame B. 7. Push the hinges in the oven frame. 10. Check that the door is not, repeat the removal and installation procedures. The display panel will go and open and close.
Installation Guide
Page 14
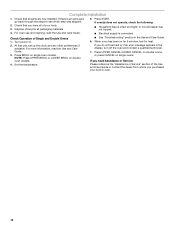
... CANCEL on double ovens, or press CANCEL on double oven models. 4. For oven use , set up the clock and any other preferences if available. NOTE: Press UPPER BROIL or LOWER BROIL on single ovens. Press BROIL on for 5 minutes, feel heat or if an error message appears in the Use and Care Guide. 6. Check Operation of /recycle all packaging materials. 4. Set the temperature. ■ See "Troubleshooting" section in the display, turn off the oven and contact...
... CANCEL on double ovens, or press CANCEL on double oven models. 4. For oven use , set up the clock and any other preferences if available. NOTE: Press UPPER BROIL or LOWER BROIL on single ovens. Press BROIL on for 5 minutes, feel heat or if an error message appears in the Use and Care Guide. 6. Check Operation of /recycle all packaging materials. 4. Set the temperature. ■ See "Troubleshooting" section in the display, turn off the oven and contact...


