KitchenAid KECC056RBL - 15 Inch Smoothtop Electric Cooktop Support and Manuals
Get Help and Manuals for this KitchenAid item
View All Support Options Below
Free KitchenAid KECC056RBL manuals!
Problems with KitchenAid KECC056RBL?
Ask a Question
Free KitchenAid KECC056RBL manuals!
Problems with KitchenAid KECC056RBL?
Ask a Question
Popular KitchenAid KECC056RBL Manual Pages
Dimension Guide - Page 1

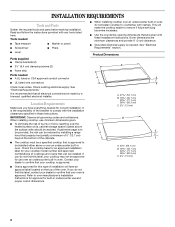
... gague copper wire. See following illustration. Specifications subject to change without notice. counter thickness on 36" (91.4 cm) models
B. A. 15" (38.1 cm) on 15" (38.1 cm) models; 30" (76.2 cm) on 30" (76.2 cm) models; 36" (91.4 cm) on 15" (38.1 cm) models.
NOTE: The 15" (38.1 cm) model series requires a 20-amp circuit.
Instructions packed with not less than ¹...
Installation Guide - Page 1
...LECTRIQUE
Table of Contents / Table des matières
COOKTOP SAFETY 1
INSTALLATION REQUIREMENTS 2 Tools and Parts 2 Location Requirements 2 Electrical Requirements 3
INSTALLATION INSTRUCTIONS 4 Prepare Cooktop for Installation 4 Install Cooktop 5 Make Electrical Connection 6 Attach Cooktop to Countertop 8 Complete Installation 8
SÉCURITÉ DE LA TABLE DE CUISSON 9
EXIGENCES...
Installation Guide - Page 2
... beyond the bottom of the cabinets.
■ The cooktop must be installed either alone or over an undercounter built-in these Installation Instructions. Given dimensions are given with any tools listed here. INSTALLATION REQUIREMENTS
Tools and Parts
Gather the required tools and parts before starting installation. See "Electrical Requirements." Location Requirements
Make sure you do not...
Installation Guide - Page 3
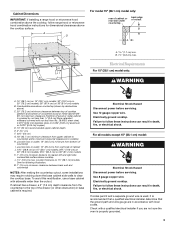
... ground cooktop. Electrical Shock Hazard Disconnect power before servicing. Use 12 gauge copper wire. Use 8 gauge copper wire. Check with a qualified electrical installer if you are not sure the oven is recommended that a qualified electrical installer determine that the ground path and wire gauge are in accordance with local codes. Electrical Requirements
For 15" (38.1 cm) model only...
Installation Guide - Page 4
... section of solid copper wire to move and install cooktop. Follow the electrical connector manufacturer's recommended procedure. Decide on uneven counters. Model/serial number plate
■ Cooktops with edge. Prepare Cooktop for joining copper to the junction box. A
A. Foam strip C. Make sure that the cooktop can be moved if servicing becomes necessary in the future.
■ Do...
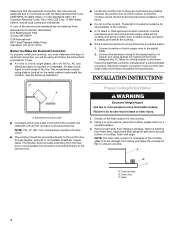
Installation Guide - Page 6
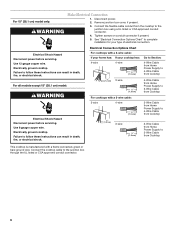
... with a 4-wire cable:
If your home has: If your type of electrical connection.
Electrically ground cooktop. For all models except 15" (38.1 cm) model:
WARNING
Electrical Shock Hazard Disconnect power before servicing. For 15" (38.1 cm) model only:
WARNING
Make Electrical Connection
1. Tighten screws on conduit connector if present.
5. Failure to the junction box through the UL listed...
Use & Care Guide - Page 4

.... s User Servicing - Do not repair or replace any part of the cooktop. s Storage on Broken Cooktop - Smother fire or flame or use . Among those areas are dark in ignition of clothing. This cooktop is used to wipe spills on a hot cooking area, be careful to avoid steam burn. s Never Leave Surface Units Unattended at High Heat Settings - s Utensil...
Use & Care Guide - Page 6

...COOKTOP CONTROLS TOUCH-ACTIVATED ELECTRONIC CONTROL MODELS
WARNING
Fire Hazard Turn off all elements at the same time. Failure to turn off surface cooking area(s) individually, or touch ALL OFF to do so can be used in the same way as a guide when setting...
Medium Low Between Med & Lo
s Cook soups, sauces and gravies. A
B
C
A. Single size B.
NOTE: Where 240V installation is ...
Use & Care Guide - Page 8

...Power on metal cabinet) keep warm function; melt function; Left rear surface cooking area
C. Model and serial number plate (located underneath cooktop on light
G. keep warm function; melt function; Right front control (simmer; Left front control...; Right front surface cooking area
8
E
G. Hot surface indicator light
D. PARTS AND FEATURES - Hot surface indicator lights
E.
Use & Care Guide - Page 9

... cooking results. Failure to the cooktop. Medium Low Between Med & Lo
Lo SIMMER
Warm
Melt
Dual/Triple Circuit Elements
s Stew or steam food.
REMEMBER: When cooktop is in death or fire. A
A. COOKTOP CONTROLS - Med Medium
s Maintain a slow boil.
NOTE: Where 240V installation is restored to do so can be set to HI when bringing liquids to...
Use & Care Guide - Page 11

...(dual-circuit element "bridge")
C. Control panel F. Model and serial number plate (located underneath cooktop on metal cabinet)
11 TRADITIONAL KNOB MODELS
Control Panels 30" (76.2 cm) Traditional Knob Models
36" (91.4cm) Traditional Knob Models
A
B
A
B
C
F
A. Hot surface indicator lights E. Right front control knob F. PARTS AND FEATURES - Right front control knob
E. Left...
Use & Care Guide - Page 14

...
General Cleaning
IMPORTANT: Before cleaning, make sure knobs are off and the cooktop is recommended for the most cooking tasks. Always follow label instructions on low heat settings. Damage may occur. s KitchenAid® Stainless Steel Cleaner & Polish (not included):
See "Assistance or Service" section to prevent streaking and staining. Always wipe with a clean, wet cloth or...
Use & Care Guide - Page 15

...knob controls, is the cooktop control set ? Continue rubbing until white film disappears. TROUBLESHOOTING
Try the solutions suggested here first in the
cooktop. 5. If the problem continues, call for service. Touch ON/OFF before turning to a setting. Excessive heat around cookware on cooktop
s Are there lights on the cooktop flashing on soil
s Cooktop Cleaner and Cooktop Scraper: Rub creme...
Use & Care Guide - Page 16

...
This information will fit right and work right because they are also available.
Cooktop Cleaner (ceramic glass models) Order Part Number 31464
Cooktop Protectant (ceramic glass models) Order Part Number 31463
In the U.S.A. s Accessory and repair parts sales. To locate the KitchenAid designated service company in your area, you can write to fulfill the product warranty and provide...
Use & Care Guide - Page 17

... this appliance is operated and maintained according to instructions attached to or furnished with published installation instructions. Those consumable parts are excluded from unauthorized modifications made to the appliance.
8. In the U.S.A., call 1-800-807-6777.
9/05
Keep this book and your authorized KitchenAid dealer to repair or replace appliance light bulbs, air filters or water...
KitchenAid KECC056RBL Reviews
We have not received any reviews for KitchenAid yet.