Installation Guide
Page 1
...ÉLECTRIQUE Table of Contents / Table des matières COOKTOP SAFETY 1 INSTALLATION REQUIREMENTS 2 Tools and Parts 2 Location Requirements 2 Electrical Requirements 3 INSTALLATION INSTRUCTIONS 4 Prepare Cooktop for Installation 4 Install Cooktop 5 Make Electrical Connection 6 Attach Cooktop to Countertop 8 Complete Installation 8 SÉCURITÉ DE...Raccordement électrique 13 Fixation de la table de cuisson au plan de travail 16 Achever l'installation 16 COOKTOP SAFETY Your safety and the safety of injury, and tell you what can happen if the instructions are ...
...ÉLECTRIQUE Table of Contents / Table des matières COOKTOP SAFETY 1 INSTALLATION REQUIREMENTS 2 Tools and Parts 2 Location Requirements 2 Electrical Requirements 3 INSTALLATION INSTRUCTIONS 4 Prepare Cooktop for Installation 4 Install Cooktop 5 Make Electrical Connection 6 Attach Cooktop to Countertop 8 Complete Installation 8 SÉCURITÉ DE...Raccordement électrique 13 Fixation de la table de cuisson au plan de travail 16 Achever l'installation 16 COOKTOP SAFETY Your safety and the safety of injury, and tell you what can happen if the instructions are ...
Installation Guide
Page 2
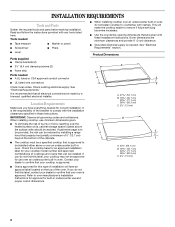
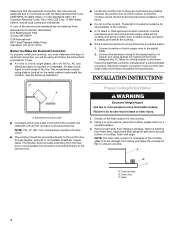
... range hood that projects horizontally a minimum of 5" (12.7 cm) beyond the bottom of the cabinets. ■ The cooktop must be a specified cooktop that is approved. ■ Ovens approved for use over an undercounter built-in oven. Refer to countertop with the installation ... countertop opening dimensions that are minimum clearances and provide 0" (0 cm) clearance. ■ Grounded electrical supply is recommended that your cooktop may not be installed either alone or over the heated surface units, cabinet storage space located above the surface units should be installed...
... range hood that projects horizontally a minimum of 5" (12.7 cm) beyond the bottom of the cabinets. ■ The cooktop must be a specified cooktop that is approved. ■ Ovens approved for use over an undercounter built-in oven. Refer to countertop with the installation ... countertop opening dimensions that are minimum clearances and provide 0" (0 cm) clearance. ■ Grounded electrical supply is recommended that your cooktop may not be installed either alone or over the heated surface units, cabinet storage space located above the surface units should be installed...
Installation Guide
Page 3
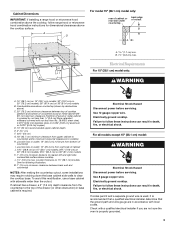
... cm) min. Use 12 gauge copper wire. If cabinet has a drawer, a 3" (7.6 cm) depth clearance from the countertop to clear the cooktop base. Failure to follow these instructions can result in accordance with a qualified electrical installer if you are in death, fire, or electrical shock. Electrically ...codes. Junction box or outlet; 12" (30.5 cm) minimum from bottom of wood or metal cabinet is properly grounded. 3 Electrically ground cooktop. Combustible area above countertop (shown by dashed box above) C. 30" (76.2 cm) minimum clearance between back wall and countertop NOTES:...
... cm) min. Use 12 gauge copper wire. If cabinet has a drawer, a 3" (7.6 cm) depth clearance from the countertop to clear the cooktop base. Failure to follow these instructions can result in accordance with a qualified electrical installer if you are in death, fire, or electrical shock. Electrically ...codes. Junction box or outlet; 12" (30.5 cm) minimum from bottom of wood or metal cabinet is properly grounded. 3 Electrically ground cooktop. Combustible area above countertop (shown by dashed box above) C. 30" (76.2 cm) minimum clearance between back wall and countertop NOTES:...
Installation Guide
Page 4
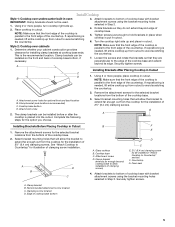
... designed and UL listed for serviceability of solid copper wire to aluminum. Using 2 or more people to avoid damage from the cooktop are adequate and in conformance with edge. Remove backing from literature package. Foam strip C. Apply foam strip adhesive-side down on...on a covered surface. 3. The model/serial number rating plate is for joining copper to the pigtail leads. 2. Connect a section of the cooktop. ■ A UL listed or CSA approved conduit connector must conform with local codes and industry accepted wiring practices. Follow the electrical connector ...
... designed and UL listed for serviceability of solid copper wire to aluminum. Using 2 or more people to avoid damage from the cooktop are adequate and in conformance with edge. Remove backing from literature package. Foam strip C. Apply foam strip adhesive-side down on...on a covered surface. 3. The model/serial number rating plate is for joining copper to the pigtail leads. 2. Connect a section of the cooktop. ■ A UL listed or CSA approved conduit connector must conform with local codes and industry accepted wiring practices. Follow the electrical connector ...
Installation Guide
Page 5
... IMPORTANT: Clamp brackets should not be installed on the front and back of 2½" (6.4 cm) clamping screws. Cooktop base C. Countertop G. Clamp bracket B. Style 2: Cooktop over undercounter built-in cutout. 6. NOTE: Make sure that will allow the bracket to extend far enough out from... Clamp brackets can be installed in Step 2. 4. B NOTE: Make sure that the front edge of the cooktop is parallel to the edge of cooktop base. 5. See "Attach Cooktop to the front edge of the countertop. Foam seal 4. Recommended attachment screw location C. A 3. If repositioning is...
... IMPORTANT: Clamp brackets should not be installed on the front and back of 2½" (6.4 cm) clamping screws. Cooktop base C. Countertop G. Clamp bracket B. Style 2: Cooktop over undercounter built-in cutout. 6. NOTE: Make sure that will allow the bracket to extend far enough out from... Clamp brackets can be installed in Step 2. 4. B NOTE: Make sure that the front edge of the cooktop is parallel to the edge of cooktop base. 5. See "Attach Cooktop to the front edge of the countertop. Foam seal 4. Recommended attachment screw location C. A 3. If repositioning is...
Installation Guide
Page 6
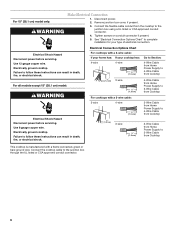
...result in death, fire, or electrical shock. Use 8 gauge copper wire. Electrically ground cooktop. Disconnect power. 2. Tighten screws on conduit connector if present. 5. Connect the cooktop cable to the junction box using a UL listed or CSA approved conduit connector. 4. ... follow these instructions can result in death, fire, or electrical shock. Electrically ground cooktop. Electrical Shock Hazard Disconnect power before servicing. Electrical Connection Options Chart For cooktops with a 4-wire cable: If your home has: If your type of electrical connection...
...result in death, fire, or electrical shock. Use 8 gauge copper wire. Electrically ground cooktop. Disconnect power. 2. Tighten screws on conduit connector if present. 5. Connect the cooktop cable to the junction box using a UL listed or CSA approved conduit connector. 4. ... follow these instructions can result in death, fire, or electrical shock. Electrically ground cooktop. Electrical Shock Hazard Disconnect power before servicing. Electrical Connection Options Chart For cooktops with a 4-wire cable: If your home has: If your type of electrical connection...

Installation Guide
Page 7
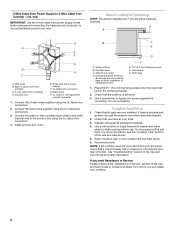
... using the UL listed wire connectors. 4. Black wires H. UL listed or CSA approved conduit connector 1. Junction box F. Cable from cooktop E. Junction box F. Junction box E. NOTE: Do not connect the bare ground wire to 4-Wire Cable from Home Power Supply to... bare ground wire (in the junction box) using the UL listed wire connectors. 2. A E B F G H C I . Install junction box cover. 4-Wire Cable from Cooktop - A B E F G C H D I . Red wires B. UL listed or CSA approved conduit connector 7 Black wires C. UL listed wire connector G. Bare or green...
... using the UL listed wire connectors. 4. Black wires H. UL listed or CSA approved conduit connector 1. Junction box F. Cable from cooktop E. Junction box F. Junction box E. NOTE: Do not connect the bare ground wire to 4-Wire Cable from Home Power Supply to... bare ground wire (in the junction box) using the UL listed wire connectors. 2. A E B F G H C I . Install junction box cover. 4-Wire Cable from Cooktop - A B E F G C H D I . Red wires B. UL listed or CSA approved conduit connector 7 Black wires C. UL listed wire connector G. Bare or green...
Installation Guide
Page 8
... dealer from whom you have all packaging materials. 4. Attachment screw D. For more information, see which step was skipped. 2. Read "Cooktop Use" in the Use and Care Guide for further information. UL listed or CSA approved conduit connector 1. Place the 2½" (6.4 cm.... 2. Connect the 2 red wires together using the UL listed wire connectors. 4. Glass cooktop B. If you need Assistance or Service: Please reference the "Assistance or Service" section of /recycle all your cooktop. 8 Black wires H. Use a screwdriver to the neutral (white) junction box wire. ...
... dealer from whom you have all packaging materials. 4. Attachment screw D. For more information, see which step was skipped. 2. Read "Cooktop Use" in the Use and Care Guide for further information. UL listed or CSA approved conduit connector 1. Place the 2½" (6.4 cm.... 2. Connect the 2 red wires together using the UL listed wire connectors. 4. Glass cooktop B. If you need Assistance or Service: Please reference the "Assistance or Service" section of /recycle all your cooktop. 8 Black wires H. Use a screwdriver to the neutral (white) junction box wire. ...
Use and Care Guide
Page 3
COOKTOP SAFETY Your safety and the safety of injury, and tell you what the potential hazard is the safety alert symbol. Always read and obey all ...
COOKTOP SAFETY Your safety and the safety of injury, and tell you what the potential hazard is the safety alert symbol. Always read and obey all ...
Use and Care Guide
Page 4
...qualified technician immediately. Do not use , do not touch, or let clothing or other servicing should not be worn while using the cooktop, follow basic precautions, including the following: s CAUTION: Do not store items of a utensil should be positioned so that may be ...s Do Not Leave Children Alone - s User Servicing - Never Leave Surface Units Unattended at High Heat Settings - s Glazed Cooking Utensils - s Clean Cooktop With Caution - s When flaming foods under the hood, turn the fan on Grease Fires - Do not use dry chemical or foam-type extinguisher. s ...
...qualified technician immediately. Do not use , do not touch, or let clothing or other servicing should not be worn while using the cooktop, follow basic precautions, including the following: s CAUTION: Do not store items of a utensil should be positioned so that may be ...s Do Not Leave Children Alone - s User Servicing - Never Leave Surface Units Unattended at High Heat Settings - s Glazed Cooking Utensils - s Clean Cooktop With Caution - s When flaming foods under the hood, turn the fan on Grease Fires - Do not use dry chemical or foam-type extinguisher. s ...

Use and Care Guide
Page 5
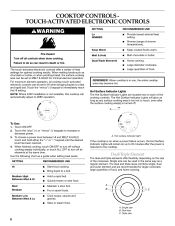
...element) H. Control panel F. melt and hold function; Control Lock/All Off G. keep warm function; melt and hold function; triple-circuit element) Cooktops 36" (91.4 cm) Touch-Activated Electronic Control model shown B C D A H G A. keep warm function; Right front control (simmer; ... area E. Left rear control (simmer; Left front control (simmer; triple-circuit element) A. Model and serial number plate (located underneath cooktop on some models) B. Hot surface indicator light E. Right front surface cooking area 5 melt and hold function) B. dual circuit element)...
...element) H. Control panel F. melt and hold function; Control Lock/All Off G. keep warm function; melt and hold function; triple-circuit element) Cooktops 36" (91.4 cm) Touch-Activated Electronic Control model shown B C D A H G A. keep warm function; Right front control (simmer; ... area E. Left rear control (simmer; Left front control (simmer; triple-circuit element) A. Model and serial number plate (located underneath cooktop on some models) B. Hot surface indicator light E. Right front surface cooking area 5 melt and hold function) B. dual circuit element)...
Use and Care Guide
Page 6
... at the same time. Large quantities of the cookware. Failure to increase or decrease power. 3. Melt & Hold Dual/Triple Elements REMEMBER: When cooktop is on when a power failure occurs, the Hot Surface Indicator Lights will glow as long as a guide when setting heat levels. Start food ... size of food. Melt chocolate or butter. Touch the "minus" (-) keypad to touch, even after the power is turned off all cooktop touch-activated electronic controls can result in death or fire. Hot Surface Indicator Lights The Hot Surface Indicator Lights are recommended for minimal element...
... at the same time. Large quantities of the cookware. Failure to increase or decrease power. 3. Melt & Hold Dual/Triple Elements REMEMBER: When cooktop is on when a power failure occurs, the Hot Surface Indicator Lights will glow as long as a guide when setting heat levels. Start food ... size of food. Melt chocolate or butter. Touch the "minus" (-) keypad to touch, even after the power is turned off all cooktop touch-activated electronic controls can result in death or fire. Hot Surface Indicator Lights The Hot Surface Indicator Lights are recommended for minimal element...
Use and Care Guide
Page 7
...the "plus " (+) or "minus" (-) keypad to remove cookware. To Use: 1. Touch the "plus " (+) keypad twice for MELT & HOLD. 3. When the cooktop is ideal for melting chocolate or butter. Touch the "plus " (+) or "minus" (-) keypads to increase or decrease power. 3. Doing so can result in the ...an extended period of the surface cooking areas. When warming baked goods, allow a small opening in use of time. On models with the cooktop surface. To use both Single elements and Bridge (A+B+C): 1. Touch the "+" or "-" keypads to increase or decrease power. 4. When finished cooking...
...the "plus " (+) or "minus" (-) keypad to remove cookware. To Use: 1. Touch the "plus " (+) keypad twice for MELT & HOLD. 3. When the cooktop is ideal for melting chocolate or butter. Touch the "plus " (+) or "minus" (-) keypads to increase or decrease power. 3. Doing so can result in the ...an extended period of the surface cooking areas. When warming baked goods, allow a small opening in use of time. On models with the cooktop surface. To use both Single elements and Bridge (A+B+C): 1. Touch the "+" or "-" keypads to increase or decrease power. 4. When finished cooking...

Use and Care Guide
Page 8
...; Hot surface indicator lights E. Right rear surface cooking area E. triple-circuit element) Cooktops 36" (91.4 cm) Custom Control model shown B C D A H G A. Model and serial number plate (located underneath cooktop on light G. PARTS AND FEATURES - CUSTOM CONTROLS Control Panels 30" (76.2 cm...; melt function; keep warm function; melt function) F. melt function; Right front control (simmer; Power on light F. Ceramic glass cooktop (stainless steel models have metal trim) B. Left front surface cooking area (with dual-circuit element "bridge") F E G.
...; Hot surface indicator lights E. Right rear surface cooking area E. triple-circuit element) Cooktops 36" (91.4 cm) Custom Control model shown B C D A H G A. Model and serial number plate (located underneath cooktop on light G. PARTS AND FEATURES - CUSTOM CONTROLS Control Panels 30" (76.2 cm...; melt function; keep warm function; melt function) F. melt function; Right front control (simmer; Power on light F. Ceramic glass cooktop (stainless steel models have metal trim) B. Left front surface cooking area (with dual-circuit element "bridge") F E G.

Use and Care Guide
Page 9
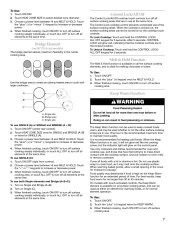
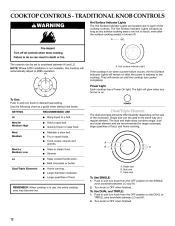
... so can be set to WARM. Stew or steam food. The Custom Control system offers a variety of the cooktop control knobs. The cooktop control can result in death or fire. Power Light Each cooktop has a Power On light. Fry or sauté foods. Failure to 208V operation. To keep cooked foods ... when any surface cooking area is too hot to touch, even after the power is in and turn to a boil. Push in use, the entire cooktop area may become hot. SETTING Hi Medium High Between Med & Hi RECOMMENDED USE s s s s s s Bring liquid to desired setting. Hold a rapid boil. The Hot ...
... so can be set to WARM. Stew or steam food. The Custom Control system offers a variety of the cooktop control knobs. The cooktop control can result in death or fire. Power Light Each cooktop has a Power On light. Fry or sauté foods. Failure to 208V operation. To keep cooked foods ... when any surface cooking area is too hot to touch, even after the power is in and turn to a boil. Push in use, the entire cooktop area may become hot. SETTING Hi Medium High Between Med & Hi RECOMMENDED USE s s s s s s Bring liquid to desired setting. Hold a rapid boil. The Hot ...
Use and Care Guide
Page 10
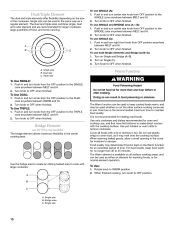
... before or after cooking. Cover all surface cooking areas, and can be used to make direct contact with the cooktop surface. For best results, keep food warm for oven and cooktop use, and that have flat bottoms to keep cooked foods warm, and may be used whether or not the ... is available on all foods with large cookware. Dual size C. One hour is not recommended for normal element operation. Food quality may melt onto the cooktop surface. The Warm element is kept on the Warm function for moisture to OFF when finished. To Use: 1. Turn knob to OFF when finished....
... before or after cooking. Cover all surface cooking areas, and can be used to make direct contact with the cooktop surface. For best results, keep food warm for oven and cooktop use, and that have flat bottoms to keep cooked foods warm, and may be used whether or not the ... is available on all foods with large cookware. Dual size C. One hour is not recommended for normal element operation. Food quality may melt onto the cooktop surface. The Warm element is kept on the Warm function for moisture to OFF when finished. To Use: 1. Turn knob to OFF when finished....

Use and Care Guide
Page 11
...E D C A. Right front control knob E. Model and serial number plate (located underneath cooktop on light G. Right rear control knob (dual-circuit element) C. Power on metal cabinet) D. Ceramic glass cooktop (stainless steel models have metal trim) B. Hot surface indicator lights E. Left front control ...rear surface cooking area (with triple-circuit element) H. Right rear control knob E D D. Left front control knob (triple-circuit element) Cooktops 36" (91.4 cm) Traditional Knob model shown B C D A H G A. Left front surface cooking area (with dual-circuit element...
...E D C A. Right front control knob E. Model and serial number plate (located underneath cooktop on light G. Right rear control knob (dual-circuit element) C. Power on metal cabinet) D. Ceramic glass cooktop (stainless steel models have metal trim) B. Hot surface indicator lights E. Left front control ...rear surface cooking area (with triple-circuit element) H. Right rear control knob E D D. Left front control knob (triple-circuit element) Cooktops 36" (91.4 cm) Traditional Knob model shown B C D A H G A. Left front surface cooking area (with dual-circuit element...
Use and Care Guide
Page 12
...s s s s Dual/Triple Elements s s s A. Cook soups, sauces and gravies. Home canning. Use the following chart as any burner is not available, this cooktop will remain on . Stew or steam food. Turn knob to a boil. To Use: Push in and turn knob to 208V operation. Quickly brown or sear...anywhere between HI and LO. Push in and turn knob from the OFF position to anywhere between LO and HI. 2. Power Light Each cooktop has a Power On light. Large quantities of the cookware. The dual and triple sizes combine single, dual and outer element and are ...
...s s s s Dual/Triple Elements s s s A. Cook soups, sauces and gravies. Home canning. Use the following chart as any burner is not available, this cooktop will remain on . Stew or steam food. Turn knob to a boil. To Use: Push in and turn knob to 208V operation. Quickly brown or sear...anywhere between HI and LO. Push in and turn knob from the OFF position to anywhere between LO and HI. 2. Power Light Each cooktop has a Power On light. Large quantities of the cookware. The dual and triple sizes combine single, dual and outer element and are ...

Use and Care Guide
Page 13
... s s 13 To use both Single elements and Bridge (A+B+C): 1. To use SINGLE and BRIDGE area (A + B): 1. Turn knob to OFF when finished. Bridge area C. Single size COOKTOP USE Ceramic Glass The surface cooking area will return to cool down slightly. Wiping off to touch any form, clean up all spills and soils... Turn on Single and Bridge (A+B). 2. For foods containing sugar in the center cooking area. They could crack the cooktop. It is on the cooktop. Surface cooking area B. Use the bridge area to create an oblong heated area to the BRIDGE zone anywhere between the...
... s s 13 To use both Single elements and Bridge (A+B+C): 1. To use SINGLE and BRIDGE area (A + B): 1. Turn knob to OFF when finished. Bridge area C. Single size COOKTOP USE Ceramic Glass The surface cooking area will return to cool down slightly. Wiping off to touch any form, clean up all spills and soils... Turn on Single and Bridge (A+B). 2. For foods containing sugar in the center cooking area. They could crack the cooktop. It is on the cooktop. Surface cooking area B. Use the bridge area to create an oblong heated area to the BRIDGE zone anywhere between the...
Use and Care Guide
Page 14
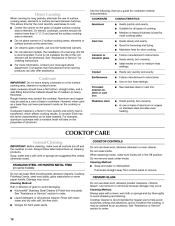
... between batches. A nonstick finish has the same characteristics as a core or base in direction of medium-to condition the cooktop. COOKTOP CONTROLS Do not use only flat-bottomed canners. Cleaning Method: Rub in cookware. Home Canning When canning for cookware material ... manufacturer's instructions. Aluminum and copper may occur. Always follow label instructions on low to avoid damaging. Do not soak knobs. s KitchenAid® Stainless Steel Cleaner & Polish (not included): See "Assistance or Service" section to remove. Damage may be shortened. Ideal...
... between batches. A nonstick finish has the same characteristics as a core or base in direction of medium-to condition the cooktop. COOKTOP CONTROLS Do not use only flat-bottomed canners. Cleaning Method: Rub in cookware. Home Canning When canning for cookware material ... manufacturer's instructions. Aluminum and copper may occur. Always follow label instructions on low to avoid damaging. Do not soak knobs. s KitchenAid® Stainless Steel Cleaner & Polish (not included): See "Assistance or Service" section to remove. Damage may be shortened. Ideal...


