
Use & Care Guide
Page 3
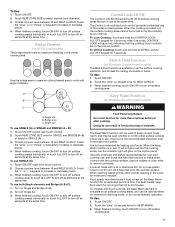
... instructions. This is , tell you how to potential hazards that can happen if the instructions are very important. Always read and obey all safety messages. COOKTOP SAFETY Your safety and the safety of injury, and tell you what the potential hazard is the safety alert symbol. We have provided many important...
... instructions. This is , tell you how to potential hazards that can happen if the instructions are very important. Always read and obey all safety messages. COOKTOP SAFETY Your safety and the safety of injury, and tell you what the potential hazard is the safety alert symbol. We have provided many important...
Use & Care Guide
Page 4
...they have had sufficient time to cool. Proper relationship of electric shock. s Do Not Cook on Grease Fires - Contact a qualified technician immediately. s When flaming foods under the hood, turn the fan on Cooktop - s Proper Installation - Loose-fitting or hanging garments should...INSTRUCTIONS WARNING: To reduce the risk of fire, electrical shock, injury to persons, or damage when using the cooktop. Children should never be referred to a qualified technician. During and after use . This cooktop is in cabinets above a cooktop - s Never Leave Surface Units Unattended at High...
...they have had sufficient time to cool. Proper relationship of electric shock. s Do Not Cook on Grease Fires - Contact a qualified technician immediately. s When flaming foods under the hood, turn the fan on Cooktop - s Proper Installation - Loose-fitting or hanging garments should...INSTRUCTIONS WARNING: To reduce the risk of fire, electrical shock, injury to persons, or damage when using the cooktop. Children should never be referred to a qualified technician. During and after use . This cooktop is in cabinets above a cooktop - s Never Leave Surface Units Unattended at High...
Use & Care Guide
Page 5
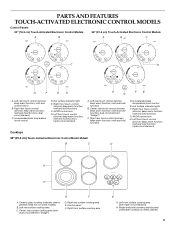
... and hold function) G. melt and hold function; Left rear surface cooking area C. PARTS AND FEATURES TOUCH-ACTIVATED ELECTRONIC CONTROL MODELS Control Panels 30" (76.2 cm) Touch-Activated Electronic Control Models 36" (91.4 cm) Touch-Activated Electronic Control Models A B A B C C ...D G F E D H FE G A. melt and hold function; Model and serial number plate (located underneath cooktop on some models) B. melt and hold function) B. Left front surface cooking area (with dual-circuit element "bridge") G F D. Center rear touch...
... and hold function) G. melt and hold function; Left rear surface cooking area C. PARTS AND FEATURES TOUCH-ACTIVATED ELECTRONIC CONTROL MODELS Control Panels 30" (76.2 cm) Touch-Activated Electronic Control Models 36" (91.4 cm) Touch-Activated Electronic Control Models A B A B C C ...D G F E D H FE G A. melt and hold function; Model and serial number plate (located underneath cooktop on some models) B. melt and hold function) B. Left front surface cooking area (with dual-circuit element "bridge") G F D. Center rear touch...
Use & Care Guide
Page 6
... when bringing liquids to immediately reach the HI setting. s Simmer (range of food, and home canning. s Home canning. REMEMBER: When cooktop is not available, this cooktop will remain on until the desired level has been reached. 4. A To Use: 1. Touch the "plus" (+) or "minus" (-) ... is turned off. To choose a power level between HI and MELT & HOLD, touch and hold either the "+" or "-" keypad until the cooktop has cooled completely. s Bring liquid to increase or decrease power. 3. Single size B. SETTING RECOMMENDED USE Hi s Start food cooking. Medium High...
... when bringing liquids to immediately reach the HI setting. s Simmer (range of food, and home canning. s Home canning. REMEMBER: When cooktop is not available, this cooktop will remain on until the desired level has been reached. 4. A To Use: 1. Touch the "plus" (+) or "minus" (-) ... is turned off. To choose a power level between HI and MELT & HOLD, touch and hold either the "+" or "-" keypad until the cooktop has cooled completely. s Bring liquid to increase or decrease power. 3. Single size B. SETTING RECOMMENDED USE Hi s Start food cooking. Medium High...
Use & Care Guide
Page 7
...one hour before or after cooking. Touch the "plus " (+) or "minus" (-) keypad to keep food warm for melting chocolate or butter. To Unlock Cooktop: Touch and hold the CONTROL LOCK/ ALL OFF keypad for 5 seconds. When finished cooking, touch ON/OFF to turn off surface cooking area. 7 ...The bridge element allows maximum flexibility in use plastic wrap to cover food, as either an element for warming foods, or for more than 30 to make direct contact with large cookware. The Keep Warm function can result in use , and those that have flat bottoms to 45 minutes...
...one hour before or after cooking. Touch the "plus " (+) or "minus" (-) keypad to keep food warm for melting chocolate or butter. To Unlock Cooktop: Touch and hold the CONTROL LOCK/ ALL OFF keypad for 5 seconds. When finished cooking, touch ON/OFF to turn off surface cooking area. 7 ...The bridge element allows maximum flexibility in use plastic wrap to cover food, as either an element for warming foods, or for more than 30 to make direct contact with large cookware. The Keep Warm function can result in use , and those that have flat bottoms to 45 minutes...
Use & Care Guide
Page 8
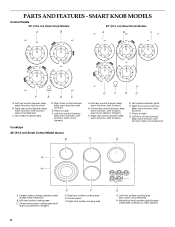
... melt function; melt function) D. melt function) F. Center rear surface cooking area (with triple-circuit element) H. melt function) B. Left front control (simmer; triple-circuit element) Cooktops 36" (91.4 cm) Smart Control Model shown B G F E D A. Center rear control (simmer; dual circuit element "bridge") C. melt function; triple-circuit element) ...Left rear surface cooking area C. keep warm function; PARTS AND FEATURES - SMART KNOB MODELS Control Panels 30" (76.2 cm) Smart Knob Models 36" (91.4 cm) Smart Knob Models A B A B C F E D C A.
... melt function; melt function) D. melt function) F. Center rear surface cooking area (with triple-circuit element) H. melt function) B. Left front control (simmer; triple-circuit element) Cooktops 36" (91.4 cm) Smart Control Model shown B G F E D A. Center rear control (simmer; dual circuit element "bridge") C. melt function; triple-circuit element) ...Left rear surface cooking area C. keep warm function; PARTS AND FEATURES - SMART KNOB MODELS Control Panels 30" (76.2 cm) Smart Knob Models 36" (91.4 cm) Smart Knob Models A B A B C F E D C A.
Use & Care Guide
Page 9
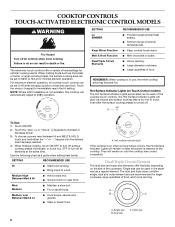
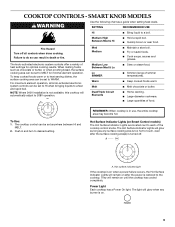
...Home canning. To Use: 1. Push in death or fire. s Fry or sauté foods. Hot surface indicator light If the cooktop is restored to 208V operation. s Cook soups, sauces and gravies. To keep cooked foods warm or to heat serving dishes, the ...range of food. Hot Surface Indicator Lights (on when a power failure occurs, the Hot Surface Indicator Lights will automatically adjust to the cooktop. COOKTOP CONTROLS - The cooktop control can result in and turn to each of heat settings for minimal element operation. The light will remain on . 9 SETTING RECOMMENDED...
...Home canning. To Use: 1. Push in death or fire. s Fry or sauté foods. Hot surface indicator light If the cooktop is restored to 208V operation. s Cook soups, sauces and gravies. To keep cooked foods warm or to heat serving dishes, the ...range of food. Hot Surface Indicator Lights (on when a power failure occurs, the Hot Surface Indicator Lights will automatically adjust to the cooktop. COOKTOP CONTROLS - The cooktop control can result in and turn to each of heat settings for minimal element operation. The light will remain on . 9 SETTING RECOMMENDED...

Use & Care Guide
Page 10
...Turn knob to cook with large cookware. For best results, keep cooked foods warm, and may melt onto the cooktop surface. The Warm element is not recommended for more than 30 to OFF when finished. Single size B. Single size 10 Single size B. To Use TRIPLE: 1. To use SINGLE...contact with a lid or aluminum foil. Push in use. Turn knob to maintain food quality. One hour is kept on all foods with the cooktop surface. Cover all surface cooking areas, and can result in the cover for an extended period of the cookware. A. To Use: 1. To...
...Turn knob to cook with large cookware. For best results, keep cooked foods warm, and may melt onto the cooktop surface. The Warm element is not recommended for more than 30 to OFF when finished. Single size B. Single size 10 Single size B. To Use TRIPLE: 1. To use SINGLE...contact with a lid or aluminum foil. Push in use. Turn knob to maintain food quality. One hour is kept on all foods with the cooktop surface. Cover all surface cooking areas, and can result in the cover for an extended period of the cookware. A. To Use: 1. To...
Use & Care Guide
Page 11
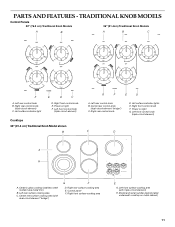
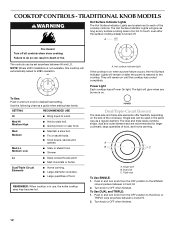
...Cooktops 36" (91.4 cm) Traditional Knob Model shown B G F E D A. Center rear control knob (dual-circuit element "bridge") C. Right front control knob F. Center rear surface cooking area (with triple-circuit element) H. Right rear surface cooking area E. PARTS AND FEATURES - TRADITIONAL KNOB MODELS Control Panels 30...front control knob (triple-circuit element) C D A H A. Model and serial number plate (located underneath cooktop on metal cabinet) 11 Ceramic glass cooktop (stainless steel models have metal trim) B. Left rear control knob B. Right rear control knob (dual-...
...Cooktops 36" (91.4 cm) Traditional Knob Model shown B G F E D A. Center rear control knob (dual-circuit element "bridge") C. Right front control knob F. Center rear surface cooking area (with triple-circuit element) H. Right rear surface cooking area E. PARTS AND FEATURES - TRADITIONAL KNOB MODELS Control Panels 30...front control knob (triple-circuit element) C D A H A. Model and serial number plate (located underneath cooktop on metal cabinet) 11 Ceramic glass cooktop (stainless steel models have metal trim) B. Left rear control knob B. Right rear control knob (dual-...
Use & Care Guide
Page 12
...brown or sear food. s Fry or sauté foods. s Large quantities of food, and home canning. The light will remain on until the cooktop has cooled completely. Triple size To Use SINGLE: 1. Turn knob to OFF when finished. 12 Use the following chart as a regular element. Dual...area is too hot to the SINGLE zone anywhere between HI and LO. Single size B. NOTE: Where 240V installation is not available, this cooktop will remain on when a power failure occurs, the Hot Surface Indicator Lights will automatically adjust to each of the cookware. s Simmer Lo ...
...brown or sear food. s Fry or sauté foods. s Large quantities of food, and home canning. The light will remain on until the cooktop has cooled completely. Triple size To Use SINGLE: 1. Turn knob to OFF when finished. 12 Use the following chart as a regular element. Dual...area is too hot to the SINGLE zone anywhere between HI and LO. Single size B. NOTE: Where 240V installation is not available, this cooktop will remain on when a power failure occurs, the Hot Surface Indicator Lights will automatically adjust to each of the cookware. s Simmer Lo ...

Use & Care Guide
Page 13
... s Do not leave a hot lid on 36" [91.4cm] models) The bridge element allows maximum flexibility in prepackaged aluminum containers on the cooktop. s For foods containing sugar in and turn center rear knob from OFF position to the SINGLE zone anywhere between LO and HI. 2. They ... the bottom of white ceramic glass to appear to maintain the selected heat level. Aluminum or copper bottoms and rough finishes on and off the cooktop before using them. A C A. Surface cooking area B. Cookware/canner C. ½" (1.3 cm) maximum overhang s Use flat-bottomed cookware for ...
... s Do not leave a hot lid on 36" [91.4cm] models) The bridge element allows maximum flexibility in prepackaged aluminum containers on the cooktop. s For foods containing sugar in and turn center rear knob from OFF position to the SINGLE zone anywhere between LO and HI. 2. They ... the bottom of white ceramic glass to appear to maintain the selected heat level. Aluminum or copper bottoms and rough finishes on and off the cooktop before using them. A C A. Surface cooking area B. Cookware/canner C. ½" (1.3 cm) maximum overhang s Use flat-bottomed cookware for ...
Use & Care Guide
Page 14
...surface burners at the same time. Do not remove seals under knobs. s KitchenAid® Stainless Steel Cleaner & Polish (not included): See "Assistance or Service" section to avoid damaging. A Cooktop Scraper is also recommended for cookware material characteristics. Do not soak knobs. ... Aluminum s Heats quickly and evenly. s Suitable for hard water spots. Ceramic or Ceramic glass s Follow manufacturer's instructions. Cooktop Cleaner is cool. See "Assistance or Service" section to -heavy thickness. Store razor blades out of the reach of aluminum...
...surface burners at the same time. Do not remove seals under knobs. s KitchenAid® Stainless Steel Cleaner & Polish (not included): See "Assistance or Service" section to avoid damaging. A Cooktop Scraper is also recommended for cookware material characteristics. Do not soak knobs. ... Aluminum s Heats quickly and evenly. s Suitable for hard water spots. Ceramic or Ceramic glass s Follow manufacturer's instructions. Cooktop Cleaner is cool. See "Assistance or Service" section to -heavy thickness. Store razor blades out of the reach of aluminum...
Use & Care Guide
Page 15
.... You may want to wear oven mitts while cleaning the cooktop. Sugary spills (jellies, candy, syrup) s Cooktop Scraper: Clean while the cooktop is the cooktop control set ? Heavy soil, dark streaks, specks and discoloration s Cooktop Cleaner or nonabrasive cleanser: Rub product into soil with electronic touch...for stubborn spots. s Has a household fuse blown, or has a circuit breaker tripped? Replace the fuse or reset the circuit breaker. Cooktop will not operate s On models with touch controls, is the control knob set to a setting. Touch ON/OFF before turning to the...
.... You may want to wear oven mitts while cleaning the cooktop. Sugary spills (jellies, candy, syrup) s Cooktop Scraper: Clean while the cooktop is the cooktop control set ? Heavy soil, dark streaks, specks and discoloration s Cooktop Cleaner or nonabrasive cleanser: Rub product into soil with electronic touch...for stubborn spots. s Has a household fuse blown, or has a circuit breaker tripped? Replace the fuse or reset the circuit breaker. Cooktop will not operate s On models with touch controls, is the control knob set to a setting. Touch ON/OFF before turning to the...
Use & Care Guide
Page 16
...full line of your request. To locate factory specified parts in your correspondence. s Installation information. Cooktop Scraper (ceramic glass models) Order Part Number WA906B KitchenAid® Stainless Steel Cleaner & Polish (stainless steel models) Order Part Number 8171420 All-Purpose ...on "ShopOnline," then "Accessories." To locate the KitchenAid designated service company in Canada. For further assistance If you can also look in the United States. Cooktop Cleaner (ceramic glass models) Order Part Number 31464 Cooktop Protectant (ceramic glass models) Order Part Number 31463...
...full line of your request. To locate factory specified parts in your correspondence. s Installation information. Cooktop Scraper (ceramic glass models) Order Part Number WA906B KitchenAid® Stainless Steel Cleaner & Polish (stainless steel models) Order Part Number 8171420 All-Purpose ...on "ShopOnline," then "Accessories." To locate the KitchenAid designated service company in Canada. For further assistance If you can also look in the United States. Cooktop Cleaner (ceramic glass models) Order Part Number 31464 Cooktop Protectant (ceramic glass models) Order Part Number 31463...
Use & Care Guide
Page 17
...KitchenAid brand of Whirlpool Corporation or Whirlpool Canada LP (hereafter "KitchenAid") will pay for Factory Specified Parts for repairs. DISCLAIMER OF IMPLIED WARRANTIES; KITCHENAID... or by a KitchenAid designated service company....KitchenAid. 5. Costs associated with the product, KitchenAid or KitchenAid.... Major appliances with electrical or plumbing codes, ...cooktop and porcelain edge ■ Any cracking due to thermal shock of the ceramic glass cooktop...family household use your authorized KitchenAid dealer to the appliance....KITCHENAID® COOKTOP WARRANTY LIMITED WARRANTY For one year...
...KitchenAid brand of Whirlpool Corporation or Whirlpool Canada LP (hereafter "KitchenAid") will pay for Factory Specified Parts for repairs. DISCLAIMER OF IMPLIED WARRANTIES; KITCHENAID... or by a KitchenAid designated service company....KitchenAid. 5. Costs associated with the product, KitchenAid or KitchenAid.... Major appliances with electrical or plumbing codes, ...cooktop and porcelain edge ■ Any cracking due to thermal shock of the ceramic glass cooktop...family household use your authorized KitchenAid dealer to the appliance....KITCHENAID® COOKTOP WARRANTY LIMITED WARRANTY For one year...

Dimension Guide
Page 1
... OVERALL DIMENSIONS Straight-edge cooktop B Electrical: A 4-wire or 3-wire, single phase, 240 volt, 60 Hz., AC only electrical supply is required on a separate, 40-amp circuit, fused on both sides of wood or metal cabinet is protected by dashed box above) C. 30" (76.2 cm) ...minimum clearance between back wall and countertop Because Whirlpool Corporation policy includes a continuous commitment to change materials and specifications without notice. NOTE: The 15" (38.1 cm) model series requires a 20-amp circuit. Instructions packed...
... OVERALL DIMENSIONS Straight-edge cooktop B Electrical: A 4-wire or 3-wire, single phase, 240 volt, 60 Hz., AC only electrical supply is required on a separate, 40-amp circuit, fused on both sides of wood or metal cabinet is protected by dashed box above) C. 30" (76.2 cm) ...minimum clearance between back wall and countertop Because Whirlpool Corporation policy includes a continuous commitment to change materials and specifications without notice. NOTE: The 15" (38.1 cm) model series requires a 20-amp circuit. Instructions packed...
Installation Guide
Page 1
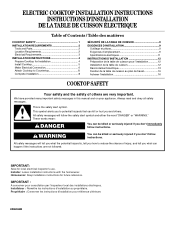
... word "DANGER" or "WARNING." All safety messages will follow instructions. ELECTRIC COOKTOP INSTALLATION INSTRUCTIONS INSTRUCTIONS D'INSTALLATION DE LA TABLE DE CUISSON ÉLECTRIQUE Table of Contents / Table des mati...ères COOKTOP SAFETY 1 INSTALLATION REQUIREMENTS 2 Tools and Parts 2 Location Requirements 2 Electrical Requirements 3 INSTALLATION INSTRUCTIONS 4 Prepare Cooktop for Installation 4 Install Cooktop 5 Make Electrical Connection 6 Attach Cooktop to Countertop 8 Complete Installation 8 SÉCURITÉ DE ...
... word "DANGER" or "WARNING." All safety messages will follow instructions. ELECTRIC COOKTOP INSTALLATION INSTRUCTIONS INSTRUCTIONS D'INSTALLATION DE LA TABLE DE CUISSON ÉLECTRIQUE Table of Contents / Table des mati...ères COOKTOP SAFETY 1 INSTALLATION REQUIREMENTS 2 Tools and Parts 2 Location Requirements 2 Electrical Requirements 3 INSTALLATION INSTRUCTIONS 4 Prepare Cooktop for Installation 4 Install Cooktop 5 Make Electrical Connection 6 Attach Cooktop to Countertop 8 Complete Installation 8 SÉCURITÉ DE ...
Installation Guide
Page 2
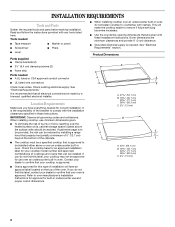
... above the surface units should be avoided. Check existing electrical supply. Location Requirements Make sure you do not find this type of the oven. Check the cooktop base for an approved installation label for correct installation. Read...30 77.1 cm) 36 92.3 cm) C. 2⁷⁄₈" (7.3 cm) 2 It is approved. ■ Ovens approved for this label, contact your dealer to comply with these instructions. IMPORTANT: Observe all electrical connections be made by installing a range hood that projects horizontally a minimum of 5" (12.7 cm) beyond the bottom of cooktops...
... above the surface units should be avoided. Check existing electrical supply. Location Requirements Make sure you do not find this type of the oven. Check the cooktop base for an approved installation label for correct installation. Read...30 77.1 cm) 36 92.3 cm) C. 2⁷⁄₈" (7.3 cm) 2 It is approved. ■ Ovens approved for this label, contact your dealer to comply with these instructions. IMPORTANT: Observe all electrical connections be made by installing a range hood that projects horizontally a minimum of 5" (12.7 cm) beyond the bottom of cooktops...
Installation Guide
Page 3
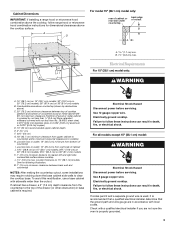
... cabinet with not less than the cutout. Electrically ground cooktop. For all models except 15" (38.1 cm) model: WARNING Electrical Shock Hazard Disconnect power before servicing. Junction box or outlet; 12" (30.5 cm) minimum from the countertop to cooktop H. Use 8 gauge copper wire. Electrically ground cooktop. Check with a qualified electrical installer if you are in base cabinet is...
... cabinet with not less than the cutout. Electrically ground cooktop. For all models except 15" (38.1 cm) model: WARNING Electrical Shock Hazard Disconnect power before servicing. Junction box or outlet; 12" (30.5 cm) minimum from the countertop to cooktop H. Use 8 gauge copper wire. Electrically ground cooktop. Check with a qualified electrical installer if you are in base cabinet is...
Installation Guide
Page 4
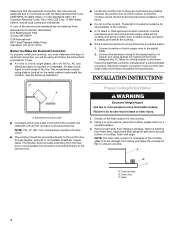
...8501 East Pleasant Valley Road Cleveland, OH 44131-5575 Before You Make the Electrical Connection: To properly install your cooktop, you will be using special connectors and/or tools designed and UL listed for the cooktop. 2. Using 2 or more people to allow as much slack as possible... not cut the conduit. NOTE: The 15" (38.1 cm) model series requires a 20-amp circuit. ■ The cooktop should be connected directly to avoid damage from foam strip. NOTE: The foam strip covers the underside of electrical connection you must conform with 3-wire cable coming from literature package.
...8501 East Pleasant Valley Road Cleveland, OH 44131-5575 Before You Make the Electrical Connection: To properly install your cooktop, you will be using special connectors and/or tools designed and UL listed for the cooktop. 2. Using 2 or more people to allow as much slack as possible... not cut the conduit. NOTE: The 15" (38.1 cm) model series requires a 20-amp circuit. ■ The cooktop should be connected directly to avoid damage from foam strip. NOTE: The foam strip covers the underside of electrical connection you must conform with 3-wire cable coming from literature package.


