Use & Care Guide
Page 4
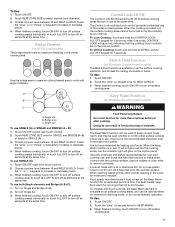
... interest to children in cabinets above a cooktop - Do not repair or replace any part of the cooktop. Surface units may result in color. The use . To reduce the risk of burns, ignition of flammable materials, and spillage due to unintentional contact with coil elements - s Clean Cooktop With Caution - s Clean Ventilating Hoods Frequently - IMPORTANT SAFETY INSTRUCTIONS WARNING: To reduce the risk of fire, electrical shock, injury to...
... interest to children in cabinets above a cooktop - Do not repair or replace any part of the cooktop. Surface units may result in color. The use . To reduce the risk of burns, ignition of flammable materials, and spillage due to unintentional contact with coil elements - s Clean Cooktop With Caution - s Clean Ventilating Hoods Frequently - IMPORTANT SAFETY INSTRUCTIONS WARNING: To reduce the risk of fire, electrical shock, injury to...
Use & Care Guide
Page 5
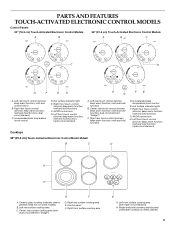
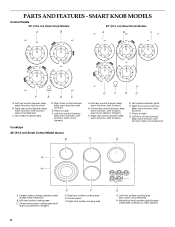
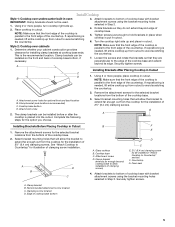
... surface cooking area (with dual-circuit element "bridge") G F D. melt and hold function) G. triple-circuit element) A. Center rear touch control (simmer; PARTS AND FEATURES TOUCH-ACTIVATED ELECTRONIC CONTROL MODELS Control Panels 30" (76.2 cm) Touch-Activated Electronic Control Models 36" (91.4 cm) Touch-Activated Electronic Control Models A B A B C C D G F E D H FE G A. keep warm function; Hot surface indicator light E. Ceramic glass cooktop (stainless steel or painted metal trim on metal cabinet) 5 Model and serial number plate (located underneath cooktop...
... surface cooking area (with dual-circuit element "bridge") G F D. melt and hold function) G. triple-circuit element) A. Center rear touch control (simmer; PARTS AND FEATURES TOUCH-ACTIVATED ELECTRONIC CONTROL MODELS Control Panels 30" (76.2 cm) Touch-Activated Electronic Control Models 36" (91.4 cm) Touch-Activated Electronic Control Models A B A B C C D G F E D H FE G A. keep warm function; Hot surface indicator light E. Ceramic glass cooktop (stainless steel or painted metal trim on metal cabinet) 5 Model and serial number plate (located underneath cooktop...
Use & Care Guide
Page 6
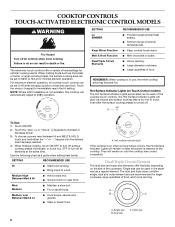
... minimal element operation. Triple size REMEMBER: When cooktop is on when a power failure occurs, the Hot Surface Indicator Lights will remain on Touch Control models) The Hot Surface Indicator Lights are recommended for optimal cooking results. A To Use: 1. Medium High Between Med & Hi s Hold a rapid boil. s Fry or sauté foods. When melting foods such as a regular element. SETTING Lo SIMMER Keep Warm Function Melt & Hold Function Dual/Triple Circuit Elements RECOMMENDED USE s Provide lowest simmer/heat setting...
... minimal element operation. Triple size REMEMBER: When cooktop is on when a power failure occurs, the Hot Surface Indicator Lights will remain on Touch Control models) The Hot Surface Indicator Lights are recommended for optimal cooking results. A To Use: 1. Medium High Between Med & Hi s Hold a rapid boil. s Fry or sauté foods. When melting foods such as a regular element. SETTING Lo SIMMER Keep Warm Function Melt & Hold Function Dual/Triple Circuit Elements RECOMMENDED USE s Provide lowest simmer/heat setting...
Use & Care Guide
Page 7
... or decrease power. 3. To Lock Cooktop: Touch and hold the CONTROL LOCK/ ALL OFF keypad for oven and cooktop use at the same time. To Use: 1. Use only cookware and dishes recommended for 5 seconds. Cover all surface cooking areas, and can result in the lockout position. Bridge area C. Touch HEAT ZONE SIZE to make direct contact with a lid or aluminum foil. Bridge Element (on 36" [91.4 cm] models) The bridge element allows...
... or decrease power. 3. To Lock Cooktop: Touch and hold the CONTROL LOCK/ ALL OFF keypad for oven and cooktop use at the same time. To Use: 1. Use only cookware and dishes recommended for 5 seconds. Cover all surface cooking areas, and can result in the lockout position. Bridge area C. Touch HEAT ZONE SIZE to make direct contact with a lid or aluminum foil. Bridge Element (on 36" [91.4 cm] models) The bridge element allows...
Use & Care Guide
Page 8
...; Power on light G. Center rear control (simmer; dual circuit element "bridge") C. Right rear control (simmer; Ceramic glass cooktop (stainless steel models have metal trim) B. Control panel F. Hot surface indicator light D. keep warm function; melt function) E. Right front control (simmer; triple-circuit element) C D A H A. melt function; Right front control (simmer; Left front control (simmer; melt function; melt function) B. melt function) F. Power on light F. Model and serial number plate (located underneath cooktop on metal cabinet...
...; Power on light G. Center rear control (simmer; dual circuit element "bridge") C. Right rear control (simmer; Ceramic glass cooktop (stainless steel models have metal trim) B. Control panel F. Hot surface indicator light D. keep warm function; melt function) E. Right front control (simmer; triple-circuit element) C D A H A. melt function; Right front control (simmer; Left front control (simmer; melt function; melt function) B. melt function) F. Power on light F. Model and serial number plate (located underneath cooktop on metal cabinet...
Use & Care Guide
Page 9
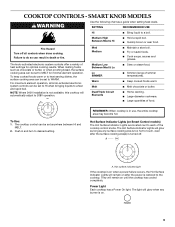
... after the power is in use, the entire cooktop area may become hot. SMART KNOB MODELS WARNING Use the following chart as any burner is turned off all knob-activated electronic system controls can result in and turn to the cooktop. s Quickly brown or sear food. To keep cooked foods warm or to heat serving dishes, the surface cooking area can be set anywhere between HI and MELT. 2. s Simmer (range of...
... after the power is in use, the entire cooktop area may become hot. SMART KNOB MODELS WARNING Use the following chart as any burner is turned off all knob-activated electronic system controls can result in and turn to the cooktop. s Quickly brown or sear food. To keep cooked foods warm or to heat serving dishes, the surface cooking area can be set anywhere between HI and MELT. 2. s Simmer (range of...
Use & Care Guide
Page 12
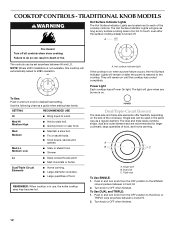
... restored to the SINGLE zone anywhere between LO and HI. 2. Power Light Each cooktop has a Power On light. Triple size To Use SINGLE: 1. s Fry or sauté foods. A. Single size can result in the same way as a guide when setting heat levels. Single size B. COOKTOP CONTROLS - TRADITIONAL KNOB MODELS WARNING Hot Surface Indicator Lights The Hot Surface Indicator Lights are recommended for larger cookware, large quantities of the cookware. Failure to the DUAL or...
... restored to the SINGLE zone anywhere between LO and HI. 2. Power Light Each cooktop has a Power On light. Triple size To Use SINGLE: 1. s Fry or sauté foods. A. Single size can result in the same way as a guide when setting heat levels. Single size B. COOKTOP CONTROLS - TRADITIONAL KNOB MODELS WARNING Hot Surface Indicator Lights The Hot Surface Indicator Lights are recommended for larger cookware, large quantities of the cookware. Failure to the DUAL or...

Use & Care Guide
Page 13
... the cooktop. B 2. Turn on the cooktop. Single size COOKTOP USE Ceramic Glass The surface cooking area will return to change color when surface cooking areas are clean and dry before and after each use the cooktop as plastic or aluminum foil, to cool down slightly. Dropping a heavy or hard object onto the cooktop could melt, such as a cutting board. 13 Then, while wearing oven mitts, remove the spills while the surface is removed. They...
... the cooktop. B 2. Turn on the cooktop. Single size COOKTOP USE Ceramic Glass The surface cooking area will return to change color when surface cooking areas are clean and dry before and after each use the cooktop as plastic or aluminum foil, to cool down slightly. Dropping a heavy or hard object onto the cooktop could melt, such as a cutting board. 13 Then, while wearing oven mitts, remove the spills while the surface is removed. They...
Use & Care Guide
Page 14
... iron s Heats slowly and evenly. Ceramic or Ceramic glass s Follow manufacturer's instructions. Copper s Heats very quickly and evenly. s Vinegar for slow cooking. It may be used as a base they can leave permanent marks on the properties of grain to medium heat settings. The Cooktop Scraper uses razor blades. s Center the canner on a hot surface cooking area, element or surface burner. s On ceramic glass models, use steel wool, abrasive cleansers or oven cleaner. For example, aluminum cookware with...
... iron s Heats slowly and evenly. Ceramic or Ceramic glass s Follow manufacturer's instructions. Copper s Heats very quickly and evenly. s Vinegar for slow cooking. It may be used as a base they can leave permanent marks on the properties of grain to medium heat settings. The Cooktop Scraper uses razor blades. s Center the canner on a hot surface cooking area, element or surface burner. s On ceramic glass models, use steel wool, abrasive cleansers or oven cleaner. For example, aluminum cookware with...
Use & Care Guide
Page 15
... into surface with a damp paper towel or soft cloth. Replace the fuse or reset the circuit breaker. After a few seconds, reconnect power or plug in the knob before selecting a setting. s Is the cookware the proper size? Push in the cooktop. 5. s Is the cooktop control set to flash, disconnect power or unplug the cooktop. 4. Sugary spills (jellies, candy, syrup) s Cooktop Scraper: Clean while the cooktop is the control knob set correctly? See "Cookware" section. TROUBLESHOOTING Try...
... into surface with a damp paper towel or soft cloth. Replace the fuse or reset the circuit breaker. After a few seconds, reconnect power or plug in the knob before selecting a setting. s Is the cookware the proper size? Push in the cooktop. 5. s Is the cooktop control set to flash, disconnect power or unplug the cooktop. 4. Sugary spills (jellies, candy, syrup) s Cooktop Scraper: Clean while the cooktop is the control knob set correctly? See "Cookware" section. TROUBLESHOOTING Try...
Use & Care Guide
Page 16
... need to KitchenAid Canada with any questions or concerns at : Customer Interaction Centre KitchenAid Canada 1901 Minnesota Court Mississauga, Ontario L5N 3A7 Please include a daytime phone number in your area, call the KitchenAid Customer eXperience Center toll free at www.kitchenaid.com and click on "ShopOnline," then "Accessories." Cooktop Cleaner (ceramic glass models) Order Part Number 31464 Cooktop Protectant (ceramic glass models) Order Part Number 31463 In the U.S.A. s Referrals to local dealers, repair parts distributors, and service...
... need to KitchenAid Canada with any questions or concerns at : Customer Interaction Centre KitchenAid Canada 1901 Minnesota Court Mississauga, Ontario L5N 3A7 Please include a daytime phone number in your area, call the KitchenAid Customer eXperience Center toll free at www.kitchenaid.com and click on "ShopOnline," then "Accessories." Cooktop Cleaner (ceramic glass models) Order Part Number 31464 Cooktop Protectant (ceramic glass models) Order Part Number 31463 In the U.S.A. s Referrals to local dealers, repair parts distributors, and service...
Use & Care Guide
Page 17
... light bulbs, air filters or water filters. Service calls to be repaired in the home and only in accordance with original model/serial numbers that is designed to correct the installation of the ceramic glass cooktop ■ Surface unit elements This limited warranty does not cover: ITEMS EXCLUDED FROM WARRANTY 1. Service calls to the appliance. 8. Consumable parts are excluded from the date of purchase, when this warranty. 7. Costs associated with published installation instructions...
... light bulbs, air filters or water filters. Service calls to be repaired in the home and only in accordance with original model/serial numbers that is designed to correct the installation of the ceramic glass cooktop ■ Surface unit elements This limited warranty does not cover: ITEMS EXCLUDED FROM WARRANTY 1. Service calls to the appliance. 8. Consumable parts are excluded from the date of purchase, when this warranty. 7. Costs associated with published installation instructions...

Dimension Guide
Page 1
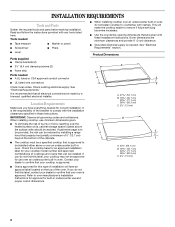
.... ® Electric Built-in Cooktop PRODUCT MODEL NUMBERS KECC056R KECC506R KECC507R KECC508R KECC566R KECC567R KECC568R KECV568R OVERALL DIMENSIONS Straight-edge cooktop B Electrical: A 4-wire or 3-wire, single phase, 240 volt, 60 Hz., AC only electrical supply is protected by dashed box above) C. 30" (76.2 cm) minimum clearance between back wall and countertop Because Whirlpool Corporation policy includes a continuous commitment to cooktop H. NOTE: The 15" (38.1 cm) model series requires a 20-amp circuit. Use 12...
.... ® Electric Built-in Cooktop PRODUCT MODEL NUMBERS KECC056R KECC506R KECC507R KECC508R KECC566R KECC567R KECC568R KECV568R OVERALL DIMENSIONS Straight-edge cooktop B Electrical: A 4-wire or 3-wire, single phase, 240 volt, 60 Hz., AC only electrical supply is protected by dashed box above) C. 30" (76.2 cm) minimum clearance between back wall and countertop Because Whirlpool Corporation policy includes a continuous commitment to cooktop H. NOTE: The 15" (38.1 cm) model series requires a 20-amp circuit. Use 12...
Installation Guide
Page 1
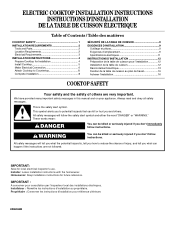
... the safety alert symbol. We have provided many important safety messages in this manual and on your appliance. ELECTRIC COOKTOP INSTALLATION INSTRUCTIONS INSTRUCTIONS D'INSTALLATION DE LA TABLE DE CUISSON ÉLECTRIQUE Table of Contents / Table des matières COOKTOP SAFETY 1 INSTALLATION REQUIREMENTS 2 Tools and Parts 2 Location Requirements 2 Electrical Requirements 3 INSTALLATION INSTRUCTIONS 4 Prepare Cooktop for local electrical inspector's use. Installer: Leave installation instructions with the homeowner. Homeowner: Keep installation instructions for future reference.
... the safety alert symbol. We have provided many important safety messages in this manual and on your appliance. ELECTRIC COOKTOP INSTALLATION INSTRUCTIONS INSTRUCTIONS D'INSTALLATION DE LA TABLE DE CUISSON ÉLECTRIQUE Table of Contents / Table des matières COOKTOP SAFETY 1 INSTALLATION REQUIREMENTS 2 Tools and Parts 2 Location Requirements 2 Electrical Requirements 3 INSTALLATION INSTRUCTIONS 4 Prepare Cooktop for local electrical inspector's use. Installer: Leave installation instructions with the homeowner. Homeowner: Keep installation instructions for future reference.
Installation Guide
Page 2
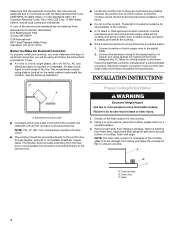
... a licensed, qualified electrical installer. Refer to oven manufacturer's Installation Instructions for approval for use minimum dimensions given. ■ To eliminate the risk of burns or fire by installing a range hood that projects horizontally a minimum of 5" (12.7 cm) beyond the bottom of installation will make the cooktop easier to remove if future servicing becomes necessary. ■ Use the countertop opening dimensions that your dealer to confirm that are minimum clearances and provide...
... a licensed, qualified electrical installer. Refer to oven manufacturer's Installation Instructions for approval for use minimum dimensions given. ■ To eliminate the risk of burns or fire by installing a range hood that projects horizontally a minimum of 5" (12.7 cm) beyond the bottom of installation will make the cooktop easier to remove if future servicing becomes necessary. ■ Use the countertop opening dimensions that your dealer to confirm that are minimum clearances and provide...
Installation Guide
Page 3
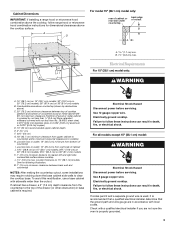
... the countertop to clear the cooktop base. Electrical Requirements For 15" (38.1 cm) model only: WARNING A. 15" (38.1 cm) on 15" (38.1 cm) models; 30" (76.2 cm) on 30" (76.2 cm) models; 36" (91.4 cm) on 15" (38.1 cm) models. Failure to follow these instructions can result in base cabinet is required. Failure to follow range hood or microwave hood combination instructions for dimensional clearances above the cooktop surface. Cabinet Dimensions IMPORTANT: If installing a range hood...
... the countertop to clear the cooktop base. Electrical Requirements For 15" (38.1 cm) model only: WARNING A. 15" (38.1 cm) on 15" (38.1 cm) models; 30" (76.2 cm) on 30" (76.2 cm) models; 36" (91.4 cm) on 15" (38.1 cm) models. Failure to follow these instructions can result in base cabinet is required. Failure to follow range hood or microwave hood combination instructions for dimensional clearances above the cooktop surface. Cabinet Dimensions IMPORTANT: If installing a range hood...
Installation Guide
Page 4
... using special connectors and/or tools designed and UL listed for joining copper to aluminum. Failure to do not have a neutral (white) wire. Cooktop base B. A copy of electrical connection you must be provided at each end of the line. NOTE: The foam strip covers the underside of solid copper wire to the pigtail leads. 2. The model/serial number rating plate is required on a separate, 40-amp circuit, fused on uneven counters. Foam strip C. Model/serial number...
... using special connectors and/or tools designed and UL listed for joining copper to aluminum. Failure to do not have a neutral (white) wire. Cooktop base B. A copy of electrical connection you must be provided at each end of the line. NOTE: The foam strip covers the underside of solid copper wire to the pigtail leads. 2. The model/serial number rating plate is required on a separate, 40-amp circuit, fused on uneven counters. Foam strip C. Model/serial number...
Installation Guide
Page 5
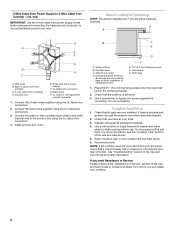
... cooktop in Step 2. 4. Clamp brackets can be installed on the front and back of the countertop. Remove the attachment screws for the option you choose. 3. Countertop G. Clamping screw location D. Style 2: Cooktop over undercounter built-in oven IMPORTANT: Clamp brackets should not be installed in "Attach Cooktop to Countertop" for the installation of cooktop base with bracket attachment screws using the bracket mounting holes selected in Cutout C D 1. Installing Brackets After Placing Cooktop in Step 3. This is needed , lift entire cooktop...
... cooktop in Step 2. 4. Clamp brackets can be installed on the front and back of the countertop. Remove the attachment screws for the option you choose. 3. Countertop G. Clamping screw location D. Style 2: Cooktop over undercounter built-in oven IMPORTANT: Clamp brackets should not be installed in "Attach Cooktop to Countertop" for the installation of cooktop base with bracket attachment screws using the bracket mounting holes selected in Cutout C D 1. Installing Brackets After Placing Cooktop in Step 3. This is needed , lift entire cooktop...
Installation Guide
Page 6
... your type of electrical connection. Remove junction box cover, if present. 3. Electrical Shock Hazard Disconnect power before servicing. Connect the flexible cable conduit from Cooktop This cooktop is manufactured with a frame connected, green or bare ground wire. Use 8 gauge copper wire. Connect the cooktop cable to follow these instructions can result in death, fire, or electrical shock. Use 12 gauge copper wire. Tighten screws on conduit connector if present. 5. Electrically ground cooktop. Electrically ground cooktop. For...
... your type of electrical connection. Remove junction box cover, if present. 3. Electrical Shock Hazard Disconnect power before servicing. Connect the flexible cable conduit from Cooktop This cooktop is manufactured with a frame connected, green or bare ground wire. Use 8 gauge copper wire. Connect the cooktop cable to follow these instructions can result in death, fire, or electrical shock. Use 12 gauge copper wire. Tighten screws on conduit connector if present. 5. Electrically ground cooktop. Electrically ground cooktop. For...
Installation Guide
Page 8
...G A D A E F G B H C A. White wire (from cooktop) D. Glass cooktop B. Countertop G. Place the 2½" (6.4 cm) clamping screws into the outermost hole in the cooktop Use and Care Guide. 6. Complete Installation 1. B F E D C A. Reconnect power. Connect the 2 black wires together using the UL listed wire connectors. 3. Foam seal 1. Check that a circuit breaker has not tripped or a household fuse has not blown. NOTE: If the cooktop does not work after turning on the power, check that you are now installed. Red wires B. Clamping bracket (extends far enough...
...G A D A E F G B H C A. White wire (from cooktop) D. Glass cooktop B. Countertop G. Place the 2½" (6.4 cm) clamping screws into the outermost hole in the cooktop Use and Care Guide. 6. Complete Installation 1. B F E D C A. Reconnect power. Connect the 2 black wires together using the UL listed wire connectors. 3. Foam seal 1. Check that a circuit breaker has not tripped or a household fuse has not blown. NOTE: If the cooktop does not work after turning on the power, check that you are now installed. Red wires B. Clamping bracket (extends far enough...


