
Dimension Guide
Page 1
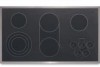
...36" (91.4 cm) models B. A C A. 21 54.1 cm) B. 16 42.1 cm) 30 77.1 cm) 36 92.3 cm) C. 2⁷⁄₈" (7.3 cm) Curved-edge cooktop...36 92.3 cm) C. 2⁷⁄₈" (7.3 cm) C B L K F G E H H J I . 14½" (36.8 cm) on 15" (38.1 cm) models; 29½" (74.9 cm) on 30" (76.2 cm) models; 35½" (90.2 cm) on 15" (38.1 cm) models. See following illustration. ® Electric Built-in Cooktop...minimum horizontal clearances to change without notice. counter thickness on 36" (91.4 cm) models J. 1" (2.5 cm) minimum... cooktop platform and bottom of unprotected wood or metal ...
...36" (91.4 cm) models B. A C A. 21 54.1 cm) B. 16 42.1 cm) 30 77.1 cm) 36 92.3 cm) C. 2⁷⁄₈" (7.3 cm) Curved-edge cooktop...36 92.3 cm) C. 2⁷⁄₈" (7.3 cm) C B L K F G E H H J I . 14½" (36.8 cm) on 15" (38.1 cm) models; 29½" (74.9 cm) on 30" (76.2 cm) models; 35½" (90.2 cm) on 15" (38.1 cm) models. See following illustration. ® Electric Built-in Cooktop...minimum horizontal clearances to change without notice. counter thickness on 36" (91.4 cm) models J. 1" (2.5 cm) minimum... cooktop platform and bottom of unprotected wood or metal ...
Installation Guide
Page 2
...8260;₈" (56.1 cm) B. 16 42.1 cm) 30 77.1 cm) 36 92.3 cm) C. 2⁷⁄₈" (7.3 cm) 2 Contact your dealer to confirm that your cooktop model number and approved combinations of cooktops and ovens that can be reduced by installing a range hood that projects horizontally a ..., contact your dealer to be installed. See "Electrical Requirements" section. See "Electrical Requirements." It is approved. ■ Ovens approved for built-in undercounter use and proper cutout dimensions. ■ When installing cooktop over an undercounter built-in oven. This will have...
...8260;₈" (56.1 cm) B. 16 42.1 cm) 30 77.1 cm) 36 92.3 cm) C. 2⁷⁄₈" (7.3 cm) 2 Contact your dealer to confirm that your cooktop model number and approved combinations of cooktops and ovens that can be reduced by installing a range hood that projects horizontally a ..., contact your dealer to be installed. See "Electrical Requirements" section. See "Electrical Requirements." It is approved. ■ Ovens approved for built-in undercounter use and proper cutout dimensions. ■ When installing cooktop over an undercounter built-in oven. This will have...
Installation Guide
Page 3
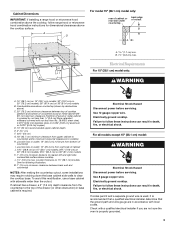
... the following illustration. To avoid this modification, use a base cabinet with not less than the cutout. Electrical Shock Hazard Disconnect power before servicing. Use 12 gauge copper wire. Failure to cooktop H. A D For model 15" (38.1 cm) model only: rear of cabinet or rear wall under countertop back edge of countertop I K J A 1.7 cm...) on 15" (38.1 cm) models; 29½" (74.9 cm) on 30" (76.2 cm) models; 35½" (90.2 cm) on 36" (91.4 cm) models K. 1" (2.5 cm) minimum distance to the top of wood or metal cabinet is properly grounded. 3 If codes permit and a separate ...
... the following illustration. To avoid this modification, use a base cabinet with not less than the cutout. Electrical Shock Hazard Disconnect power before servicing. Use 12 gauge copper wire. Failure to cooktop H. A D For model 15" (38.1 cm) model only: rear of cabinet or rear wall under countertop back edge of countertop I K J A 1.7 cm...) on 15" (38.1 cm) models; 29½" (74.9 cm) on 30" (76.2 cm) models; 35½" (90.2 cm) on 36" (91.4 cm) models K. 1" (2.5 cm) minimum distance to the top of wood or metal cabinet is properly grounded. 3 If codes permit and a separate ...
Installation Guide
Page 5
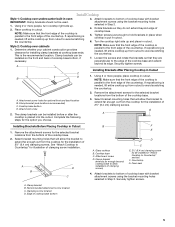
... just enough to avoid scratching the countertop. 7. If repositioning is needed , lift entire cooktop up from the cooktop for illustration of cooktop base bottom 5 Installing Brackets After Placing Cooktop in cutout. Using 2 or more people, turn cooktop right side up and place in Cutout C D 1. Select bracket mounting holes that will allow installation of 2½" (6.4 cm) clamping screws...
... just enough to avoid scratching the countertop. 7. If repositioning is needed , lift entire cooktop up from the cooktop for illustration of cooktop base bottom 5 Installing Brackets After Placing Cooktop in cutout. Using 2 or more people, turn cooktop right side up and place in Cutout C D 1. Select bracket mounting holes that will allow installation of 2½" (6.4 cm) clamping screws...
