

Use & Care Guide
Page 3
... Children climbing on Broken Cooktop - Do not repair or replace any part of a utensil should never be seriously injured. ■ Proper Installation - All other bulky cloth. ■ DO NOT TOUCH SURFACE UNITS OR AREAS NEAR UNITS - Flammable materials should break, cleaning solutions and ...■ Clean Ventilating Hoods Frequently - Absence of electric shock, or fire. ■ Do Not Soak Removable Heating Elements - Improper installation of these pans or bowls during cooking may subject wiring or components underneath to accumulate on hood or filter. ■ When flaming ...
... Children climbing on Broken Cooktop - Do not repair or replace any part of a utensil should never be seriously injured. ■ Proper Installation - All other bulky cloth. ■ DO NOT TOUCH SURFACE UNITS OR AREAS NEAR UNITS - Flammable materials should break, cleaning solutions and ...■ Clean Ventilating Hoods Frequently - Absence of electric shock, or fire. ■ Do Not Soak Removable Heating Elements - Improper installation of these pans or bowls during cooking may subject wiring or components underneath to accumulate on hood or filter. ■ When flaming ...

Use & Care Guide
Page 13
... Cleaning" section. 3. If after 1 minute the cooktop displays F1E0 again, call for 30 minutes then turn the burner on again. See the Installation Instructions for your model. 13 Press and hold "Control Lock" for your model. ■ Is the cooktop level? Wipe debris from the control...more information. Use cookware about the same size as Keep Warm, the elements do not perform as well as usual? Level the cooktop. See the Installation Instructions. ■ Does it appear to take longer than ½" (1.3 cm) outside the cooking area. ■ Do cooktop surfaces become hot....
... Cleaning" section. 3. If after 1 minute the cooktop displays F1E0 again, call for 30 minutes then turn the burner on again. See the Installation Instructions for your model. 13 Press and hold "Control Lock" for your model. ■ Is the cooktop level? Wipe debris from the control...more information. Use cookware about the same size as Keep Warm, the elements do not perform as well as usual? Level the cooktop. See the Installation Instructions. ■ Does it appear to take longer than ½" (1.3 cm) outside the cooking area. ■ Do cooktop surfaces become hot....

Use & Care Guide
Page 14
... are trained to local dealers, repair parts distributors and service companies. In the U.S.A. KitchenAid designated service technicians are trained to your request. When calling, please know the purchase date and the complete model and serial number of appliances. ■ Installation information. ■ Use and maintenance procedures. To locate factory specified parts in...
... are trained to local dealers, repair parts distributors and service companies. In the U.S.A. KitchenAid designated service technicians are trained to your request. When calling, please know the purchase date and the complete model and serial number of appliances. ■ Installation information. ■ Use and maintenance procedures. To locate factory specified parts in...

Use & Care Guide
Page 15
...cannot be provided by this limited warranty. This major appliance is designed to be borne by an authorized KitchenAid servicer is not installed in accordance with published installation instructions. 10. DISCLAIMER OF IMPLIED WARRANTIES; IMPLIED WARRANTIES, INCLUDING WARRANTIES OF MERCHANTABILITY OR FITNESS FOR A...use or when it is used for other damage to the finish of your authorized KitchenAid dealer to published user or operator instructions and/or installation instructions. 4. KITCHENAID SHALL NOT BE LIABLE FOR INCIDENTAL OR CONSEQUENTIAL DAMAGES. If outside the 50 United ...
...cannot be provided by this limited warranty. This major appliance is designed to be borne by an authorized KitchenAid servicer is not installed in accordance with published installation instructions. 10. DISCLAIMER OF IMPLIED WARRANTIES; IMPLIED WARRANTIES, INCLUDING WARRANTIES OF MERCHANTABILITY OR FITNESS FOR A...use or when it is used for other damage to the finish of your authorized KitchenAid dealer to published user or operator instructions and/or installation instructions. 4. KITCHENAID SHALL NOT BE LIABLE FOR INCIDENTAL OR CONSEQUENTIAL DAMAGES. If outside the 50 United ...

Use & Care Guide
Page 16
You will need it. You can find this book and your complete model number and serial number. Dealer name Address Phone number Model number Serial number Purchase date 16 Write down the following information about your major appliance to better help you obtain assistance or service if you ever need to know your sales slip together for in-warranty service. Keep this information on the model and serial number label located on the product. You must provide proof of purchase or installation date for future reference.
You will need it. You can find this book and your complete model number and serial number. Dealer name Address Phone number Model number Serial number Purchase date 16 Write down the following information about your major appliance to better help you obtain assistance or service if you ever need to know your sales slip together for in-warranty service. Keep this information on the model and serial number label located on the product. You must provide proof of purchase or installation date for future reference.

Dimension Guide
Page 1
...in Cooktop PRODUCT MODEL NUMBERS KECC602B KECC604B KECC605B KECC607B KECC662B KECC664B KECC667B Before You Make the Electrical Connection: To properly install your cooktop, you will be using special connectors and/or tools designed and UL listed for joining copper to ... covered by dashed box above the cooktop surface. The model/serial number rating plate is already provided at the cooktop. CABINET OPENING DIMENSIONS IMPORTANT: If installing a range hood or microwave hood combination above the cooktop, follow the procedure below: 1. A D C B L F G E A A. Most models have a...
...in Cooktop PRODUCT MODEL NUMBERS KECC602B KECC604B KECC605B KECC607B KECC662B KECC664B KECC667B Before You Make the Electrical Connection: To properly install your cooktop, you will be using special connectors and/or tools designed and UL listed for joining copper to ... covered by dashed box above the cooktop surface. The model/serial number rating plate is already provided at the cooktop. CABINET OPENING DIMENSIONS IMPORTANT: If installing a range hood or microwave hood combination above the cooktop, follow the procedure below: 1. A D C B L F G E A A. Most models have a...

Dimension Guide
Page 2
... depth - Frame width - 30" (76.2 cm) models - 28 73.5 cm) Frame width - 36" (91.4 cm) models - 34 87.5 cm) E. PRODUCT DIMENSIONS B A C D F E A. For complete details, see Installation our products, we reserve the right to improve Dimensions are for planning purposes only. W10353374A 7/26/12 Glass width - 30" (76.2 cm) models - 30 78...
... depth - Frame width - 30" (76.2 cm) models - 28 73.5 cm) Frame width - 36" (91.4 cm) models - 34 87.5 cm) E. PRODUCT DIMENSIONS B A C D F E A. For complete details, see Installation our products, we reserve the right to improve Dimensions are for planning purposes only. W10353374A 7/26/12 Glass width - 30" (76.2 cm) models - 30 78...

Installation Guide
Page 1
...." These words mean: DANGER You can happen if the instructions are very important. IMPORTANT : À conserver pour consultation par l'inspecteur local des installations électriques. ELECTRIC COOKTOP INSTALLATION INSTRUCTIONS INSTRUCTIONS D'INSTALLATION DE LA TABLE DE CUISSON ÉLECTRIQUE Table of Contents / Table des matières COOKTOP SAFETY 1 SÉCURITÉ DE LA...
...." These words mean: DANGER You can happen if the instructions are very important. IMPORTANT : À conserver pour consultation par l'inspecteur local des installations électriques. ELECTRIC COOKTOP INSTALLATION INSTRUCTIONS INSTRUCTIONS D'INSTALLATION DE LA TABLE DE CUISSON ÉLECTRIQUE Table of Contents / Table des matières COOKTOP SAFETY 1 SÉCURITÉ DE LA...

Installation Guide
Page 2
... damage, check with any tools listed here. Product Dimensions B A C D F E A. Check existing electrical supply. Refer to oven manufacturer's Installation Instructions for approval for built-in oven. stainless steel models - 22¹⁄₈" (56.4 cm) B. Tools needed ■ Tape measure... Clamping brackets (2) ■ 2½" (6.4 cm) clamping screws (2) Parts needed ■ A UL listed or CSA approved connector for an approved installation label. See the "Electrical Requirements" section. Glass width - 30" (76.2 cm) models - 30 78.4 cm) Glass width - 36" (...
... damage, check with any tools listed here. Product Dimensions B A C D F E A. Check existing electrical supply. Refer to oven manufacturer's Installation Instructions for approval for built-in oven. stainless steel models - 22¹⁄₈" (56.4 cm) B. Tools needed ■ Tape measure... Clamping brackets (2) ■ 2½" (6.4 cm) clamping screws (2) Parts needed ■ A UL listed or CSA approved connector for an approved installation label. See the "Electrical Requirements" section. Glass width - 30" (76.2 cm) models - 30 78.4 cm) Glass width - 36" (...

Installation Guide
Page 3
...drawer, a 5¹⁄₂" (14.0 cm) depth clearance from right side of wood or metal cabinet is recommended that a qualified electrical installer determine that the electrical connection and wire size are in cutout from upper cabinet to countertop within minimum horizontal clearances to the top of the... MA 02169-7471 CSA International 8501 East Pleasant Valley Road Cleveland, OH 44131-5575 Before You Make the Electrical Connection: To properly install your cooktop, you must determine the type of electrical connection you are not sure the cooktop is required on a separate, 40-...
...drawer, a 5¹⁄₂" (14.0 cm) depth clearance from right side of wood or metal cabinet is recommended that a qualified electrical installer determine that the electrical connection and wire size are in cutout from upper cabinet to countertop within minimum horizontal clearances to the top of the... MA 02169-7471 CSA International 8501 East Pleasant Valley Road Cleveland, OH 44131-5575 Before You Make the Electrical Connection: To properly install your cooktop, you must determine the type of electrical connection you are not sure the cooktop is required on a separate, 40-...

Installation Guide
Page 4
... underside of the cooktop is needed, lift entire cooktop up into or severing existing wiring during installation. 1. Style 2: Cooktop over undercounter built-in oven IMPORTANT: Clamping brackets should not be used. 1. The clamping brackets can be... C B C A. If repositioning is parallel to the pigtail leads. 2. INSTALLATION INSTRUCTIONS Prepare Cooktop for installing clamping brackets at each end of foam. A Install Cooktop Style 1: Cooktop over cabinets 1. Using 2 or more people to move and install cooktop. Make sure that the knobs are not resting on the final location for...
... underside of the cooktop is needed, lift entire cooktop up into or severing existing wiring during installation. 1. Style 2: Cooktop over undercounter built-in oven IMPORTANT: Clamping brackets should not be used. 1. The clamping brackets can be... C B C A. If repositioning is parallel to the pigtail leads. 2. INSTALLATION INSTRUCTIONS Prepare Cooktop for installing clamping brackets at each end of foam. A Install Cooktop Style 1: Cooktop over cabinets 1. Using 2 or more people to move and install cooktop. Make sure that the knobs are not resting on the final location for...
Installation Guide
Page 5
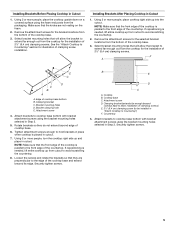
...C. Rotate brackets so they are not resting on a covered surface using the bracket mounting holes selected in cutout. 7. Installing Brackets Before Placing Cooktop in Cutout 1. Make sure that they do not extend beyond its edge. See the "Attach ... is placed in Step 3. Clamping bracket (extends far enough beyond cooktop base to allow the bracket to the front edge of clamping screw installation. Cooktop B. Installing Brackets After Placing Cooktop in Cutout 1. Remove the attachment screws for the bracket locations from cutout to avoid scratching the countertop. 8. F ...
...C. Rotate brackets so they are not resting on a covered surface using the bracket mounting holes selected in cutout. 7. Installing Brackets Before Placing Cooktop in Cutout 1. Make sure that they do not extend beyond its edge. See the "Attach ... is placed in Step 3. Clamping bracket (extends far enough beyond cooktop base to allow the bracket to the front edge of clamping screw installation. Cooktop B. Installing Brackets After Placing Cooktop in Cutout 1. Remove the attachment screws for the bracket locations from cutout to avoid scratching the countertop. 8. F ...
Installation Guide
Page 6
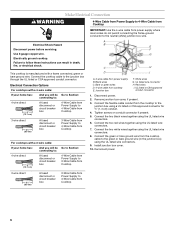
... the flexible cable conduit from Cooktop Electrical Shock Hazard Disconnect power before servicing. Connect the two black wires together using the UL listed wire connectors. 6. Install junction box cover. 10. Reconnect power. 3-wire direct 3¹⁄₂" (8.9 cm) A fused disconnect or circuit breaker box 3-Wire Cable from Power Supply to 3-Wire...
... the flexible cable conduit from Cooktop Electrical Shock Hazard Disconnect power before servicing. Connect the two black wires together using the UL listed wire connectors. 6. Install junction box cover. 10. Reconnect power. 3-wire direct 3¹⁄₂" (8.9 cm) A fused disconnect or circuit breaker box 3-Wire Cable from Power Supply to 3-Wire...
Installation Guide
Page 7
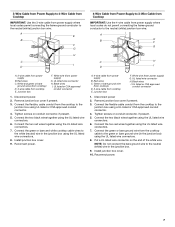
...White wire (from the cooktop to the junction box using the UL listed wire connectors. 8. Tighten screws on the end of the white wire. Install junction box cover. 9. UL listed or CSA approved conduit connector 1. Disconnect power 2. Put a UL listed wire connector on conduit connector, if present... listed wire connectors. 6. Connect the green or bare ground wire from power supply) G. Connect the flexible cable conduit from cooktop E. Install junction box cover. 10. Reconnect power. White and green or bare ground wires (from cooktop) D. 4-wire cable from the cooktop ...
...White wire (from the cooktop to the junction box using the UL listed wire connectors. 8. Tighten screws on the end of the white wire. Install junction box cover. 9. UL listed or CSA approved conduit connector 1. Disconnect power 2. Put a UL listed wire connector on conduit connector, if present... listed wire connectors. 6. Connect the green or bare ground wire from power supply) G. Connect the flexible cable conduit from cooktop E. Install junction box cover. 10. Reconnect power. White and green or bare ground wires (from cooktop) D. 4-wire cable from the cooktop ...
Installation Guide
Page 8
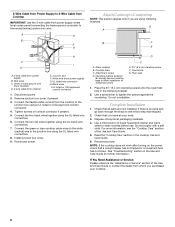
... connector 1. Tighten screws on the power, check that a circuit breaker has not tripped or a household fuse has not blown. Reconnect power. Complete Installation 1. G A B F E H C I . Connect the two black wires together using the UL listed wire connectors. 7. Foam seal 1. ...of clamping screws) E. 2½" (6.4 cm) clamping screw F. Read the "Cooktop Use" section in the clamping bracket. 2. Junction box F. Install junction box cover. 9. Attachment screw D. Place the 2½" (6.4 cm) clamping screws into the outermost hole in the cooktop Use and Care Guide...
... connector 1. Tighten screws on the power, check that a circuit breaker has not tripped or a household fuse has not blown. Reconnect power. Complete Installation 1. G A B F E H C I . Connect the two black wires together using the UL listed wire connectors. 7. Foam seal 1. ...of clamping screws) E. 2½" (6.4 cm) clamping screw F. Read the "Cooktop Use" section in the clamping bracket. 2. Junction box F. Install junction box cover. 9. Attachment screw D. Place the 2½" (6.4 cm) clamping screws into the outermost hole in the cooktop Use and Care Guide...


