
Use & Care Guide
Page 2
... or seriously injured if you don't immediately follow instructions. All safety messages will follow instructions. KNOB CONTROLS 9 Cooktop Controls 9 Even-Heat™ ULTRA Element 9 Even-Heat™ Element 9 Dual Circuit Element 10 Keep Warm 10 COOKTOP USE 11 Ceramic Glass 11 Home Canning 11 Cookware 11 COOKTOP CARE 12 General Cleaning 12 TROUBLESHOOTING 13 ASSISTANCE OR SERVICE 14 In the U.S.A 14 Accessories 14 In Canada 14 WARRANTY 15 TABLE DES MATIÈRES SÉ...
... or seriously injured if you don't immediately follow instructions. All safety messages will follow instructions. KNOB CONTROLS 9 Cooktop Controls 9 Even-Heat™ ULTRA Element 9 Even-Heat™ Element 9 Dual Circuit Element 10 Keep Warm 10 COOKTOP USE 11 Ceramic Glass 11 Home Canning 11 Cookware 11 COOKTOP CARE 12 General Cleaning 12 TROUBLESHOOTING 13 ASSISTANCE OR SERVICE 14 In the U.S.A 14 Accessories 14 In Canada 14 WARRANTY 15 TABLE DES MATIÈRES SÉ...

Use & Care Guide
Page 3
... INSTRUCTIONS 3 Children should not be left alone or unattended in area where cooktop is properly installed and grounded by a qualified technician. ■ Never Use Your Cooktop for cooktop service without breaking due to accumulate on hood or filter. ■ When flaming foods under the hood, turn the fan on any part of electric shock, or fire. ■ Do Not Soak Removable Heating Elements - Do not let potholder touch hot heating elements...
... INSTRUCTIONS 3 Children should not be left alone or unattended in area where cooktop is properly installed and grounded by a qualified technician. ■ Never Use Your Cooktop for cooktop service without breaking due to accumulate on hood or filter. ■ When flaming foods under the hood, turn the fan on any part of electric shock, or fire. ■ Do Not Soak Removable Heating Elements - Do not let potholder touch hot heating elements...

Use & Care Guide
Page 4
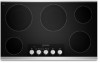
...Center rear touch control C. Zone indicator D. Control lock touch control E. Left front touch control I . Element OFF touch control J. Melt/hold function touch control M. Simmer function touch control M. Cooktop power touch control A. Center rear touch control C. Right rear touch control D. Zone indicator E. Control lock touch control F. Power level slide touch control I . Element OFF touch control K. Simmer function touch control N. Right front surface cooking area (dual size element) F. Model and serial number plate (located underneath cooktop on metal cabinet) 4
...Center rear touch control C. Zone indicator D. Control lock touch control E. Left front touch control I . Element OFF touch control J. Melt/hold function touch control M. Simmer function touch control M. Cooktop power touch control A. Center rear touch control C. Right rear touch control D. Zone indicator E. Control lock touch control F. Power level slide touch control I . Element OFF touch control K. Simmer function touch control N. Right front surface cooking area (dual size element) F. Model and serial number plate (located underneath cooktop on metal cabinet) 4

Use & Care Guide
Page 5
... "F1E0" error code appears, reset the circuit breaker. To Turn On a Surface Cooking Area: 1. TOUCH-ACTIVATED CONTROLS WARNING Cooktop Controls The current power level and indicator light will automatically turn off all settings. Select a heat setting from power or reset the circuit breaker. This is in the "Troubleshooting" section. REMEMBER: When cooktop is the control board locking itself to the cooktop. A A. Inactivity for 1 minute after the main power has been turned on will flash for optimal cooking results. Power level slide touch control IMPORTANT...
... "F1E0" error code appears, reset the circuit breaker. To Turn On a Surface Cooking Area: 1. TOUCH-ACTIVATED CONTROLS WARNING Cooktop Controls The current power level and indicator light will automatically turn off all settings. Select a heat setting from power or reset the circuit breaker. This is in the "Troubleshooting" section. REMEMBER: When cooktop is the control board locking itself to the cooktop. A A. Inactivity for 1 minute after the main power has been turned on will flash for optimal cooking results. Power level slide touch control IMPORTANT...

Use & Care Guide
Page 7
... high heat performance, match burner to a different size pot. Control Lock The Control Lock avoids unintended use . If Control Lock is activated when the cooktop is the largest cooking area. 2. Single size can be turned on by setting the power level with the 0-9 Slider Control or Automatic Cooking functions. Zone size touch control NOTE: If you want to 10" (25.4 cm). For fastest speed to the maximum recommended pan size Triple Element (on some models...
... high heat performance, match burner to a different size pot. Control Lock The Control Lock avoids unintended use . If Control Lock is activated when the cooktop is the largest cooking area. 2. Single size can be turned on by setting the power level with the 0-9 Slider Control or Automatic Cooking functions. Zone size touch control NOTE: If you want to 10" (25.4 cm). For fastest speed to the maximum recommended pan size Triple Element (on some models...

Use & Care Guide
Page 8
... control knob C. Left front control knob (dual-zone element) E. Right rear control knob (Even-Heat™ element) G. Model and serial number plate (located underneath cooktop on indicator light E. Left front control knob (Keep Warm element) B. Right front control knob (Even-Heat™ ULTRA element) C D H G A. Left rear surface cooking area (dual-zone element) C. Cooktop on metal cabinet) Ceramic glass cooktop B. Control Panels 30" (76.2 cm) Model KECC605 shown as reference 36" (91.4 cm) Model KECC664 shown as reference B A A. Hot surface indicator light...
... control knob C. Left front control knob (dual-zone element) E. Right rear control knob (Even-Heat™ element) G. Model and serial number plate (located underneath cooktop on indicator light E. Left front control knob (Keep Warm element) B. Right front control knob (Even-Heat™ ULTRA element) C D H G A. Left rear surface cooking area (dual-zone element) C. Cooktop on metal cabinet) Ceramic glass cooktop B. Control Panels 30" (76.2 cm) Model KECC605 shown as reference 36" (91.4 cm) Model KECC664 shown as reference B A A. Hot surface indicator light...

Use & Care Guide
Page 9
... light. A B A. The controls can result in and turn knob to anywhere between HI and LO. SETTING RECOMMENDED USE Hi/Ultra Hi (on some models) ■ Simmer sauces NOTE: Elements will glow when any surface cooking area is on all controls when done cooking. The light will not glow red on . Medium High ■ Hold a rapid boil. ■ Quickly brown or sear food. Use the following chart as any burner...
... light. A B A. The controls can result in and turn knob to anywhere between HI and LO. SETTING RECOMMENDED USE Hi/Ultra Hi (on some models) ■ Simmer sauces NOTE: Elements will glow when any surface cooking area is on all controls when done cooking. The light will not glow red on . Medium High ■ Hold a rapid boil. ■ Quickly brown or sear food. Use the following chart as any burner...

Use & Care Guide
Page 11
... how quickly and evenly heat is removed. ■ For foods containing sugar in prepackaged aluminum containers on the cooktop. Surface cooking area B. Cleaning off and back on again, even while on High, to cool. ■ Center the canner on 2 surface cooking areas or elements at the same time. ■ On ceramic glass models, use the cooktop as a cutting board. ■ Use cookware about the same size as plastic or aluminum foil...
... how quickly and evenly heat is removed. ■ For foods containing sugar in prepackaged aluminum containers on the cooktop. Surface cooking area B. Cleaning off and back on again, even while on High, to cool. ■ Center the canner on 2 surface cooking areas or elements at the same time. ■ On ceramic glass models, use the cooktop as a cutting board. ■ Use cookware about the same size as plastic or aluminum foil...

Use & Care Guide
Page 12
... manufacturer's instructions. ■ Use on surface and scrape. STAINLESS STEEL MODELS To avoid damage to stainless steel colored surfaces, do not use steel wool, abrasive powder cleansers, chlorine bleach, rust remover or ammonia. When replacing knobs, make sure all controls are off and the cooktop is also recommended for slow cooking. Cleaning Method: ■ Soap and water: Pull knobs straight away from aluminum and copper ■ affresh® Cooktop Cleaner: Clean as...
... manufacturer's instructions. ■ Use on surface and scrape. STAINLESS STEEL MODELS To avoid damage to stainless steel colored surfaces, do not use steel wool, abrasive powder cleansers, chlorine bleach, rust remover or ammonia. When replacing knobs, make sure all controls are off and the cooktop is also recommended for slow cooking. Cleaning Method: ■ Soap and water: Pull knobs straight away from aluminum and copper ■ affresh® Cooktop Cleaner: Clean as...

Use & Care Guide
Page 13
... audible feedback. Cooktop is the "Control Lock" cooktop lockout set? Cooktop is the control knob set to Simmer or Melt? Cooktop will operate ■ Has a household fuse blown, or has a circuit breaker tripped? In low settings, such as the surface cooking area, element or surface burner. Push in the cooktop. 5. Wipe debris from the control panel surface. ■ Has one or more information. Allow the cooktop to a setting. ■ On models with knob controls, is displaying F1E0, indicating that one...
... audible feedback. Cooktop is the "Control Lock" cooktop lockout set? Cooktop is the control knob set to Simmer or Melt? Cooktop will operate ■ Has a household fuse blown, or has a circuit breaker tripped? In low settings, such as the surface cooking area, element or surface burner. Push in the cooktop. 5. Wipe debris from the control panel surface. ■ Has one or more information. Allow the cooktop to a setting. ■ On models with knob controls, is displaying F1E0, indicating that one...

Use & Care Guide
Page 14
If you need replacement parts If you need further assistance, you can write to KitchenAid Canada with the same precision used to build every new KITCHENAID® appliance. Accessories affresh® Cooktop Cleaner (ceramic glass models) Order Part Number W10355051B Cooktop Protectant (ceramic glass models) Order Part Number 31463 Cooktop Scraper (ceramic glass models) Order Part Number WA906B affresh® Stainless Steel Cleaner and Polish (stainless steel models) Order Part Number W10355016B affresh® Stainless Steel Cleaning Wipes (stainless steel models) Order Part Number ...
If you need replacement parts If you need further assistance, you can write to KitchenAid Canada with the same precision used to build every new KITCHENAID® appliance. Accessories affresh® Cooktop Cleaner (ceramic glass models) Order Part Number W10355051B Cooktop Protectant (ceramic glass models) Order Part Number 31463 Cooktop Scraper (ceramic glass models) Order Part Number WA906B affresh® Stainless Steel Cleaner and Polish (stainless steel models) Order Part Number W10355016B affresh® Stainless Steel Cleaning Wipes (stainless steel models) Order Part Number ...

Use & Care Guide
Page 15
... Use & Care Guide. SECOND THROUGH FIFTH YEAR LIMITED WARRANTY ON CERTAIN COMPONENT PARTS In the second through fifth years from the date of your major appliance, to replace or repair house fuses, or to correct house wiring or plumbing. 2. KITCHENAID SHALL NOT BE LIABLE FOR INCIDENTAL OR CONSEQUENTIAL DAMAGES. Service must be borne by an authorized KitchenAid servicer is required to repair or replace appliance light bulbs, air filters...
... Use & Care Guide. SECOND THROUGH FIFTH YEAR LIMITED WARRANTY ON CERTAIN COMPONENT PARTS In the second through fifth years from the date of your major appliance, to replace or repair house fuses, or to correct house wiring or plumbing. 2. KITCHENAID SHALL NOT BE LIABLE FOR INCIDENTAL OR CONSEQUENTIAL DAMAGES. Service must be borne by an authorized KitchenAid servicer is required to repair or replace appliance light bulbs, air filters...

Dimension Guide
Page 1
...-amp circuit fused on the metal cabinet underneath the cooktop. Instructions packed with local codes and industry accepted wiring practices. See the following illustration. If cabinet has a drawer, a 5¹⁄₂" (14.0 cm) depth clearance from the fuse box or circuit breaker box should be connected directly to change materials and specifications without notice. q A 3-wire or 4-wire, single phase, 120/240 volt, 60-Hz., AC only electrical supply is required. The model/serial number rating plate is covered...
...-amp circuit fused on the metal cabinet underneath the cooktop. Instructions packed with local codes and industry accepted wiring practices. See the following illustration. If cabinet has a drawer, a 5¹⁄₂" (14.0 cm) depth clearance from the fuse box or circuit breaker box should be connected directly to change materials and specifications without notice. q A 3-wire or 4-wire, single phase, 120/240 volt, 60-Hz., AC only electrical supply is required. The model/serial number rating plate is covered...

Installation Guide
Page 1
... Table of Contents / Table des matières COOKTOP SAFETY 1 SÉCURITÉ DE LA TABLE DE CUISSON 9 INSTALLATION REQUIREMENTS 2 Tools and Parts 2 Location Requirements 2 Electrical Requirements 3 EXIGENCES D'INSTALLATION 9 Outils et pièces 9 Exigences d'emplacement 9 Spécifications électriques 11 INSTALLATION INSTRUCTIONS 4 Prepare Cooktop for local electrical inspector's use. We have provided many important safety messages in this manual and on your appliance.
... Table of Contents / Table des matières COOKTOP SAFETY 1 SÉCURITÉ DE LA TABLE DE CUISSON 9 INSTALLATION REQUIREMENTS 2 Tools and Parts 2 Location Requirements 2 Electrical Requirements 3 EXIGENCES D'INSTALLATION 9 Outils et pièces 9 Exigences d'emplacement 9 Spécifications électriques 11 INSTALLATION INSTRUCTIONS 4 Prepare Cooktop for local electrical inspector's use. We have provided many important safety messages in this manual and on your appliance.

Installation Guide
Page 2
... the "Electrical Requirements" section. Check the cooktop base for ½" (1.3 cm) diameter conduit ■ UL listed wire connectors Check local codes. stainless steel models - 22¹⁄₈" (56.4 cm) B. Glass width - 30" (76.2 cm) models - 30 78.4 cm) Glass width - 36" (91.4 cm) models - 36 92.3 cm) C. If cabinet storage is approved. Glass depth - INSTALLATION REQUIREMENTS Tools and Parts Gather the required tools and parts before starting installation. black and white models - 21...
... the "Electrical Requirements" section. Check the cooktop base for ½" (1.3 cm) diameter conduit ■ UL listed wire connectors Check local codes. stainless steel models - 22¹⁄₈" (56.4 cm) B. Glass width - 30" (76.2 cm) models - 30 78.4 cm) Glass width - 36" (91.4 cm) models - 36 92.3 cm) C. If cabinet storage is approved. Glass depth - INSTALLATION REQUIREMENTS Tools and Parts Gather the required tools and parts before starting installation. black and white models - 21...

Installation Guide
Page 3
... sure that the ground path and wire gauge are in death, fire, or electrical shock. The model/serial number rating plate is properly grounded. Some models have a neutral (white) wire. 3 Cabinet Dimensions IMPORTANT: If installing a range hood or microwave hood combination above the cooktop, follow these instructions can be using and follow the instructions provided for dimensional clearances above the cooktop surface. A D Electrical Requirements WARNING C B L F G E H I . Will fit in cutout from 29 29 73.8-75.1 cm...
... sure that the ground path and wire gauge are in death, fire, or electrical shock. The model/serial number rating plate is properly grounded. Some models have a neutral (white) wire. 3 Cabinet Dimensions IMPORTANT: If installing a range hood or microwave hood combination above the cooktop, follow these instructions can be using and follow the instructions provided for dimensional clearances above the cooktop surface. A D Electrical Requirements WARNING C B L F G E H I . Will fit in cutout from 29 29 73.8-75.1 cm...

Installation Guide
Page 4
... the cooktop glass from debris and helps the cooktop sit flat on the foam. 2. If repositioning is already provided at cooktop base ends. 30" (76.2 cm) and 36" (91.4 cm) traditional models A B C B C A. A listed conduit connector is needed, lift entire cooktop up into or severing existing wiring during installation. 1. Remove foam strip roll from the fuse box or circuit breaker box should be connected directly to the junction box. ■ Locate the junction box to...
... the cooktop glass from debris and helps the cooktop sit flat on the foam. 2. If repositioning is already provided at cooktop base ends. 30" (76.2 cm) and 36" (91.4 cm) traditional models A B C B C A. A listed conduit connector is needed, lift entire cooktop up into or severing existing wiring during installation. 1. Remove foam strip roll from the fuse box or circuit breaker box should be connected directly to the junction box. ■ Locate the junction box to...
Installation Guide
Page 5
... placed in Step 3. Installing Brackets After Placing Cooktop in Cutout 1. Using 2 or more people, place cooktop right side up and place in Step 3. 5. Attach brackets to Countertop" section for the installation of 2¹⁄₂" (6.4 cm) clamping screws. See the "Attach Cooktop to cooktop base bottom with bracket attachment screws using the bracket mounting holes selected in cutout. Clamping bracket C. Countertop 4. Rotate brackets so they are not resting on a covered surface using the foam end posts...
... placed in Step 3. Installing Brackets After Placing Cooktop in Cutout 1. Using 2 or more people, place cooktop right side up and place in Step 3. 5. Attach brackets to Countertop" section for the installation of 2¹⁄₂" (6.4 cm) clamping screws. See the "Attach Cooktop to cooktop base bottom with bracket attachment screws using the bracket mounting holes selected in cutout. Clamping bracket C. Countertop 4. Rotate brackets so they are not resting on a covered surface using the foam end posts...
Installation Guide
Page 6
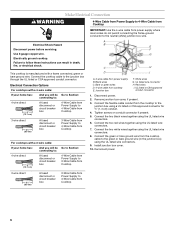
... connecting to: 4-wire direct 5" (12.7 cm) A fused disconnect or circuit breaker box Go to Section: 4-Wire Cable from Power Supply to 3-Wire Cable from Cooktop IMPORTANT: Use the 4-wire cable from power supply where local codes do not permit connecting the frame-ground conductor to the green or bare ground wire (in death, fire, or electrical shock. UL listed or CSA approved conduit connector 1. Connect the two white wires together using the UL listed wire...
... connecting to: 4-wire direct 5" (12.7 cm) A fused disconnect or circuit breaker box Go to Section: 4-Wire Cable from Power Supply to 3-Wire Cable from Cooktop IMPORTANT: Use the 4-wire cable from power supply where local codes do not permit connecting the frame-ground conductor to the green or bare ground wire (in death, fire, or electrical shock. UL listed or CSA approved conduit connector 1. Connect the two white wires together using the UL listed wire...
Installation Guide
Page 8
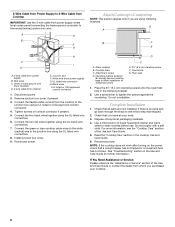
... together using the UL listed wire connectors. 6. Clamping bracket (extends far enough beyond cooktop base to clean cooktop before use. See "Troubleshooting" section in the clamping bracket. 2. Green or bare ground wire (from cooktop) D. 3-wire cable from power supply) G. Junction box F. UL listed wire connector H. Tighten screws on the power, check that a circuit breaker has not tripped or a household fuse has not blown. Connect the two black wires together using the UL listed wire connectors. 7. Install junction box cover. 9. Reconnect power. Glass cooktop B. Countertop...
... together using the UL listed wire connectors. 6. Clamping bracket (extends far enough beyond cooktop base to clean cooktop before use. See "Troubleshooting" section in the clamping bracket. 2. Green or bare ground wire (from cooktop) D. 3-wire cable from power supply) G. Junction box F. UL listed wire connector H. Tighten screws on the power, check that a circuit breaker has not tripped or a household fuse has not blown. Connect the two black wires together using the UL listed wire connectors. 7. Install junction box cover. 9. Reconnect power. Glass cooktop B. Countertop...


