
Installation Guide
Page 1
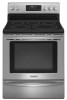
... Installer • Read all instructions contained in these installation instructions before installing range. • Remove all packing material from the oven compartments before connecting the gas & electrical supply to the range. • Observe all governing codes and ordinances. • Be sure ...THE COOKING SURFACE AND THE BOTTOM OF AN UNPROTECTED WOOD OR METAL CABINET; INSTALLATION INSTRUCTIONS FOR FREESTANDING ELECTRIC RANGE INSTALLATION AND SERVICE MUST BE PERFORMED BY A QUALIFIED INSTALLER. READ AND SAVE THESE INSTRUCTIONS FOR FUTURE REFERENCE. Provide adequate clearances between the...
... Installer • Read all instructions contained in these installation instructions before installing range. • Remove all packing material from the oven compartments before connecting the gas & electrical supply to the range. • Observe all governing codes and ordinances. • Be sure ...THE COOKING SURFACE AND THE BOTTOM OF AN UNPROTECTED WOOD OR METAL CABINET; INSTALLATION INSTRUCTIONS FOR FREESTANDING ELECTRIC RANGE INSTALLATION AND SERVICE MUST BE PERFORMED BY A QUALIFIED INSTALLER. READ AND SAVE THESE INSTRUCTIONS FOR FUTURE REFERENCE. Provide adequate clearances between the...

Installation Guide
Page 2
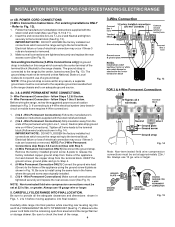
... the wall or floor mount method. For wall mount, locate the bracket by properly installed Anti-Tip Bracket and screws packed with the range. INSTALLATION INSTRUCTIONS FOR FREESTANDING ELECTRIC RANGE BEFORE STARTING Tools You Will Need For leveling legs and Anti-Tip Bracket: • Adjustable wrench or channel lock pliers • 5/16" Nutdriver...
... the wall or floor mount method. For wall mount, locate the bracket by properly installed Anti-Tip Bracket and screws packed with the range. INSTALLATION INSTRUCTIONS FOR FREESTANDING ELECTRIC RANGE BEFORE STARTING Tools You Will Need For leveling legs and Anti-Tip Bracket: • Adjustable wrench or channel lock pliers • 5/16" Nutdriver...

Installation Guide
Page 3
...See Fig. 8). To use with 1-3/8" dia. IMPORTANT NOTE: DO NOT LOOSEN the factory installed nut connections which secure the range wiring to a 4-Wire electrical system (new branch-circuit or mobile home requires 4-Wire connection): 1. Cut and discard the copper ground strap & plate.... for 3-Wire connections. 3. MODELS REQUIRING POWER SUPPLY CORD KIT. INSTALLATION INSTRUCTIONS FOR FREESTANDING ELECTRIC RANGE 2b. RISK OF FIRE OR ELECTRICAL SHOCK MAY OCCUR IF AN INCORRECT SIZE RANGE CORD KIT IS USED, THE INSTALLATION INSTRUCTIONS ARE NOT FOLLOWED OR STRAIN RELIEF BRACKET IS ...
...See Fig. 8). To use with 1-3/8" dia. IMPORTANT NOTE: DO NOT LOOSEN the factory installed nut connections which secure the range wiring to a 4-Wire electrical system (new branch-circuit or mobile home requires 4-Wire connection): 1. Cut and discard the copper ground strap & plate.... for 3-Wire connections. 3. MODELS REQUIRING POWER SUPPLY CORD KIT. INSTALLATION INSTRUCTIONS FOR FREESTANDING ELECTRIC RANGE 2b. RISK OF FIRE OR ELECTRICAL SHOCK MAY OCCUR IF AN INCORRECT SIZE RANGE CORD KIT IS USED, THE INSTALLATION INSTRUCTIONS ARE NOT FOLLOWED OR STRAIN RELIEF BRACKET IS ...
Installation Guide
Page 4
... block (Follow wire locations shown in the frame where the ground screw was originally installed. 5. (3 & 4 - INSTALLATION INSTRUCTIONS FOR FREESTANDING ELECTRIC RANGE or 4B. The ground strap is removed for Line 1, Line 2 and Neutral and tighten securely to the terminal block. Before wiring the...connectors for any reason, a separate ground wire must not be connected to the separate ground screw attached to the range chassis and to check the level of electrical connection may occur if these 3 nuts are tightened securely and replace the rear access cover (See Fig. 9). ...
... block (Follow wire locations shown in the frame where the ground screw was originally installed. 5. (3 & 4 - INSTALLATION INSTRUCTIONS FOR FREESTANDING ELECTRIC RANGE or 4B. The ground strap is removed for Line 1, Line 2 and Neutral and tighten securely to the terminal block. Before wiring the...connectors for any reason, a separate ground wire must not be connected to the separate ground screw attached to the range chassis and to check the level of electrical connection may occur if these 3 nuts are tightened securely and replace the rear access cover (See Fig. 9). ...

Use & Care Guide
Page 3
... on appliance — flammable materials should be done only by properly installed anti-tip bracket provided with the National Electrical Code ANSI/NFPA No. 70 latest edition and local electrical code requirements. If the range is the safety alert symbol. Storage in or on the risk type. - DO NOT leave small children unattended...
... on appliance — flammable materials should be done only by properly installed anti-tip bracket provided with the National Electrical Code ANSI/NFPA No. 70 latest edition and local electrical code requirements. If the range is the safety alert symbol. Storage in or on the risk type. - DO NOT leave small children unattended...
Use & Care Guide
Page 4
...should never be allowed to sit or stand on the backguard of the range. Both surface heating and oven heating elements may result in risk of electric shock, or fire. • Use care when opening oven door, ...warmer drawer or lower oven door — Stand to the side of the range when opening the door of ... before moving. • Do not use , do not place plastic or heat-sensitive items on the range to reach items could be kept away from steam. Remove all utensils from the rack before you remove or...
...should never be allowed to sit or stand on the backguard of the range. Both surface heating and oven heating elements may result in risk of electric shock, or fire. • Use care when opening oven door, ...warmer drawer or lower oven door — Stand to the side of the range when opening the door of ... before moving. • Do not use , do not place plastic or heat-sensitive items on the range to reach items could be kept away from steam. Remove all utensils from the rack before you remove or...
Use & Care Guide
Page 5
.... • Clean cook top with one or more surface units of clothing. IMPORTANT INSTRUCTIONS FOR CLEANING YOUR RANGE Before manually cleaning any kind should be sure all parts free of some birds is extremely sensitive to the ... Not Use Oven Cleaners — No commercial oven cleaner or oven liner protective coating of any part of the range, be positioned so that has boiled dry may be taken not to accumulate. • Kitchen cleaners and aerosols...remove the oven racks, broil pan, broil pan insert and any range. Save these instructions for cook top use of electric shock.
.... • Clean cook top with one or more surface units of clothing. IMPORTANT INSTRUCTIONS FOR CLEANING YOUR RANGE Before manually cleaning any kind should be sure all parts free of some birds is extremely sensitive to the ... Not Use Oven Cleaners — No commercial oven cleaner or oven liner protective coating of any part of the range, be positioned so that has boiled dry may be taken not to accumulate. • Kitchen cleaners and aerosols...remove the oven racks, broil pan, broil pan insert and any range. Save these instructions for cook top use of electric shock.

Use & Care Guide
Page 30
... rear of the oven cavity and is much lower than that of the range, be in place whenever the oven is in the oven bottom or cover an entire oven rack with a new 40 watt appliance bulb. 4. Turn electrical power off at main source (or plug the appliance in this Use & Care... Guide. 30 Replace glass shield over bulb and snap wire holder back into place. 5. The clock will the utensil be damaged or destroyed, but it more detailed information about cleaning specific parts of the range. Aluminum foil...
... rear of the oven cavity and is much lower than that of the range, be in place whenever the oven is in the oven bottom or cover an entire oven rack with a new 40 watt appliance bulb. 4. Turn electrical power off at main source (or plug the appliance in this Use & Care... Guide. 30 Replace glass shield over bulb and snap wire holder back into place. 5. The clock will the utensil be damaged or destroyed, but it more detailed information about cleaning specific parts of the range. Aluminum foil...
Use & Care Guide
Page 32
... section. Appliance must first be accessible for service, review the following list. Surface element is plugged properly into outlet. • Electrical power outage. The time of day must be set properly for the desired cooking function in this checklist. Cookware materials and weight ...149; Lightweight or warped pans used . See Setting Oven Controls section and review instructions for the desired function. Possible solutions to make range appear not level. Entire appliance does not operate. • Make sure power cord is too hot or not hot enough. Because ...
... section. Appliance must first be accessible for service, review the following list. Surface element is plugged properly into outlet. • Electrical power outage. The time of day must be set properly for the desired cooking function in this checklist. Cookware materials and weight ...149; Lightweight or warped pans used . See Setting Oven Controls section and review instructions for the desired function. Possible solutions to make range appear not level. Entire appliance does not operate. • Make sure power cord is too hot or not hot enough. Because ...


