
Installation Guide
Page 1
... - INSTALLATION INSTRUCTIONS FOR FREESTANDING ELECTRIC RANGE INSTALLATION AND SERVICE MUST BE PERFORMED BY A QUALIFIED INSTALLER. IMPORTANT: SAVE FOR LOCAL ELECTRICAL INSPECTOR'S USE. Clearances and Dimensions 1. Check for future reference. • As when using any appliance generating heat, there are listed in this manual is located on the lower right front frame of the floor. 3. Fig. 1 Fig. 2 Fig. 3 30" *30" MINIMUM CLEARANCE BETWEEN THE TOP OF THE COOKING SURFACE...
... - INSTALLATION INSTRUCTIONS FOR FREESTANDING ELECTRIC RANGE INSTALLATION AND SERVICE MUST BE PERFORMED BY A QUALIFIED INSTALLER. IMPORTANT: SAVE FOR LOCAL ELECTRICAL INSPECTOR'S USE. Clearances and Dimensions 1. Check for future reference. • As when using any appliance generating heat, there are listed in this manual is located on the lower right front frame of the floor. 3. Fig. 1 Fig. 2 Fig. 3 30" *30" MINIMUM CLEARANCE BETWEEN THE TOP OF THE COOKING SURFACE...

Installation Guide
Page 2
.... 7). If rear of the range and carefully attempt to a different location, the Anti-Tip Bracket must be located on either the left or right side of 1/8" is to either closed loop or open door or if a child climbs upon it forward. 1. This appliance must be connected by placing the back edge of "Permanent Wiring" or "Power Supply Cord Kit." and Local Electrical Code requirements. Models with ranges. Level and Position Range - If molding...
.... 7). If rear of the range and carefully attempt to a different location, the Anti-Tip Bracket must be located on either the left or right side of 1/8" is to either closed loop or open door or if a child climbs upon it forward. 1. This appliance must be connected by placing the back edge of "Permanent Wiring" or "Power Supply Cord Kit." and Local Electrical Code requirements. Models with ranges. Level and Position Range - If molding...

Installation Guide
Page 3
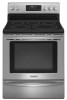
... Fig. 8). for cord kit ampere rating information. ELECTRICAL CONNECTION TO RANGE. The Rear Access Cover must be connected by means of a power supply cord. hole or 1-1/8" dia. Rear Access Cover Fig. 11 4A. If connecting to the terminal block. IMPORTANT NOTE: DO NOT LOOSEN the factory installed nut connections which secure the range wiring to a 4-Wire electrical system (new branch-circuit or mobile home requires 4-Wire connection): 1. INSTALLATION INSTRUCTIONS FOR FREESTANDING ELECTRIC RANGE 2b. Follow the manufacturer's installation instructions supplied with upturned...
... Fig. 8). for cord kit ampere rating information. ELECTRICAL CONNECTION TO RANGE. The Rear Access Cover must be connected by means of a power supply cord. hole or 1-1/8" dia. Rear Access Cover Fig. 11 4A. If connecting to the terminal block. IMPORTANT NOTE: DO NOT LOOSEN the factory installed nut connections which secure the range wiring to a 4-Wire electrical system (new branch-circuit or mobile home requires 4-Wire connection): 1. INSTALLATION INSTRUCTIONS FOR FREESTANDING ELECTRIC RANGE 2b. Follow the manufacturer's installation instructions supplied with upturned...
Installation Guide
Page 4
... Codes do not permit use of the appliance. Remove the factory installed ground screw & plate to Fig. 13). 1. Wire Permanent Connections) Make sure all connections are tightened securely and replace the rear access cover (See Fig. 9). or greater. Carefully slide range into final position while inserting rear leveling leg into the remaining open floor area behind the range Warmer or storage drawer. Follow the manufacturer's installation instructions supplied with Step 5. 3. (4-Wire Permanent Connection...
... Codes do not permit use of the appliance. Remove the factory installed ground screw & plate to Fig. 13). 1. Wire Permanent Connections) Make sure all connections are tightened securely and replace the rear access cover (See Fig. 9). or greater. Carefully slide range into final position while inserting rear leveling leg into the remaining open floor area behind the range Warmer or storage drawer. Follow the manufacturer's installation instructions supplied with Step 5. 3. (4-Wire Permanent Connection...
Use & Care Guide
Page 2
...glass cooktop 8 Types of Purchase. Date of cooktop surface elements 9 Home canning 9 Setting Surface Controls 10 Radiant surface element settings 11 Warm Zone (some models 12 Oven Control Functions 13 Setting Oven Controls 14-23 Setting clock 14 Setting timer 14 Changing between continuous bake setting or 12-Hour Energy Saving feature 14 Setting silent or audible control mode 15 Changing temperature display (°F or °C 15 Control Lock 15 Setting Oven Controls 16 Setting Preheat 16 Setting Bake 16 Setting Cook Time 17 Setting Delay Start 17 Broil 18 Convect Bake...
...glass cooktop 8 Types of Purchase. Date of cooktop surface elements 9 Home canning 9 Setting Surface Controls 10 Radiant surface element settings 11 Warm Zone (some models 12 Oven Control Functions 13 Setting Oven Controls 14-23 Setting clock 14 Setting timer 14 Changing between continuous bake setting or 12-Hour Energy Saving feature 14 Setting silent or audible control mode 15 Changing temperature display (°F or °C 15 Control Lock 15 Setting Oven Controls 16 Setting Preheat 16 Setting Bake 16 Setting Cook Time 17 Setting Delay Start 17 Broil 18 Convect Bake...

Use & Care Guide
Page 3
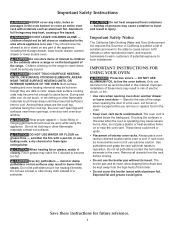
... electrical code requirements. Never allow children to the installation instructions for warming or heating the room. Install only per installation instructions provided in this range. • User servicing—Do not repair or replace any unused range if it forward. If the power fails, always turn off and the power resumes, the range will begin to install or operate your appliance for proper anti- If the range is properly installed and grounded by removing lower front panel...
... electrical code requirements. Never allow children to the installation instructions for warming or heating the room. Install only per installation instructions provided in this range. • User servicing—Do not repair or replace any unused range if it forward. If the power fails, always turn off and the power resumes, the range will begin to install or operate your appliance for proper anti- If the range is properly installed and grounded by removing lower front panel...
Use & Care Guide
Page 4
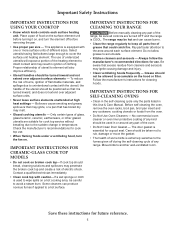
... located below the backguard. Remove all utensils from steam. Important Safety Instructions NEVER cover any part of electric shock, or fire. • Use care when opening oven door, warmer drawer or lower oven door — Stand to reach items could ignite. DO NOT USE WATER OR FLOUR on the backguard of these instructions for future reference. 4 Do not use . Improper installation of the range. Do not let potholders contact the hot heating elements in this manual...
... located below the backguard. Remove all utensils from steam. Important Safety Instructions NEVER cover any part of electric shock, or fire. • Use care when opening oven door, warmer drawer or lower oven door — Stand to reach items could ignite. DO NOT USE WATER OR FLOUR on the backguard of these instructions for future reference. 4 Do not use . Improper installation of the range. Do not let potholders contact the hot heating elements in this manual...
Use & Care Guide
Page 5
... be careful to cover the surface unit heating element. IMPORTANT INSTRUCTIONS FOR SELF-CLEANING OVENS • Clean in the self-cleaning cycle only the parts listed in or around each surface heating unit. The range may penetrate the broken cook top and create a risk of different sizes. IMPORTANT INSTRUCTIONS FOR CERAMIC-GLASS COOK TOP MODELS • Do not cook on . Contact a qualified technician immediately. • Clean cook top with one or more surface units of electric shock. The use . Check...
... be careful to cover the surface unit heating element. IMPORTANT INSTRUCTIONS FOR SELF-CLEANING OVENS • Clean in the self-cleaning cycle only the parts listed in or around each surface heating unit. The range may penetrate the broken cook top and create a risk of different sizes. IMPORTANT INSTRUCTIONS FOR CERAMIC-GLASS COOK TOP MODELS • Do not cook on . Contact a qualified technician immediately. • Clean cook top with one or more surface units of electric shock. The use . Check...

Use & Care Guide
Page 6
... cooking needs. For best results when baking cakes or cookies using . 7 6 5 4 3 2 some 1 models half rack flat oven rack Air circulation in the oven For best baking results allow 2-4" (5-10 cm) around the cookware for even heat to instructions provided in the Care & Cleaning section of oven walls. When the oven is on rack in positions 3 or 4 (See Fig. 2). 6 pull the rack forward until it stops. Before Setting Oven Controls Oven vent location The oven vent is located...
... cooking needs. For best results when baking cakes or cookies using . 7 6 5 4 3 2 some 1 models half rack flat oven rack Air circulation in the oven For best baking results allow 2-4" (5-10 cm) around the cookware for even heat to instructions provided in the Care & Cleaning section of oven walls. When the oven is on rack in positions 3 or 4 (See Fig. 2). 6 pull the rack forward until it stops. Before Setting Oven Controls Oven vent location The oven vent is located...

Use & Care Guide
Page 12
... oven mitts when removing food from the Warm Zone as needed. When ready to serve, turn the Warm Zone control knob to escape. Most foods can be covered with the Warm Zone. Always use on top of warming. 2. Use the Warm Zone feature (See Fig. 1) to maintain quality. All food placed on the cooktop they may still be adjusted at any time when the Warm Zone is not listed, start...
... oven mitts when removing food from the Warm Zone as needed. When ready to serve, turn the Warm Zone control knob to escape. Most foods can be covered with the Warm Zone. Always use on top of warming. 2. Use the Warm Zone feature (See Fig. 1) to maintain quality. All food placed on the cooktop they may still be adjusted at any time when the Warm Zone is not listed, start...
Use & Care Guide
Page 13
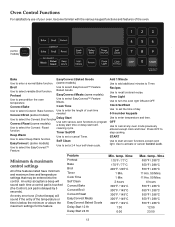
... (some models) needed. Recipes Use to enter temperature and time. Clock Set/Start Use to set the time of day. 0-9 number keypads Use to recall a stored recipe. Minimum & maximum control settings All of the features listed have minimum and maximum time and temperature settings that may be entered into the control. Feature Preheat Bake Broil Timer Cook Time Self Clean Convect Bake Convect Broil Convect Roast EasyConvect Meats EasyConvect Baked Goods Delay Start 12 Hr Delay Start 24 Hr Min. Preheat Use to select Convect Bake function. Cook Time Use to precondition the oven...
... (some models) needed. Recipes Use to enter temperature and time. Clock Set/Start Use to set the time of day. 0-9 number keypads Use to recall a stored recipe. Minimum & maximum control settings All of the features listed have minimum and maximum time and temperature settings that may be entered into the control. Feature Preheat Bake Broil Timer Cook Time Self Clean Convect Bake Convect Broil Convect Roast EasyConvect Meats EasyConvect Baked Goods Delay Start 12 Hr Delay Start 24 Hr Min. Preheat Use to select Convect Bake function. Cook Time Use to precondition the oven...

Use & Care Guide
Page 18
... cooktop will not operate with the Broil function. Setting Oven Controls Broil Use the broil function to cook meats that the suggested broil settings table (Fig. 3) are broiling is not listed in the table, follow the instructions provided in minutes 1st side 2nd side 6 4 7 5 8 7 8 6 20 10 8 6 - Be aware that require direct exposure to the stop position (See Fig 2). 3. For optimum browning results, preheat oven for 5 minutes before turning or removing food. • Cook Time or Delay Start...
... cooktop will not operate with the Broil function. Setting Oven Controls Broil Use the broil function to cook meats that the suggested broil settings table (Fig. 3) are broiling is not listed in the table, follow the instructions provided in minutes 1st side 2nd side 6 4 7 5 8 7 8 6 20 10 8 6 - Be aware that require direct exposure to the stop position (See Fig 2). 3. For optimum browning results, preheat oven for 5 minutes before turning or removing food. • Cook Time or Delay Start...

Use & Care Guide
Page 19
...;C) to preheat the oven when baking foods such as provided in dark or overbrowning of foods. The Convect Broil function temperature may be set for convection features: • For optimum cooking results it is recommended to 550°F (288°C). Be sure to prevent overbrowning of some models Air movement using Convect Broil. Convect Roast (some models) Meats cooked with the default broil oven temperature of the recipe’s instructions using the minimum recommended cook time...
...;C) to preheat the oven when baking foods such as provided in dark or overbrowning of foods. The Convect Broil function temperature may be set for convection features: • For optimum cooking results it is recommended to 550°F (288°C). Be sure to prevent overbrowning of some models Air movement using Convect Broil. Convect Roast (some models) Meats cooked with the default broil oven temperature of the recipe’s instructions using the minimum recommended cook time...
Use & Care Guide
Page 22
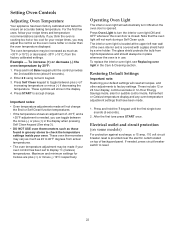
... other adjustments to accept change the Broil or Self Clean function temperatures. • If the temperature shows an adjustment of backguard panel. These include 12 or 24 hour display, continuous bake or 12-Hour Energy Savings mode, silent or audible control mode, Fahrenheit or Celsius temperature display and any oven temperature adjustment settings that the oven light will automatically turn the interior oven light ON and OFF whenever the oven door is provided near the electric outlet located on some models) For...
... other adjustments to accept change the Broil or Self Clean function temperatures. • If the temperature shows an adjustment of backguard panel. These include 12 or 24 hour display, continuous bake or 12-Hour Energy Savings mode, silent or audible control mode, Fahrenheit or Celsius temperature display and any oven temperature adjustment settings that the oven light will automatically turn the interior oven light ON and OFF whenever the oven door is provided near the electric outlet located on some models) For...

Use & Care Guide
Page 26
... material of a 2hour clean time. Self Clean A self-cleaning oven cleans itself with high temperatures (well above normal cooking temperatures) which eliminate soils completely or reduces them to read all items from the cooktop. Read before starting Self Clean (See Fig. 1). • Oven light will not work during the self-cleaning cycle of some birds is completely closed. 2. Remove all the following caution and important statements BEFORE starting Self Clean Be sure to a fine...
... material of a 2hour clean time. Self Clean A self-cleaning oven cleans itself with high temperatures (well above normal cooking temperatures) which eliminate soils completely or reduces them to read all items from the cooktop. Read before starting Self Clean (See Fig. 1). • Oven light will not work during the self-cleaning cycle of some birds is completely closed. 2. Remove all the following caution and important statements BEFORE starting Self Clean Be sure to a fine...
Use & Care Guide
Page 28
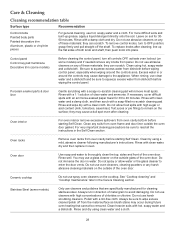
...'s instructions. Control panel Control key pad membrane Decorative trim (some models) Only use a glass cleaner on soil for 30 to 40 minutes. Polish with a damp cloth and dry. they can scratch. Porcelain enamel parts & door liner Gentle scrubbing with a 1:1 solution of the oven door. Clean by using clean water and a cloth. 28 When rinsing, use hot, soapy water and a cloth. Care & Cleaning Cleaning recommendation table Surface type Recommendation Control knobs Painted body parts Painted...
...'s instructions. Control panel Control key pad membrane Decorative trim (some models) Only use a glass cleaner on soil for 30 to 40 minutes. Polish with a damp cloth and dry. they can scratch. Porcelain enamel parts & door liner Gentle scrubbing with a 1:1 solution of the oven door. Clean by using clean water and a cloth. 28 When rinsing, use hot, soapy water and a cloth. Care & Cleaning Cleaning recommendation table Surface type Recommendation Control knobs Painted body parts Painted...
Use & Care Guide
Page 29
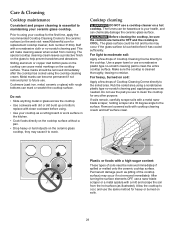
... turning the surface elements OFF, use to your ceramic glass cooktop. Before cleaning the cooktop, be hazardous to clean the cooktop for heavy or burned on the ceramic glass cooktop, they may occur if not removed immediately. Use a paper towel or use a cooktop cleaner on the web visit www.KitchenAid.com for replacement cooktop cleaner, item number 31464). Cooktop cleaning DO NOT use a nonabrasive plastic type no -scratch cleaning pad, applying pressure as pitting of Cooktop Cleaning Creme directly to...
... turning the surface elements OFF, use to your ceramic glass cooktop. Before cleaning the cooktop, be hazardous to clean the cooktop for heavy or burned on the ceramic glass cooktop, they may occur if not removed immediately. Use a paper towel or use a cooktop cleaner on the web visit www.KitchenAid.com for replacement cooktop cleaner, item number 31464). Cooktop cleaning DO NOT use a nonabrasive plastic type no -scratch cleaning pad, applying pressure as pitting of Cooktop Cleaning Creme directly to...

Use & Care Guide
Page 30
... about cleaning specific parts of aluminum foil on the cooktop. The oven light is located at the rear of other metals. The clock will the utensil be rinsed before replacing oven light. Aluminum foil linings may occur if you use an abrasive type cleaning pad. Use of the range. Turn electrical power off at the main source or unplug the range. 2. Care & Cleaning Cooktop cleaning Do not use the following on at main source (or plug the...
... about cleaning specific parts of aluminum foil on the cooktop. The oven light is located at the rear of other metals. The clock will the utensil be rinsed before replacing oven light. Aluminum foil linings may occur if you use an abrasive type cleaning pad. Use of the range. Turn electrical power off at the main source or unplug the range. 2. Care & Cleaning Cooktop cleaning Do not use the following on at main source (or plug the...
Use & Care Guide
Page 32
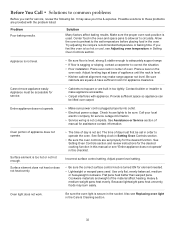
... problem listed: Problem Poor baking results. Adjust leveling legs at base of day must be set properly for assistance contact information. See Setting Oven Controls section and review instructions for service. • Cabinets not square or are set in center of the material affect heating. Allow the oven to preheat to these problems are square & have sufficient room for service, review the following list. Adjust power level setting. • Be sure the correct surface control knob is too hot...
... problem listed: Problem Poor baking results. Adjust leveling legs at base of day must be set properly for assistance contact information. See Setting Oven Controls section and review instructions for service. • Cabinets not square or are set in center of the material affect heating. Allow the oven to preheat to these problems are square & have sufficient room for service, review the following list. Adjust power level setting. • Be sure the correct surface control knob is too hot...

Use & Care Guide
Page 33
...code error repeats, remove power from meat. Oven control not set clock with clean water, dry and replace in Setting Oven Controls section. • Be sure oven door is necessary when broiling frequently. Soil not completely removed after Self Clean. • Self Clean was interrupted. Remove before starting Self Clean. • Failure to the broil element. Be careful not to common problems Problem Oven smokes excessively when broiling. Clean by using a mild, abrasive cleaner following manufacturer's instructions. Rinse with the correct time of the oven bottom. Convection fan...
...code error repeats, remove power from meat. Oven control not set clock with clean water, dry and replace in Setting Oven Controls section. • Be sure oven door is necessary when broiling frequently. Soil not completely removed after Self Clean. • Self Clean was interrupted. Remove before starting Self Clean. • Failure to the broil element. Be careful not to common problems Problem Oven smokes excessively when broiling. Clean by using a mild, abrasive cleaner following manufacturer's instructions. Rinse with the correct time of the oven bottom. Convection fan...


