KitchenAid KERS206XSS Support Question
KitchenAid KERS206XSS Support Question
Find answers below for this question about KitchenAid KERS206XSS.Need a KitchenAid KERS206XSS manual? We have 2 online manuals for this item!
Question posted by mjradomski on December 23rd, 2011
How Do We Remove The Bottom Storage Drawer?
how do we remove the bottom storage drawer? we dropped something behind the stove and are trying to retrieve it from the bottom?
Current Answers
Related KitchenAid KERS206XSS Manual Pages
Installation Guide - Page 1

... FOR LOCAL ELECTRICAL INSPECTOR'S USE. IF CABINET STORAGE IS TO BE PROVIDED, THE RISK CAN BE REDUCED BY INSTALLING A RANGE HOOD THAT PROJECTS HORIZONTALLY A MINIMUM OF 5" BEYOND THE BOTTOM OF THE CABINETS. Serial Plate Locations:
If the information in these installation instructions
before installing range. • Remove all packing material from the oven compartments...
Installation Guide - Page 2

... be mounted to either the left or right side of the range
will be connected by properly installed Anti-Tip Bracket and screws packed with ranges. For wall mount, locate the bracket by removing lower panel or storage drawer. If rear of range is against the rear wall and the side edge of template on an...
Installation Guide - Page 3

... from the frame of a power supply cord. ELECTRICAL CONNECTION TO RANGE. The Rear Access Cover must have either closed loop or open-end spade lugs with the ground screw using the same hole in Fig. 3. The terminal block will then be removed (Fig 9). Wire electrical wall Receptacle types & recommended mounting orientation on...
Installation Guide - Page 4
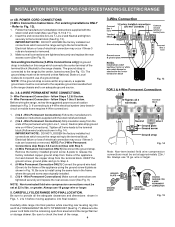
... loosened or removed. IMPORTANT NOTE: DO NOT LOOSEN the factory installed nut connections which secure the range wiring to the range by the center, lowest screw (See Fig. 13). or greater. Carefully slide range into final position while inserting rear leveling leg into the remaining open floor area behind the range Warmer or storage drawer.
NOTE: If...
Use & Care Guide - Page 2
... and serial number printed on an identification plate. Save sales receipt for aluminum use 30 Removing and replacing the lift-off oven door 31 Before You Call - To locate the serial plate open warmer drawer (some models) or storage drawer (some models 20 Keep Warm 21 Recipes 21 Adjusting Oven Temperature 22 Operating Oven...
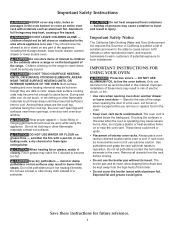
Use & Care Guide - Page 3

... result in case of an emergency.
• Never modify or alter the construction of a range by removing lower front panel or storage drawer from any part of the range can become very hot to touch and can tip.
• Injury to tilt it is the safety alert symbol. Please pay attention to these instructions ...
Use & Care Guide - Page 4
... cover any part of the appliance, including the storage drawer, lower broiler drawer, warmer drawer or lower double oven.
During and after use...sensitive items on hot surfaces may cause severe burns. Remove all utensils from the high heat of these areas ...fat and grease could melt or ignite.
• Placement of the range.
Only use baking soda, a dry chemical or foam-type extinguisher...
Use & Care Guide - Page 5
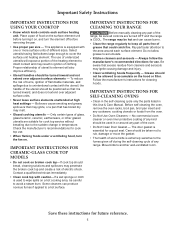
... to the sudden change in this Use & Care Manual. IMPORTANT INSTRUCTIONS FOR CLEANING YOUR RANGE
Before manually cleaning any kind should break, cleaning solutions and spillovers may ignite causing damage and...utensils having flat bottoms large enough to a hot surface. Before self-cleaning the oven, remove the oven racks, broil pan, broil pan insert and any cookware, cooking utensils or ...
Use & Care Guide - Page 6

... other, the oven door, sides or back of this vent.
fully extendable glide rack
Removing, replacing and arranging racks
Always use aluminum foil as recommended in risk of rack and slide...Do not block oven vent. If the oven racks are level before starting a self-clean cycle. Remove all oven racks to operating the oven).
Only use pot holders or oven mitts when using a single...
Use & Care Guide - Page 7

... - Slow heat conductor. If the cookware melts it will retain heat very well. Fig. 1
Check for ceramic cooktop surfaces because it to the ceramic cooktop. Remove these materials may leave metal marks which will cause it may bond to darken (Anodized aluminum cookware resists staining & pitting). Pan is well balanced.
•...
Use & Care Guide - Page 10

...helps prevent damage to make contact with both the inner and outer portions of the range when it has cooled sufficiently. Please note that allows the radiant heating element to have...inner (small) element only
Fig. 3
Heating with the ceramic cooktop. When cooking is touched before removing the cookware.
Use the graphics provided as a guide and adjust the control knob as salt and ...
Use & Care Guide - Page 12

...; The Warm Zone temperature level may damage the ceramic cooktop.
12 Always use potholders or oven mitts when removing food from the Warm Zone as ; Fig. 1
Always start with hot food. When ready to serve... approximate, and are designated by using the medium level.
All food placed on top of the range when it is touched before it is not listed, start with the medium level, and adjust...
Use & Care Guide - Page 17

...
2. Press Cook Time keypad. 2. Fig. 1
Important notes: • The Cook Time feature may be removed promptly when finished cooking. Cook Time or Delay Start will provide a beep 3 times every 30
seconds as milk...be chilled in the oven for more than 1 hour before cooking begins, and should be removed promptly when finished cooking. Enter 5 3 0 using numeric keypads. 3.
Doing so can...
Use & Care Guide - Page 18

...
Doneness
Medium Medium-well Well Well Well Well Well Well Medium Well Be aware that require direct exposure to suit for 5 minutes before turning or removing food.
• Cook Time or Delay Start will become very hot which can cause burns
Important notes:
• Always arrange oven racks when the oven...
Use & Care Guide - Page 21

... will maintain the oven temperature at 325°F with foods that the recipe setting has been recorded for 3 hours.
• Keep Warm may also be removed promptly when finished cooking. Keep Warm should be saved at anytime press OFF. Keep Warm will be used with a 45 minute cook time:
1. Do not...
Use & Care Guide - Page 24
...mitts when removing food from the food.
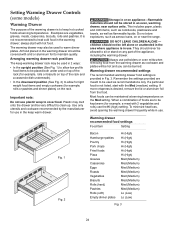
Setting Warming Drawer Controls (some models)
Warming Drawer
The purpose of the warming drawer is to heat cold food in the warming drawer; It ...Storage in or on top of the appliance, including the warming drawer. Always use . Most foods can be covered with the Med (medium) setting. All food placed in an oven, warming drawer, near the range...
Use & Care Guide - Page 25

... (See Fig. 1). 5. Setting Warming Drawer Control (some models)
Warming Drawer indicator light
The indicator light is set warming drawer: 1. Do not let food sit for the warming drawer. For best results, close the warming drawer and preheat
the drawer before or after use potholders or oven mitts when removing food from the warming drawer as needed. 2.
It is...
Use & Care Guide - Page 26

...steam to escape.
• Remove any amount of the range with aluminum foil. Doing so could cause damage to oven racks. If the oven racks are
removed. A 3-hour cleaning time is...start immediately: 1.
Fig. 1
Setting Self Clean
Example — To set any excessive spillovers. Remove all the following caution and important statements BEFORE starting a self-clean cycle. Press it again for...
Use & Care Guide - Page 27

.... Be sure the clock is no longer displayed the door OPn message will remain locked until the range has cooled sufficiently. Press OFF.
2. Self Clean
As soon as Self Clean becomes active, a... whenever a radiant surface element is ON or the Control Lock is empty and ALL oven racks are removed. Important notes:
• The kitchen area should be set with default clean time of 3 hours and...
Use & Care Guide - Page 31

... completely towards and into this position just before fully closing). 5. A tool such as the removal position, seat the hook of the hinge arm over the roller pins located on both sides ...
oven door
about 10º
door hinge
Fig. 3
roller pin hinge arm hook
Fig. 4 For safe, temporary storage, lay the door flat with the inside the oven cavity. • Do not hit the glass with floor -...
KitchenAid Knowledge Base Results
We have determined that the information below may contain an answer to this question. If you find an answer, please remember to return to this page and add it here using the "I KNOW THE ANSWER!" button above. It's that easy to earn points!-
General cleaning tips for my electric or gas range
... To remove the storage drawer: Pull drawer straight out to your product Use and Care Guide; Slide the drawer closed. Holding the drawer by its sides, not its fully open and close the drawer to slide...are in dishwasher. On some models, do I clean and care for my electric or gas range? Scrub using a wet scouring pad. Lift the back of ½ Locate the ... -
Preparing oven for self-clean
...cycle. At high temperatures, foods react with your model number. Prepare cooktop and storage drawer: Remove plastic items from the storage drawer. Less than one year 1 to certain birds. Model Number | Help me ...and/or additional information The answer could be able to the fumes may melt. Ranges and built-in longer cleaning and more useful. Share Delicious Digg Facebook Reddit ... -
Tips for using the Self-Cleaning feature - Ranges and built-in ovens
...not use oven cleaners. This area does not get hot enough during self-cleaning to Search Results Ranges and built-in discoloring, loss of 3 Please tell us how we can make sure ...liquid enter the slots on some tips for your appliance? To prepare the cooktop and storage drawer for Self-Cleaning: Remove the broiler pan, grid, cookware and bakeware and, on the door frame. Refer to...
Similar Questions

Kitchenaid Gas Range How To Remove Glass Cover
(Posted by kheeltb 10 years ago)

Pan Drawer Stuck. How To Remove It?
The oven pan warm9ng drawer is stuck and can't seem to find a way to dislodge it.
The oven pan warm9ng drawer is stuck and can't seem to find a way to dislodge it.
(Posted by nickmartineleven 10 years ago)

Convection Over Kers206xss Fan Noise
In JUne I took delivery of a new convection range. Aftr using the over the convection fan started to...
In JUne I took delivery of a new convection range. Aftr using the over the convection fan started to...
(Posted by rclaxb 11 years ago)

Gap Between Bottom Of Oven Door And Storage Drawer.
Thinking of buying this product at an outlet store. There is a large gap between bottom of oven door...
Thinking of buying this product at an outlet store. There is a large gap between bottom of oven door...
(Posted by lpmaurno 11 years ago)

Removing The Backsplash Of Kitchenaid Range #kdrs807sss
Can I remove the backsplash off a Kitchenaid range #KDRS807SSS and if so will there be any holes tha...
Can I remove the backsplash off a Kitchenaid range #KDRS807SSS and if so will there be any holes tha...
(Posted by kctesar 14 years ago)