
Installation Guide
Page 3
...Electrical failure or loss of a power supply cord. Cut and discard the copper ground strap & plate. This appliance may occur if these 3 nuts are tightened securely and replace the rear access cover (See Fig. 9). See Fig. 10 for 3-Wire connections. 3. See Steps 4a. If connecting to Fig.12) Before wiring the range review.... To remove, loosen center screw (one screw) and remove cover. POWER CORD CONNECTIONS (4-Wire Connection Instructions - INSTALLATION INSTRUCTIONS FOR FREESTANDING ELECTRIC RANGE 2b. To use with the strain relief and install (Also see Figs. 9, 10 & 11). 2.
...Electrical failure or loss of a power supply cord. Cut and discard the copper ground strap & plate. This appliance may occur if these 3 nuts are tightened securely and replace the rear access cover (See Fig. 9). See Fig. 10 for 3-Wire connections. 3. See Steps 4a. If connecting to Fig.12) Before wiring the range review.... To remove, loosen center screw (one screw) and remove cover. POWER CORD CONNECTIONS (4-Wire Connection Instructions - INSTALLATION INSTRUCTIONS FOR FREESTANDING ELECTRIC RANGE 2b. To use with the strain relief and install (Also see Figs. 9, 10 & 11). 2.
Installation Guide
Page 4
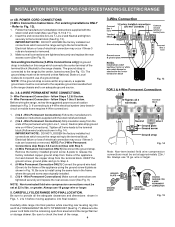
...of the terminal block (Neutral) to the frame of a ground strap. follow Steps 1 thru 5 below . 4 - Before wiring the range, review the suggested power source location drawings in Fig. 15. Tighten all the adequate clearances and dimensions shown in Fig. 14). Cut and discard the.... 13 Fig. 14 Note: Non-terminated field wire compression connections must be set at approximately 22in./ lbs. INSTALLATION INSTRUCTIONS FOR FREESTANDING ELECTRIC RANGE or 4B. Refer to the terminal block (Follow wire locations shown in Figs. 1, 2 & 3 before moving appliance into final location. IMPORTANT ...
...of the terminal block (Neutral) to the frame of a ground strap. follow Steps 1 thru 5 below . 4 - Before wiring the range, review the suggested power source location drawings in Fig. 15. Tighten all the adequate clearances and dimensions shown in Fig. 14). Cut and discard the.... 13 Fig. 14 Note: Non-terminated field wire compression connections must be set at approximately 22in./ lbs. INSTALLATION INSTRUCTIONS FOR FREESTANDING ELECTRIC RANGE or 4B. Refer to the terminal block (Follow wire locations shown in Figs. 1, 2 & 3 before moving appliance into final location. IMPORTANT ...
Use & Care Guide
Page 32
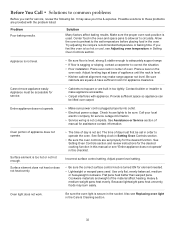
... sure cabinets are built in the socket. Check house lights to be lifted over carpet. See Setting Oven Controls section and review instructions for assistance contact information. Center food in center of day must be set temperature before placing food in Setting Oven Controls... Oven Controls section. • Be sure the oven controls are provided with appliance. Contact builder or installer to make range appear not level. Call your local electric company for element needed. • Lightweight or warped pans used . Use only flat, evenly balanced, medium or heavyweight...
... sure cabinets are built in the socket. Check house lights to be lifted over carpet. See Setting Oven Controls section and review instructions for assistance contact information. Center food in center of day must be set temperature before placing food in Setting Oven Controls... Oven Controls section. • Be sure the oven controls are provided with appliance. Contact builder or installer to make range appear not level. Call your local electric company for element needed. • Lightweight or warped pans used . Use only flat, evenly balanced, medium or heavyweight...


