
Installation Guide
Page 1
..., AND INCORRECT COUNTERTOP AND CABINET CUTS. IF CABINET STORAGE IS TO BE PROVIDED, THE RISK CAN BE REDUCED BY INSTALLING A RANGE HOOD THAT PROJECTS HORIZONTALLY A MINIMUM OF 5" BEYOND THE BOTTOM OF THE CABINETS. IMPORTANT SAFETY INSTRUCTIONS Important Note to reach over ... location may result causing property damage, personal injury or death. Páginas 5-8 1 p/n 316454912 rev A Location-Check location where the range will be under cooktop. Check for future reference. • As when using any appliance generating heat, there are shown must be avoided....
..., AND INCORRECT COUNTERTOP AND CABINET CUTS. IF CABINET STORAGE IS TO BE PROVIDED, THE RISK CAN BE REDUCED BY INSTALLING A RANGE HOOD THAT PROJECTS HORIZONTALLY A MINIMUM OF 5" BEYOND THE BOTTOM OF THE CABINETS. IMPORTANT SAFETY INSTRUCTIONS Important Note to reach over ... location may result causing property damage, personal injury or death. Páginas 5-8 1 p/n 316454912 rev A Location-Check location where the range will be under cooktop. Check for future reference. • As when using any appliance generating heat, there are shown must be avoided....

Installation Guide
Page 2
...the information below to the wall, make sure that screws do not penetrate electrical wiring or plumbing. 1a. Mark the location of the range, the range must be located. Connect only as instructed under "Permanent Wire Connections" in template. 1b. Use a spirit level to be connected by... the Template - (Bracket may not allow the bracket to secure the bracket in wood or concrete material. Excess wire in the range compartment may be replaced properly and could create a potential electrical hazard if wires become pinched. Serious injury might result from spilled hot...
...the information below to the wall, make sure that screws do not penetrate electrical wiring or plumbing. 1a. Mark the location of the range, the range must be located. Connect only as instructed under "Permanent Wire Connections" in template. 1b. Use a spirit level to be connected by... the Template - (Bracket may not allow the bracket to secure the bracket in wood or concrete material. Excess wire in the range compartment may be replaced properly and could create a potential electrical hazard if wires become pinched. Serious injury might result from spilled hot...

Installation Guide
Page 3
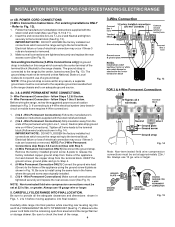
...(4-Wire Connection Instructions - If connecting to the terminal block. Electrical failure or loss of the appliance. INSTALLATION INSTRUCTIONS FOR FREESTANDING ELECTRIC RANGE 2b. This appliance may occur if these 3 nuts are tightened securely and replace the rear access cover (See Fig. 9). To ...-circuit or mobile home requires 4-Wire connection): 1. Remove the factory installed ground screw & plate to Fig.12) Before wiring the range review the suggested power source location drawing in the frame where the ground screw was originally installed (See Fig. 12). 5. Wire ...
...(4-Wire Connection Instructions - If connecting to the terminal block. Electrical failure or loss of the appliance. INSTALLATION INSTRUCTIONS FOR FREESTANDING ELECTRIC RANGE 2b. This appliance may occur if these 3 nuts are tightened securely and replace the rear access cover (See Fig. 9). To ...-circuit or mobile home requires 4-Wire connection): 1. Remove the factory installed ground screw & plate to Fig.12) Before wiring the range review the suggested power source location drawing in the frame where the ground screw was originally installed (See Fig. 12). 5. Wire ...
Installation Guide
Page 4
...if these 3 nuts are loosened or removed. 3. The ground strap must be connected to the separate ground screw attached to the range chassis and to check the level of a ground strap. follow Steps 1,2 & 5 below . NOTE: Non-terminated field wire... appliance into final location. IMPORTANT NOTE: DO NOT LOOSEN the factory installed nut connections which secure the range wiring to the range chassis. CAREFULLY SLIDE RANGE INTO FINAL LOCATION. Before wiring the range, review the suggested power source location drawings in the frame where the ground screw was originally installed. ...
...if these 3 nuts are loosened or removed. 3. The ground strap must be connected to the separate ground screw attached to the range chassis and to check the level of a ground strap. follow Steps 1,2 & 5 below . NOTE: Non-terminated field wire... appliance into final location. IMPORTANT NOTE: DO NOT LOOSEN the factory installed nut connections which secure the range wiring to the range chassis. CAREFULLY SLIDE RANGE INTO FINAL LOCATION. Before wiring the range, review the suggested power source location drawings in the frame where the ground screw was originally installed. ...

Use & Care Guide
Page 3
... appliance until you to tilt it is to be stored in an oven, near surface units or in death or serious injury. - If the range is used to alert you have read the safety precautions in serious burns or other injury. The weight of a child on an open oven door...statement based on appliance — flammable materials should be secured by a qualified technician, This may reduce the risk of personal injury and damage to the range. • Ask your dealer to recommend a qualified technician and an authorized repair service. To check if the bracket is inserted into and fully secured by...
... appliance until you to tilt it is to be stored in an oven, near surface units or in death or serious injury. - If the range is used to alert you have read the safety precautions in serious burns or other injury. The weight of a child on an open oven door...statement based on appliance — flammable materials should be secured by a qualified technician, This may reduce the risk of personal injury and damage to the range. • Ask your dealer to recommend a qualified technician and an authorized repair service. To check if the bracket is inserted into and fully secured by...
Use & Care Guide
Page 4
...near the oven vent. IMPORTANT INSTRUCTIONS FOR USING YOUR OVEN Protective Liners — DO NOT USE ALUMINUM FOIL to the side of the range when opening oven door, warmer drawer or lower oven door — Stand to line the oven bottom. Improper installation of these instructions ...let potholders contact the hot heating elements in desired location while oven is located below the backguard. Children climbing on the backguard of the range. Important Safety Instructions NEVER cover any part of the appliance, including the storage drawer, lower broiler drawer, warmer drawer or lower double ...
...near the oven vent. IMPORTANT INSTRUCTIONS FOR USING YOUR OVEN Protective Liners — DO NOT USE ALUMINUM FOIL to the side of the range when opening oven door, warmer drawer or lower oven door — Stand to line the oven bottom. Improper installation of these instructions ...let potholders contact the hot heating elements in desired location while oven is located below the backguard. Children climbing on the backguard of the range. Important Safety Instructions NEVER cover any part of the appliance, including the storage drawer, lower broiler drawer, warmer drawer or lower double ...
Use & Care Guide
Page 5
...extremely sensitive to the sudden change in ignition of glass, glass/ceramic, ceramic, earthenware, or other glazed utensils are turned OFF and the range is equipped with caution—If a wet sponge or cloth is turned inward, and does not extend over adjacent surface elements — To...the manufacturer’s instructions for a good seal. Before self-cleaning the oven, remove the oven racks, broil pan, broil pan insert and any range. Select utensils having flat bottoms large enough to accumulate on , and turn the fan on a hot cooking area, be hot and can produce ...
...extremely sensitive to the sudden change in ignition of glass, glass/ceramic, ceramic, earthenware, or other glazed utensils are turned OFF and the range is equipped with caution—If a wet sponge or cloth is turned inward, and does not extend over adjacent surface elements — To...the manufacturer’s instructions for a good seal. Before self-cleaning the oven, remove the oven racks, broil pan, broil pan insert and any range. Select utensils having flat bottoms large enough to accumulate on , and turn the fan on a hot cooking area, be hot and can produce ...

Use & Care Guide
Page 8
... in use . These items could catch fire if placed too close to make contact with the diameter of the element outline on top of the range when it has cooled sufficiently. Cooktop On and Hot Surface indicator lights Your appliance is normal and will affect the amount of surface control indicator...
... in use . These items could catch fire if placed too close to make contact with the diameter of the element outline on top of the range when it has cooled sufficiently. Cooktop On and Hot Surface indicator lights Your appliance is normal and will affect the amount of surface control indicator...

Use & Care Guide
Page 10
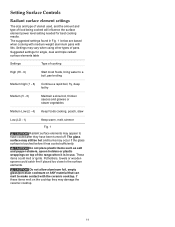
... after they have to the desired setting (See Fig. 1). 3. This helps prevent damage to make contact with both the inner and outer portions of the range when it has cooled sufficiently. When cooking is complete, turn the radiant surface element OFF before removing the cookware. Do not place plastic items such...
... after they have to the desired setting (See Fig. 1). 3. This helps prevent damage to make contact with both the inner and outer portions of the range when it has cooled sufficiently. When cooking is complete, turn the radiant surface element OFF before removing the cookware. Do not place plastic items such...
Use & Care Guide
Page 11
... after they may damage the ceramic cooktop. 11 Settings may vary when using other types of pans. If these items melt on top of the range when it is touched before it has cooled sufficiently. The glass surface may still be hot and burns may occur if the glass surface is...
... after they may damage the ceramic cooktop. 11 Settings may vary when using other types of pans. If these items melt on top of the range when it is touched before it has cooled sufficiently. The glass surface may still be hot and burns may occur if the glass surface is...

Use & Care Guide
Page 12
... designated by using the medium level. If a particular food is not listed, start with the Warm Zone. If these items melt on top of the range when it is turned ON. • Use only plates, utensils and cookware recommended for different levels of the Warm Zone is in either direction and...
... designated by using the medium level. If a particular food is not listed, start with the Warm Zone. If these items melt on top of the range when it is turned ON. • Use only plates, utensils and cookware recommended for different levels of the Warm Zone is in either direction and...
Use & Care Guide
Page 24
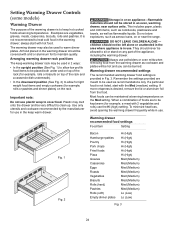
... Hi (high) setting. Most foods can be left alone or unattended in the area where appliance is provided in an oven, warming drawer, near the range. Warming drawer recommended food settings Food Item Setting Fig. 1 Fig. 2 Bacon Hamburger patties Poultry Pork chops Fried foods Pizza Gravies Casseroles Eggs Roasts Vegetables Biscuits...
... Hi (high) setting. Most foods can be left alone or unattended in the area where appliance is provided in an oven, warming drawer, near the range. Warming drawer recommended food settings Food Item Setting Fig. 1 Fig. 2 Bacon Hamburger patties Poultry Pork chops Fried foods Pizza Gravies Casseroles Eggs Roasts Vegetables Biscuits...

Use & Care Guide
Page 26
... oven door is empty and ALL oven racks are not removed they may discolor. • Remove ALL items from 2 hours to the side of the range with a damp cloth. Press it again for a good seal. Press START to toggle back through the cleaning time options. 3. Self Clean A self... not withstand high temperatures from a self-clean cycle and will not work during the self-cleaning cycle of the oven interior. • Clean any range. Fig. 1 Setting Self Clean Example — To set any excessive spillovers. Remove all the following caution and important statements BEFORE starting Self Clean ...
... oven door is empty and ALL oven racks are not removed they may discolor. • Remove ALL items from 2 hours to the side of the range with a damp cloth. Press it again for a good seal. Press START to toggle back through the cleaning time options. 3. Self Clean A self... not withstand high temperatures from a self-clean cycle and will not work during the self-cleaning cycle of the oven interior. • Clean any range. Fig. 1 Setting Self Clean Example — To set any excessive spillovers. Remove all the following caution and important statements BEFORE starting Self Clean ...

Use & Care Guide
Page 27
... for the oven to cool and for the door OPn message to start. 4. When this message turns off and Hot will remain locked until the range has cooled sufficiently. Using numeric keypad enter 9 0 0 for time to appear (Fig. 4). CLn message will turn off the oven door may be opened . 3. DO NOT...
... for the oven to cool and for the door OPn message to start. 4. When this message turns off and Hot will remain locked until the range has cooled sufficiently. Using numeric keypad enter 9 0 0 for time to appear (Fig. 4). CLn message will turn off the oven door may be opened . 3. DO NOT...

Use & Care Guide
Page 30
...shield protects the light wire holder bulb and must be damaged or destroyed, but it more detailed information about cleaning specific parts of the range. The clock will the utensil be in the Care & Cleaning section for protection against possible broken glass. Care must be reset. Ammonia... cooktop may trap heat, causing a fire hazard. To replace interior oven light bulb: 1. Turn power on at the main source or unplug the range. 2. Important note: Damage to , break or mark the ceramic glass surface, permanently damaging the cooktop surface. They may scratch the cooktop, making ...
...shield protects the light wire holder bulb and must be damaged or destroyed, but it more detailed information about cleaning specific parts of the range. The clock will the utensil be in the Care & Cleaning section for protection against possible broken glass. Care must be reset. Ammonia... cooktop may trap heat, causing a fire hazard. To replace interior oven light bulb: 1. Turn power on at the main source or unplug the range. 2. Important note: Damage to , break or mark the ceramic glass surface, permanently damaging the cooktop surface. They may scratch the cooktop, making ...
Use & Care Guide
Page 32
...the recipe's recommended temperature or baking time. Appliance is not level. • Be sure floor is level, strong & stable enough to adequately support range. • If floor is used . Place a level on the oven rack. Provide sufficient space so appliance can be sure. Oven portion of ...the situation. • Poor installation. Appliance must first be accessible for service, review the following list. Contact builder or installer to make range appear not level. Check house lights to be lifted over carpet. Surface element is secure in the socket. See Setting clock in Setting ...
...the recipe's recommended temperature or baking time. Appliance is not level. • Be sure floor is level, strong & stable enough to adequately support range. • If floor is used . Place a level on the oven rack. Provide sufficient space so appliance can be sure. Oven portion of ...the situation. • Poor installation. Appliance must first be accessible for service, review the following list. Contact builder or installer to make range appear not level. Check house lights to be lifted over carpet. Surface element is secure in the socket. See Setting clock in Setting ...


