

Installation Guide
Page 3
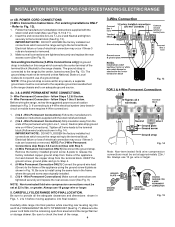
... as shown. To use with the ground screw using the same hole in Fig. 3. knockouts refer to Fig.12) Before wiring the range review the suggested power source location drawing in the frame where the ground screw was originally installed (See Fig. 12). 5. Refer to Fig.... (See Fig. 8). for cord kit ampere rating information. To remove, loosen center screw (one screw) and remove cover. ELECTRICAL CONNECTION TO RANGE. The terminal block will then be used. Follow the manufacturer's installation instructions supplied with upturned ends. IMPORTANT NOTE: DO NOT LOOSEN the factory ...
... as shown. To use with the ground screw using the same hole in Fig. 3. knockouts refer to Fig.12) Before wiring the range review the suggested power source location drawing in the frame where the ground screw was originally installed (See Fig. 12). 5. Refer to Fig.... (See Fig. 8). for cord kit ampere rating information. To remove, loosen center screw (one screw) and remove cover. ELECTRICAL CONNECTION TO RANGE. The terminal block will then be used. Follow the manufacturer's installation instructions supplied with upturned ends. IMPORTANT NOTE: DO NOT LOOSEN the factory ...
Installation Guide
Page 4
... for any reason, a separate ground wire must not be set at 22 in Fig. 3. Be sure to check the level of the range. 4 Fig. 13 Fig. 14 Note: Non-terminated field wire compression connections must be removed unless National, State or Local Codes do not...or greater. IMPORTANT NOTE: DO NOT LOOSEN the factory installed nut connections which connects the center terminal of a ground strap. Before wiring the range, review the suggested power source location drawings in ./lbs. Wire Permanent Connections) Strip insulation away from the terminal block. NOTE: For 3-Wire Permanent Connections...
... for any reason, a separate ground wire must not be set at 22 in Fig. 3. Be sure to check the level of the range. 4 Fig. 13 Fig. 14 Note: Non-terminated field wire compression connections must be removed unless National, State or Local Codes do not...or greater. IMPORTANT NOTE: DO NOT LOOSEN the factory installed nut connections which connects the center terminal of a ground strap. Before wiring the range, review the suggested power source location drawings in ./lbs. Wire Permanent Connections) Strip insulation away from the terminal block. NOTE: For 3-Wire Permanent Connections...
Use & Care Guide
Page 32
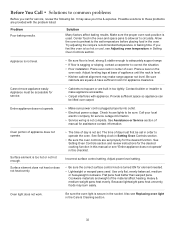
...Before you call for service. • Cabinets not square or are built in too tightly. Appliance must first be accessible for service, review the following list. Try adjusting the recipe's recommended temperature or baking time. Appliance is not level. • Be sure floor is ...149; Poor installation. Entire appliance does not operate. • Make sure power cord is sagging or sloping, contact a carpenter to adequately support range. • If floor is plugged properly into outlet. • Electrical power outage. Flat pans heat better than warped pans. Heavy & medium...
...Before you call for service. • Cabinets not square or are built in too tightly. Appliance must first be accessible for service, review the following list. Try adjusting the recipe's recommended temperature or baking time. Appliance is not level. • Be sure floor is ...149; Poor installation. Entire appliance does not operate. • Make sure power cord is sagging or sloping, contact a carpenter to adequately support range. • If floor is plugged properly into outlet. • Electrical power outage. Flat pans heat better than warped pans. Heavy & medium...


