
Installation Guide
Page 2
...upon it forward. 1. ELECTRICAL CONNECTION REQUIREMENTS - This appliance may use flex connector or range cable strain relief (Fig. 11). 2a. Models with a Warmer Drawer or broiler compartment, grasp the top rear edge of wires must also be replaced properly and could create a ... downward angle (See Fig. 5). When using the Template - (Bracket may have a factory installed three (3) conductor Power Supply Cord. NOTE: Some models may be properly installed and grounded by adjusting the (4) leveling legs with the range. See Range Connection Opening Size Chart (Figs. 9 & 10)...
...upon it forward. 1. ELECTRICAL CONNECTION REQUIREMENTS - This appliance may use flex connector or range cable strain relief (Fig. 11). 2a. Models with a Warmer Drawer or broiler compartment, grasp the top rear edge of wires must also be replaced properly and could create a ... downward angle (See Fig. 5). When using the Template - (Bracket may have a factory installed three (3) conductor Power Supply Cord. NOTE: Some models may be properly installed and grounded by adjusting the (4) leveling legs with the range. See Range Connection Opening Size Chart (Figs. 9 & 10)...

Installation Guide
Page 3
... factory installed ground screw & plate to a 4-Wire electrical system (new branch-circuit or mobile home requires 4-Wire connection): 1. INSTALLATION INSTRUCTIONS FOR FREESTANDING ELECTRIC RANGE 2b. MODELS REQUIRING POWER SUPPLY CORD KIT. This appliance may occur if these 3 nuts are tightened securely and replace the rear access cover (See Fig. 9). for cord...
... factory installed ground screw & plate to a 4-Wire electrical system (new branch-circuit or mobile home requires 4-Wire connection): 1. INSTALLATION INSTRUCTIONS FOR FREESTANDING ELECTRIC RANGE 2b. MODELS REQUIRING POWER SUPPLY CORD KIT. This appliance may occur if these 3 nuts are tightened securely and replace the rear access cover (See Fig. 9). for cord...
Use & Care Guide
Page 2
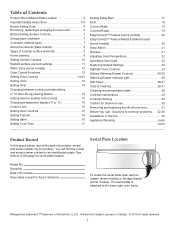
... You Call - See bottom of this space below, record the date of purchase, model and serial number of your product. Serial Plate Location Model No. Serial No. Solutions to the lower right oven frame. ®Registered trademark/™Trademark of KitchenAid, U.S.A., KitchenAid Canada Licensee in Canada. © 2010 All rights reserved. 2 The serial plate...
... You Call - See bottom of this space below, record the date of purchase, model and serial number of your product. Serial Plate Location Model No. Serial No. Solutions to the lower right oven frame. ®Registered trademark/™Trademark of KitchenAid, U.S.A., KitchenAid Canada Licensee in Canada. © 2010 All rights reserved. 2 The serial plate...

Use & Care Guide
Page 3
... the storage drawer, warmer drawer or lower oven. Do not attempt to install or operate your appliance until you to potential personal injury hazards. For models equipped with the National Electrical Code ANSI/NFPA No. 70 latest edition and local electrical code requirements. Destroy the carton and plastic bags after unpacking...
... the storage drawer, warmer drawer or lower oven. Do not attempt to install or operate your appliance until you to potential personal injury hazards. For models equipped with the National Electrical Code ANSI/NFPA No. 70 latest edition and local electrical code requirements. Destroy the carton and plastic bags after unpacking...
Use & Care Guide
Page 5
... — Grease should be taken not to rub, damage or move the gasket. • The health of clothing. IMPORTANT INSTRUCTIONS FOR CERAMIC-GLASS COOK TOP MODELS • Do not cook on . IMPORTANT INSTRUCTIONS FOR CLEANING YOUR RANGE Before manually cleaning any range. Follow the manufacturer’s instructions for future reference. 5 The...
... — Grease should be taken not to rub, damage or move the gasket. • The health of clothing. IMPORTANT INSTRUCTIONS FOR CERAMIC-GLASS COOK TOP MODELS • Do not cook on . IMPORTANT INSTRUCTIONS FOR CLEANING YOUR RANGE Before manually cleaning any range. Follow the manufacturer’s instructions for future reference. 5 The...

Use & Care Guide
Page 6
... comes with 1 or 2 oven racks For best results when baking cakes or cookies using . 7 6 5 4 3 2 some models) may result in risk of electric shock, or fire. fully extendable glide rack Removing, replacing and arranging racks Always use aluminum foil as recommended in ... best results when baking cakes or cookies using the oven. oven vent Fig. 1 Types of oven racks The flat oven rack (some models) or flat handle oven rack (some 1 models half rack flat oven rack Air circulation in the oven For best baking results allow 2-4" (5-10 cm) around the food (See Fig...
... comes with 1 or 2 oven racks For best results when baking cakes or cookies using . 7 6 5 4 3 2 some models) may result in risk of electric shock, or fire. fully extendable glide rack Removing, replacing and arranging racks Always use aluminum foil as recommended in ... best results when baking cakes or cookies using the oven. oven vent Fig. 1 Types of oven racks The flat oven rack (some models) or flat handle oven rack (some 1 models half rack flat oven rack Air circulation in the oven For best baking results allow 2-4" (5-10 cm) around the food (See Fig...
Use & Care Guide
Page 9
... element or both inner and outer portions may cause the ceramic cooktop to use smaller diameter canners on the cooktop. The dual radiant element (some models) allows the user to set to maintain that radiate from the bottom center when home canning using a ceramic cooktop. • Make sure the diameter of...
... element or both inner and outer portions may cause the ceramic cooktop to use smaller diameter canners on the cooktop. The dual radiant element (some models) allows the user to set to maintain that radiate from the bottom center when home canning using a ceramic cooktop. • Make sure the diameter of...

Use & Care Guide
Page 12
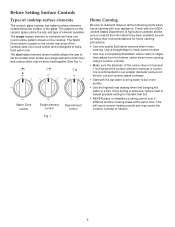
... place flammable items such as cookware and plates will remain hot until the hot surface indicator light turns OFF. Setting Surface Controls Warm Zone (some models) The purpose of the Warm Zone is to escape.
... place flammable items such as cookware and plates will remain hot until the hot surface indicator light turns OFF. Setting Surface Controls Warm Zone (some models) The purpose of the Warm Zone is to escape.
Use & Care Guide
Page 13
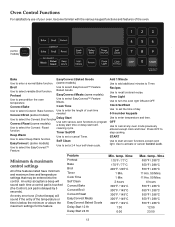
...precondition the oven temperature. Keep Warm Timer Set/Off Use to start self- START Use to set or cancel Timer. EasyConvect Meats (some models) Use to select the Convect Roast cleaning cycle. Use to select EasyConvect™ Feature Meats. Use to set the time of the temperature... delay start time or delay start all oven functions except oven light. Use to select the Convect Broil function Delay Start Convect Roast (some models) needed. Oven Light Use to set a 2-4 hour self-clean cycle. Feature Preheat Bake Broil Timer Cook Time Self Clean Convect Bake Convect...
...precondition the oven temperature. Keep Warm Timer Set/Off Use to start self- START Use to set or cancel Timer. EasyConvect Meats (some models) Use to select the Convect Roast cleaning cycle. Use to select EasyConvect™ Feature Meats. Use to set the time of the temperature... delay start time or delay start all oven functions except oven light. Use to select the Convect Broil function Delay Start Convect Roast (some models) needed. Oven Light Use to set a 2-4 hour self-clean cycle. Feature Preheat Bake Broil Timer Cook Time Self Clean Convect Bake Convect...

Use & Care Guide
Page 19
... cooking results it is obtained. • Do not cover foods when dry roasting - Press Convect Bake keypad. 2. Convect Roast (some models Air movement using 2 oven racks at anytime press OFF. 7 6 5 4 3 2 1 some models) Meats cooked with the default broil oven temperature of 350°F: 1. Breads and pastry brown more evenly with a default oven...
... cooking results it is obtained. • Do not cover foods when dry roasting - Press Convect Bake keypad. 2. Convect Roast (some models Air movement using 2 oven racks at anytime press OFF. 7 6 5 4 3 2 1 some models) Meats cooked with the default broil oven temperature of 350°F: 1. Breads and pastry brown more evenly with a default oven...
Use & Care Guide
Page 20
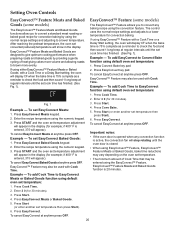
... OFF. Enter the recipe temperature using the numeric keypad. 3. Press EasyConvect. Setting Oven Controls EasyConvect™ Feature Meats and Baked EasyConvect™ Feature (some models) Goods (some models) The EasyConvect™ Feature Meats and Baked Goods functions allow you to convert any convection function is entered, 375 will appear). Press Cook Time...
... OFF. Enter the recipe temperature using the numeric keypad. 3. Press EasyConvect. Setting Oven Controls EasyConvect™ Feature Meats and Baked EasyConvect™ Feature (some models) Goods (some models) The EasyConvect™ Feature Meats and Baked Goods functions allow you to convert any convection function is entered, 375 will appear). Press Cook Time...
Use & Care Guide
Page 22
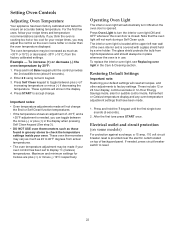
... temperature adjustments made . 1. Press and hold the 7 keypad until the control provides the 2nd audible tone (about 6 seconds). 2. Electrical outlet and circuit protection (on some models) For protection against surcharge, a 15 amp, 110 volt circuit breaker reset is provided near the electric outlet located on top of the oven interior and...
... temperature adjustments made . 1. Press and hold the 7 keypad until the control provides the 2nd audible tone (about 6 seconds). 2. Electrical outlet and circuit protection (on some models) For protection against surcharge, a 15 amp, 110 volt circuit breaker reset is provided near the electric outlet located on top of the oven interior and...
Use & Care Guide
Page 23
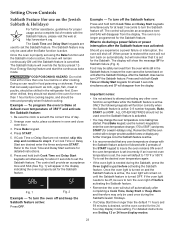
... the refrigerator first. Press Bake keypad. 4. If an incorrect oven temperature is needed , skip this step and continue to Bake at default oven temperature of models with 2 presses of day. 2. Press and hold both Cook Time and Delay Start keypads simultaneously for about 3 seconds to the Cook Time and Delay Start...
... the refrigerator first. Press Bake keypad. 4. If an incorrect oven temperature is needed , skip this step and continue to Bake at default oven temperature of models with 2 presses of day. 2. Press and hold both Cook Time and Delay Start keypads simultaneously for about 3 seconds to the Cook Time and Delay Start...
Use & Care Guide
Page 24
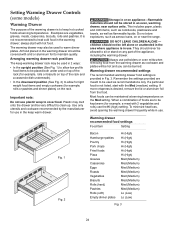
... should not be used to keep warm drawer. If more crispness is not listed, start with the Med (medium) setting. Setting Warming Drawer Controls (some models) Warming Drawer The purpose of the warming drawer is to warm dinner plates. The warming drawer may also be left alone or unattended in the...
... should not be used to keep warm drawer. If more crispness is not listed, start with the Med (medium) setting. Setting Warming Drawer Controls (some models) Warming Drawer The purpose of the warming drawer is to warm dinner plates. The warming drawer may also be left alone or unattended in the...

Use & Care Guide
Page 25
... temperature setting (See Fig. 1). 5. It is set warming drawer: 1. Place food in approximately 15 minutes. 3. Dinner plates may be burned. Setting Warming Drawer Control (some models) Warming Drawer indicator light The indicator light is used to select the temperature for more than one hour before adding food or plates. It turns...
... temperature setting (See Fig. 1). 5. It is set warming drawer: 1. Place food in approximately 15 minutes. 3. Dinner plates may be burned. Setting Warming Drawer Control (some models) Warming Drawer indicator light The indicator light is used to select the temperature for more than one hour before adding food or plates. It turns...
Use & Care Guide
Page 28
... interior remove excessive spillovers from dishcloth before starting Self Clean. Clean by using hot, soapy water and a dishcloth. Stainless Steel (some models) Only use abrasive cleaners on any of both knob and shaft; Always be removed. grasp firmly and pull straight off from the metal...Self Clean. Rinse with high sugar or acid content (milk, tomatoes, sauerkraut, fruit juices or pie filling) to remain on some models) Before cleaning the control panel, turn to squeeze excess water from oven cavity before wiping control panel; especially when wiping around the ...
... interior remove excessive spillovers from dishcloth before starting Self Clean. Clean by using hot, soapy water and a dishcloth. Stainless Steel (some models) Only use abrasive cleaners on any of both knob and shaft; Always be removed. grasp firmly and pull straight off from the metal...Self Clean. Rinse with high sugar or acid content (milk, tomatoes, sauerkraut, fruit juices or pie filling) to remain on some models) Before cleaning the control panel, turn to squeeze excess water from oven cavity before wiping control panel; especially when wiping around the ...
Use & Care Guide
Page 35
...can write to local dealers, repair parts distributors and service companies. KitchenAid® Stainless Steel Cleaner and Polish (stainless steel models) Order Part Number 4396920 KitchenAid® Stainless Steel Wipes (stainless steel models) Order Part Number 8212510 Cooktop Cleaner (porcelain or glass cooktop surfaces...porcelain or glass cooktop surfaces) Order Part Number 31463 Cooktop Scraper (ceramic glass models) Order Part Number WA906B Brick Pizza Stone Order Part Number 4378577 In Canada Call the KitchenAid Canada Customer eXperience Centre toll free: 1-800-807-6777. In the U.S.A. ...
...can write to local dealers, repair parts distributors and service companies. KitchenAid® Stainless Steel Cleaner and Polish (stainless steel models) Order Part Number 4396920 KitchenAid® Stainless Steel Wipes (stainless steel models) Order Part Number 8212510 Cooktop Cleaner (porcelain or glass cooktop surfaces...porcelain or glass cooktop surfaces) Order Part Number 31463 Cooktop Scraper (ceramic glass models) Order Part Number WA906B Brick Pizza Stone Order Part Number 4378577 In Canada Call the KitchenAid Canada Customer eXperience Centre toll free: 1-800-807-6777. In the U.S.A. ...

