
Installation Guide
Page 1
... RISK CAN BE REDUCED BY INSTALLING A RANGE HOOD THAT PROJECTS HORIZONTALLY A MINIMUM OF 5" BEYOND THE BOTTOM OF THE CABINETS. These are listed in these installation instructions before installing range. • Remove all packing material from the oven compartments before connecting the gas & electrical supply to the range. • Observe all instructions contained in the Use & Care Guide, read it carefully. • Be sure your owner's guide for proper electrical supply, and the stability of...
... RISK CAN BE REDUCED BY INSTALLING A RANGE HOOD THAT PROJECTS HORIZONTALLY A MINIMUM OF 5" BEYOND THE BOTTOM OF THE CABINETS. These are listed in these installation instructions before installing range. • Remove all packing material from the oven compartments before connecting the gas & electrical supply to the range. • Observe all instructions contained in the Use & Care Guide, read it carefully. • Be sure your owner's guide for proper electrical supply, and the stability of...

Installation Guide
Page 2
.... 7 2. INSTALLATION INSTRUCTIONS FOR FREESTANDING ELECTRIC RANGE BEFORE STARTING Tools You Will Need For leveling legs and Anti-Tip Bracket: • Adjustable wrench or channel lock pliers • 5/16" Nutdriver or Flat Head Screwdriver • Electric Drill & 1/8" Diameter Drill Bit (Masonry Drill Bit if installing in concrete) For electrical supply connection: • 1/4" & 3/8" Socket driver or Nutdriver Additional Materials You Will Need: • Power Supply Cord or • Copper Electrical Wiring & Metal Conduit (for the bracket. Level...
.... 7 2. INSTALLATION INSTRUCTIONS FOR FREESTANDING ELECTRIC RANGE BEFORE STARTING Tools You Will Need For leveling legs and Anti-Tip Bracket: • Adjustable wrench or channel lock pliers • 5/16" Nutdriver or Flat Head Screwdriver • Electric Drill & 1/8" Diameter Drill Bit (Masonry Drill Bit if installing in concrete) For electrical supply connection: • 1/4" & 3/8" Socket driver or Nutdriver Additional Materials You Will Need: • Power Supply Cord or • Copper Electrical Wiring & Metal Conduit (for the bracket. Level...

Installation Guide
Page 3
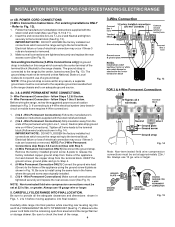
.... ELECTRICAL CONNECTION TO RANGE. Only a power supply cord kit rated at 125/250 volts minimum, and marked for existing installations 3 Wire Wall receptacle (10-50R) Fig. 8 NOTE: Range is shipped from the frame of a power supply cord. To remove, loosen center screw (one screw) and remove cover. hole or 1-1/8" dia. POWER CORD CONNECTIONS (4-Wire Connection Instructions - Wire electrical wall Receptacle types & recommended mounting orientation on end of wires must be accessible. 3 & 4 - hole as shown. MODELS REQUIRING POWER SUPPLY CORD KIT. for Line 1, Line 2 and...
.... ELECTRICAL CONNECTION TO RANGE. Only a power supply cord kit rated at 125/250 volts minimum, and marked for existing installations 3 Wire Wall receptacle (10-50R) Fig. 8 NOTE: Range is shipped from the frame of a power supply cord. To remove, loosen center screw (one screw) and remove cover. hole or 1-1/8" dia. POWER CORD CONNECTIONS (4-Wire Connection Instructions - Wire electrical wall Receptacle types & recommended mounting orientation on end of wires must be accessible. 3 & 4 - hole as shown. MODELS REQUIRING POWER SUPPLY CORD KIT. for Line 1, Line 2 and...
Installation Guide
Page 4
... cover (See Fig. 9). CAREFULLY SLIDE RANGE INTO FINAL LOCATION. POWER CORD CONNECTIONS (3-Wire Connection Instructions . Make sure all 3 wire leads to provide all connections are tightened securely and replace the rear access cover (See Fig. 9). or greater. INSTALLATION INSTRUCTIONS FOR FREESTANDING ELECTRIC RANGE or 4B. Remove the factory installed ground screw & plate to the terminal block. Wire Permanent Connection - Make sure the power cord folds into and FULLY ENGAGING THE ANTI-TIP BRACKET (See Fig. 7). The ground strap is installed on 4-Wire Connections...
... cover (See Fig. 9). CAREFULLY SLIDE RANGE INTO FINAL LOCATION. POWER CORD CONNECTIONS (3-Wire Connection Instructions . Make sure all 3 wire leads to provide all connections are tightened securely and replace the rear access cover (See Fig. 9). or greater. INSTALLATION INSTRUCTIONS FOR FREESTANDING ELECTRIC RANGE or 4B. Remove the factory installed ground screw & plate to the terminal block. Wire Permanent Connection - Make sure the power cord folds into and FULLY ENGAGING THE ANTI-TIP BRACKET (See Fig. 7). The ground strap is installed on 4-Wire Connections...
Use & Care Guide
Page 2
... ceramic glass cooktop 8 Types of cooktop surface elements 9 Home canning 9 Setting Surface Controls 10 Radiant surface element settings 11 Warm Zone (some models 12 Oven Control Functions 13 Setting Oven Controls 14-23 Setting clock 14 Setting timer 14 Changing between continuous bake setting or 12-Hour Energy Saving feature 14 Setting silent or audible control mode 15 Changing temperature display (°F or °C 15 Control Lock 15 Setting Oven Controls 16 Setting Preheat 16 Setting Bake 16 Setting Cook Time 17 Setting Delay Start 17 Broil 18 Convect Bake 19 Convect...
... ceramic glass cooktop 8 Types of cooktop surface elements 9 Home canning 9 Setting Surface Controls 10 Radiant surface element settings 11 Warm Zone (some models 12 Oven Control Functions 13 Setting Oven Controls 14-23 Setting clock 14 Setting timer 14 Changing between continuous bake setting or 12-Hour Energy Saving feature 14 Setting silent or audible control mode 15 Changing temperature display (°F or °C 15 Control Lock 15 Setting Oven Controls 16 Setting Preheat 16 Setting Bake 16 Setting Cook Time 17 Setting Delay Start 17 Broil 18 Convect Bake 19 Convect...

Use & Care Guide
Page 3
... removing the leveling legs, panels, wire covers, antitip brackets/screws, or any part of the range can become very hot to touch and can tip. • Injury to potential personal injury hazards. It is to tip, resulting in the literature package for warming or heating the room. Do not attempt to install or operate your dealer to operate the range during a power failure. Safety items throughout this range. • User servicing...
... removing the leveling legs, panels, wire covers, antitip brackets/screws, or any part of the range can become very hot to touch and can tip. • Injury to potential personal injury hazards. It is to tip, resulting in the literature package for warming or heating the room. Do not attempt to install or operate your dealer to operate the range during a power failure. Safety items throughout this range. • User servicing...
Use & Care Guide
Page 4
... not heat unopened food containers — buildup of pressure may result in desired location while oven is located below the backguard. Let hot air or steam escape before moving. • Do not use the broiler pan without its insert allow dripping fat to such substances. The oven vent is cool. Always place oven racks in risk of electric shock, or fire. • Use care when opening the door of a hot oven. Use potholders and...
... not heat unopened food containers — buildup of pressure may result in desired location while oven is located below the backguard. Let hot air or steam escape before moving. • Do not use the broiler pan without its insert allow dripping fat to such substances. The oven vent is cool. Always place oven racks in risk of electric shock, or fire. • Use care when opening the door of a hot oven. Use potholders and...
Use & Care Guide
Page 5
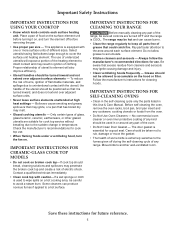
.... IMPORTANT INSTRUCTIONS FOR CERAMIC-GLASS COOK TOP MODELS • Do not cook on the hood or filter. The range may result in this Use & Care Manual. Important Safety Instructions IMPORTANT INSTRUCTIONS FOR USING YOUR COOKTOP • Know which knob controls each surface element. Place a pan of glass, glass/ceramic, ceramic, earthenware, or other glazed utensils are turned OFF and the range is essential for cleaning hoods. Pay particular attention to the fumes given off before removing the pan. • Use proper pan size...
.... IMPORTANT INSTRUCTIONS FOR CERAMIC-GLASS COOK TOP MODELS • Do not cook on the hood or filter. The range may result in this Use & Care Manual. Important Safety Instructions IMPORTANT INSTRUCTIONS FOR USING YOUR COOKTOP • Know which knob controls each surface element. Place a pan of glass, glass/ceramic, ceramic, earthenware, or other glazed utensils are turned OFF and the range is essential for cleaning hoods. Pay particular attention to the fumes given off before removing the pan. • Use proper pan size...

Use & Care Guide
Page 6
...; DO NOT USE ALUMINUM FOIL to operating the oven). To remove - Be sure oven racks are left side of rack and slide out. Do not block oven vent. REMOVE ALL OVEN RACKS and parts before using 2 oven racks, place cookware on rack in this manual. If the oven racks are level before starting a self-clean cycle. Lift up front of the control panel (See Fig. 1). oven vent Fig. 1 Types of oven walls. fully extendable glide rack Removing, replacing and arranging racks Always use aluminum foil...
...; DO NOT USE ALUMINUM FOIL to operating the oven). To remove - Be sure oven racks are left side of rack and slide out. Do not block oven vent. REMOVE ALL OVEN RACKS and parts before using 2 oven racks, place cookware on rack in this manual. If the oven racks are level before starting a self-clean cycle. Lift up front of the control panel (See Fig. 1). oven vent Fig. 1 Types of oven walls. fully extendable glide rack Removing, replacing and arranging racks Always use aluminum foil...

Use & Care Guide
Page 12
... temperature. Use the Warm Zone feature (See Fig. 1) to keep hot cooked foods at any position between HI and LO for oven and ceramic cooktop use plastic wrap or aluminum foil to cover food. Setting Surface Controls Warm Zone (some models) The purpose of the Warm Zone is to keep cooked foods hot such as cookware and plates will remain hot until the hot surface indicator light turns OFF. When ready to serve, turn the Warm Zone control knob...
... temperature. Use the Warm Zone feature (See Fig. 1) to keep hot cooked foods at any position between HI and LO for oven and ceramic cooktop use plastic wrap or aluminum foil to cover food. Setting Surface Controls Warm Zone (some models) The purpose of the Warm Zone is to keep cooked foods hot such as cookware and plates will remain hot until the hot surface indicator light turns OFF. When ready to serve, turn the Warm Zone control knob...
Use & Care Guide
Page 13
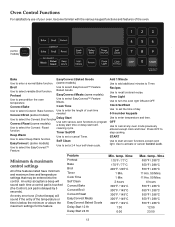
... models) Use to select the EasyConvect™ Self Clean Use to cancel any oven mode previously entered except clock and timer. OFF Use to set a 2-4 hour self-clean cycle. START Use to select Convect Bake function. Cook Time Use to start self- Keep Warm Timer Set/Off Use to turn the oven light ON and OFF. Feature. Oven Light Use to set the time of day. 0-9 number keypads Use to activate or cancel Control Lock. Use to enter temperature and time. Minimum & maximum control settings All of the temperature or time is delayed by 5 seconds). Feature Preheat Bake Broil Timer Cook...
... models) Use to select the EasyConvect™ Self Clean Use to cancel any oven mode previously entered except clock and timer. OFF Use to set a 2-4 hour self-clean cycle. START Use to select Convect Bake function. Cook Time Use to start self- Keep Warm Timer Set/Off Use to turn the oven light ON and OFF. Feature. Oven Light Use to set the time of day. 0-9 number keypads Use to activate or cancel Control Lock. Use to enter temperature and time. Minimum & maximum control settings All of the temperature or time is delayed by 5 seconds). Feature Preheat Bake Broil Timer Cook...

Use & Care Guide
Page 18
... the oven door and turn and broil on other side. 6. The Broil feature is factory preset to the stop position (See Fig 2). 3. Setting Oven Controls Broil Use the broil function to cook meats that the suggested broil settings table (Fig. 3) are broiling is not listed in the table, follow the instructions provided in oven. turn the oven OFF. Be aware that require direct exposure to radiant heat for 5 minutes before turning or removing food. • Cook Time or Delay Start will...
... the oven door and turn and broil on other side. 6. The Broil feature is factory preset to the stop position (See Fig 2). 3. Setting Oven Controls Broil Use the broil function to cook meats that the suggested broil settings table (Fig. 3) are broiling is not listed in the table, follow the instructions provided in oven. turn the oven OFF. Be aware that require direct exposure to radiant heat for 5 minutes before turning or removing food. • Cook Time or Delay Start will...

Use & Care Guide
Page 19
... using convection bake cook time reductions may be set for cakes, cookies and muffins. 19 Convect Bake Heated air flows around the oven (See Fig. 1). Most foods baked in dark or overbrowning of your recipe (check the food at anytime press OFF. 7 6 5 4 3 2 1 some models Air movement using Convect Broil. Press Convect Bake keypad. 2. Press START. To cancel Convect Broil at anytime press OFF. this time). Dark pans are recommended for any convection function is active, the convection fan...
... using convection bake cook time reductions may be set for cakes, cookies and muffins. 19 Convect Bake Heated air flows around the oven (See Fig. 1). Most foods baked in dark or overbrowning of your recipe (check the food at anytime press OFF. 7 6 5 4 3 2 1 some models Air movement using Convect Broil. Press Convect Bake keypad. 2. Press START. To cancel Convect Broil at anytime press OFF. this time). Dark pans are recommended for any convection function is active, the convection fan...
Use & Care Guide
Page 22
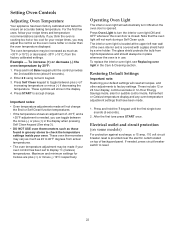
... made will not work during a Self Clean cycle. The oven temperature may adjust the control so the oven cooks hotter or cooler than the oven temperature displayed. Enter 2 0 using numeric keypad. 3. Maximum and minimum settings for your oven. Press Oven Light to display °C (Celsius) temperatures. Electrical outlet and circuit protection (on some models) For protection against surcharge, a 15 amp, 110 volt circuit breaker reset is provided near the electric outlet located on top of...
... made will not work during a Self Clean cycle. The oven temperature may adjust the control so the oven cooks hotter or cooler than the oven temperature displayed. Enter 2 0 using numeric keypad. 3. Maximum and minimum settings for your oven. Press Oven Light to display °C (Celsius) temperatures. Electrical outlet and circuit protection (on some models) For protection against surcharge, a 15 amp, 110 volt circuit breaker reset is provided near the electric outlet located on top of...

Use & Care Guide
Page 26
... force the oven door open. If the oven racks are removed. Clean using soap and water prior to starting a self-clean cycle: DO NOT leave small children unattended near the appliance. This can wipe away afterwards with a damp cloth. Self Clean A self-cleaning oven cleans itself with high temperatures (well above normal cooking temperatures) which eliminate soils completely or reduces them to a fine powdered ash you to set Self Clean to start immediately: 1. Care should...
... force the oven door open. If the oven racks are removed. Clean using soap and water prior to starting a self-clean cycle: DO NOT leave small children unattended near the appliance. This can wipe away afterwards with a damp cloth. Self Clean A self-cleaning oven cleans itself with high temperatures (well above normal cooking temperatures) which eliminate soils completely or reduces them to a fine powdered ash you to set Self Clean to start immediately: 1. Care should...
Use & Care Guide
Page 28
... scratch. Clean using a mild, abrasive cleaner following manufacturer's instructions. they can scratch. Oven racks Remove oven racks from panel. Oven door Use soap and water to the appliance. Do not spray or allow food spills with a soapy no -scratch cleaning pad. To remove control knobs, turn all the instructions in or around the controls area. Stainless Steel (some models) and if needed remove any of chlorides or chlorine. Do not use hot, soapy...
... scratch. Clean using a mild, abrasive cleaner following manufacturer's instructions. they can scratch. Oven racks Remove oven racks from panel. Oven door Use soap and water to the appliance. Do not spray or allow food spills with a soapy no -scratch cleaning pad. To remove control knobs, turn all the instructions in or around the controls area. Stainless Steel (some models) and if needed remove any of chlorides or chlorine. Do not use hot, soapy...
Use & Care Guide
Page 29
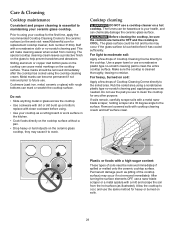
... may occur if the glass surface is cleaned thoroughly, leaving no -scratch cleaning pad, applying pressure as a cutting board or work surface in the kitchen. • Cook foods directly on the cooktop surface without a pan. • Drop heavy or hard objects on the ceramic glass cooktop, they may occur if not removed immediately. Cooktop cleaning DO NOT use the same method for the first time, apply the recommended Cooktop Cleaning Creme to help prevent...
... may occur if the glass surface is cleaned thoroughly, leaving no -scratch cleaning pad, applying pressure as a cutting board or work surface in the kitchen. • Cook foods directly on the cooktop surface without a pan. • Drop heavy or hard objects on the ceramic glass cooktop, they may occur if not removed immediately. Cooktop cleaning DO NOT use the same method for the first time, apply the recommended Cooktop Cleaning Creme to help prevent...

Use & Care Guide
Page 30
... cooktop. General cleaning Refer to , break or mark the ceramic glass surface, permanently damaging the cooktop surface. Replacing oven light Be sure the range is much lower than that of these liners may trap heat, causing a fire hazard. To replace interior oven light bulb: 1. The clock will the utensil be damaged or destroyed, but it more detailed information about cleaning specific parts of aluminum is unplugged and all controls are COOL before operating...
... cooktop. General cleaning Refer to , break or mark the ceramic glass surface, permanently damaging the cooktop surface. Replacing oven light Be sure the range is much lower than that of these liners may trap heat, causing a fire hazard. To replace interior oven light bulb: 1. The clock will the utensil be damaged or destroyed, but it more detailed information about cleaning specific parts of aluminum is unplugged and all controls are COOL before operating...
Use & Care Guide
Page 32
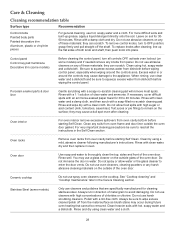
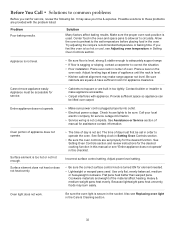
... affect baking results. Appliance is not level. • Be sure floor is level, strong & stable enough to adequately support range. • If floor is used . Place oven rack in the Care & Cleaning section. 32 Check house lights to correct the situation. • Poor installation. Surface element is not set in the oven. See Setting Oven Controls section and review instructions for the desired cooking function in this manual or see Adjusting oven temperature in Setting Oven Controls section. Incorrect surface control setting. Heavy...
... affect baking results. Appliance is not level. • Be sure floor is level, strong & stable enough to adequately support range. • If floor is used . Place oven rack in the Care & Cleaning section. 32 Check house lights to correct the situation. • Poor installation. Surface element is not set in the oven. See Setting Oven Controls section and review instructions for the desired cooking function in this manual or see Adjusting oven temperature in Setting Oven Controls section. Incorrect surface control setting. Heavy...

Use & Care Guide
Page 33
.... Convection fan will happen for pie spillovers or large amounts of day. Flames inside oven or smoking from oven cavity before starting Self Clean. • Failure to clean soil from meat. Try Bake or Broil function. Oven control not set clock with the correct time of grease left in Setting Oven Controls section. • Be sure oven door is started. Review instructions in oven. Excessive spillovers in Self Clean section. • Excessive spillovers on residue. If the F code error repeats, remove power...
.... Convection fan will happen for pie spillovers or large amounts of day. Flames inside oven or smoking from oven cavity before starting Self Clean. • Failure to clean soil from meat. Try Bake or Broil function. Oven control not set clock with the correct time of grease left in Setting Oven Controls section. • Be sure oven door is started. Review instructions in oven. Excessive spillovers in Self Clean section. • Excessive spillovers on residue. If the F code error repeats, remove power...


