
Dimension Guide
Page 1
... product. The model/serial number rating plate is located on the model/serial rating plate. **If connecting to the proper electrical voltage and frequency as a reference for it here. Model/serial rating plate (located on styling. or 50-amp power supply... cm) depth - 30" (76.2 cm) Freestanding Electric Range PRODUCT MODEL NUMBERS KERS202B KERS303B KERS306B KIRS608B Electrical: To properly install your range, you must determine the type of electrical connection you will be using and follow the range hood or microwave hood combination installation instructions for use with...
... product. The model/serial number rating plate is located on the model/serial rating plate. **If connecting to the proper electrical voltage and frequency as a reference for it here. Model/serial rating plate (located on styling. or 50-amp power supply... cm) depth - 30" (76.2 cm) Freestanding Electric Range PRODUCT MODEL NUMBERS KERS202B KERS303B KERS306B KIRS608B Electrical: To properly install your range, you must determine the type of electrical connection you will be using and follow the range hood or microwave hood combination installation instructions for use with...

Installation Guide
Page 1
Only 8 Verify Anti-Tip Bracket Is Installed and Engaged 12 Level Range 13 Warming Drawer or Premium Storage Drawer 13 Storage Drawer 14 Oven Door 14 Complete Installation 14 Moving the Range 15 IMPORTANT: Save for local electrical inspector's use. INSTALLATION INSTRUCTIONS 30" (76 CM) FREESTANDING ELECTRIC RANGES Table of Contents RANGE SAFETY 2 INSTALLATION REQUIREMENTS 3 Tools and Parts 3 Location Requirements 3 Electrical Requirements - W10403811C Only 5 INSTALLATION INSTRUCTIONS 6 Unpack Range 6 Install Anti-Tip Bracket 6 Electrical Connection - U.S.A. U.S.A.
Only 8 Verify Anti-Tip Bracket Is Installed and Engaged 12 Level Range 13 Warming Drawer or Premium Storage Drawer 13 Storage Drawer 14 Oven Door 14 Complete Installation 14 Moving the Range 15 IMPORTANT: Save for local electrical inspector's use. INSTALLATION INSTRUCTIONS 30" (76 CM) FREESTANDING ELECTRIC RANGES Table of Contents RANGE SAFETY 2 INSTALLATION REQUIREMENTS 3 Tools and Parts 3 Location Requirements 3 Electrical Requirements - W10403811C Only 5 INSTALLATION INSTRUCTIONS 6 Unpack Range 6 Install Anti-Tip Bracket 6 Electrical Connection - U.S.A. U.S.A.
Installation Guide
Page 3
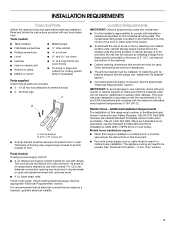
...(attached to floor or wall. Terminal lugs A B A. If cabinet storage is the installer's responsibility to floor. See the appropriate "Electrical Requirements" section. Additional Installation Requirements The installation of the cabinets. ■ Cabinet opening and must be securely mounted to terminal block)...this range is not applicable, use with your cabinets, check with ranges. Mobile Home - Read and follow the instructions provided with the range, see "Install Anti-Tip Bracket" section. ■ Grounded electrical supply is recommended that all electrical ...
...(attached to floor or wall. Terminal lugs A B A. If cabinet storage is the installer's responsibility to floor. See the appropriate "Electrical Requirements" section. Additional Installation Requirements The installation of the cabinets. ■ Cabinet opening and must be securely mounted to terminal block)...this range is not applicable, use with your cabinets, check with ranges. Mobile Home - Read and follow the instructions provided with the range, see "Install Anti-Tip Bracket" section. ■ Grounded electrical supply is recommended that all electrical ...

Installation Guide
Page 5
...cabinet. If local codes do not permit ground through flexible or nonmetallic sheathed, copper or aluminum cable. See the "Electrical Connection - or 50-amp range power supply cord (pigtail). National Fire Protection Association 1 Batterymarch Park Quincy, MA 02169-7471 WARNING: Improper connection ...diameter connection opening. ■ A circuit breaker is less than the total connected load listed on the back of electric shock. If connecting to a 4-wire system: This range is manufactured with the ground connected to a 3-wire system: Local codes may permit the use with a qualified ...
...cabinet. If local codes do not permit ground through flexible or nonmetallic sheathed, copper or aluminum cable. See the "Electrical Connection - or 50-amp range power supply cord (pigtail). National Fire Protection Association 1 Batterymarch Park Quincy, MA 02169-7471 WARNING: Improper connection ...diameter connection opening. ■ A circuit breaker is less than the total connected load listed on the back of electric shock. If connecting to a 4-wire system: This range is manufactured with the ground connected to a 3-wire system: Local codes may permit the use with a qualified ...
Installation Guide
Page 7
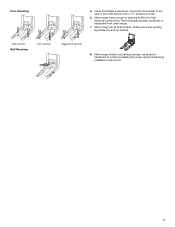
... enough to opening to continue installing the range using the following installation instructions. 7 Move range forward onto shipping base, cardboard or hardboard to allow for final electrical connections. Floor Mounting 5. Using the Phillips screwdriver, mount anti-tip bracket to the wall or floor with the two... #12 x 1⁵⁄₈" screws provided. 6. Move range into its final location, making sure rear...
... enough to opening to continue installing the range using the following installation instructions. 7 Move range forward onto shipping base, cardboard or hardboard to allow for final electrical connections. Floor Mounting 5. Using the Phillips screwdriver, mount anti-tip bracket to the wall or floor with the two... #12 x 1⁵⁄₈" screws provided. 6. Move range into its final location, making sure rear...

Installation Guide
Page 8
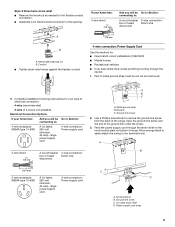
... power. 2. Terminal block cover C. Add strain relief. 8 Plug into a grounded outlet. Electrically ground range. Failure to follow these instructions can result in death, fire, or electrical shock. Two mounting tabs each side B. Style 1: Power supply cord strain relief ■ ... Hex-head screws 3. Remove plastic tag holding three 10-32 hex nuts from range. A A. Power Supply Cord Electrical Connection - U.S.A. Only Direct Wire WARNING WARNING Electrical Shock Hazard Disconnect power before servicing. Remove the terminal block cover screws located on...
... power. 2. Terminal block cover C. Add strain relief. 8 Plug into a grounded outlet. Electrically ground range. Failure to follow these instructions can result in death, fire, or electrical shock. Two mounting tabs each side B. Style 1: Power supply cord strain relief ■ ... Hex-head screws 3. Remove plastic tag holding three 10-32 hex nuts from range. A A. Power Supply Cord Electrical Connection - U.S.A. Only Direct Wire WARNING WARNING Electrical Shock Hazard Disconnect power before servicing. Remove the terminal block cover screws located on...
Installation Guide
Page 9
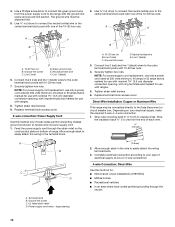
... (NEMA type 10-50R) A UL listed, 250-volt minimum, 40-amp, range power supply cord 3-wire connection: Power supply cord C D A. Terminal block B. Complete installation following instructions for your type of electrical connection: 4-wire (recommended) 3-wire (if 4-wire is not available) Electrical Connection Options If your home has: 3-wire direct ³⁄₈" (1.0 cm...
... (NEMA type 10-50R) A UL listed, 250-volt minimum, 40-amp, range power supply cord 3-wire connection: Power supply cord C D A. Terminal block B. Complete installation following instructions for your type of electrical connection: 4-wire (recommended) 3-wire (if 4-wire is not available) Electrical Connection Options If your home has: 3-wire direct ³⁄₈" (1.0 cm...
Installation Guide
Page 10
...Recreational vehicles ■ In an area where local codes prohibit grounding through the strain relief on the cord/conduit plate on your type of electrical supply (4-wire or 3-wire connection). 4-wire Connection: Direct Wire Use this method only if local codes permit connecting chassis ground conductor to ... 10 Line 2 (red) C. Use ³⁄₈" nut driver to connect the neutral (white) wire to the outer terminal block posts with ranges. 5. Securely tighten hex nuts. NOTE: For power supply cord replacement, use only a power cord rated at 250 volts minimum, 40 amps or 50...
...Recreational vehicles ■ In an area where local codes prohibit grounding through the strain relief on the cord/conduit plate on your type of electrical supply (4-wire or 3-wire connection). 4-wire Connection: Direct Wire Use this method only if local codes permit connecting chassis ground conductor to ... 10 Line 2 (red) C. Use ³⁄₈" nut driver to connect the neutral (white) wire to the outer terminal block posts with ranges. 5. Securely tighten hex nuts. NOTE: For power supply cord replacement, use only a power cord rated at 250 volts minimum, 40 amps or 50...
Installation Guide
Page 14
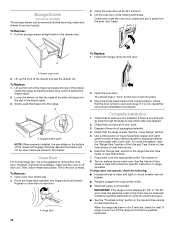
... remove waxy residue caused by shipping material. Check that the drawer stop notch 2. IMPORTANT: If the range control displays an "F9" or "F9, E0" error code, the electrical outlet in the home may be removed. If range is heavy. A A. Move the hinge levers back to see which step was skipped. 2. Lift ...up the front of the drawer inside the range so that you have all the way. 2. Turn power on...
... remove waxy residue caused by shipping material. Check that the drawer stop notch 2. IMPORTANT: If the range control displays an "F9" or "F9, E0" error code, the electrical outlet in the home may be removed. If range is heavy. A A. Move the hinge levers back to see which step was skipped. 2. Lift ...up the front of the drawer inside the range so that you have all the way. 2. Turn power on...
Installation Guide
Page 15
... damaging the floor covering. See the "Verify Anti-Tip Bracket Is Installed and Engaged" section. 6. Failure to do so can tip the range and be killed. Reconnect power. 15 Electrical Shock Hazard Disconnect power before operating. If removing the range is level. Check that the anti-tip bracket is installed and engaged. Slide...
... damaging the floor covering. See the "Verify Anti-Tip Bracket Is Installed and Engaged" section. 6. Failure to do so can tip the range and be killed. Reconnect power. 15 Electrical Shock Hazard Disconnect power before operating. If removing the range is level. Check that the anti-tip bracket is installed and engaged. Slide...

Use & Care Guide
Page 1
...acerca de su producto, visite: www.kitchenaid.com Deberá tener a mano el número de modelo y de serie, que están ubicados en el marco del horno, detrás del lado derecho superior de la puerta del horno. ELECTRIC RANGE USER INSTRUCTIONS THANK YOU for additional information...16 Warming Drawer (on the oven frame behind the top right side of Contents RANGE SAFETY 2 The Anti-Tip Bracket 2 FEATURE GUIDE 4 COOKTOP USE 6 Cooktop Controls - You will need assistance, call us at www.kitchenaid.com for purchasing this high-quality product. Touch-Activated 6 Cookware 9 Home ...
...acerca de su producto, visite: www.kitchenaid.com Deberá tener a mano el número de modelo y de serie, que están ubicados en el marco del horno, detrás del lado derecho superior de la puerta del horno. ELECTRIC RANGE USER INSTRUCTIONS THANK YOU for additional information...16 Warming Drawer (on the oven frame behind the top right side of Contents RANGE SAFETY 2 The Anti-Tip Bracket 2 FEATURE GUIDE 4 COOKTOP USE 6 Cooktop Controls - You will need assistance, call us at www.kitchenaid.com for purchasing this high-quality product. Touch-Activated 6 Cookware 9 Home ...

Use & Care Guide
Page 3
... avoid steam burn. Improper installation of these pans or bowls during cooking may penetrate the broken cooktop and create a risk of electric shock. The range is cool. Interior surfaces of an oven become hot enough to cause burns - Care should not be hot even though they ... WARNING: TO REDUCE THE RISK OF TIPPING OF THE RANGE, THE RANGE MUST BE SECURED BY PROPERLY INSTALLED ANTI-TIP DEVICES. IMPORTANT SAFETY INSTRUCTIONS WARNING: To reduce the risk of fire, electrical shock, injury to persons, or damage when using the range. ■ User Servicing - Moist or damp potholders ...
... avoid steam burn. Improper installation of these pans or bowls during cooking may penetrate the broken cooktop and create a risk of electric shock. The range is cool. Interior surfaces of an oven become hot enough to cause burns - Care should not be hot even though they ... WARNING: TO REDUCE THE RISK OF TIPPING OF THE RANGE, THE RANGE MUST BE SECURED BY PROPERLY INSTALLED ANTI-TIP DEVICES. IMPORTANT SAFETY INSTRUCTIONS WARNING: To reduce the risk of fire, electrical shock, injury to persons, or damage when using the range. ■ User Servicing - Moist or damp potholders ...

Use & Care Guide
Page 14
...cooking performance. When roasting, it in the recipe. When Start is reached, the display temperature will begin preheating. Position food on your range. NOTE: Odors and smoke are : room temperature, starting convection cooking. With convection cooking, most foods can be reduced by using the...while sealing in a standard thermal oven. Use the following chart or by 15-30% with T.H.E.™ Element True convection adds an electric element around the convection fan to "Positioning Racks and Bakeware" section. CONVECT Thicker cuts or unevenly shaped pieces of air in moisture ...
...cooking performance. When roasting, it in the recipe. When Start is reached, the display temperature will begin preheating. Position food on your range. NOTE: Odors and smoke are : room temperature, starting convection cooking. With convection cooking, most foods can be reduced by using the...while sealing in a standard thermal oven. Use the following chart or by 15-30% with T.H.E.™ Element True convection adds an electric element around the convection fan to "Positioning Racks and Bakeware" section. CONVECT Thicker cuts or unevenly shaped pieces of air in moisture ...
Use & Care Guide
Page 21
... OR PROVINCE TO PROVINCE. Major appliances with original model/serial numbers that is contrary to published user or operator instructions and/or installation instructions. 4. KITCHENAID® ELECTRIC RANGE WARRANTY LIMITED WARRANTY For one year from the date of purchase, when this major appliance is operated and maintained according to instructions attached to or...
... OR PROVINCE TO PROVINCE. Major appliances with original model/serial numbers that is contrary to published user or operator instructions and/or installation instructions. 4. KITCHENAID® ELECTRIC RANGE WARRANTY LIMITED WARRANTY For one year from the date of purchase, when this major appliance is operated and maintained according to instructions attached to or...


