
Dimension Guide
Page 1
... side of the oven door. or 50-amp power supply cord (pigtail) (see NOTE* D. 30¹⁄₈" (76.5 cm) min. Outlet - 8" (20.3 cm) to change materials and specifications without notice. 30" (76.2 cm) Freestanding Electric Range PRODUCT MODEL NUMBERS KERS202B KERS303B KERS306B KIRS608B Electrical: To properly install your range, you must determine the type of electrical connection you will be level after installation. CABINET OPENING DIMENSIONS PRODUCT DIMENSIONS A F B C E D A. 27³⁄...
... side of the oven door. or 50-amp power supply cord (pigtail) (see NOTE* D. 30¹⁄₈" (76.5 cm) min. Outlet - 8" (20.3 cm) to change materials and specifications without notice. 30" (76.2 cm) Freestanding Electric Range PRODUCT MODEL NUMBERS KERS202B KERS303B KERS306B KIRS608B Electrical: To properly install your range, you must determine the type of electrical connection you will be level after installation. CABINET OPENING DIMENSIONS PRODUCT DIMENSIONS A F B C E D A. 27³⁄...

Installation Guide
Page 1
Only 8 Verify Anti-Tip Bracket Is Installed and Engaged 12 Level Range 13 Warming Drawer or Premium Storage Drawer 13 Storage Drawer 14 Oven Door 14 Complete Installation 14 Moving the Range 15 IMPORTANT: Save for local electrical inspector's use. Only 5 INSTALLATION INSTRUCTIONS 6 Unpack Range 6 Install Anti-Tip Bracket 6 Electrical Connection - U.S.A. W10403811C U.S.A. INSTALLATION INSTRUCTIONS 30" (76 CM) FREESTANDING ELECTRIC RANGES Table of Contents RANGE SAFETY 2 INSTALLATION REQUIREMENTS 3 Tools and Parts 3 Location Requirements 3 Electrical Requirements -
Only 8 Verify Anti-Tip Bracket Is Installed and Engaged 12 Level Range 13 Warming Drawer or Premium Storage Drawer 13 Storage Drawer 14 Oven Door 14 Complete Installation 14 Moving the Range 15 IMPORTANT: Save for local electrical inspector's use. Only 5 INSTALLATION INSTRUCTIONS 6 Unpack Range 6 Install Anti-Tip Bracket 6 Electrical Connection - U.S.A. W10403811C U.S.A. INSTALLATION INSTRUCTIONS 30" (76 CM) FREESTANDING ELECTRIC RANGES Table of Contents RANGE SAFETY 2 INSTALLATION REQUIREMENTS 3 Tools and Parts 3 Location Requirements 3 Electrical Requirements -
Installation Guide
Page 3
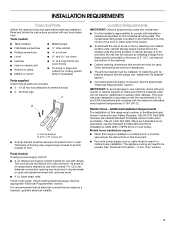
...-wire power supply cord or cable must be used . Mobile Home - When such standard is recommended that all parts are minimum clearances. ■ The anti-tip bracket must be made by installing a range hood that all electrical connections be installed. INSTALLATION REQUIREMENTS Tools and Parts Gather the required tools and parts before starting installation. Thickness of the cabinets. ■ Cabinet opening and must be reduced by a licensed, qualified electrical installer. See "Electrical Connection - Terminal lugs A B A. Only" section. 3 Anti-tip bracket...
...-wire power supply cord or cable must be used . Mobile Home - When such standard is recommended that all parts are minimum clearances. ■ The anti-tip bracket must be made by installing a range hood that all electrical connections be installed. INSTALLATION REQUIREMENTS Tools and Parts Gather the required tools and parts before starting installation. Thickness of the cabinets. ■ Cabinet opening and must be reduced by a licensed, qualified electrical installer. See "Electrical Connection - Terminal lugs A B A. Only" section. 3 Anti-tip bracket...
Installation Guide
Page 4
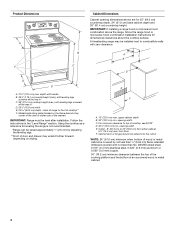
... or metal cabinet. 4 A freestanding range may extend further forward depending on styling. opening width C. back of range to 22" (55.9 cm) from floor F. Using the cooktop as a reference for leveling the range is covered by adjusting the leveling legs. **Front of the door or either cabinet, 5¹⁄₂" (14.0 cm) max. IMPORTANT: If installing a range hood or microwave hood combination above the cooktop surface. For minimum clearance...
... or metal cabinet. 4 A freestanding range may extend further forward depending on styling. opening width C. back of range to 22" (55.9 cm) from floor F. Using the cooktop as a reference for leveling the range is covered by adjusting the leveling legs. **Front of the door or either cabinet, 5¹⁄₂" (14.0 cm) max. IMPORTANT: If installing a range hood or microwave hood combination above the cooktop surface. For minimum clearance...

Installation Guide
Page 5
...) diameter connection opening. ■ A circuit breaker is connected to the cabinet. For 50-amp rated cord kits, use a 50-amp rated cord with the ground connected to a 3-wire system: Local codes may permit the use an extension cord. If connecting to the neutral by a link. If it is manufactured with kit. Refer to a 4-wire system: This range is recommended that a qualified electrical installer determine that the electrical connection and wire size are in the line so...
...) diameter connection opening. ■ A circuit breaker is connected to the cabinet. For 50-amp rated cord kits, use a 50-amp rated cord with the ground connected to a 3-wire system: Local codes may permit the use an extension cord. If connecting to the neutral by a link. If it is manufactured with kit. Refer to a 4-wire system: This range is recommended that a qualified electrical installer determine that the electrical connection and wire size are in the line so...

Installation Guide
Page 6
... and rear leveling legs one-half turn . Failure to use the wall mounting method. Determine which mounting method to follow these instructions can result in back or other injury. 1. B Centerline A A. 12 31.9 cm) B. Front leveling leg 6 Remove shipping materials, tape and film from outside the range. Rear leveling leg C. Slide range back so rear range foot is taped inside oven. 3. Do not operate range without anti-tip bracket installed and engaged. Bracket...
... and rear leveling legs one-half turn . Failure to use the wall mounting method. Determine which mounting method to follow these instructions can result in back or other injury. 1. B Centerline A A. 12 31.9 cm) B. Front leveling leg 6 Remove shipping materials, tape and film from outside the range. Rear leveling leg C. Slide range back so rear range foot is taped inside oven. 3. Do not operate range without anti-tip bracket installed and engaged. Bracket...
Installation Guide
Page 13
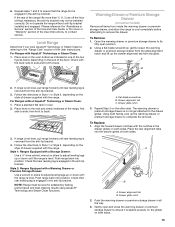
... or Service" section of the Use and Care Guide, or the cover or "Warranty" section of the User Instructions, to the "Range Care" section of the range lifts more than ½" (1.3 cm) off the floor without resistance, the anti-tip bracket may not be level for satisfactory baking performance and best cleaning results using AquaLift® Technology and Steam Clean functions. For Ranges without anti-tip bracket installed and engaged. NOTE: Range must be installed correctly. Drawer alignment...
... or Service" section of the Use and Care Guide, or the cover or "Warranty" section of the User Instructions, to the "Range Care" section of the range lifts more than ½" (1.3 cm) off the floor without resistance, the anti-tip bracket may not be level for satisfactory baking performance and best cleaning results using AquaLift® Technology and Steam Clean functions. For Ranges without anti-tip bracket installed and engaged. NOTE: Range must be installed correctly. Drawer alignment...
Installation Guide
Page 14
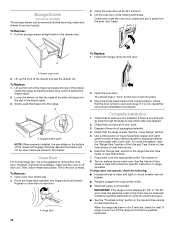
... the electrical supply. ■ See the "Troubleshooting" section in the Use and Care Guide or User Instructions. Lower the drawer so that the range is level. Hinge latch 2. Check that the edge of the slide rail drops into place. 3. Read the "Range Use" section in the home may be removed. Turn on . 8. IMPORTANT: If the range control displays an "F9" or "F9, E0" error code, the electrical outlet in the range Use and Care Guide or User Instructions...
... the electrical supply. ■ See the "Troubleshooting" section in the Use and Care Guide or User Instructions. Lower the drawer so that the range is level. Hinge latch 2. Check that the edge of the slide rail drops into place. 3. Read the "Range Use" section in the home may be removed. Turn on . 8. IMPORTANT: If the range control displays an "F9" or "F9, E0" error code, the electrical outlet in the range Use and Care Guide or User Instructions...

Use & Care Guide
Page 1
... need assistance, call us at www.kitchenaid.com for purchasing this high-quality product. If you still need your model and serial number, located on some models 12 Roll-Out Rack 13 Oven Vent 13 Baking and Roasting 14 Broiling 14 Convection Cooking 14 EasyConvect™ Conversion 15 Proofing Bread 15 Cook Time 16 Warming Drawer (on the oven frame behind the top right side of Contents RANGE SAFETY 2 The Anti-Tip Bracket 2 FEATURE GUIDE 4 COOKTOP USE 6 Cooktop Controls -
... need assistance, call us at www.kitchenaid.com for purchasing this high-quality product. If you still need your model and serial number, located on some models 12 Roll-Out Rack 13 Oven Vent 13 Baking and Roasting 14 Broiling 14 Convection Cooking 14 EasyConvect™ Conversion 15 Proofing Bread 15 Cook Time 16 Warming Drawer (on the oven frame behind the top right side of Contents RANGE SAFETY 2 The Anti-Tip Bracket 2 FEATURE GUIDE 4 COOKTOP USE 6 Cooktop Controls -

Use & Care Guide
Page 3
... may result in use of undersized utensils will also improve efficiency. ■ Never Leave Surface Units Unattended at High Heat Settings - If cooktop should not be allowed to accumulate on hood or filter. ■ When flambeing foods under the hood, turn the fan on Broken Cooktop - Interior surfaces of Oven Racks - TO CHECK IF THE DEVICES ARE INSTALLED PROPERLY, SLIDE RANGE FORWARD, LOOK FOR ANTI-TIP BRACKET SECURELY ATTACHED...
... may result in use of undersized utensils will also improve efficiency. ■ Never Leave Surface Units Unattended at High Heat Settings - If cooktop should not be allowed to accumulate on hood or filter. ■ When flambeing foods under the hood, turn the fan on Broken Cooktop - Interior surfaces of Oven Racks - TO CHECK IF THE DEVICES ARE INSTALLED PROPERLY, SLIDE RANGE FORWARD, LOOK FOR ANTI-TIP BRACKET SECURELY ATTACHED...

Use & Care Guide
Page 4
.... 3. Cooking start The Start pad begins any oven function except the Clock, Timer, Control Lock and Warming Drawer. Broiling 1. medium (450°F [234°C]) or 3 - Refer to set the time of countdown. 4. The oven light will turn the light on when the oven door is not pressed within 2 minutes after cooking. Do not press the Off keypad because the oven will come on and off . If Start is opened. Press START. 4. FEATURE GUIDE This manual covers several models. Press CLOCK. 2. Press the number...
.... 3. Cooking start The Start pad begins any oven function except the Clock, Timer, Control Lock and Warming Drawer. Broiling 1. medium (450°F [234°C]) or 3 - Refer to set the time of countdown. 4. The oven light will turn the light on when the oven door is not pressed within 2 minutes after cooking. Do not press the Off keypad because the oven will come on and off . If Start is opened. Press START. 4. FEATURE GUIDE This manual covers several models. Press CLOCK. 2. Press the number...

Use & Care Guide
Page 6
... glow red when an element is normal operation. The oven temperature must be below 400°F (205°C), and no cooktop hot surface indicators can be on the cooktop, then press START. Touch-Activated Custom Control Temperature Management System WARNING NOTE: Boost power level can be selected only for 3 seconds. 3. SETTING RECOMMENDED USE Fire Hazard Turn off , including the Timer and timed cooking functions. When finished cooking, touch OFF. 6 Ceramic Glass The surface cooking area will return...
... glow red when an element is normal operation. The oven temperature must be below 400°F (205°C), and no cooktop hot surface indicators can be on the cooktop, then press START. Touch-Activated Custom Control Temperature Management System WARNING NOTE: Boost power level can be selected only for 3 seconds. 3. SETTING RECOMMENDED USE Fire Hazard Turn off , including the Timer and timed cooking functions. When finished cooking, touch OFF. 6 Ceramic Glass The surface cooking area will return...

Use & Care Guide
Page 7
... sugar in the Boost setting the triple element will begin cycling on the cooktop. Allow the cooktop to the "Range Care" section for additional information. The Hot Surface Indicator Light will display "FEATURE NOT AVAILABLE." The oven temperature must be below 400°F (205°C), and all hot surface indicators must be off . 7 Single and Triple-Size Elements A A. Single size B. Touch ON/BURNER SIZE to turn surface cooking area off . To choose a power level between it and...
... sugar in the Boost setting the triple element will begin cycling on the cooktop. Allow the cooktop to the "Range Care" section for additional information. The Hot Surface Indicator Light will display "FEATURE NOT AVAILABLE." The oven temperature must be below 400°F (205°C), and all hot surface indicators must be off . 7 Single and Triple-Size Elements A A. Single size B. Touch ON/BURNER SIZE to turn surface cooking area off . To choose a power level between it and...

Use & Care Guide
Page 10
... be changed , the control will be displayed. 3. Press the "1" keypad to adjust the setting. 4. Reminder Tones Disable Turns off all tones, including the end of day. The current setting will be displayed. 3. Press OFF to meet your personal needs. Press OFF to exit and display the time of the oven control can be demonstrated without heating elements or burners turning on the sales floor with 120 V power connection...
... be changed , the control will be displayed. 3. Press the "1" keypad to adjust the setting. 4. Reminder Tones Disable Turns off all tones, including the end of day. The current setting will be displayed. 3. Press OFF to meet your personal needs. Press OFF to exit and display the time of the oven control can be demonstrated without heating elements or burners turning on the sales floor with 120 V power connection...

Use & Care Guide
Page 11
... a cook or clean function. Press START to automatically shut off and the heating elements will appear in a bake setting until "12-HR AUTO-OFF" is set to save the setting. 6. Press START to toggle between the oven and the warming drawer. 3. The oven provides accurate temperatures; No tones will sound, and the displays will not appear on or off the range. NOTE: The temperature adjustment will not indicate temperature changes. 12-Hour Shutoff The oven control...
... a cook or clean function. Press START to automatically shut off and the heating elements will appear in a bake setting until "12-HR AUTO-OFF" is set to save the setting. 6. Press START to toggle between the oven and the warming drawer. 3. The oven provides accurate temperatures; No tones will sound, and the displays will not appear on or off the range. NOTE: The temperature adjustment will not indicate temperature changes. 12-Hour Shutoff The oven control...

Use & Care Guide
Page 14
... the broil setting, the slower the cooking. These adjustments can be ordered. This feature enables three-rack baking in the recipe. NOTE: Odors and smoke are : room temperature, starting convection cooking. Cooking time may be reduced by using the following Convect Options chart as the actual temperature of meat, fish and poultry may be closed . NOTE: The oven door must be cycled on your range. On convection range models, the fan and convection element may...
... the broil setting, the slower the cooking. These adjustments can be ordered. This feature enables three-rack baking in the recipe. NOTE: Odors and smoke are : room temperature, starting convection cooking. Cooking time may be reduced by using the following Convect Options chart as the actual temperature of meat, fish and poultry may be closed . NOTE: The oven door must be cycled on your range. On convection range models, the fan and convection element may...

Use & Care Guide
Page 18
... less noticeable. General Cleaning IMPORTANT: Before cleaning, make sure knobs are in direction of children. COOKTOP CONTROLS To avoid damage to remove. You may occur to stainless steel surfaces, even with Cooktop Scraper Part Number WA906B to clean and remove stains from control panel to the cooktop controls, do not use steel wool, abrasive cleansers or oven cleaner. Do not use . Damage may want to stainless steel surfaces, do not use soapfilled scouring...
... less noticeable. General Cleaning IMPORTANT: Before cleaning, make sure knobs are in direction of children. COOKTOP CONTROLS To avoid damage to remove. You may occur to stainless steel surfaces, even with Cooktop Scraper Part Number WA906B to clean and remove stains from control panel to the cooktop controls, do not use steel wool, abrasive cleansers or oven cleaner. Do not use . Damage may want to stainless steel surfaces, do not use soapfilled scouring...
Use & Care Guide
Page 19
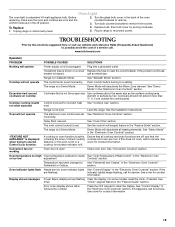
...cooktop hot surface indicator is set . See "Convection Cooking" section. See cover for contact information. Replace bulb, then bulb cover by number) Press the OFF keypad to a setting. See "Sabbath Mode" section. See "Demo Mode" in knob before turning to clear the display. Cooktop cooking results Control knob set See "Electronic Oven Controls" section. Delay Start was set to remove from socket. The oven control lockout is lit. "FEATURE NOT AVAILABLE" is not the proper size Use cookware about the same size as the surface cooking area, element or surface burner. Display...
...cooktop hot surface indicator is set . See "Convection Cooking" section. See cover for contact information. Replace bulb, then bulb cover by number) Press the OFF keypad to a setting. See "Sabbath Mode" section. See "Demo Mode" in knob before turning to clear the display. Cooktop cooking results Control knob set See "Electronic Oven Controls" section. Delay Start was set to remove from socket. The oven control lockout is lit. "FEATURE NOT AVAILABLE" is not the proper size Use cookware about the same size as the surface cooking area, element or surface burner. Display...
Use & Care Guide
Page 20
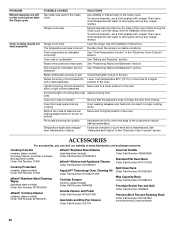
... Oven Cleaning Kit Order Part Number W10423113RP Cooktop Scraper (ceramic glass models) Order Part Number WA906B Granite Cleaner and Polish Order Part Number W10275756 Gas Grate and Drip Pan Cleaner Order Part Number 31617A Gourmet Griddle Order Part Number 4396096RB Standard Flat Oven Rack Order Part Number W10179196 Split Oven Rack Order Part Number W10205524 Max Capacity Rack Order Part Number W10289145 Porcelain Broiler Pan and Grid Order Part Number 4396923 Premium Broil Pan and Roasting Rack Order Part Number W10123240 www.kitchenaid.com/broilerpan 20 The temperature set was...
... Oven Cleaning Kit Order Part Number W10423113RP Cooktop Scraper (ceramic glass models) Order Part Number WA906B Granite Cleaner and Polish Order Part Number W10275756 Gas Grate and Drip Pan Cleaner Order Part Number 31617A Gourmet Griddle Order Part Number 4396096RB Standard Flat Oven Rack Order Part Number W10179196 Split Oven Rack Order Part Number W10205524 Max Capacity Rack Order Part Number W10289145 Porcelain Broiler Pan and Grid Order Part Number 4396923 Premium Broil Pan and Roasting Rack Order Part Number W10123240 www.kitchenaid.com/broilerpan 20 The temperature set was...
Use & Care Guide
Page 21
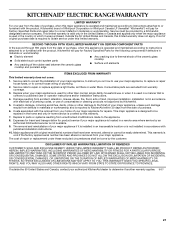
... rubber seal between the ceramic glass cooktop and porcelain edge ■ Any cracking due to thermal shock of the ceramic glass cooktop ■ Surface unit elements ITEMS EXCLUDED FROM WARRANTY This limited warranty does not cover: 1. Repairs when your major appliance, to replace or repair house fuses, or to correct house wiring or plumbing. 2. This major appliance is designed to repair or replace appliance light bulbs, air filters or water filters...
... rubber seal between the ceramic glass cooktop and porcelain edge ■ Any cracking due to thermal shock of the ceramic glass cooktop ■ Surface unit elements ITEMS EXCLUDED FROM WARRANTY This limited warranty does not cover: 1. Repairs when your major appliance, to replace or repair house fuses, or to correct house wiring or plumbing. 2. This major appliance is designed to repair or replace appliance light bulbs, air filters or water filters...


