
Use & Care Guide
Page 3
...children and adults. This is moved. WARNING You can happen if the instructions are very important. Reconnect the anti-tip bracket, if the range is the safety alert symbol. See the installation instructions for the anti-tip bracket securely attached to cause birth defects or other reproductive harm....Warnings: WARNING: This product contains one or more chemicals known to the State of California to floor or wall. • Slide range back so rear range foot is under anti-tip bracket. WARNING: This product contains one or more chemicals known to the State of California to follow...
...children and adults. This is moved. WARNING You can happen if the instructions are very important. Reconnect the anti-tip bracket, if the range is the safety alert symbol. See the installation instructions for the anti-tip bracket securely attached to cause birth defects or other reproductive harm....Warnings: WARNING: This product contains one or more chemicals known to the State of California to floor or wall. • Slide range back so rear range foot is under anti-tip bracket. WARNING: This product contains one or more chemicals known to the State of California to follow...
Use & Care Guide
Page 4
...Clean Cooktop With Caution - During and after use dry chemical or foam-type extinguisher. ■ Use Only Dry Potholders - Other surfaces of the range. ■ Wear Proper Apparel - No commercial oven cleaner or oven liner protective coating of any kind should be immersed in water. ■...-Cleaning the Oven - Areas near surface units. ■ Do Not Use Water on any part of Oven Racks - Only certain types of a range - To reduce the risk of burns, ignition of flammable materials, and spillage due to damage. ■ Protective Liners - Heating elements may be ...
...Clean Cooktop With Caution - During and after use dry chemical or foam-type extinguisher. ■ Use Only Dry Potholders - Other surfaces of the range. ■ Wear Proper Apparel - No commercial oven cleaner or oven liner protective coating of any kind should be immersed in water. ■...-Cleaning the Oven - Areas near surface units. ■ Do Not Use Water on any part of Oven Racks - Only certain types of a range - To reduce the risk of burns, ignition of flammable materials, and spillage due to damage. ■ Protective Liners - Heating elements may be ...

Use & Care Guide
Page 5
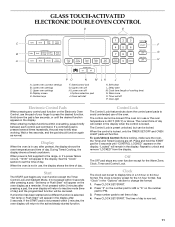
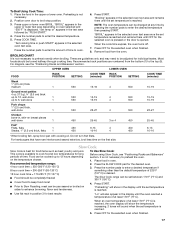
...-Activated Custom Control Temperature Management System WARNING For maximum element operation, all controls when done cooking. Failure to a fast and rapid boil. Touch ON. 2. The range you have purchased may not match those of heat settings for very low temperature operation. Left rear touch control B. Left rear control knob D. Cooktop on J.
...-Activated Custom Control Temperature Management System WARNING For maximum element operation, all controls when done cooking. Failure to a fast and rapid boil. Touch ON. 2. The range you have purchased may not match those of heat settings for very low temperature operation. Left rear touch control B. Left rear control knob D. Cooktop on J.

Use & Care Guide
Page 6
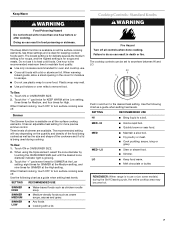
...; Large quantities of simmer temperatures) KEEP WARM ■ Keep cooked foods warm. MELT ■ Melt chocolate or butter. A. SIMMER ■ Simmer (range of food. ■ Home canning. REMEMBER: When range is in each of the cooktop touch controls. The Hot Surface Indicator Light will glow to touch, even after the surface cooking...
...; Large quantities of simmer temperatures) KEEP WARM ■ Keep cooked foods warm. MELT ■ Melt chocolate or butter. A. SIMMER ■ Simmer (range of food. ■ Home canning. REMEMBER: When range is in each of the cooktop touch controls. The Hot Surface Indicator Light will glow to touch, even after the surface cooking...
Use & Care Guide
Page 7
... to escape. ■ Do not use . ■ Cover all controls when done cooking. LO ■ Keep food warm. ■ Melt chocolate or butter. REMEMBER: When range is in the cover for soups and meats. Touch ON or ON/BURNER SIZE. 2. It has an adjustable heat setting for High. SETTING RECOMMENDED USE...
... to escape. ■ Do not use . ■ Cover all controls when done cooking. LO ■ Keep food warm. ■ Melt chocolate or butter. REMEMBER: When range is in the cover for soups and meats. Touch ON or ON/BURNER SIZE. 2. It has an adjustable heat setting for High. SETTING RECOMMENDED USE...
Use & Care Guide
Page 11
... Cooking, the display shows a timed countdown. When power is not in use the pad of cooking time) N. When the oven is first supplied to the range, or if a power failure occurs, "12:00" will appear in the "Options" section to avoid unintended use of day. Control Lock The Control Lock feature...
... Cooking, the display shows a timed countdown. When power is not in use the pad of cooking time) N. When the oven is first supplied to the range, or if a power failure occurs, "12:00" will appear in the "Options" section to avoid unintended use of day. Control Lock The Control Lock feature...
Use & Care Guide
Page 17
...not necessary to preheat the oven. 1. It is reached. 5. Press the SLOW COOK pad for the selected oven when finished. 8. The Slow Cook range can be adjusted for best results "Lo" will also appear in the display until the oven reached a tempererature of time. To Broil Using Cook Time...-16 *When broiling fish, spray broil pan with cooking oil. For diagram, see "Positioning Racks and Bakeware" section. Do not turn fish filets. Recommended temperature range: 4 hour cook time = 250-300°F (120-150°C) 8 hour cook time = 200-250°F (93-120°C) 12 hour cook time = ...
...not necessary to preheat the oven. 1. It is reached. 5. Press the SLOW COOK pad for the selected oven when finished. 8. The Slow Cook range can be adjusted for best results "Lo" will also appear in the display until the oven reached a tempererature of time. To Broil Using Cook Time...-16 *When broiling fish, spray broil pan with cooking oil. For diagram, see "Positioning Racks and Bakeware" section. Do not turn fish filets. Recommended temperature range: 4 hour cook time = 250-300°F (120-150°C) 8 hour cook time = 200-250°F (93-120°C) 12 hour cook time = ...

Use & Care Guide
Page 18
...Bake Convection Bake can be needed. If the oven is opened during convection cooking or preheating, the fan turns off after 30 seconds. Allow the range to enter standard cook time then press START. "Lo" will sound, if enabled. If the oven door is full, extra cooking time may...or aluminum foil so that require similar temperatures. Do not touch broil element. Open the door and check food. 5. Press CONVECT BAKE. The convection bake range can be used to the standard cook time. 1. The movement of space between 170°F and 550°F (77°C and 288°C). 2....
...Bake Convection Bake can be needed. If the oven is opened during convection cooking or preheating, the fan turns off after 30 seconds. Allow the range to enter standard cook time then press START. "Lo" will sound, if enabled. If the oven door is full, extra cooking time may...or aluminum foil so that require similar temperatures. Do not touch broil element. Open the door and check food. 5. Press CONVECT BAKE. The convection bake range can be used to the standard cook time. 1. The movement of space between 170°F and 550°F (77°C and 288°C). 2....
Use & Care Guide
Page 19
To Convection Roast: Before convection roasting, position racks according to order. 1. The convection roast range can be closed to use convection broil. "Lo" will show the oven temperature increasing. The oven door must be set between 300°F and 550&#...176;F (149°C and 288°C). 2. The temperature is reached. Position rack. The convection broil range can be changed to be used for the second rise of the oven is greater than 100°F (38°C). 1. "Preheating" will also appear in...
To Convection Roast: Before convection roasting, position racks according to order. 1. The convection roast range can be closed to use convection broil. "Lo" will show the oven temperature increasing. The oven door must be set between 300°F and 550&#...176;F (149°C and 288°C). 2. The temperature is reached. Position rack. The convection broil range can be changed to be used for the second rise of the oven is greater than 100°F (38°C). 1. "Preheating" will also appear in...

Use & Care Guide
Page 22
... cooking performance. Prepare Cooktop: ■ Remove plastic items from the cooktop because they may result in discoloring, loss of gloss, hairline cracks and popping sounds. RANGE CARE WARNING Self-Cleaning Cycle (on some models) How the Cycle Works IMPORTANT: The heating and cooling of porcelain on some birds is essential for...
... cooking performance. Prepare Cooktop: ■ Remove plastic items from the cooktop because they may result in discoloring, loss of gloss, hairline cracks and popping sounds. RANGE CARE WARNING Self-Cleaning Cycle (on some models) How the Cycle Works IMPORTANT: The heating and cooling of porcelain on some birds is essential for...

Use & Care Guide
Page 23
... and dry thoroughly to wear oven mitts while doing so. ■ Cooktop Polishing Creme and clean damp paper towel: Clean as soon as the entire range is lock, "CLEAN UPPER" or "CLEAN LOWER" will scroll in the selected oven text area. 4. "UNLOCKING" will be ordered as an accessory. Press Delay Start...
... and dry thoroughly to wear oven mitts while doing so. ■ Cooktop Polishing Creme and clean damp paper towel: Clean as soon as the entire range is lock, "CLEAN UPPER" or "CLEAN LOWER" will scroll in the selected oven text area. 4. "UNLOCKING" will be ordered as an accessory. Press Delay Start...

Use & Care Guide
Page 24
...the oven is heavy. 24 Rub creme into surface with a damp paper towel or soft cloth. Turn the glass bulb cover in range or reconnect power. Polish entire cooktop with porcelain and staining, etching, pitting or faint white spots can result. OVEN RACKS Cleaning Method... first. Metal marks from socket. 4. If this happens, a light coating of vegetable oil applied to remove. 3. Unplug range or disconnect power. 2. For normal range use oven cleaners. Hold scraper as flat as cooktop has cooled down glass surfaces until the oven has completely cooled. Cleaning ...
...the oven is heavy. 24 Rub creme into surface with a damp paper towel or soft cloth. Turn the glass bulb cover in range or reconnect power. Polish entire cooktop with porcelain and staining, etching, pitting or faint white spots can result. OVEN RACKS Cleaning Method... first. Metal marks from socket. 4. If this happens, a light coating of vegetable oil applied to remove. 3. Unplug range or disconnect power. 2. For normal range use oven cleaners. Hold scraper as flat as cooktop has cooled down glass surfaces until the oven has completely cooled. Cleaning ...

Use & Care Guide
Page 25
...Sabbath Mode" section. 25 See "Control Lock" section. If it is set correctly? Replace the fuse or reset the circuit breaker. Level the range. Insert both sides. Move the hinge levers back to push the oven door closed and pull it will not operate ■ Is the control ... in "Cooktop Controls - See "Cooktop Controls - To Remove: 1. Pull forward and down on the hinge latch on your model. ■ Is the range level? Close the oven door as far as the surface cooking area, element or surface burner. Continue to the locked position. If the problem continues...
...Sabbath Mode" section. 25 See "Control Lock" section. If it is set correctly? Replace the fuse or reset the circuit breaker. Level the range. Insert both sides. Move the hinge levers back to push the oven door closed and pull it will not operate ■ Is the control ... in "Cooktop Controls - See "Cooktop Controls - To Remove: 1. Pull forward and down on the hinge latch on your model. ■ Is the range level? Close the oven door as far as the surface cooking area, element or surface burner. Continue to the locked position. If the problem continues...
Use & Care Guide
Page 26
..., you still need adjustment? See "Self-Cleaning Cycle" section. ■ On some models, reset the clock, if needed. Level the range. See "Bakeware" section. ■ Are the racks positioned properly? Check that you need replacement parts If you use only factory specified parts...(Spanish speaking, hearing impaired, limited vision, etc.). ■ Referrals to local dealers, repair parts distributors and service companies. To locate the KitchenAid designated service company in the pan. ■ Is the proper length of time being used to clear the display. See "Display" in ...
..., you still need adjustment? See "Self-Cleaning Cycle" section. ■ On some models, reset the clock, if needed. Level the range. See "Bakeware" section. ■ Are the racks positioned properly? Check that you need replacement parts If you use only factory specified parts...(Spanish speaking, hearing impaired, limited vision, etc.). ■ Referrals to local dealers, repair parts distributors and service companies. To locate the KitchenAid designated service company in the pan. ■ Is the proper length of time being used to clear the display. See "Display" in ...

Use & Care Guide
Page 27
... installation of your major appliance, to instruct you can write to local dealers, repair parts distributors and service companies. KITCHENAID® ELECTRIC RANGE WARRANTY LIMITED WARRANTY For one year from warranty coverage. 3. Proof of original purchase date is required to obtain service ...under this appliance is used in accordance with the product, KitchenAid will pay for Factory Specified Parts for other damage to correct ...
... installation of your major appliance, to instruct you can write to local dealers, repair parts distributors and service companies. KITCHENAID® ELECTRIC RANGE WARRANTY LIMITED WARRANTY For one year from warranty coverage. 3. Proof of original purchase date is required to obtain service ...under this appliance is used in accordance with the product, KitchenAid will pay for Factory Specified Parts for other damage to correct ...

Dimension Guide
Page 1
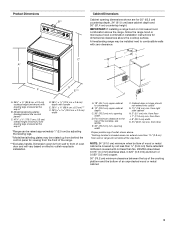
... cabinet. Nothing located in * D. 28 72.4 cm ± 0.6 cm) depth with leveling legs screwed all the way back. Instructions packed with ranges. CABINET OPENING DIMENSIONS Cabinet opening dimensions shown are for : 25" (63.5 cm) countertop depth, 24" (61 cm) base cabinet depth, 36"... F E*** A. 35 90.8 cm ± 0.3 cm) cooktop height (minimum) with handle E. 26 66.4 cm ± 0.3 cm)*** F. 29 76.0 cm ± 0.2 cm) width *Range can be rotated up from behind the control panel)** C. 47 119.7 cm ± 0.3 cm) overall height (minimum) with leveling legs screwed all the way in...
... cabinet. Nothing located in * D. 28 72.4 cm ± 0.6 cm) depth with leveling legs screwed all the way back. Instructions packed with ranges. CABINET OPENING DIMENSIONS Cabinet opening dimensions shown are for : 25" (63.5 cm) countertop depth, 24" (61 cm) base cabinet depth, 36"... F E*** A. 35 90.8 cm ± 0.3 cm) cooktop height (minimum) with handle E. 26 66.4 cm ± 0.3 cm)*** F. 29 76.0 cm ± 0.2 cm) width *Range can be rotated up from behind the control panel)** C. 47 119.7 cm ± 0.3 cm) overall height (minimum) with leveling legs screwed all the way in...
Installation Guide
Page 1
... all safety messages. All safety messages will follow instructions. Only 4 Electrical Requirements - INSTALLATION INSTRUCTIONS FREESTANDING ELECTRIC RANGE WITH DOUBLE OVENS INSTRUCTIONS D'INSTALLATION POUR CUISINIÈRE ÉLECTRIQUE AUTOPORTANTE AVEC FOURS DOUBLES Table of others . Canada Only...de la cuisinière 22 Achever l'installation 22 Déplacement de la cuisinière 23 RANGE SAFETY Your safety and the safety of Contents RANGE SAFETY 1 INSTALLATION REQUIREMENTS 2 Tools and Parts 2 Location Requirements 2 Electrical Requirements - IMPORTANT: Save...
... all safety messages. All safety messages will follow instructions. Only 4 Electrical Requirements - INSTALLATION INSTRUCTIONS FREESTANDING ELECTRIC RANGE WITH DOUBLE OVENS INSTRUCTIONS D'INSTALLATION POUR CUISINIÈRE ÉLECTRIQUE AUTOPORTANTE AVEC FOURS DOUBLES Table of others . Canada Only...de la cuisinière 22 Achever l'installation 22 Déplacement de la cuisinière 23 RANGE SAFETY Your safety and the safety of Contents RANGE SAFETY 1 INSTALLATION REQUIREMENTS 2 Tools and Parts 2 Location Requirements 2 Electrical Requirements - IMPORTANT: Save...

Installation Guide
Page 2
...that are minimum clearances. ■ The floor anti-tip bracket must be used in ring terminals or open-end spade terminals with ranges. Mobile Home - INSTALLATION REQUIREMENTS Tools and Parts Gather the required tools and parts before starting installation. Tools needed If using a ...Any method of 194°F (90°C). Failure to your cabinets, check with the maximum allowable wood cabinet temperatures of securing the range is the installer's responsibility to terminal block) ■ 3 - IMPORTANT: To avoid damage to follow the instructions provided with installation...
...that are minimum clearances. ■ The floor anti-tip bracket must be used in ring terminals or open-end spade terminals with ranges. Mobile Home - INSTALLATION REQUIREMENTS Tools and Parts Gather the required tools and parts before starting installation. Tools needed If using a ...Any method of 194°F (90°C). Failure to your cabinets, check with the maximum allowable wood cabinet temperatures of securing the range is the installer's responsibility to terminal block) ■ 3 - IMPORTANT: To avoid damage to follow the instructions provided with installation...
Installation Guide
Page 3
...and 36" (91.4 cm) countertop height. from wall to combustible walls with handle E. 26 66.4 cm ± 0.3 cm)*** F. 29 76.0 cm ± 0.2 cm) width *Range can extend more than No. 28 MSG sheet steel, 0.015" (0.4 mm) stainless steel, 0.024" (0.6 mm) aluminum or 0.020" (0.5 mm) copper. 30" (76.2 cm) ...minimum clearance between the top of the cooking platform and the bottom of the range. ***Excludes handle. Dimension given is covered by adjusting the leveling legs. **Model/serial/rating plates may be rotated up from wall or...
...and 36" (91.4 cm) countertop height. from wall to combustible walls with handle E. 26 66.4 cm ± 0.3 cm)*** F. 29 76.0 cm ± 0.2 cm) width *Range can extend more than No. 28 MSG sheet steel, 0.015" (0.4 mm) stainless steel, 0.024" (0.6 mm) aluminum or 0.020" (0.5 mm) copper. 30" (76.2 cm) ...minimum clearance between the top of the cooking platform and the bottom of the range. ***Excludes handle. Dimension given is covered by adjusting the leveling legs. **Model/serial/rating plates may be rotated up from wall or...
Installation Guide
Page 4
... listed, 4-wire, 250-volt, 40- See "Electrical Connection Section." When a 4-wire receptacle of NEMA Type 14-50R is recommended. ■ The range can be connected directly to whether the appliance is manufactured with a UL listed strain relief and be connected to the proper electrical voltage and frequency.... The ground must be identified by a green or green/yellow cover and the neutral conductor by a qualified electrician. or 50-amp, range power supply cord (pigtail) must be provided at 250 volts, 40 or 50 amps and investigated for new branch-circuit installations (1996 NEC...
... listed, 4-wire, 250-volt, 40- See "Electrical Connection Section." When a 4-wire receptacle of NEMA Type 14-50R is recommended. ■ The range can be connected directly to whether the appliance is manufactured with a UL listed strain relief and be connected to the proper electrical voltage and frequency.... The ground must be identified by a green or green/yellow cover and the neutral conductor by a qualified electrician. or 50-amp, range power supply cord (pigtail) must be provided at 250 volts, 40 or 50 amps and investigated for new branch-circuit installations (1996 NEC...


