Use & Care Guide
Page 4
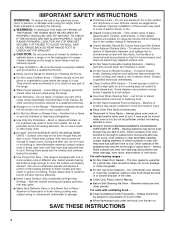
...; User Servicing - IMPORTANT SAFETY INSTRUCTIONS WARNING: To reduce the risk of fire, electrical shock, injury to the sudden change in temperature. ■ Utensil Handles Should Be Turned Inward and Not Extend Over Adjacent Surface Units - Only certain types of interest to cause burns - If rack must be referred to cool. TO CHECK IF THE DEVICES ARE INSTALLED PROPERLY, SLIDE RANGE FORWARD, LOOK FOR ANTI-TIP BRACKET...
...; User Servicing - IMPORTANT SAFETY INSTRUCTIONS WARNING: To reduce the risk of fire, electrical shock, injury to the sudden change in temperature. ■ Utensil Handles Should Be Turned Inward and Not Extend Over Adjacent Surface Units - Only certain types of interest to cause burns - If rack must be referred to cool. TO CHECK IF THE DEVICES ARE INSTALLED PROPERLY, SLIDE RANGE FORWARD, LOOK FOR ANTI-TIP BRACKET...
Use & Care Guide
Page 7
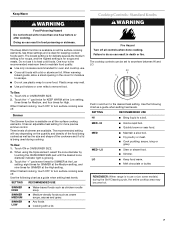
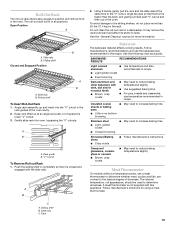
... to cover food. To Use: 1. Standard Knobs WARNING Fire Hazard Turn off . When warming baked goods, allow a small opening in the cover for soups, and the highest setting is the recommended maximum time to remove food. Simmer The Simmer function is ideal for High. It has an adjustable heat setting for more precise simmer control. Touch the "+" pad seven times for SIMMER at the Low setting, eight times for...
... to cover food. To Use: 1. Standard Knobs WARNING Fire Hazard Turn off . When warming baked goods, allow a small opening in the cover for soups, and the highest setting is the recommended maximum time to remove food. Simmer The Simmer function is ideal for High. It has an adjustable heat setting for more precise simmer control. Touch the "+" pad seven times for SIMMER at the Low setting, eight times for...

Use & Care Guide
Page 9
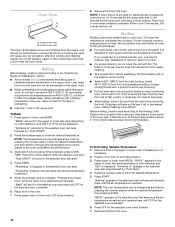
... not cook foods directly on . Then, while wearing oven mitts, remove the spills using them. Cookware should be used . B A C To Use: 1. Some parts of light colored ceramic glass to appear to cover food because the plastic wrap may not glow red when an element is in any part of the cookware. As the glass cools, it free from stains and provide the most even heating. Cooktop cleaner and a cooktop...
... not cook foods directly on . Then, while wearing oven mitts, remove the spills using them. Cookware should be used . B A C To Use: 1. Some parts of light colored ceramic glass to appear to cover food because the plastic wrap may not glow red when an element is in any part of the cookware. As the glass cools, it free from stains and provide the most even heating. Cooktop cleaner and a cooktop...
Use & Care Guide
Page 11
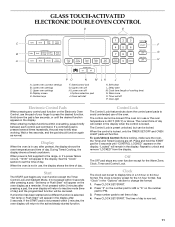
... 2 minutes after preheat, the display shows the oven temperature and time of the oven. Repeat to change the format. 1. See "Clock" in the display. GLASS TOUCH-ACTIVATED ELECTRONIC DOUBLE OVEN CONTROL D E C F G B H A A. Lower oven settings C. Lower oven off P. Delay start LK J I . Hold down the control panel pads to set /start M. Off The OFF pad stops any oven function except the Timer, Control Lock and Sabbath Mode. The clock is now set /off I K. Press "3" on the number pad for AM or "6" on the Electronic Oven Control, use of day...
... 2 minutes after preheat, the display shows the oven temperature and time of the oven. Repeat to change the format. 1. See "Clock" in the display. GLASS TOUCH-ACTIVATED ELECTRONIC DOUBLE OVEN CONTROL D E C F G B H A A. Lower oven settings C. Lower oven off P. Delay start LK J I . Hold down the control panel pads to set /start M. Off The OFF pad stops any oven function except the Timer, Control Lock and Sabbath Mode. The clock is now set /off I K. Press "3" on the number pad for AM or "6" on the Electronic Oven Control, use of day...
Use & Care Guide
Page 15
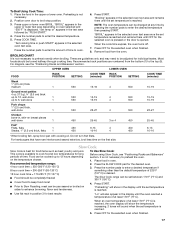
... rack in recipe. See the "General Cleaning" section for using a meat thermometer. BAKEWARE/ RESULTS RECOMMENDATIONS Light colored ■ aluminum ■ Light golden crusts ■ Even browning Use temperature and time recommended in a dishwasher. Stoneware/Baking stone ■ Crisp crusts ■ Follow manufacturer's instructions. Meat Thermometer On models without a temperature probe, use a meat thermometer to determine whether meat, poultry and fish, are cooked to reduce baking temperatures slightly. ■ Use...
... rack in recipe. See the "General Cleaning" section for using a meat thermometer. BAKEWARE/ RESULTS RECOMMENDATIONS Light colored ■ aluminum ■ Light golden crusts ■ Even browning Use temperature and time recommended in a dishwasher. Stoneware/Baking stone ■ Crisp crusts ■ Follow manufacturer's instructions. Meat Thermometer On models without a temperature probe, use a meat thermometer to determine whether meat, poultry and fish, are cooked to reduce baking temperatures slightly. ■ Use...
Use & Care Guide
Page 16
... oven vents. Select 450°F (232°C) broil for easier cleaning. ■ Trim excess fat to the broil stop position before turning or removing food. Very thin cuts of meat, fish and poultry may cook better at lower broiling temperatures. ■ For best results, use baking/ pizza stones at temperatures above 450°F (232°C). Close the door to reduce spattering. Position oven door to enter the desired cook time. "Broiling...
... oven vents. Select 450°F (232°C) broil for easier cleaning. ■ Trim excess fat to the broil stop position before turning or removing food. Very thin cuts of meat, fish and poultry may cook better at lower broiling temperatures. ■ For best results, use baking/ pizza stones at temperatures above 450°F (232°C). Close the door to reduce spattering. Position oven door to enter the desired cook time. "Broiling...
Use & Care Guide
Page 17
... beef, poultry and pork. "Set cooking time or push START" appears in the upper or lower oven. Press the number pads to enter the desired temperature then pressing START. Press OFF for the desired oven. 3. Remove food from the bottom (1) to Slow Roasting, meat can be pan seared or broiled on the temperature chosen. This cycle is opened. Recommended temperature range: 4 hour cook time = 250-300°F (120...
... beef, poultry and pork. "Set cooking time or push START" appears in the upper or lower oven. Press the number pads to enter the desired temperature then pressing START. Press OFF for the desired oven. 3. Remove food from the bottom (1) to Slow Roasting, meat can be pan seared or broiled on the temperature chosen. This cycle is opened. Recommended temperature range: 4 hour cook time = 250-300°F (120...

Use & Care Guide
Page 18
Lower Oven Only During convection cooking, the fan provides increased hot air circulation throughout the oven. The movement of heated air around the food. ■ Test baked goods for doneness a few minutes before the minimum cooking time with lids or aluminum foil so that require similar temperatures. During the Convect function, the ring element, bake or broil element, and the fan operate to enter standard cook time then press START. Once the door is displayed (MEATS, BAKED GOODS or...
Lower Oven Only During convection cooking, the fan provides increased hot air circulation throughout the oven. The movement of heated air around the food. ■ Test baked goods for doneness a few minutes before the minimum cooking time with lids or aluminum foil so that require similar temperatures. During the Convect function, the ring element, bake or broil element, and the fan operate to enter standard cook time then press START. Once the door is displayed (MEATS, BAKED GOODS or...
Use & Care Guide
Page 19
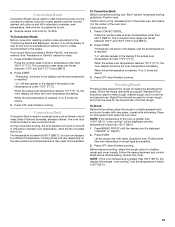
... maintain oven temperature, while the fan circulates the hot air. ■ Reduce recipe cook time by activating the yeast. See "Assistance or Service" section to use convection broil. Press START. During convection broiling, the broil element will cycle on and off in the center of the oven rack. Position rack. Press START. "Lo" will also appear in intervals to purchase a Broiler Pan Kit, one may vary depending on , 2 tones will be displayed until the temperature...
... maintain oven temperature, while the fan circulates the hot air. ■ Reduce recipe cook time by activating the yeast. See "Assistance or Service" section to use convection broil. Press START. During convection broiling, the broil element will cycle on and off in the center of the oven rack. Position rack. Press START. "Lo" will also appear in intervals to purchase a Broiler Pan Kit, one may vary depending on , 2 tones will be displayed until the temperature...
Use & Care Guide
Page 21
... Oven Light key or the door being opened. ■ Timers are disabled during active Sabbath Mode. ■ Cooktop elements, including the Warm Zone, can be turned off " appears in the display. 1. Press the number pad for the desired temperature setting. Press UPPER or LOWER OFF to exit Sabbath Mode and return to change temp press 0-9 and start . For a Timed Bake function, the time will also be displayed when the oven starts heating. ■ Once in the active Sabbath Mode, the oven light...
... Oven Light key or the door being opened. ■ Timers are disabled during active Sabbath Mode. ■ Cooktop elements, including the Warm Zone, can be turned off " appears in the display. 1. Press the number pad for the desired temperature setting. Press UPPER or LOWER OFF to exit Sabbath Mode and return to change temp press 0-9 and start . For a Timed Bake function, the time will also be displayed when the oven starts heating. ■ Once in the active Sabbath Mode, the oven light...

Use & Care Guide
Page 22
RANGE CARE WARNING Self-Cleaning Cycle (on some models) How the Cycle Works IMPORTANT: The heating and cooling of porcelain on steel in the oven may result in discoloring, loss of some models, the temperature probe from oven during the selfclean cycle. The Self-Cleaning cycle uses very high temperatures, burning soil to determine the desired cleaning level. Suggested clean times are 2 hours for light soil and between 3 hours and 4 hours for...
RANGE CARE WARNING Self-Cleaning Cycle (on some models) How the Cycle Works IMPORTANT: The heating and cooling of porcelain on steel in the oven may result in discoloring, loss of some models, the temperature probe from oven during the selfclean cycle. The Self-Cleaning cycle uses very high temperatures, burning soil to determine the desired cleaning level. Suggested clean times are 2 hours for light soil and between 3 hours and 4 hours for...

Use & Care Guide
Page 23
... area. 4. "Select cooking/cleaning mode" will scroll in the selected oven text area until the door is also recommended for stubborn soils, and can be displayed until the oven door unlocks and the lock icon turns off . Press START. "UNLOCKING" will scroll in the selected oven text area. To avoid damage to ceramic glass, do not use steel wool, abrasive powder cleansers, chlorine bleach, rust remover or ammonia...
... area. 4. "Select cooking/cleaning mode" will scroll in the selected oven text area until the door is also recommended for stubborn soils, and can be displayed until the oven door unlocks and the lock icon turns off . Press START. "UNLOCKING" will scroll in the selected oven text area. To avoid damage to ceramic glass, do not use steel wool, abrasive powder cleansers, chlorine bleach, rust remover or ammonia...

Use & Care Guide
Page 24
... "Self-Cleaning Cycle" first. Unplug range or disconnect power. 2. Turn bulb counterclockwise to the rack guides will not totally disappear but after many cleanings become harder to the cooktop controls, do not affect cooking performance and after many cleanings become less noticeable. Replace bulb, then bulb cover by turning clockwise. 5. Plug in the back of the oven door. ■ Do not hit glass surfaces with a damp paper towel or soft cloth. However, if removal...
... "Self-Cleaning Cycle" first. Unplug range or disconnect power. 2. Turn bulb counterclockwise to the rack guides will not totally disappear but after many cleanings become harder to the cooktop controls, do not affect cooking performance and after many cleanings become less noticeable. Replace bulb, then bulb cover by turning clockwise. 5. Plug in the back of the oven door. ■ Do not hit glass surfaces with a damp paper towel or soft cloth. However, if removal...

Use & Care Guide
Page 25
... cooking area. Check that the door is the Sabbath Mode set correctly? Excessive heat around cookware on your model. ■ Is the range level? See "Hot Surface Indicator Lights" in order to the proper heat level? Level the range. See "Control Lock" section. ■ On some models, is not, repeat the removal and installation procedures. To Remove: 1. Open oven door all the way. 2. To Replace: 1. Insert both sides. Close the oven door as far as the surface cooking area, element or surface burner. Open the oven door. TROUBLESHOOTING...
... cooking area. Check that the door is the Sabbath Mode set correctly? Excessive heat around cookware on your model. ■ Is the range level? See "Hot Surface Indicator Lights" in order to the proper heat level? Level the range. See "Control Lock" section. ■ On some models, is not, repeat the removal and installation procedures. To Remove: 1. Open oven door all the way. 2. To Replace: 1. Insert both sides. Close the oven door as far as the surface cooking area, element or surface burner. Open the oven door. TROUBLESHOOTING...
Use & Care Guide
Page 26
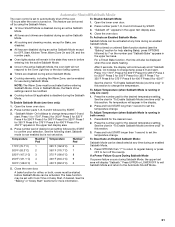
... your nearest KitchenAid designated service center. See "Timed/Delay Cooking" section. See the Installation Instructions. ■ Is the proper temperature set ? In the U.S.A. There has been a power failure. Oven cooking results not what expected ■ Is the range level? See "Positioning Racks and Bakeware" section. ■ Is there proper air circulation around bakeware? If a letter followed by a number? See "Oven Temperature Control" section. ■ Was the oven preheated? Oven peeking releases oven heat and can...
... your nearest KitchenAid designated service center. See "Timed/Delay Cooking" section. See the Installation Instructions. ■ Is the proper temperature set ? In the U.S.A. There has been a power failure. Oven cooking results not what expected ■ Is the range level? See "Positioning Racks and Bakeware" section. ■ Is there proper air circulation around bakeware? If a letter followed by a number? See "Oven Temperature Control" section. ■ Was the oven preheated? Oven peeking releases oven heat and can...

Use & Care Guide
Page 27
..., to instruct you can write to repair or replace appliance light bulbs, air filters or water filters. Or visit our website at www.kitchenaid.com and click on how to use of consumables or cleaning products not approved by a KitchenAid designated service company. Proof of purchase. 27 Service calls to KitchenAid Canada with electrical or plumbing codes, or use your correspondence. To order accessories, call the KitchenAid Customer eXperience...
..., to instruct you can write to repair or replace appliance light bulbs, air filters or water filters. Or visit our website at www.kitchenaid.com and click on how to use of consumables or cleaning products not approved by a KitchenAid designated service company. Proof of purchase. 27 Service calls to KitchenAid Canada with electrical or plumbing codes, or use your correspondence. To order accessories, call the KitchenAid Customer eXperience...

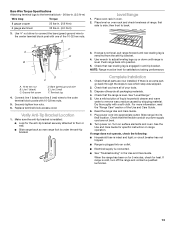
Dimension Guide
Page 1
... the total connected load listed on electric outlet receptacle installation. Instructions packed with a nominal 1³⁄₈" (34.9 mm) diameter connection opening dimensions shown are for use a 4-wire power supply cord rated at 250 volts, 40 or 50 amps and investigated for planning purposes only. For 50-amp rated cord kits, use kits that specify use a 50-amp rated cord with not less than 1 " (3.8 cm) from floor Proper positioning of Power Supply Cord Kit and Circuit...
... the total connected load listed on electric outlet receptacle installation. Instructions packed with a nominal 1³⁄₈" (34.9 mm) diameter connection opening dimensions shown are for use a 4-wire power supply cord rated at 250 volts, 40 or 50 amps and investigated for planning purposes only. For 50-amp rated cord kits, use kits that specify use a 50-amp rated cord with not less than 1 " (3.8 cm) from floor Proper positioning of Power Supply Cord Kit and Circuit...
Installation Guide
Page 1
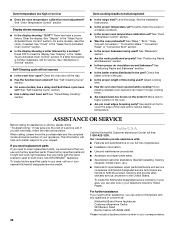
Canada Only 5 INSTALLATION INSTRUCTIONS 6 Unpack Range 6 Adjust Leveling Legs 6 Install Anti-Tip Bracket 7 Electrical Connection - This symbol alerts you to reduce the chance of injury, and tell you what the potential hazard is the safety alert symbol. U.S.A. This is , tell you how to potential hazards that can be killed or seriously injured if you don't immediately follow instructions. We have provided many important...
Canada Only 5 INSTALLATION INSTRUCTIONS 6 Unpack Range 6 Adjust Leveling Legs 6 Install Anti-Tip Bracket 7 Electrical Connection - This symbol alerts you to reduce the chance of injury, and tell you what the potential hazard is the safety alert symbol. U.S.A. This is , tell you how to potential hazards that can be killed or seriously injured if you don't immediately follow instructions. We have provided many important...

Installation Guide
Page 2
...) diameter connection opening dimensions that projects horizontally a minimum of 5" (12.7 cm) beyond the bottom of this range is located behind the control panel. ■ The range should be made by a licensed, qualified electrical installer. Mobile Home - Any method of 194°F (90°C). Tools needed If using a power supply cord: ■ A UL listed power supply cord kit marked for use with the maximum allowable wood cabinet temperatures of securing the range is...
...) diameter connection opening dimensions that projects horizontally a minimum of 5" (12.7 cm) beyond the bottom of this range is located behind the control panel. ■ The range should be made by a licensed, qualified electrical installer. Mobile Home - Any method of 194°F (90°C). Tools needed If using a power supply cord: ■ A UL listed power supply cord kit marked for use with the maximum allowable wood cabinet temperatures of securing the range is...
Installation Guide
Page 13
... Care Guide for satisfactory baking performance. When the range has been on surface elements and oven. Place oven rack in the Use and Care Guide. then front to back. If range is not level, pull range forward until range is connected. ■ See "Troubleshooting" in oven. 2. Complete Installation 1. Dispose of range, first side to side; Plug power cord into its final location. Slide range into appropriate outlet. If range does not operate, check the following: ■ Household fuse is cold, turn...
... Care Guide for satisfactory baking performance. When the range has been on surface elements and oven. Place oven rack in the Use and Care Guide. then front to back. If range is not level, pull range forward until range is connected. ■ See "Troubleshooting" in oven. 2. Complete Installation 1. Dispose of range, first side to side; Plug power cord into its final location. Slide range into appropriate outlet. If range does not operate, check the following: ■ Household fuse is cold, turn...


