KitchenAid KERS507XSS Support Question
KitchenAid KERS507XSS Support Question
Find answers below for this question about KitchenAid KERS507XSS.Need a KitchenAid KERS507XSS manual? We have 3 online manuals for this item!
Question posted by jpbras44 on November 30th, 2013
Odor From Panel Of Kers507xss
KitchenAid Electric Dual Oven: Odor of burned electrical insulation has been coming from control panel whenever any burner or oven is on. Has been from the day we installed in late August 2013. Do we need a new panel?
Current Answers
Related KitchenAid KERS507XSS Manual Pages
Use & Care Guide - Page 4
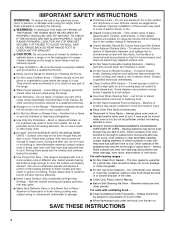
... hanging garments should be referred to a qualified technician.
■ Storage in burns from steam. Moist or damp potholders on any part of the range unless specifically recommended in an oven or near units until they have had sufficient time to cool. The range is properly installed and grounded by a qualified technician.
■ Never Use the...
Use & Care Guide - Page 5

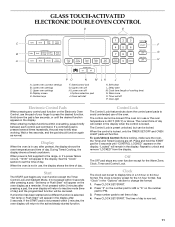
... ON. The range you have purchased may not match those of heat settings for very low temperature operation. Glass Touch-Activated Electronic Double Oven Control Panel (Models KERS507X and YKERS507X)
AB
C
DE
F
LK
J
I . Oven display D. Right front touch control
I
H
G
A.
To Use Single-Size Elements: 1. Upper/lower oven touch control E. Right rear control knob F. Cooktop...
Use & Care Guide - Page 8

... of 2 optional heating choices. Lower heat option B. A
B
C
A
A. Single size B. A
A. To Use Dual: 1.
A B
A.
Push in and turn knob counterclockwise from the OFF
position to boil liquids faster. Dual size C. Hot Surface Indicator Light
A Hot Surface Indicator light is located on the control panel. Push in and turn knob counterclockwise from the OFF
position to OFF...
Use & Care Guide - Page 11
... desired function. The time of your finger to the range, or if a power failure occurs, "12:00" will be locked. Cook time (length of day. 4. Hold down the control panel pads to set the time of day.
When power is in use , after pressing a pad, the oven display will return to display time in the display...
Use & Care Guide - Page 14
...and slide back into the oven. If the oven temperature is increased after the oven is preheated, make sure the oven is preheated to the new temperature before turning on the oven.
■ Do not ... Oven
2 1
BAKEWARE
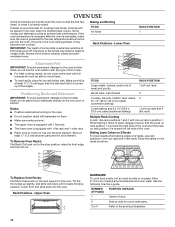
To cook food evenly, hot air must be placed in the oven. OVEN USE
Odors and smoke are level.
■ The upper oven is equipped with 1 flat rack.
■ The lower oven...
Use & Care Guide - Page 22

... heat, odors, and smoke. Staining, etching, pitting or faint white spots can use the Self-Clean cycle at a time. Close the oven door.
2.
Only 1 oven can result in the oven may burn or melt, damaging the oven.
■ Hand clean inside door edge and the 1½" (3.8 cm) area around the inside oven cavity frame, being cleaned.
4. RANGE CARE...
Use & Care Guide - Page 24

Burned-on panel.
■ All-Purpose Appliance Cleaner Part Number 31682 (not included):
See "Assistance ... and cool. CONTROL PANEL
To avoid damage to remove the oven door. Food spills should be cleaned when oven cools. Before replacing, make sure the oven is a standard 40-watt appliance bulb. Unplug range or disconnect power. 2. IMPORTANT:
Oven Door
To avoid oven door glass breakage...
Use & Care Guide - Page 26
... Oven Control" section. See "Display" in longer cooking times.
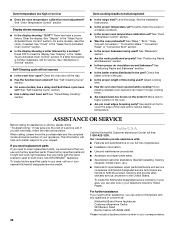
■ Are baked items too brown on our full line of appliances.
■ Installation information.
■ Use and maintenance procedures.
■ Accessory and repair parts sales.
■ Specialized customer assistance (Spanish speaking, hearing impaired, limited vision, etc.).
■ Referrals to build every new KITCHENAID...
Use & Care Guide - Page 27

...; ELECTRIC RANGE WARRANTY
LIMITED WARRANTY
For one year from the date of Whirlpool Corporation or Whirlpool Canada LP (hereafter "KitchenAid") will pay for the following components if defective in Canada. Service calls to fulfill the product warranty and provide after-warranty service, anywhere in materials or workmanship:
■ Electric element
■ Solid state touch control...
Dimension Guide - Page 1

...Freestanding Electric Range
PRODUCT MODEL NUMBERS
KERS505X
KERS507X
PRODUCT DIMENSIONS B**
Electrical Connection:
q This range is recommended.
Model/serial/rating plates (located behind the control panel)**
C....-amp power supply cord (pigtail) (see Installation
our products, we reserve the right to improve... 1 " (3.8 cm)
from the front of oven door and will not slide all the way in...
Installation Guide - Page 1
...pièces 17 Exigences d'emplacement 17 Spécifications électriques -
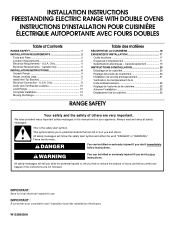
WARNING
You can happen if the instructions are very important. INSTALLATION INSTRUCTIONS FREESTANDING ELECTRIC RANGE WITH DOUBLE OVENS
INSTRUCTIONS D'INSTALLATION POUR CUISINIÈRE ÉLECTRIQUE AUTOPORTANTE AVEC FOURS DOUBLES
Table of injury, and tell you don't follow instructions. All safety...
Installation Guide - Page 2

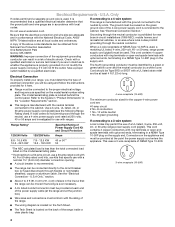
... volts minimum, 40 amps or 50 amps that the materials used will need to rear range foot.
See "Electrical Requirements" section. Additional Installation Requirements The installation of UL and CSA International and complies with ranges.
Failure to back wall or floor. Terminal lugs
■ Oven racks
■ 2 - #12 x 1⁵⁄₈" screws (for Mobile Home Construction...
Installation Guide - Page 3
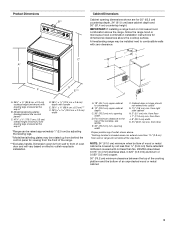
...) from behind the control panel)**
C. 47 119.7 cm ± 0.3 cm) overall height (minimum) with leveling legs screwed all the way back. B D
C
C*
A E
D
F
E***
J G
I . 7" (17.8 cm) min.
from right side cabinet
H. 2" (5.1 cm) min. NOTE: 24" (61.0 cm) minimum when bottom of outlet shown above the range, follow the range hood or microwave hood combination installation instructions for 25...
Installation Guide - Page 4
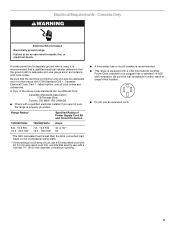
... must be using and follow the instructions provided for new branch-circuit installations (1996 NEC);
WARNING: Improper connection of the range.
■ The wiring diagram is located on the... modify the power supply cord plug. If it is recommended that a qualified electrical installer determine that specify use of Power Supply Cord Kit and Circuit Protection
Amps
40...control panel.
Installation Guide - Page 5
...extension cord.
5 Toronto, ON M9W 1R3 CANADA
■ Check with a qualified electrical installer if you are adequate and in conformance with kit. If codes permit and a separate ground wire...is used, it is recommended that a qualified electrical installer determine that the electrical connection and wire size are not sure the range is within reach of range's final location.
■ Do not use...
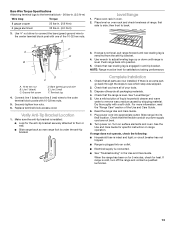
Installation Guide - Page 8
....
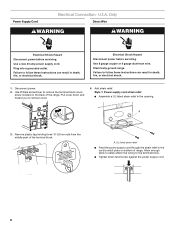
4. Use 8 gauge copper or 6 gauge aluminum wire. Use a new 40 amp power supply cord. Use Phillips screwdriver to follow these instructions can result in the cord/conduit plate on the back of the range. Power Supply Cord
Electrical Connection - Only
Direct Wire
WARNING
WARNING
Electrical Shock Hazard Disconnect power before servicing. A. Disconnect power.
2. Pull...
Installation Guide - Page 9
Strain relief
9 Replace back panel and screws on rear of
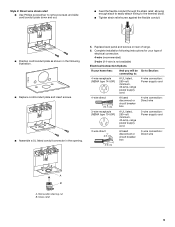
electrical connection: 4-wire (recommended)
3-wire (if 4-wire is not available)
Electrical Connection Options
If your home has:
And you will be Go to Section: connecting to:
4-wire receptacle (NEMA type 14-50R)
A UL listed, 250-volt minimum, 40-amp, range power supply cord
4-wire connection...
Installation Guide - Page 11
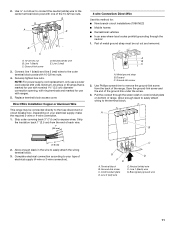
... 4-wire connection. 1. Complete electrical connection according to expose wires. Cord/conduit plate D.
A
E
D B
C
A. 10-32 hex nut B. Line 2 (red)
3. Ground-link screw C. Ground-link screw
2.
Terminal block B. Connect line 1 (black) and line 2 (red) wires to the fuse disconnect or circuit breaker box. Direct Wire Installation: Copper or Aluminum Wire
This range may be cut...
Installation Guide - Page 13
... level on oven rack and check levelness of your tools. 3. F A
E
B
D C
A. 10-32 hex nut B. Line 2 (red) F. Replace terminal block access cover.
Push range back into an outlet.
■ Electrical supply is level. Dispose of/recycle all of range, first side to back. Check that the flexible conduit or power supply cord are now installed. Use...
Installation Guide - Page 14
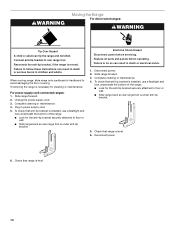
... parts and panels before servicing. Failure to do so can result in death or serious burns to floor or
wall. ■ Slide range back so rear range foot is level. 6. If removing the range is moved. Plug in death or electrical shock.
1. Complete cleaning or maintenance. 4. Reconnect power.
6. Check that anti-tip bracket is installed, use a flashlight...
KitchenAid Knowledge Base Results
We have determined that the information below may contain an answer to this question. If you find an answer, please remember to return to this page and add it here using the "I KNOW THE ANSWER!" button above. It's that easy to earn points!-
Vacation and moving care for wine cellar
...your product model number in the search tool below. Care Guides, Installation Instructions and Warranty Information. This helps stop odor and mold buildup. Tape a rubber or wood block to the top... Manuals/Use & Answers others found helpful Product Recall Information Care and cleaning of your new home, replace all removable parts, wrap them well, and tape them together so they don... -
Using your meat thermometer
...(1.3 cm) more and read again. Check all meat, poultry, and fish in oven Proposition 65 Warnings Tips for using the Self-Cleaning feature - The internal temperature, ... gristle. If the temperature drops, cook the meat or poultry longer. gas and electric ranges Hidden Options - Ranges and built-in ovens The tip of poultry. A meat thermometer is not supplied with this appliance. Temperature... -
Damp loads or long drying times - Dryer
... increasing - Dryers need good air movement ... space, and, for most installations, the rear of elbows for the best airflow. Your installation should be in a new location or is free of this a new installation? Use only 4" diameter heavy...sheet per load, and use . Were you drying a large load? Electric dryer Or Dryer does not heat - A dryer softener sheet may be blocking ...
Similar Questions

Cooktop Will Not Heat But Control Panel Appears To Work.
Stove was pulled out and unplugged to install a new floor
Stove was pulled out and unplugged to install a new floor
(Posted by jhaley39625 9 years ago)

Dual Burner Switch Replacement For The Model #kess907 Electric Range
How do i replace the left side dual burner switch and what is the part number ?
How do i replace the left side dual burner switch and what is the part number ?
(Posted by woodsv 9 years ago)

Kitchen Aid Gas Range Model Kgra806 I Need Control Panel
i need control panel for my gas range Kitchen Aid moder KGRA806
i need control panel for my gas range Kitchen Aid moder KGRA806
(Posted by black2stars 11 years ago)

Kers507xss Range Error Code F6e0
Need Service Manual Thanks [email protected]
error code F6E0, need service manual thanks [email protected]
error code F6E0, need service manual thanks [email protected]
(Posted by HAZMIKE 12 years ago)

Electrical Panel Is Off
After self cleaning my oven, then oven door would not open and the electrical panel not functional a...
After self cleaning my oven, then oven door would not open and the electrical panel not functional a...
(Posted by brnfox 13 years ago)