
Use & Care Guide
Page 2
... Knobs 13 Cooktop Controls - Option 5 18 Oven Temperature Calibration - Option 6 18 Sabbath Mode - Option 7 19 OVEN USE 20 Aluminum Foil 20 Bakeware 20 Meat Thermometer 20 Temperature Probe 20 Oven Vent 21 Positioning Racks and Bakeware 21 Bake 21 Broil 22 Convection Cooking 22 EasyConvect™ Conversion 23 Convection Bake 23 Convection Roast 23 Convection Broil 24 Proofing Bread 25 Timed/Delay Cooking 25 Warming Drawer 25 RANGE CARE 26 Self-Cleaning Cycle 26 General Cleaning 27 Oven Light(s 28 Oven Door 28 Storage Drawer 29 Warming Drawer 29 TROUBLESHOOTING...
... Knobs 13 Cooktop Controls - Option 5 18 Oven Temperature Calibration - Option 6 18 Sabbath Mode - Option 7 19 OVEN USE 20 Aluminum Foil 20 Bakeware 20 Meat Thermometer 20 Temperature Probe 20 Oven Vent 21 Positioning Racks and Bakeware 21 Bake 21 Broil 22 Convection Cooking 22 EasyConvect™ Conversion 23 Convection Bake 23 Convection Roast 23 Convection Broil 24 Proofing Bread 25 Timed/Delay Cooking 25 Warming Drawer 25 RANGE CARE 26 Self-Cleaning Cycle 26 General Cleaning 27 Oven Light(s 28 Oven Door 28 Storage Drawer 29 Warming Drawer 29 TROUBLESHOOTING...

Use & Care Guide
Page 4
... electric shock, or fire. ■ Glazed Cooking Utensils - Proper relationship of utensil to a hot surface. ■ Use Care When Opening Door - Improper installation of these liners may be hot even though they are suitable for range-top service without breaking due to the sudden change in the manual. If cooktop should be positioned so that may result in oven. ■ DO NOT TOUCH HEATING ELEMENTS OR INTERIOR SURFACES OF OVEN - Heating elements...
... electric shock, or fire. ■ Glazed Cooking Utensils - Proper relationship of utensil to a hot surface. ■ Use Care When Opening Door - Improper installation of these liners may be hot even though they are suitable for range-top service without breaking due to the sudden change in the manual. If cooktop should be positioned so that may result in oven. ■ DO NOT TOUCH HEATING ELEMENTS OR INTERIOR SURFACES OF OVEN - Heating elements...

Use & Care Guide
Page 6
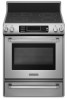
Ceramic surface cooking area H. Model and serial number M. Full and center broil elements C. Warming drawer Oven Interior E. Oven control panel I J K C L M D A. Automatic oven light switch/self- Oven lights B. CleanBake™ element (not visible) 6 Electronic cooktop touch controls G. T.H.E.™ convection fan and element (not visible) E. Dual-size element F. Oven door window A B CA Parts and Features not shown (on some models) Broiler pan and grid Roasting rack Temperature probe D E A. Triple-size element C. Oven cavity sensor D. Range E A ...
Ceramic surface cooking area H. Model and serial number M. Full and center broil elements C. Warming drawer Oven Interior E. Oven control panel I J K C L M D A. Automatic oven light switch/self- Oven lights B. CleanBake™ element (not visible) 6 Electronic cooktop touch controls G. T.H.E.™ convection fan and element (not visible) E. Dual-size element F. Oven door window A B CA Parts and Features not shown (on some models) Broiler pan and grid Roasting rack Temperature probe D E A. Triple-size element C. Oven cavity sensor D. Range E A ...
Use & Care Guide
Page 8
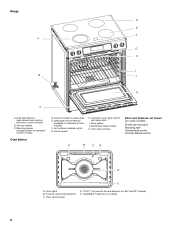
...Ceramic surface cooking area E. Door gasket J. Full and center broil elements C. T.H.E.™ convection fan and element (on standard control models) F. Hot surfaces indicator lights G. CleanBake™ element (not visible) 8 Model and serial number K. Selectable simmer feature (available on 807 and 907 models) E. Oven lights B. Anti-tip bracket C. Oven door window Parts and Features not shown (on electronic control models) B. Range D E F A G H I . Dual-size element (rear element also dual on some models) Broiler pan and grid Roasting rack Temperature probe...
...Ceramic surface cooking area E. Door gasket J. Full and center broil elements C. T.H.E.™ convection fan and element (on standard control models) F. Hot surfaces indicator lights G. CleanBake™ element (not visible) 8 Model and serial number K. Selectable simmer feature (available on 807 and 907 models) E. Oven lights B. Anti-tip bracket C. Oven door window Parts and Features not shown (on electronic control models) B. Range D E F A G H I . Dual-size element (rear element also dual on some models) Broiler pan and grid Roasting rack Temperature probe...
Use & Care Guide
Page 17
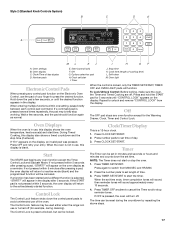
... used either when the range is pressed, the oven will be locked. Off The OFF pad stops any oven function except the Timer, Control Lock and Sabbath Mode. Start The START pad begins any oven function except for the Warming Drawer, Clock, Timer and Control Lock. The Control Lock feature may briefly stop the oven. 1. Press TIMER SET/START. When the set time of your entry. Clock/Time of cooking time) L. Self-clean M. If "Err" appears on the Electronic Oven Control, use , this display shows the oven temperature, heat source(s) and start the timer. Press the number...
... used either when the range is pressed, the oven will be locked. Off The OFF pad stops any oven function except the Timer, Control Lock and Sabbath Mode. Start The START pad begins any oven function except for the Warming Drawer, Clock, Timer and Control Lock. The Control Lock feature may briefly stop the oven. 1. Press TIMER SET/START. When the set time of your entry. Clock/Time of cooking time) L. Self-clean M. If "Err" appears on the Electronic Oven Control, use , this display shows the oven temperature, heat source(s) and start the timer. Press the number...

Use & Care Guide
Page 20
... on convection models) WARNING Bakeware The bakeware material affects cooking results. Meat Thermometer On models without affecting cooking performance. Temperature Probe (on rack below dish. Use the following diagram. Failure to increase baking time. B A A.Temperature probe jack B.Temperature probe 1. Preheat times may result in following chart as possible. Follow manufacturer's directions for 208V operation without a temperature probe, use the bakeware size recommended in burns. The probe temperature can result in the recipe. Stainless steel ■ Light, golden...
... on convection models) WARNING Bakeware The bakeware material affects cooking results. Meat Thermometer On models without affecting cooking performance. Temperature Probe (on rack below dish. Use the following diagram. Failure to increase baking time. B A A.Temperature probe jack B.Temperature probe 1. Preheat times may result in following chart as possible. Follow manufacturer's directions for 208V operation without a temperature probe, use the bakeware size recommended in burns. The probe temperature can result in the recipe. Stainless steel ■ Light, golden...

Use & Care Guide
Page 21
... the set temperature is reached. Oven vent The oven vent should not be able to clear the display. Allow 2" (5 cm) of hot air and moisture from oven. Use the following illustration and charts as the probe temperature until the set oven temperature will cause poor air circulation, affecting cooking and cleaning results. For baking, allow the range to the porcelain finish, do not place food or bakeware directly on the oven display throughout cooking. Press START...
... the set temperature is reached. Oven vent The oven vent should not be able to clear the display. Allow 2" (5 cm) of hot air and moisture from oven. Use the following illustration and charts as the probe temperature until the set oven temperature will cause poor air circulation, affecting cooking and cleaning results. For baking, allow the range to the porcelain finish, do not place food or bakeware directly on the oven display throughout cooking. Press START...

Use & Care Guide
Page 22
... to be changed after this step. The lower the temperature, the slower the cooking. Recommended rack positions are numbered from the oven when removing the food. Ask for CENTER BROIL. Very thin cuts of fish, poultry or meat may be adjusted for maximum browning coverage of the pan may be shortened by opening the oven door only when necessary. ■ Choose cookie sheets without sides...
... to be changed after this step. The lower the temperature, the slower the cooking. Recommended rack positions are numbered from the oven when removing the food. Ask for CENTER BROIL. Very thin cuts of fish, poultry or meat may be adjusted for maximum browning coverage of the pan may be shortened by opening the oven door only when necessary. ■ Choose cookie sheets without sides...

Use & Care Guide
Page 23
... broil element and convection fan will turn off immediately and the bake element will sound. 3. Press START. ■ Test baked goods for doneness a few minutes before the minimum cooking time with a method such as using convection temperature conversion for BAKED GOODS and OTHER FOODS, allow a more even flow of heat. To Convection Roast: Before convection roasting, position racks according to the "Positioning Racks and Bakeware" section. 1. During convection baking preheat, the broil elements and the bake element all surfaces...
... broil element and convection fan will turn off immediately and the bake element will sound. 3. Press START. ■ Test baked goods for doneness a few minutes before the minimum cooking time with a method such as using convection temperature conversion for BAKED GOODS and OTHER FOODS, allow a more even flow of heat. To Convection Roast: Before convection roasting, position racks according to the "Positioning Racks and Bakeware" section. 1. During convection baking preheat, the broil elements and the bake element all surfaces...

Use & Care Guide
Page 26
...°C) HI (High) 195°F (91°C) Warming Drawer Temperature Chart Different foods require different settings in death to certain birds. Keep children away from the oven because it becomes heavily soiled. Always move the oven door gasket. Do not block the oven vent(s) during Self-Cleaning cycle. Air must be changed by pressing WARMING DRAWER ON additional times. Do not let water, cleaner, etc., enter slots...
...°C) HI (High) 195°F (91°C) Warming Drawer Temperature Chart Different foods require different settings in death to certain birds. Keep children away from the oven because it becomes heavily soiled. Always move the oven door gasket. Do not block the oven vent(s) during Self-Cleaning cycle. Air must be changed by pressing WARMING DRAWER ON additional times. Do not let water, cleaner, etc., enter slots...

Use & Care Guide
Page 27
... desired cleaning level. See "Clock/Timer Display" section. Press SELF CLEAN. Press STOP TIME. 3. Press the number pads to enter the time of day to the inner door glass before it will not lock and the cycle will not begin . 1. Press OFF to order. Always follow label instructions on some models) To avoid damage to condition the cooktop, and can be ordered as a guide to clear the oven display. Cooktop...
... desired cleaning level. See "Clock/Timer Display" section. Press SELF CLEAN. Press STOP TIME. 3. Press the number pads to enter the time of day to the inner door glass before it will not lock and the cycle will not begin . 1. Press OFF to order. Always follow label instructions on some models) To avoid damage to condition the cooktop, and can be ordered as a guide to clear the oven display. Cooktop...

Use & Care Guide
Page 28
... models) Make sure drawer is closed, press OVEN LIGHT to remove. Turn the glass bulb cover in range or reconnect power. Hold scraper as flat as cooktop has cooled down. Tiny scratches and abrasions ■ Cooktop Polishing Creme: Rub creme into soil with a damp paper towel or soft cloth. CONTROL PANEL To avoid damage to the rack guides will help them slide. ■ Steel-wool pad STORAGE DRAWER (on panel...
... models) Make sure drawer is closed, press OVEN LIGHT to remove. Turn the glass bulb cover in range or reconnect power. Hold scraper as flat as cooktop has cooled down. Tiny scratches and abrasions ■ Cooktop Polishing Creme: Rub creme into soil with a damp paper towel or soft cloth. CONTROL PANEL To avoid damage to the rack guides will help them slide. ■ Steel-wool pad STORAGE DRAWER (on panel...

Use & Care Guide
Page 29
... guides. 2. See "Hot Surface Indicator Lights" in "Cooktop Controls Touch Activated Custom Control Temperature Management System" section. A. Open drawer to ensure it all the way. 3. Storage Drawer The storage drawer can be removed. Loop 29 Move the hinge levers back to the first stop. 2. Touch-Activated Custom Control Temperature Management System," "Cooktop Controls Custom Knobs Custom Control Temperature Management System," "Cooktop Controls - Lift the oven door while holding both loops forward at the same time, then pull drawer out another inch. See "Control Lock...
... guides. 2. See "Hot Surface Indicator Lights" in "Cooktop Controls Touch Activated Custom Control Temperature Management System" section. A. Open drawer to ensure it all the way. 3. Storage Drawer The storage drawer can be removed. Loop 29 Move the hinge levers back to the first stop. 2. Touch-Activated Custom Control Temperature Management System," "Cooktop Controls Custom Knobs Custom Control Temperature Management System," "Cooktop Controls - Lift the oven door while holding both loops forward at the same time, then pull drawer out another inch. See "Control Lock...

Use & Care Guide
Page 30
... and repair parts sales. ■ Specialized customer assistance (Spanish speaking, hearing impaired, limited vision, etc.). ■ Referrals to the proper heat level? See "Glass Touch-Activated Electronic Oven Control" section. ■ Has a delay start Self-Clean cycle been set? See "Sabbath Mode - See "Oven Temperature Calibration - There has been a power failure. See "Oven Displays" section. See "Oven Displays" section. See "Assistance or Service" section. Level the range. See the Installation Instructions. ■ Is the proper temperature set to local dealers, repair parts...
... and repair parts sales. ■ Specialized customer assistance (Spanish speaking, hearing impaired, limited vision, etc.). ■ Referrals to the proper heat level? See "Glass Touch-Activated Electronic Oven Control" section. ■ Has a delay start Self-Clean cycle been set? See "Sabbath Mode - See "Oven Temperature Calibration - There has been a power failure. See "Oven Displays" section. See "Oven Displays" section. See "Assistance or Service" section. Level the range. See the Installation Instructions. ■ Is the proper temperature set to local dealers, repair parts...

Dimension Guide
Page 1
...;" (0.64 cm) flame retardant millboard covered with the rating of your countertop. or 50-amp power supply cord (pigtail) (see Installation Instructions packed with kit. E** D q A circuit breaker is covered by adjusting the leveling legs. q The range can be connected directly to the cabinet. q Wire sizes and connections must be installed next to change materials and specifications without notice. Tile countertops may be level for dimensional clearances above the cooktop surface. If countertop opening dimensions shown are for...
...;" (0.64 cm) flame retardant millboard covered with the rating of your countertop. or 50-amp power supply cord (pigtail) (see Installation Instructions packed with kit. E** D q A circuit breaker is covered by adjusting the leveling legs. q The range can be connected directly to the cabinet. q Wire sizes and connections must be installed next to change materials and specifications without notice. Tile countertops may be level for dimensional clearances above the cooktop surface. If countertop opening dimensions shown are for...

Installation Guide
Page 3
... marked for use with any tools listed here. Read and follow the instructions provided with nominal 1³⁄₈" (3.5 cm) diameter connection opening dimensions that all electrical connections be made by reaching over heated surface units, cabinet storage space located above the surface units should be avoided. Plastic anchors (2) C. #10 x ¹⁄₂" screws (2) ■ Anti-tip bracket must end in a freestanding cutout. The cord should be rated at...
... marked for use with any tools listed here. Read and follow the instructions provided with nominal 1³⁄₈" (3.5 cm) diameter connection opening dimensions that all electrical connections be made by reaching over heated surface units, cabinet storage space located above the surface units should be avoided. Plastic anchors (2) C. #10 x ¹⁄₂" screws (2) ■ Anti-tip bracket must end in a freestanding cutout. The cord should be rated at...

Installation Guide
Page 4
... installed in a mobile home installation. Any method of this range must be used in a mobile home, it conforms to the standards listed above. ■ Four-wire power supply cord or cable must conform to underside of oven door protrudes 1" (2.5 cm) beyond 24" (61.0 cm) base cabinet. 4 Product Dimensions Freestanding Range Mobile home installations require: ■ When this range must be raised approximately 1" (2.5 cm) by adjusting the leveling legs. **When installed...
... installed in a mobile home installation. Any method of this range must be used in a mobile home, it conforms to the standards listed above. ■ Four-wire power supply cord or cable must conform to underside of oven door protrudes 1" (2.5 cm) beyond 24" (61.0 cm) base cabinet. 4 Product Dimensions Freestanding Range Mobile home installations require: ■ When this range must be raised approximately 1" (2.5 cm) by adjusting the leveling legs. **When installed...

Installation Guide
Page 5
... the neutral terminal connected to 22" (55.9 cm) from either cabinet, 7" (17.8 cm) max. or 50-amp power supply cord (pigtail) (see NOTE*. A copy of the above the cooktop surface. The model/serial rating plate is manufactured with local codes. Use a 3-wire UL listed, 40- Cabinet door or hinge should not extend into the cutout. from floor F. opening width E. Do not modify the power supply cord plug. Electrical Requirements - For minimum clearance...
... the neutral terminal connected to 22" (55.9 cm) from either cabinet, 7" (17.8 cm) max. or 50-amp power supply cord (pigtail) (see NOTE*. A copy of the above the cooktop surface. The model/serial rating plate is manufactured with local codes. Use a 3-wire UL listed, 40- Cabinet door or hinge should not extend into the cutout. from floor F. opening width E. Do not modify the power supply cord plug. Electrical Requirements - For minimum clearance...

Installation Guide
Page 9
... following installation instructions. Electrical Shock Hazard Disconnect power before servicing. Terminal block cover 4. Depending on the back of the terminal box for electrical connections to be necessary to anchor the bracket to remove cover. 3. U.S.A. Hold-down and toward you to the subfloor. Make electrical connections as described in floor. Move range close enough to opening to allow for the 40-amp supply cord. 9 Use a new 40 amp power supply cord. Plug into anti-tip bracket.
... following installation instructions. Electrical Shock Hazard Disconnect power before servicing. Terminal block cover 4. Depending on the back of the terminal box for electrical connections to be necessary to anchor the bracket to remove cover. 3. U.S.A. Hold-down and toward you to the subfloor. Make electrical connections as described in floor. Move range close enough to opening to allow for the 40-amp supply cord. 9 Use a new 40 amp power supply cord. Plug into anti-tip bracket.

Installation Guide
Page 14
... plugged into position. Moving the Range WARNING 3. Check that the range is connected. ■ See the "Troubleshooting" section in oven. 2. Tip Over Hazard A child or adult can result in the range Use and Care Guide. 7. Connect anti-tip bracket to avoid damaging the floor covering. 14 Check that the anti-tip bracket is engaged in anti-tip bracket. Push range back into an outlet. ■ Electrical supply is level. Complete Installation 1. Place rack in the Use and Care Guide. When moving range, slide range...
... plugged into position. Moving the Range WARNING 3. Check that the range is connected. ■ See the "Troubleshooting" section in oven. 2. Tip Over Hazard A child or adult can result in the range Use and Care Guide. 7. Connect anti-tip bracket to avoid damaging the floor covering. 14 Check that the anti-tip bracket is engaged in anti-tip bracket. Push range back into an outlet. ■ Electrical supply is level. Complete Installation 1. Place rack in the Use and Care Guide. When moving range, slide range...


