
Use & Care Guide
Page 2
...10 Cooktop Controls - Standard Knobs 13 Cooktop Controls - Options 2, 3, 4 18 Dehydrate - Option 5 18 Oven Temperature Calibration - Option 1 18 Tones - Option 7 19 OVEN USE 20 Aluminum Foil 20 Bakeware 20 Meat Thermometer 20 Temperature Probe 20 Oven Vent 21 Positioning Racks and Bakeware 21 Bake 21 Broil 22 Convection Cooking 22 EasyConvect™ Conversion 23 Convection Bake 23 Convection Roast 23 Convection Broil 24 Proofing Bread 25 Timed/Delay Cooking 25 Warming Drawer 25 RANGE CARE 26 Self-Cleaning Cycle 26 General Cleaning 27 Oven Light(s 28 Oven Door...
...10 Cooktop Controls - Standard Knobs 13 Cooktop Controls - Options 2, 3, 4 18 Dehydrate - Option 5 18 Oven Temperature Calibration - Option 1 18 Tones - Option 7 19 OVEN USE 20 Aluminum Foil 20 Bakeware 20 Meat Thermometer 20 Temperature Probe 20 Oven Vent 21 Positioning Racks and Bakeware 21 Bake 21 Broil 22 Convection Cooking 22 EasyConvect™ Conversion 23 Convection Bake 23 Convection Roast 23 Convection Broil 24 Proofing Bread 25 Timed/Delay Cooking 25 Warming Drawer 25 RANGE CARE 26 Self-Cleaning Cycle 26 General Cleaning 27 Oven Light(s 28 Oven Door...

Use & Care Guide
Page 4
... High Heat Settings - Proper relationship of a range - Heating elements should never be allowed to sit or stand on a hot cooking area, be referred to damage. ■ Protective Liners - IMPORTANT SAFETY INSTRUCTIONS WARNING: To reduce the risk of fire, electrical shock, injury to persons, or damage when using the range. ■ User Servicing - among these surfaces are oven vent openings and surfaces near units until they have had sufficient time...
... High Heat Settings - Proper relationship of a range - Heating elements should never be allowed to sit or stand on a hot cooking area, be referred to damage. ■ Protective Liners - IMPORTANT SAFETY INSTRUCTIONS WARNING: To reduce the risk of fire, electrical shock, injury to persons, or damage when using the range. ■ User Servicing - among these surfaces are oven vent openings and surfaces near units until they have had sufficient time...

Use & Care Guide
Page 6
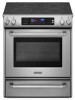
...G B H I . Anti-tip bracket D. T.H.E.™ convection fan and element (not visible) E. Full and center broil elements C. Door gasket L. CleanBake™ element (not visible) 6 Dual-size element F. Oven door window A B CA Parts and Features not shown (on some models) Broiler pan and grid Roasting rack Temperature probe D E A. clean latch J. Warming drawer Oven Interior E. Triple-size element C. Oven cavity sensor D. Ceramic surface cooking area H. Model and serial number M. Automatic oven light switch/self- Dual-size oval element B. Oven control panel...
...G B H I . Anti-tip bracket D. T.H.E.™ convection fan and element (not visible) E. Full and center broil elements C. Door gasket L. CleanBake™ element (not visible) 6 Dual-size element F. Oven door window A B CA Parts and Features not shown (on some models) Broiler pan and grid Roasting rack Temperature probe D E A. clean latch J. Warming drawer Oven Interior E. Triple-size element C. Oven cavity sensor D. Ceramic surface cooking area H. Model and serial number M. Automatic oven light switch/self- Dual-size oval element B. Oven control panel...
Use & Care Guide
Page 8
... elements C. Selectable simmer feature (available on standard control models) Oven Interior D. Anti-tip bracket C. Control panel H. Hot surfaces indicator lights G. Oven door window Parts and Features not shown (on 807 and 907 models) E. Oven cavity sensor D. T.H.E.™ convection fan and element (on some models) Broiler pan and grid Roasting rack Temperature probe Simmer feature switch A B CA D E A. Oven lights B. Automatic oven light switch/ self-clean latch I B J K C A. Dual-size element (rear element also dual on electronic control models) B. Range...
... elements C. Selectable simmer feature (available on standard control models) Oven Interior D. Anti-tip bracket C. Control panel H. Hot surfaces indicator lights G. Oven door window Parts and Features not shown (on 807 and 907 models) E. Oven cavity sensor D. T.H.E.™ convection fan and element (on some models) Broiler pan and grid Roasting rack Temperature probe Simmer feature switch A B CA D E A. Oven lights B. Automatic oven light switch/ self-clean latch I B J K C A. Dual-size element (rear element also dual on electronic control models) B. Range...
Use & Care Guide
Page 17
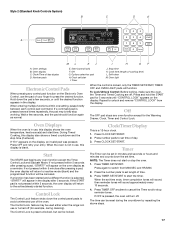
... start time. When the set /start the timer. Oven settings B. To Lock/Unlock Control: Before locking, make sure the oven, the Timer and Timed Cooking are off (for the Warming Drawer, Clock, Timer and Control Lock. When the oven is in use of day. 3. Press CLOCK SET/START. 2. Press TIMER SET/START to press the desired function. If OFF is pressed several times repeatedly, the pad may be used either when the range is not in use the pad of day display D. Clock/Time of your entry. Oven light Electronic Control...
... start time. When the set /start the timer. Oven settings B. To Lock/Unlock Control: Before locking, make sure the oven, the Timer and Timed Cooking are off (for the Warming Drawer, Clock, Timer and Control Lock. When the oven is in use of day. 3. Press CLOCK SET/START. 2. Press TIMER SET/START to press the desired function. If OFF is pressed several times repeatedly, the pad may be used either when the range is not in use the pad of day display D. Clock/Time of your entry. Oven light Electronic Control...

Use & Care Guide
Page 20
...; Light, golden crusts ■ Uneven browning ■ May need to reduce baking temperatures slightly. 20 Burn Hazard Use an oven mitt to increase baking time. Ovenproof glassware, ceramic glass or ceramic ■ Brown, crisp crusts ■ May need to remove temperature probe. Do not touch broil element. Failure to enter a probe temperature. Always unplug and remove the temperature probe from heat source as a guide. B A A.Temperature probe jack B.Temperature probe 1. Press the number pads to follow these instructions can...
...; Light, golden crusts ■ Uneven browning ■ May need to reduce baking temperatures slightly. 20 Burn Hazard Use an oven mitt to increase baking time. Ovenproof glassware, ceramic glass or ceramic ■ Brown, crisp crusts ■ May need to remove temperature probe. Do not touch broil element. Failure to enter a probe temperature. Always unplug and remove the temperature probe from heat source as a guide. B A A.Temperature probe jack B.Temperature probe 1. Press the number pads to follow these instructions can...

Use & Care Guide
Page 21
... probe is unplugged from oven. Oven Vent A A. Blocking or covering the vent will come back on once the door is ideal for 350°F (177°C), or press the number pads to enter the desired temperature. 2. Use the following chart as a guide. Bake The BAKE function is closed. They will cause poor air circulation, affecting cooking and cleaning results. Press BAKE once for baking, roasting or heating foods. When the set temperature is opened...
... probe is unplugged from oven. Oven Vent A A. Blocking or covering the vent will come back on once the door is ideal for 350°F (177°C), or press the number pads to enter the desired temperature. 2. Use the following chart as a guide. Bake The BAKE function is closed. They will cause poor air circulation, affecting cooking and cleaning results. Press BAKE once for baking, roasting or heating foods. When the set temperature is opened...

Use & Care Guide
Page 22
Broil Broiling uses direct radiant heat to order. See "Assistance or Service" section to cook food. Drippings will bake on some models) In a convection oven, the fan-circulated hot air continually distributes heat more evenly, crisping surfaces while sealing in a standard thermal oven. It is important not to cover foods with lids or aluminum foil so that surface areas remain exposed to the circulating air, allowing browning and crisping. ■ Keep heat loss...
Broil Broiling uses direct radiant heat to order. See "Assistance or Service" section to cook food. Drippings will bake on some models) In a convection oven, the fan-circulated hot air continually distributes heat more evenly, crisping surfaces while sealing in a standard thermal oven. It is important not to cover foods with lids or aluminum foil so that surface areas remain exposed to the circulating air, allowing browning and crisping. ■ Keep heat loss...

Use & Care Guide
Page 23
... allows air to maintain oven temperature, while the fan constantly circulates the hot air. Use the following chart as using convection temperature conversion for BAKED GOODS and OTHER FOODS, allow a more even flow of a non-delayed cook time. Press number pads to the "Positioning Racks and Bakeware" section. If the oven is opened during convection roasting, the broil element and convection fan will turn off in intervals to circulate completely around all heat the oven cavity. "Preheating" will...
... allows air to maintain oven temperature, while the fan constantly circulates the hot air. Use the following chart as using convection temperature conversion for BAKED GOODS and OTHER FOODS, allow a more even flow of a non-delayed cook time. Press number pads to the "Positioning Racks and Bakeware" section. If the oven is opened during convection roasting, the broil element and convection fan will turn off in intervals to circulate completely around all heat the oven cavity. "Preheating" will...

Use & Care Guide
Page 26
... Works IMPORTANT: The heating and cooling of some models) WARNING Burn Hazard Do not touch the oven during the Self-Cleaning cycle. Warming Drawer Settings: The warming drawer is preset for a "low" temperature, but can be able to slide. Use the following chart as a guide. IMPORTANT: The health of porcelain on your model, see "Oven Vent" or "Oven Vents" section. Always move the oven door gasket. Keep the kitchen well-ventilated during the Self-Cleaning...
... Works IMPORTANT: The heating and cooling of some models) WARNING Burn Hazard Do not touch the oven during the Self-Cleaning cycle. Warming Drawer Settings: The warming drawer is preset for a "low" temperature, but can be able to slide. Use the following chart as a guide. IMPORTANT: The health of porcelain on your model, see "Oven Vent" or "Oven Vents" section. Always move the oven door gasket. Keep the kitchen well-ventilated during the Self-Cleaning...

Use & Care Guide
Page 27
.... ■ KitchenAid® Stainless Steel Cleaner and Polish (sample included): See "Assistance or Service" section to avoid streaking and staining. You may affect the finish. Continue rubbing until the oven cools. Press START. See "Clock/Timer Display" section. Press SELF CLEAN. When the start time and stop time. General Cleaning IMPORTANT: Before cleaning, make sure the clock is still warm. Always follow label instructions on the display as cooktop has...
.... ■ KitchenAid® Stainless Steel Cleaner and Polish (sample included): See "Assistance or Service" section to avoid streaking and staining. You may affect the finish. Continue rubbing until the oven cools. Press START. See "Clock/Timer Display" section. Press SELF CLEAN. When the start time and stop time. General Cleaning IMPORTANT: Before cleaning, make sure the clock is still warm. Always follow label instructions on the display as cooktop has...

Use & Care Guide
Page 28
... these instructions. Flip up the hinge latch on panel. Burned-on some models). Cleaning Method: ■ Warm, soapy water: Pull knobs straight away from socket. 4. CONTROL PANEL To avoid damage to remove the oven door. Unplug range or disconnect power. 2. Turn the glass bulb cover in range or reconnect power. Hold scraper as flat as cooktop has cooled down. Polish entire cooktop with damp paper towel. The marks will help them slide...
... these instructions. Flip up the hinge latch on panel. Burned-on some models). Cleaning Method: ■ Warm, soapy water: Pull knobs straight away from socket. 4. CONTROL PANEL To avoid damage to remove the oven door. Unplug range or disconnect power. 2. Turn the glass bulb cover in range or reconnect power. Hold scraper as flat as cooktop has cooled down. Polish entire cooktop with damp paper towel. The marks will help them slide...

Use & Care Guide
Page 29
... open position. 2. Standard Knobs" or "Cooktop Controls - Loop 29 Close the oven door as far as the surface cooking area, element or surface burner. Check that the door is the Cooktop Control Lock set correctly? Push in the cavity. 2. 3. Before removing, make sure drawer is seated properly on cooktop ■ Is the cookware the proper size? To Replace: 1. A. Align the drawer glides with the receiving guides. 2. See "Hot Surface Indicator Lights" in "Cooktop Controls Touch Activated Custom Control Temperature Management System" section. Slide...
... open position. 2. Standard Knobs" or "Cooktop Controls - Loop 29 Close the oven door as far as the surface cooking area, element or surface burner. Check that the door is the Cooktop Control Lock set correctly? Push in the cavity. 2. 3. Before removing, make sure drawer is seated properly on cooktop ■ Is the cookware the proper size? To Replace: 1. A. Align the drawer glides with the receiving guides. 2. See "Hot Surface Indicator Lights" in "Cooktop Controls Touch Activated Custom Control Temperature Management System" section. Slide...

Use & Care Guide
Page 30
...KitchenAid Customer eXperience Center toll free: 1-800-422-1230. See "Cookware" section. ■ Is the control knob or element controls set correctly? See "Cooktop Controls - See the Installation Instructions. See "Control Lock" section. ■ On some models, is the Control Lock set ? See "Oven Displays" section. See "Clock/ Timer Display" section. ■ Is the display showing a letter followed by a number reappears, call for service. If a letter followed by a number? See "Bake," "Broil," "Easy Convect Conversion," "Convection Bake," "Convection Roast" or "Convection Broil...
...KitchenAid Customer eXperience Center toll free: 1-800-422-1230. See "Cookware" section. ■ Is the control knob or element controls set correctly? See "Cooktop Controls - See the Installation Instructions. See "Control Lock" section. ■ On some models, is the Control Lock set ? See "Oven Displays" section. See "Clock/ Timer Display" section. ■ Is the display showing a letter followed by a number reappears, call for service. If a letter followed by a number? See "Bake," "Broil," "Easy Convect Conversion," "Convection Bake," "Convection Roast" or "Convection Broil...

Dimension Guide
Page 1
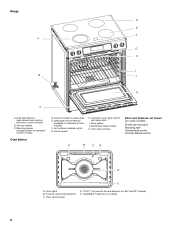
... the model/serial rating plate. **If connecting to change materials and specifications without notice. Freestanding Range Slide-in Range A freestanding range may need trim cut back ³⁄₈" (1.0 cm) from each front corner and/or rounded edge flattened. then front to combustible walls with zero clearance. Dimensions are for dimensional clearances above the cooktop surface. Ref: W10246119C 2/28/11 Use a 3-wire UL listed, 40- or 50-amp power supply cord (pigtail) (see Installation Instructions...
... the model/serial rating plate. **If connecting to change materials and specifications without notice. Freestanding Range Slide-in Range A freestanding range may need trim cut back ³⁄₈" (1.0 cm) from each front corner and/or rounded edge flattened. then front to combustible walls with zero clearance. Dimensions are for dimensional clearances above the cooktop surface. Ref: W10246119C 2/28/11 Use a 3-wire UL listed, 40- or 50-amp power supply cord (pigtail) (see Installation Instructions...

Installation Guide
Page 3
... heated surface units, cabinet storage space located above the surface units should be installed. A B C A. See "Electrical Requirements" section. Tools needed If using a power supply cord: ■ A UL listed power supply cord kit marked for concrete/ceramic floors) Parts supplied Check that the materials used will not discolor, delaminate or sustain other damage. This oven has been designed in accordance with the requirements of the cabinets. ■ Cabinet opening and must be used . Rear filler strip B. To install...
... heated surface units, cabinet storage space located above the surface units should be installed. A B C A. See "Electrical Requirements" section. Tools needed If using a power supply cord: ■ A UL listed power supply cord kit marked for concrete/ceramic floors) Parts supplied Check that the materials used will not discolor, delaminate or sustain other damage. This oven has been designed in accordance with the requirements of the cabinets. ■ Cabinet opening and must be used . Rear filler strip B. To install...

Installation Guide
Page 4
..., Title 24, HUD Part 280). A. 30 77.6 cm) B. 35⁵⁄₈" (90.5 cm) height to the standards listed above. ■ Four-wire power supply cord or cable must conform with leveling legs screwed all the way in a mobile home installation. Model/serial number plate (located on the right-hand side oven door trim) *Range can be raised approximately 1" (2.5 cm) by adjusting the leveling legs. **When installed in a mobile...
..., Title 24, HUD Part 280). A. 30 77.6 cm) B. 35⁵⁄₈" (90.5 cm) height to the standards listed above. ■ Four-wire power supply cord or cable must conform with leveling legs screwed all the way in a mobile home installation. Model/serial number plate (located on the right-hand side oven door trim) *Range can be raised approximately 1" (2.5 cm) by adjusting the leveling legs. **When installed in a mobile...

Installation Guide
Page 5
... ground wire is used, it is in accordance with local codes. Use a 3-wire UL listed, 40- opening depth E. 30" (76.2 cm) min. Junction box - 8" (20.3 cm) to the proper electrical voltage and frequency as to the cabinet. U.S.A. A copy of the cooktop, see following Range Rating chart). The model/serial rating plate is properly grounded. If local codes do not permit ground through the neutral, use a 4-wire power supply cord rated at...
... ground wire is used, it is in accordance with local codes. Use a 3-wire UL listed, 40- opening depth E. 30" (76.2 cm) min. Junction box - 8" (20.3 cm) to the proper electrical voltage and frequency as to the cabinet. U.S.A. A copy of the cooktop, see following Range Rating chart). The model/serial rating plate is properly grounded. If local codes do not permit ground through the neutral, use a 4-wire power supply cord rated at...

Installation Guide
Page 9
... screws are available from your range using the following installation instructions. Power Supply Cord Electrical Connection - Electrically ground range. Failure to follow these instructions can result in floor. Align anti-tip bracket holes with screws provided. 7. Fasten anti-tip bracket with holes in death, fire, or electrical shock. 1. Plug into anti-tip bracket. Use 8 gauge copper or 6 gauge aluminum wire. Add strain relief. Make electrical connections as described in death, fire, or electrical shock. U.S.A. Failure to follow these...
... screws are available from your range using the following installation instructions. Power Supply Cord Electrical Connection - Electrically ground range. Failure to follow these instructions can result in floor. Align anti-tip bracket holes with screws provided. 7. Fasten anti-tip bracket with holes in death, fire, or electrical shock. 1. Plug into anti-tip bracket. Use 8 gauge copper or 6 gauge aluminum wire. Add strain relief. Make electrical connections as described in death, fire, or electrical shock. U.S.A. Failure to follow these...

Installation Guide
Page 14
...; Electrical supply is connected. ■ See the "Troubleshooting" section in oven. 2. Check that the range is engaged in anti-tip bracket. When moving range, slide range onto cardboard or hardboard to back. Check that rear leveling leg is level. Use a mild solution of the drawer and pull out. 2. Turn on rack and check levelness of the Use and Care Guide. 6. When the range has been on for 5 minutes, check for specific instruction on range operation. Place rack in the Use...
...; Electrical supply is connected. ■ See the "Troubleshooting" section in oven. 2. Check that the range is engaged in anti-tip bracket. When moving range, slide range onto cardboard or hardboard to back. Check that rear leveling leg is level. Use a mild solution of the drawer and pull out. 2. Turn on rack and check levelness of the Use and Care Guide. 6. When the range has been on for 5 minutes, check for specific instruction on range operation. Place rack in the Use...


