
Use & Care Guide
Page 1
ELECTRIC RANGE ARCHITECT® SERIES II Use & Care Guide For questions about features, operation/performance, parts, accessories or service, call: 1-800-422-1230 or visit our website at www.kitchenaid.com In Canada, call for assistance, installation and service, call: 1-800-807-6777 or visit our website at www.KitchenAid.ca Table of Contents...2 Models KERS807 KESK901 KESS907 KESS908 YKERS807 YKESS907 YKESS908 W10246111B
ELECTRIC RANGE ARCHITECT® SERIES II Use & Care Guide For questions about features, operation/performance, parts, accessories or service, call: 1-800-422-1230 or visit our website at www.kitchenaid.com In Canada, call for assistance, installation and service, call: 1-800-807-6777 or visit our website at www.KitchenAid.ca Table of Contents...2 Models KERS807 KESK901 KESS907 KESS908 YKERS807 YKESS907 YKESS908 W10246111B

Use & Care Guide
Page 2
TABLE OF CONTENTS RANGE SAFETY 3 The Anti-Tip Bracket 3 PARTS AND FEATURES 5 COOKTOP USE 9 Ceramic Glass 9 Cookware 9 Home Canning 10 Cooktop Controls - Options 2, 3, 4 18 Dehydrate - Option 5 18 Oven Temperature Calibration - Option 6 18 Sabbath Mode - Custom ...
TABLE OF CONTENTS RANGE SAFETY 3 The Anti-Tip Bracket 3 PARTS AND FEATURES 5 COOKTOP USE 9 Ceramic Glass 9 Cookware 9 Home Canning 10 Cooktop Controls - Options 2, 3, 4 18 Dehydrate - Option 5 18 Oven Temperature Calibration - Option 6 18 Sabbath Mode - Custom ...

Use & Care Guide
Page 4
... sudden change in temperature. ■ Utensil Handles Should Be Turned Inward and Not Extend Over Adjacent Surface Units - Do not repair or replace any part of the range. ■ Wear Proper Apparel - Smother fire or flame or use . Areas near units until they have had sufficient time to ... on . If cooktop should be allowed to accumulate on hood or filter. ■ When flambeing foods under the hood, turn the fan on any part of the range unless specifically recommended in a risk of electric shock, or fire. ■ Glazed Cooking Utensils - Heating elements may subject wiring or...
... sudden change in temperature. ■ Utensil Handles Should Be Turned Inward and Not Extend Over Adjacent Surface Units - Do not repair or replace any part of the range. ■ Wear Proper Apparel - Smother fire or flame or use . Areas near units until they have had sufficient time to ... on . If cooktop should be allowed to accumulate on hood or filter. ■ When flambeing foods under the hood, turn the fan on any part of the range unless specifically recommended in a risk of electric shock, or fire. ■ Glazed Cooking Utensils - Heating elements may subject wiring or...

Use & Care Guide
Page 5
...-size element) A B. Hot surface indicator lights H. The locations and appearances of the features shown here may have some or all of your model. Oven display B. PARTS AND FEATURES This manual covers several different models. Zone diameter indicator (dual) G. Zone diameter indicator (single) I F. The range you have purchased may not match those...
...-size element) A B. Hot surface indicator lights H. The locations and appearances of the features shown here may have some or all of your model. Oven display B. PARTS AND FEATURES This manual covers several different models. Zone diameter indicator (dual) G. Zone diameter indicator (single) I F. The range you have purchased may not match those...

Use & Care Guide
Page 6
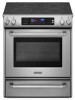
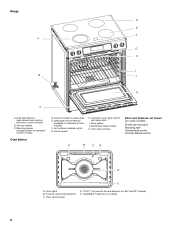
... element B. Anti-tip bracket D. CleanBake™ element (not visible) 6 Electronic cooktop touch controls G. Range E A F G B H I . Warming drawer Oven Interior E. Dual-size element F. Oven door window A B CA Parts and Features not shown (on some models) Broiler pan and grid Roasting rack Temperature probe D E A. Oven cavity sensor D.
... element B. Anti-tip bracket D. CleanBake™ element (not visible) 6 Electronic cooktop touch controls G. Range E A F G B H I . Warming drawer Oven Interior E. Dual-size element F. Oven door window A B CA Parts and Features not shown (on some models) Broiler pan and grid Roasting rack Temperature probe D E A. Oven cavity sensor D.
Use & Care Guide
Page 8
... and 907 models) E. T.H.E.™ convection fan and element (on standard control models) F. Ceramic surface cooking area E. Control panel H. Hot surfaces indicator lights G. Oven door window Parts and Features not shown (on some models) Broiler pan and grid Roasting rack Temperature probe Simmer feature switch A B CA D E A. Range D E F A G H I .
... and 907 models) E. T.H.E.™ convection fan and element (on standard control models) F. Ceramic surface cooking area E. Control panel H. Hot surfaces indicator lights G. Oven door window Parts and Features not shown (on some models) Broiler pan and grid Roasting rack Temperature probe Simmer feature switch A B CA D E A. Range D E F A G H I .

Use & Care Guide
Page 9
...finishes on cookware or bakeware could leave aluminum marks that cannot be used as possible. Copper ■ Heats very quickly and evenly. Some parts of the surface cooking area may be of medium-to cool down , they can leave permanent marks on the cooktop. Cleaning off to ... C. ½" (1.3 cm) maximum overhang ■ Use flat-bottomed cookware for all spills and soils as soon as a core or base in any part of the entire cooktop. ■ To avoid damage to its base material. For example, aluminum cookware with slightly indented bottoms or small expansion channels can...
...finishes on cookware or bakeware could leave aluminum marks that cannot be used as possible. Copper ■ Heats very quickly and evenly. Some parts of the surface cooking area may be of medium-to cool down , they can leave permanent marks on the cooktop. Cleaning off to ... C. ½" (1.3 cm) maximum overhang ■ Use flat-bottomed cookware for all spills and soils as soon as a core or base in any part of the entire cooktop. ■ To avoid damage to its base material. For example, aluminum cookware with slightly indented bottoms or small expansion channels can...

Use & Care Guide
Page 19
... 7, 8, 9, 6, in food poisoning or sickness. 1. The bake range can be regularly set, the oven must first be disabled of the ability to set for only part of Sabbath Mode time, up to keep the oven on the display. 5. No tones will sound, and the display will begin a timed bake cycle. Press...
... 7, 8, 9, 6, in food poisoning or sickness. 1. The bake range can be regularly set, the oven must first be disabled of the ability to set for only part of Sabbath Mode time, up to keep the oven on the display. 5. No tones will sound, and the display will begin a timed bake cycle. Press...

Use & Care Guide
Page 22
... be ordered. Before broiling, position rack according to ensure proper broiling operation. Close the door to the Broiling Chart. The temperature can be adjusted for Part Number W10123240. ■ For proper draining, do not cover the grid with only the inner broil element. 2. Full Broil uses both broil elements. It is...
... be ordered. Before broiling, position rack according to ensure proper broiling operation. Close the door to the Broiling Chart. The temperature can be adjusted for Part Number W10123240. ■ For proper draining, do not cover the grid with only the inner broil element. 2. Full Broil uses both broil elements. It is...

Use & Care Guide
Page 24
... air. Press OFF when finished cooking. INTERNAL FOOD TEMP. INTERNAL FOOD TEMP. boneless, skinless chicken; To Convection Broil: Before convection broiling, see "Broil" section for Part Number W10123240. 1. Press CONVECT BROIL. Press START. filets of the oven rack with the longest side parallel to the door. The temperature is often not...
... air. Press OFF when finished cooking. INTERNAL FOOD TEMP. INTERNAL FOOD TEMP. boneless, skinless chicken; To Convection Broil: Before convection broiling, see "Broil" section for Part Number W10123240. 1. Press CONVECT BROIL. Press START. filets of the oven rack with the longest side parallel to the door. The temperature is often not...

Use & Care Guide
Page 30
... to your area, call us to better respond to the proper heat level? If you need replacement parts If you need to cover the edge of your nearest KitchenAid designated service center. See the Installation Instructions. Oven temperature too high or too low ■ Does ... recommend that batter is the Control Lock set? If you use . In the U.S.A. To locate the KitchenAid designated service company in use only factory specified parts. Clear the display. See "Oven Temperature Calibration - See "Bakeware" section. ■ Are the racks positioned properly? When calling, ...
... to your area, call us to better respond to the proper heat level? If you need replacement parts If you need to cover the edge of your nearest KitchenAid designated service center. See the Installation Instructions. Oven temperature too high or too low ■ Does ... recommend that batter is the Control Lock set? If you use . In the U.S.A. To locate the KitchenAid designated service company in use only factory specified parts. Clear the display. See "Oven Temperature Calibration - See "Bakeware" section. ■ Are the racks positioned properly? When calling, ...

Use & Care Guide
Page 31
...: ■ Features and specifications on our full line of appliances. ■ Use and maintenance procedures. ■ Accessory and repair parts sales. ■ Referrals to "Replacement Parts & Accessories" and click on "Shopping Options." KITCHENAID® ELECTRIC RANGE WARRANTY LIMITED WARRANTY For one year from the date of purchase, when this major appliance is operated...
...: ■ Features and specifications on our full line of appliances. ■ Use and maintenance procedures. ■ Accessory and repair parts sales. ■ Referrals to "Replacement Parts & Accessories" and click on "Shopping Options." KITCHENAID® ELECTRIC RANGE WARRANTY LIMITED WARRANTY For one year from the date of purchase, when this major appliance is operated...

Use & Care Guide
Page 32
...; 2010. Service calls to better help by checking the "Assistance or Service" section or by KitchenAid. 5. Service calls to determine if another warranty applies. Consumable parts are excluded from unauthorized modifications made to the finish of your major appliance is located in -home... service is covered by an authorized KitchenAid servicer is used for future reference. Damage resulting from defects in...
...; 2010. Service calls to better help by checking the "Assistance or Service" section or by KitchenAid. 5. Service calls to determine if another warranty applies. Consumable parts are excluded from unauthorized modifications made to the finish of your major appliance is located in -home... service is covered by an authorized KitchenAid servicer is used for future reference. Damage resulting from defects in...

Installation Guide
Page 2
... or hurt you don't follow the safety alert symbol and either the word "DANGER" or "WARNING." TABLE OF CONTENTS RANGE SAFETY 2 INSTALLATION REQUIREMENTS 3 Tools and Parts 3 Location Requirements 3 Electrical Requirements - Canada Only 6 Countertop Preparation 7 INSTALLATION INSTRUCTIONS 7 Unpack Range 7 Measure for Proper Height 7 Adjust Leveling Legs 8 Install Anti-Tip Bracket 8 Electrical Connection...
... or hurt you don't follow the safety alert symbol and either the word "DANGER" or "WARNING." TABLE OF CONTENTS RANGE SAFETY 2 INSTALLATION REQUIREMENTS 3 Tools and Parts 3 Location Requirements 3 Electrical Requirements - Canada Only 6 Countertop Preparation 7 INSTALLATION INSTRUCTIONS 7 Unpack Range 7 Measure for Proper Height 7 Adjust Leveling Legs 8 Install Anti-Tip Bracket 8 Electrical Connection...

Installation Guide
Page 3
... governing codes and ordinances. ■ It is recommended that the materials used . A. W10113904A Location Requirements IMPORTANT: Observe all parts are shown must be located for use in a freestanding cutout. See "Electrical Requirements" section. Countertop C. Given dimensions are ...available from your builder or cabinet supplier to subfloor. Parts needed Rear Filler Strip (optional) The rear filler strip may require longer screws to anchor bracket to comply with your...
... governing codes and ordinances. ■ It is recommended that the materials used . A. W10113904A Location Requirements IMPORTANT: Observe all parts are shown must be located for use in a freestanding cutout. See "Electrical Requirements" section. Countertop C. Given dimensions are ...available from your builder or cabinet supplier to subfloor. Parts needed Rear Filler Strip (optional) The rear filler strip may require longer screws to anchor bracket to comply with your...

Installation Guide
Page 4
... 1" (2.5 cm) beyond 24" (61.0 cm) base cabinet. 4 See "Electrical Connection" section. Model/serial number plate (located on models KERS807XSP and KESS907XSP) beyond 24" (61.0 cm) base cabinet. front of range** G. Model/serial number plate (located on the right-hand side oven door trim) D.... (76.2 cm) E. 27¼" (69.2 cm) (27 70.3 cm] on models KERS807XSP and KESS907XSP) from handle to the Manufactured Home Construction and Safety Standard, Title 24 CFR, Part 3280 (formerly the Federal Standard for Manufactured Home Installations, ANSI A225.1/NFPA 501A or follow local codes.
... 1" (2.5 cm) beyond 24" (61.0 cm) base cabinet. 4 See "Electrical Connection" section. Model/serial number plate (located on models KERS807XSP and KESS907XSP) beyond 24" (61.0 cm) base cabinet. front of range** G. Model/serial number plate (located on the right-hand side oven door trim) D.... (76.2 cm) E. 27¼" (69.2 cm) (27 70.3 cm] on models KERS807XSP and KESS907XSP) from handle to the Manufactured Home Construction and Safety Standard, Title 24 CFR, Part 3280 (formerly the Federal Standard for Manufactured Home Installations, ANSI A225.1/NFPA 501A or follow local codes.

Installation Guide
Page 6
... electrical installer if you are adequate and in a clear plastic bag. Toronto, ON M9W 1R3 CANADA ■ Check with CSA Standard C22.1, Canadian Electrical Code, Part 1 - For 50-amp rated cord kits, use with a nominal 1³⁄₈" (34.93 mm) diameter connection opening. ■ A circuit breaker is recommended. ■ The...
... electrical installer if you are adequate and in a clear plastic bag. Toronto, ON M9W 1R3 CANADA ■ Check with CSA Standard C22.1, Canadian Electrical Code, Part 1 - For 50-amp rated cord kits, use with a nominal 1³⁄₈" (34.93 mm) diameter connection opening. ■ A circuit breaker is recommended. ■ The...

Installation Guide
Page 7
... not be the difference between the 2 measurements you have just taken. 7 If you have a square finish (flat) countertop and the opening . Remove oven racks and parts package from the floor to underside of the countertop to be level. Measure from inside oven. 2. Cooktop 3. Range side frame C. Measure the distance of range...
... not be the difference between the 2 measurements you have just taken. 7 If you have a square finish (flat) countertop and the opening . Remove oven racks and parts package from the floor to underside of the countertop to be level. Measure from inside oven. 2. Cooktop 3. Range side frame C. Measure the distance of range...

Installation Guide
Page 11
... cord/conduit plate on bottom of the ground link under the screw. 3. Discard C. Feed the power supply cord through the neutral. 1. Cut out and remove part of the 10-32 hex nuts. Line 2 (red) D D. Ground-link screw C. Ground-link screw 2. Line 1 (black) 6. 4-wire connection: Power Supply Cord Use this method only...
... cord/conduit plate on bottom of the ground link under the screw. 3. Discard C. Feed the power supply cord through the neutral. 1. Cut out and remove part of the 10-32 hex nuts. Line 2 (red) D D. Ground-link screw C. Ground-link screw 2. Line 1 (black) 6. 4-wire connection: Power Supply Cord Use this method only...

Installation Guide
Page 12
... not remove) the setscrew on bottom of the terminal lug and insert exposed wire end through the neutral A. A B C D E A. Neutral (white) wire E. Cut out and remove part of each wire. ³⁄₈" (1.0 cm) 3" (7.6 cm) 2. Ground-link screw D. Securely tighten hex nuts. Direct Wire Installation: Copper or Aluminum Wire This range may...
... not remove) the setscrew on bottom of the terminal lug and insert exposed wire end through the neutral A. A B C D E A. Neutral (white) wire E. Cut out and remove part of each wire. ³⁄₈" (1.0 cm) 3" (7.6 cm) 2. Ground-link screw D. Securely tighten hex nuts. Direct Wire Installation: Copper or Aluminum Wire This range may...


