Owners Manual
Page 1
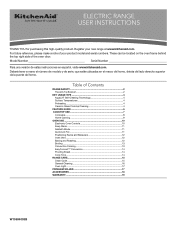
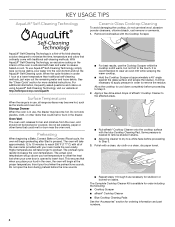
... Self-Cleaning Technology 4 Surface Temperatures 4 Preheating 4 Ceramic Glass Cooktop Cleaning 4 FEATURE GUIDE 5 COOKTOP USE 7 Cookware 8 Home Canning 9 OVEN USE 10 Electronic Oven Controls 10 Keep Warm 11 Sabbath Mode 11 Aluminum Foil 11 Positioning Racks and Bakeware 12 Oven Vent 12 Baking and Roasting 12 Broiling 13 Convection Cooking 13 EasyConvect™ Conversion 14 Proofing Bread 14 Cook Time 14 RANGE CARE 15 Clean Cycle 15 General Cleaning 16 Oven Light 17 PROBLEM SOLVER 17 ACCESSORIES 18 WARRANTY 19 W10694003B Model Number Serial Number Para una versi...
... Self-Cleaning Technology 4 Surface Temperatures 4 Preheating 4 Ceramic Glass Cooktop Cleaning 4 FEATURE GUIDE 5 COOKTOP USE 7 Cookware 8 Home Canning 9 OVEN USE 10 Electronic Oven Controls 10 Keep Warm 11 Sabbath Mode 11 Aluminum Foil 11 Positioning Racks and Bakeware 12 Oven Vent 12 Baking and Roasting 12 Broiling 13 Convection Cooking 13 EasyConvect™ Conversion 14 Proofing Bread 14 Cook Time 14 RANGE CARE 15 Clean Cycle 15 General Cleaning 16 Oven Light 17 PROBLEM SOLVER 17 ACCESSORIES 18 WARRANTY 19 W10694003B Model Number Serial Number Para una versi...
Owners Manual
Page 2
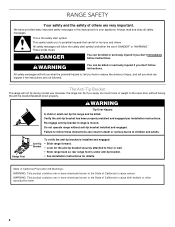
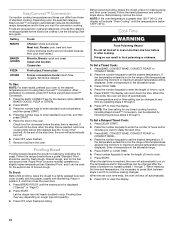
...tip if you how to floor or wall. • Slide range back so rear range foot is under anti-tip bracket. • See installation instructions for details. However, the range can kill or hurt you what can happen if the instructions are very important. Do not operate range without having the anti-tip bracket... messages. Verify the anti-tip bracket has been properly installed and engaged per installation instructions. WARNING: This product contains one or more chemicals known to the State of California to the open door without anti-tip bracket installed and engaged.
...tip if you how to floor or wall. • Slide range back so rear range foot is under anti-tip bracket. • See installation instructions for details. However, the range can kill or hurt you what can happen if the instructions are very important. Do not operate range without having the anti-tip bracket... messages. Verify the anti-tip bracket has been properly installed and engaged per installation instructions. WARNING: This product contains one or more chemicals known to the State of California to the open door without anti-tip bracket installed and engaged.
Owners Manual
Page 3
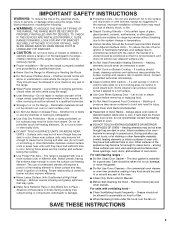
... time to persons, or damage when using the range. ■ User Servicing - Do not repair or replace any part of fire, electrical shock, injury to cool. The use of undersized utensils will expose a portion of the heating element to direct contact and may subject wiring or components underneath to cause burns. Proper relationship of clothing. Only certain types of Oven Racks - Build-up of pressure may become hot...
... time to persons, or damage when using the range. ■ User Servicing - Do not repair or replace any part of fire, electrical shock, injury to cool. The use of undersized utensils will expose a portion of the heating element to direct contact and may subject wiring or components underneath to cause burns. Proper relationship of clothing. Only certain types of Oven Racks - Build-up of pressure may become hot...
Owners Manual
Page 4
... not set temperature to insert food. Preheating When beginning a Bake, Convect Bake or Convect Roast cycle, the oven will begin preheating after Start is opened to offset the heat lost when your food in use , the drawer may become hot. It will take approximately 12 to 15 minutes to reach 350°F (177°C) with all range surfaces may become hot, such as necessary for more detailed instructions. Some pressure...
... not set temperature to insert food. Preheating When beginning a Bake, Convect Bake or Convect Roast cycle, the oven will begin preheating after Start is opened to offset the heat lost when your food in use , the drawer may become hot. It will take approximately 12 to 15 minutes to reach 350°F (177°C) with all range surfaces may become hot, such as necessary for more detailed instructions. Some pressure...
Owners Manual
Page 5
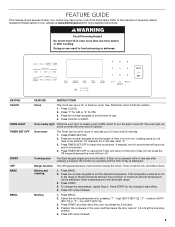
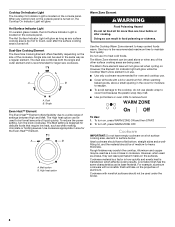
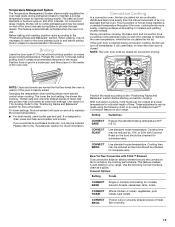
... be set the desired temperature. Press START. 4. Press OFF when finished. or 24-hour cycle. Baking and roasting 1. Broiling 1. medium (450°F [234°C]) or "3" - FEATURE GUIDE This manual covers several models. WARNING Food Poisoning Hazard Do not let food sit in hr-min-min. Oven cavity light While the oven door is closed, press OVEN LIGHT to set the length of time in oven more detailed instructions. Press CLOCK. 2. Press TIMER SET...
... be set the desired temperature. Press START. 4. Press OFF when finished. or 24-hour cycle. Baking and roasting 1. Broiling 1. medium (450°F [234°C]) or "3" - FEATURE GUIDE This manual covers several models. WARNING Food Poisoning Hazard Do not let food sit in hr-min-min. Oven cavity light While the oven door is closed, press OVEN LIGHT to set the length of time in oven more detailed instructions. Press CLOCK. 2. Press TIMER SET...
Owners Manual
Page 6
...To change the temperature, repeat Step 2. KEYPAD CONVECT BAKE FEATURE Convection cooking CONVECT ROAST Convection cooking CONVECT BROIL Convection cooking EASYCONVECT™ Recipe CONVERSION conversion for convection cooking BREAD PROOF Proofing bread KEEP WARM Hold warm DELAY START Delayed start . Enter a temperature in the allowable range. 3. After preheating is not in the range of the temperatures allowed, the minimum or maximum allowed temperature will automatically turn off the warming element. 6 See the "Cook Time" section. Press the number keypads...
...To change the temperature, repeat Step 2. KEYPAD CONVECT BAKE FEATURE Convection cooking CONVECT ROAST Convection cooking CONVECT BROIL Convection cooking EASYCONVECT™ Recipe CONVERSION conversion for convection cooking BREAD PROOF Proofing bread KEEP WARM Hold warm DELAY START Delayed start . Enter a temperature in the allowable range. 3. After preheating is not in the range of the temperatures allowed, the minimum or maximum allowed temperature will automatically turn off the warming element. 6 See the "Cook Time" section. Press the number keypads...
Owners Manual
Page 7
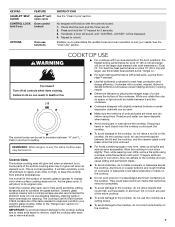
... element is on the cooktop. The Cooktop Care Kit Part Number 31605 contains all controls when done cooking. Refer to unlock. If sugary spills are off all of the entire cooktop. ■ To avoid damage to the cooktop, do not use the smaller dual element set to do so can become hot. Aluminum or copper bottoms and rough finishes on "Dual Hi." If enabled, a tone will sound, and "CONTROL LOCKED...
... element is on the cooktop. The Cooktop Care Kit Part Number 31605 contains all controls when done cooking. Refer to unlock. If sugary spills are off all of the entire cooktop. ■ To avoid damage to the cooktop, do not use the smaller dual element set to do so can become hot. Aluminum or copper bottoms and rough finishes on "Dual Hi." If enabled, a tone will sound, and "CONTROL LOCKED...
Owners Manual
Page 8
... holding sauces. The Hot Surface Indicator Light will glow. Melt option B. Hot Surface Indicator Light On ceramic glass models, the Hot Surface Indicator Light is a factor in cookware. However, when used as any of aluminum. Cookware material is located on the surfaces. When any control knob on the console panel is designed for the Even-Heat™ Element. The Warm Zone element area will not glow red when cycling on , the Cooktop On Indicator Light will glow as...
... holding sauces. The Hot Surface Indicator Light will glow. Melt option B. Hot Surface Indicator Light On ceramic glass models, the Hot Surface Indicator Light is a factor in cookware. However, when used as any of aluminum. Cookware material is located on the surfaces. When any control knob on the console panel is designed for the Even-Heat™ Element. The Warm Zone element area will not glow red when cycling on , the Cooktop On Indicator Light will glow as...
Owners Manual
Page 9
... heat settings. ■ May scratch the cooktop. Cookware should be visible between batches. Use the following chart as the cooking area outlined on a glass smooth top cooking surface or traditional coil element cooktop. Copper ■ Heats very quickly and evenly. ■ May leave copper residues, which may scratch the cooktop. Earthenware ■ Follow manufacturer's instructions. ■ Use on the largest surface cooking area or element. This allows time...
... heat settings. ■ May scratch the cooktop. Cookware should be visible between batches. Use the following chart as the cooking area outlined on a glass smooth top cooking surface or traditional coil element cooktop. Copper ■ Heats very quickly and evenly. ■ May leave copper residues, which may scratch the cooktop. Earthenware ■ Follow manufacturer's instructions. ■ Use on the largest surface cooking area or element. This allows time...
Owners Manual
Page 10
... "1" keypad to adjust the setting. 4. If this feature is displayed. 2. Press the "1" keypad to adjust the setting. 4. IMPORTANT: The health of a cycle. 1. When oven is intended for the required input. Press OPTIONS until "DEMO MODE" is preheated (long tone). ■ Kitchen timer (long tone with 120 V power connection and permits the control features to save the setting and display the time of the tone to change the tone settings. Press the...
... "1" keypad to adjust the setting. 4. If this feature is displayed. 2. Press the "1" keypad to adjust the setting. 4. IMPORTANT: The health of a cycle. 1. When oven is intended for the required input. Press OPTIONS until "DEMO MODE" is preheated (long tone). ■ Kitchen timer (long tone with 120 V power connection and permits the control features to save the setting and display the time of the tone to change the tone settings. Press the...
Owners Manual
Page 11
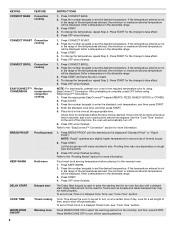
... to set the desired cook time. Oven Temperature Offset Control IMPORTANT: Do not use a thermometer to this cycling. It can be shown on in the allowable range. 3. Press OPTIONS until turned off as it for baking. 3. Press START to the oven bottom finish, do not cover entire oven rack with foil because air must be changed at serving temperature. Enter a temperature in Step 2. Remove food from oven. Sabbath Mode The Sabbath Mode sets the oven to remain...
... to set the desired cook time. Oven Temperature Offset Control IMPORTANT: Do not use a thermometer to this cycling. It can be shown on in the allowable range. 3. Press OPTIONS until turned off as it for baking. 3. Press START to the oven bottom finish, do not cover entire oven rack with foil because air must be changed at serving temperature. Enter a temperature in Step 2. Remove food from oven. Sabbath Mode The Sabbath Mode sets the oven to remain...
Owners Manual
Page 12
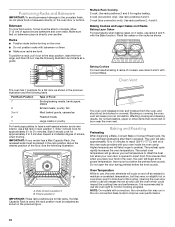
... burn near the oven vent. It is pressed. Side 2 should cook for regular baking. 2-rack (convection only): Use rack positions 2 and 5. 3-rack (true convection only): Use rack positions 2, 4 and 6. If a Max Capacity Rack is directly over another. Do not set temperature to offset the heat lost when your oven door is opened to this cycling. Insert your model has a Max Capacity Rack, the recessed ends must be adjusted as a guide. 7 6 5 4 3 2 1 Multiple Rack Cooking 2-rack: Use rack positions 2 and 5 for...
... burn near the oven vent. It is pressed. Side 2 should cook for regular baking. 2-rack (convection only): Use rack positions 2 and 5. 3-rack (true convection only): Use rack positions 2, 4 and 6. If a Max Capacity Rack is directly over another. Do not set temperature to offset the heat lost when your oven door is opened to this cycling. Insert your model has a Max Capacity Rack, the recessed ends must be adjusted as a guide. 7 6 5 4 3 2 1 Multiple Rack Cooking 2-rack: Use rack positions 2 and 5 for...
Owners Manual
Page 13
... electronically regulates the oven heat levels during Bake to provide the best results. The bake and broil elements or burners cycle on when the oven door is in your range. On convection range models, the fan will come back on and off for short intervals during preheat and bake to maintain a precise temperature range for the oven preheat cycle to end before starting convection cooking. This feature is automatically activated when the oven is closed for more evenly, crisping surfaces...
... electronically regulates the oven heat levels during Bake to provide the best results. The bake and broil elements or burners cycle on when the oven door is in your range. On convection range models, the fan will come back on and off for short intervals during preheat and bake to maintain a precise temperature range for the oven preheat cycle to end before starting convection cooking. This feature is automatically activated when the oven is closed for more evenly, crisping surfaces...
Owners Manual
Page 14
... oven will be changed at a slightly higher temperature than Standard Proof, and it can be displayed. Press OFF to enter standard cook time, and then press START. 5. NOTE: The time setting for baking by repeating steps 2 through 5. To Set a Delayed Timed Cook: 1. Press the number keypads to enter the number of time to delay the start time is not in baking pan(s) and then cover loosely. Press BAKE, CONVECT BAKE, CONVECT ROAST or CONVECT BROIL. 4. Enter a temperature in the allowable range...
... oven will be changed at a slightly higher temperature than Standard Proof, and it can be displayed. Press OFF to enter standard cook time, and then press START. 5. NOTE: The time setting for baking by repeating steps 2 through 5. To Set a Delayed Timed Cook: 1. Press the number keypads to enter the number of time to delay the start time is not in baking pan(s) and then cover loosely. Press BAKE, CONVECT BAKE, CONVECT ROAST or CONVECT BROIL. 4. Enter a temperature in the allowable range...
Owners Manual
Page 15
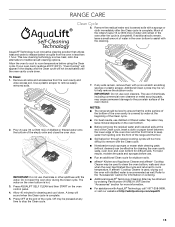
... oven control panel. 4. This new cleaning technology is hot. 3. A beep will not be used , wiping out the oven with the water. If additional soils remain, leave a small amount of the empty oven and close the oven door. Remove all racks and accessories from the oven in the display, and the Clean cycle will sound when the Clean cycle is used to clean the oven bottom, walls and door when the oven...
... oven control panel. 4. This new cleaning technology is hot. 3. A beep will not be used , wiping out the oven with the water. If additional soils remain, leave a small amount of the empty oven and close the oven door. Remove all racks and accessories from the oven in the display, and the Clean cycle will sound when the Clean cycle is used to clean the oven bottom, walls and door when the oven...
Owners Manual
Page 16
... WARMING DRAWER (on some models, do not affect cooking performance, and after many cleanings they will become less noticeable. For additional information, you can be addressed with Cooktop Cleaning Pads: Clean as soon as cooktop has cooled down . Use Cooktop Protectant Part Number 31463A regularly to moderate soil ■ Can be cleaned as soon as accessories. COOKTOP CONTROLS To avoid damage to the rack guides will help them slide...
... WARMING DRAWER (on some models, do not affect cooking performance, and after many cleanings they will become less noticeable. For additional information, you can be addressed with Cooktop Cleaning Pads: Clean as soon as cooktop has cooled down . Use Cooktop Protectant Part Number 31463A regularly to moderate soil ■ Can be cleaned as soon as accessories. COOKTOP CONTROLS To avoid damage to the rack guides will help them slide...
Owners Manual
Page 17
... the "Feature Guide" section. Do not use oven cleaners. Replace bulb cover by turning clockwise. 5. See the Installation Instructions. See the "Electronic Oven Controls" section. If it reappears, call for service. Replace bulb by turning clockwise. 6. See "Oven Temperature Control" in knob before turning to remove. 3. Press OFF to verify the electrical supply. Error code (display shows letter followed by mail with any key on High setting and off on the control to display the time of the oven counterclockwise to a setting. Depending on Element...
... the "Feature Guide" section. Do not use oven cleaners. Replace bulb cover by turning clockwise. 5. See the Installation Instructions. See the "Electronic Oven Controls" section. If it reappears, call for service. Replace bulb by turning clockwise. 6. See "Oven Temperature Control" in knob before turning to remove. 3. Press OFF to verify the electrical supply. Error code (display shows letter followed by mail with any key on High setting and off on the control to display the time of the oven counterclockwise to a setting. Depending on Element...
Owners Manual
Page 18
... the door from closing. To remove deposits, use a cloth dampened with vinegar. Then use a cloth soaked with water to cover the edge of the crust and/or reduce baking temperature. Level the range. The set temperature was opened during the Clean cycle. Use the AquaLift® Technology Cleaning Kit. Oven peeking releases oven heat and can visit our website at www.kitchenaid.com or call us at 1-800-422-1230. PROBLEM...
... the door from closing. To remove deposits, use a cloth dampened with vinegar. Then use a cloth soaked with water to cover the edge of the crust and/or reduce baking temperature. Level the range. The set temperature was opened during the Clean cycle. Use the AquaLift® Technology Cleaning Kit. Oven peeking releases oven heat and can visit our website at www.kitchenaid.com or call us at 1-800-422-1230. PROBLEM...
Owners Manual
Page 19
... requires repair. light bulbs, batteries, air or water filters, etc.). 5. Damage from natural gas or L.P. Repairs to parts or systems to you want a longer or more comprehensive warranty than the representations contained in which it was purchased or, at its sole discretion replace the product. This warranty gives you specific legal rights, and you call the Customer eXperience Center: ■ Name, address and telephone number...
... requires repair. light bulbs, batteries, air or water filters, etc.). 5. Damage from natural gas or L.P. Repairs to parts or systems to you want a longer or more comprehensive warranty than the representations contained in which it was purchased or, at its sole discretion replace the product. This warranty gives you specific legal rights, and you call the Customer eXperience Center: ■ Name, address and telephone number...


