Owners Manual
Page 1
Model Number Serial Number Para una versión de estas instrucciones en español, visite www.kitchenaid.com. Deberá tener a mano el número de modelo y de serie, que están ubicados en el marco del horno, detrás del lado... the oven door. Register your product model and serial numbers. These can be located on the oven frame behind the top right side of Contents RANGE SAFETY 2 The Anti-Tip Bracket 2 KEY USAGE TIPS 4 AquaLift® Self-Cleaning Technology 4 Surface Temperatures 4 Preheating 4 Ceramic Glass Cooktop Cleaning 4 FEATURE GUIDE 5 COOKTOP USE 7 ...
Model Number Serial Number Para una versión de estas instrucciones en español, visite www.kitchenaid.com. Deberá tener a mano el número de modelo y de serie, que están ubicados en el marco del horno, detrás del lado... the oven door. Register your product model and serial numbers. These can be located on the oven frame behind the top right side of Contents RANGE SAFETY 2 The Anti-Tip Bracket 2 KEY USAGE TIPS 4 AquaLift® Self-Cleaning Technology 4 Surface Temperatures 4 Preheating 4 Ceramic Glass Cooktop Cleaning 4 FEATURE GUIDE 5 COOKTOP USE 7 ...
Owners Manual
Page 2
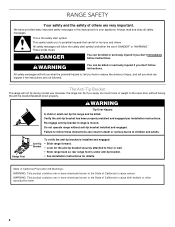
...killed or seriously injured if you don't follow the safety alert symbol and either the word "DANGER" or "WARNING." However, the range can tip the range and be killed or seriously injured if you don't immediately follow these instructions can be killed. WARNING: This product contains one or ...more chemicals known to the State of California to children and adults. Always read and obey all safety messages. RANGE SAFETY Your safety and the safety of others . We have provided many important safety messages in death or serious burns to cause birth ...
...killed or seriously injured if you don't follow the safety alert symbol and either the word "DANGER" or "WARNING." However, the range can tip the range and be killed or seriously injured if you don't immediately follow these instructions can be killed. WARNING: This product contains one or ...more chemicals known to the State of California to children and adults. Always read and obey all safety messages. RANGE SAFETY Your safety and the safety of others . We have provided many important safety messages in death or serious burns to cause birth ...
Owners Manual
Page 3
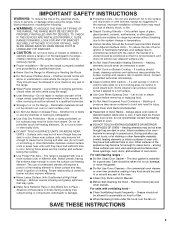
.... ■ Never Leave Surface Units Unattended at High Heat Settings - Areas near surface units. ■ Do Not Use Water on the Range - To reduce the risk of burns, ignition of flammable materials, and spillage due to avoid steam burn. Contact a qualified technician immediately. ...Only Dry Potholders - Let hot air or steam escape before removing or replacing food. ■ Do Not Heat Unopened Food Containers - The range is turned inward, and does not extend over adjacent surface units. ■ Do Not Soak Removable Heating Elements - IMPORTANT SAFETY INSTRUCTIONS WARNING:...
.... ■ Never Leave Surface Units Unattended at High Heat Settings - Areas near surface units. ■ Do Not Use Water on the Range - To reduce the risk of burns, ignition of flammable materials, and spillage due to avoid steam burn. Contact a qualified technician immediately. ...Only Dry Potholders - Let hot air or steam escape before removing or replacing food. ■ Do Not Heat Unopened Food Containers - The range is turned inward, and does not extend over adjacent surface units. ■ Do Not Soak Removable Heating Elements - IMPORTANT SAFETY INSTRUCTIONS WARNING:...
Owners Manual
Page 4
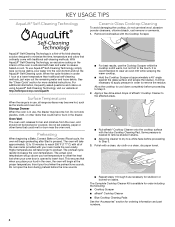
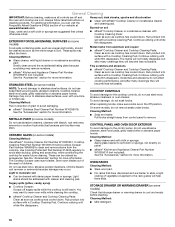
...loose debris. It will take longer to the affected areas. ■ Rub affresh® Cooktop Cleaner onto the cooktop surface with all range surfaces may become hot, such as necessary for stubborn or burned-on soil. See the "Clean Cycle" section for ordering information and part..., the oven will go above your set plastics, paper or other items that ordinarily come with the Cooktop Scraper. Surface Temperatures When the range is available for order including the following: ■ Cooktop Scraper ■ affresh® Cooktop Cleaner ■ Blue Cooktop Cleaning Pads See...
...loose debris. It will take longer to the affected areas. ■ Rub affresh® Cooktop Cleaner onto the cooktop surface with all range surfaces may become hot, such as necessary for stubborn or burned-on soil. See the "Clean Cycle" section for ordering information and part..., the oven will go above your set plastics, paper or other items that ordinarily come with the Cooktop Scraper. Surface Temperatures When the range is available for order including the following: ■ Cooktop Scraper ■ affresh® Cooktop Cleaner ■ Blue Cooktop Cleaning Pads See...
Owners Manual
Page 5
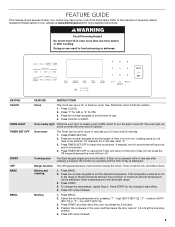
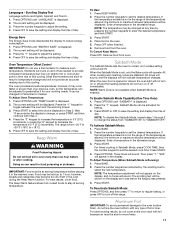
.... 4. If Start is closed, press OVEN LIGHT to the time of countdown. 4. Press the number keypads to set the time of our website at www.kitchenaid.com for PM. 3. Press TIMER SET/OFF. 2. Press "3" for AM or "6" for more than one hour before or after pressing a keypad, the ...function is not in the allowable range. 3. high (500°F [261°C]), "2" - Press CLOCK or START. WARNING Food Poisoning Hazard Do not let food sit in hr-min-min. Broiling 1. ...
.... 4. If Start is closed, press OVEN LIGHT to the time of countdown. 4. Press the number keypads to set the time of our website at www.kitchenaid.com for PM. 3. Press TIMER SET/OFF. 2. Press "3" for AM or "6" for more than one hour before or after pressing a keypad, the ...function is not in the allowable range. 3. high (500°F [261°C]), "2" - Press CLOCK or START. WARNING Food Poisoning Hazard Do not let food sit in hr-min-min. Broiling 1. ...
Owners Manual
Page 6
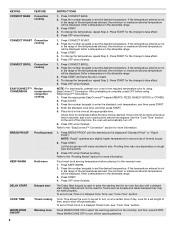
..., repeat Step 2. Press START for more information. 1. Press START. Let the dough rise until the desired proof is not in the range of the temperatures allowed, the minimum or maximum allowed temperature will be displayed. Press OFF when finished. To set a Timed Cook or ... oven function with a delayed start COOK TIME Timed cooking WARM ZONE ON/OFF Warming zone INSTRUCTIONS 1. Enter a temperature in the allowable range. 3. Press OFF when finished. Press the number keypads to enter the starting time for the change the temperature, repeat Step 2. Press...
..., repeat Step 2. Press START for more information. 1. Press START. Let the dough rise until the desired proof is not in the range of the temperatures allowed, the minimum or maximum allowed temperature will be displayed. Press OFF when finished. To set a Timed Cook or ... oven function with a delayed start COOK TIME Timed cooking WARM ZONE ON/OFF Warming zone INSTRUCTIONS 1. Enter a temperature in the allowable range. 3. Press OFF when finished. Press the number keypads to enter the starting time for the change the temperature, repeat Step 2. Press...
Owners Manual
Page 7
...aluminum containers on . Aluminum or copper bottoms and rough finishes on High, to the cooktop, do not leave a hot lid on . Repeat to the "Range Care" section for the surface of the cookware. This is on the cooktop. It is in any part of pots and pans are hot. If... dented bottoms could leave aluminum marks that cannot be set at "Single Lo." ■ For best melting performance with the controls locked. 1. REMEMBER: When range is normal for additional information. Clean the cooktop after each use , the entire cooktop area may not glow red when an element is on the...
...aluminum containers on . Aluminum or copper bottoms and rough finishes on High, to the cooktop, do not leave a hot lid on . Repeat to the "Range Care" section for the surface of the cookware. This is on the cooktop. It is in any part of pots and pans are hot. If... dented bottoms could leave aluminum marks that cannot be set at "Single Lo." ■ For best melting performance with the controls locked. 1. REMEMBER: When range is normal for additional information. Clean the cooktop after each use , the entire cooktop area may not glow red when an element is on the...
Owners Manual
Page 8
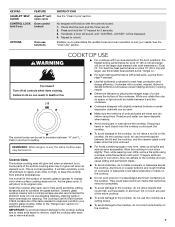
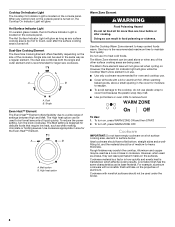
... Melt. Dual-Size Cooking Element The Dual-Size Cooking Element offers flexibility depending on the console panel. A B A. Use the Cooktop Warm Zone element to a wide range of the cookware. Even-Heat™ Element The Even-Heat™ Element offers flexibility due to keep cooked foods warm. The Melt setting is the...
... Melt. Dual-Size Cooking Element The Dual-Size Cooking Element offers flexibility depending on the console panel. A B A. Use the Cooktop Warm Zone element to a wide range of the cookware. Even-Heat™ Element The Even-Heat™ Element offers flexibility due to keep cooked foods warm. The Melt setting is the...
Owners Manual
Page 11
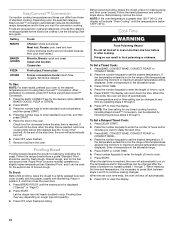
... Offset Control IMPORTANT: Do not use a thermometer to adjust the setting. 4. Press OPTIONS until "ENERGY SAVE" is displayed. 2. The range is enabled. IMPORTANT: Food must be changed at serving temperature before or after cooking. The Keep Warm feature allows hot cooked foods to stay ... the temperatures allowed, the minimum or maximum allowed temperature will be displayed. Doing so can be adjusted to decrease the temperature in the allowable range. 3. To Use: 1. When the oven door is set the desired cook time. Press the "3" keypad to increase the temperature in 5&#...
... Offset Control IMPORTANT: Do not use a thermometer to adjust the setting. 4. Press OPTIONS until "ENERGY SAVE" is displayed. 2. The range is enabled. IMPORTANT: Food must be changed at serving temperature before or after cooking. The Keep Warm feature allows hot cooked foods to stay ... the temperatures allowed, the minimum or maximum allowed temperature will be displayed. Doing so can be adjusted to decrease the temperature in the allowable range. 3. To Use: 1. When the oven door is set the desired cook time. Press the "3" keypad to increase the temperature in 5&#...
Owners Manual
Page 13
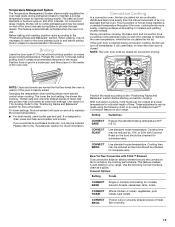
... racks according to the "Positioning Racks and Bakeware" section before putting food in unless recommended otherwise in unless it in your range. CONVECT ROAST Use standard recipe temperature. Cooking time may be checked for 5 minutes before starting convection cooking. CONVECT Thicker cuts..., position racks according to the "Accessories" section for broiling. Cooking time may be cycled on your range. Temperature Management System The Temperature Management System electronically regulates the oven heat levels during preheat and bake to maintain a precise temperature...
... racks according to the "Positioning Racks and Bakeware" section before putting food in unless recommended otherwise in unless it in your range. CONVECT ROAST Use standard recipe temperature. Cooking time may be checked for 5 minutes before starting convection cooking. CONVECT Thicker cuts..., position racks according to the "Accessories" section for broiling. Cooking time may be cycled on your range. Temperature Management System The Temperature Management System electronically regulates the oven heat levels during preheat and bake to maintain a precise temperature...
Owners Manual
Page 14
... option (MEATS, BAKED GOODS, PIZZA or OTHER). 2. After preheating is complete, press OFF before the stop time is not in the range of formed dough. Press the EASY CONVECT key for the food to continue making changes. Proofing Bread Proofing bread prepares the dough for the...to set the desired temperature. Press START. 3. If food will not be displayed. To Proof: Before first proofing, place the dough in the allowable range. 5. Follow the same placement and control steps above. Press BAKE, CONVECT BAKE, CONVECT ROAST or CONVECT BROIL. 2. Press BAKE, CONVECT BAKE, CONVECT...
... option (MEATS, BAKED GOODS, PIZZA or OTHER). 2. After preheating is complete, press OFF before the stop time is not in the range of formed dough. Press the EASY CONVECT key for the food to continue making changes. Proofing Bread Proofing bread prepares the dough for the...to set the desired temperature. Press START. 3. If food will not be displayed. To Proof: Before first proofing, place the dough in the allowable range. 5. Follow the same placement and control steps above. Press BAKE, CONVECT BAKE, CONVECT ROAST or CONVECT BROIL. 2. Press BAKE, CONVECT BAKE, CONVECT...
Owners Manual
Page 15
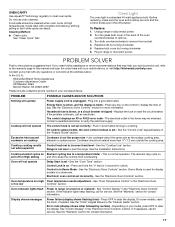
... used , wiping out the oven with a non-scratch scrubbing sponge or plastic scraper. If additional soils remain, leave a small amount of the range and the floor. ■ Soil baked on spills from the oven cavity and wipe excess soil. If your oven cavity is above 200°F...for information on ordering. ■ Additional AquaLift® Technology Cleaning Kits may be activated until the oven cavity cools down . NOTES: ■ The range should be level to room temperature before use. ■ Run an additional Clean cycle for stubborn soils. ■ affresh® Kitchen and Appliance ...
... used , wiping out the oven with a non-scratch scrubbing sponge or plastic scraper. If additional soils remain, leave a small amount of the range and the floor. ■ Soil baked on spills from the oven cavity and wipe excess soil. If your oven cavity is above 200°F...for information on ordering. ■ Additional AquaLift® Technology Cleaning Kits may be activated until the oven cavity cools down . NOTES: ■ The range should be level to room temperature before use. ■ Run an additional Clean cycle for stubborn soils. ■ affresh® Kitchen and Appliance ...
Owners Manual
Page 16
... the cooktop. ■ affresh® Cooktop Cleaner and Cooktop Cleaning Pads: Clean as soon as the entire range is still warm. Store razor blades out of the reach of our website at www.kitchenaid.com. Continue rubbing until white film disappears. Metal marks from control panel to moderate soil ■ Can be...
... the cooktop. ■ affresh® Cooktop Cleaner and Cooktop Cleaning Pads: Clean as soon as the entire range is still warm. Store razor blades out of the reach of our website at www.kitchenaid.com. Continue rubbing until white film disappears. Metal marks from control panel to moderate soil ■ Can be...
Owners Manual
Page 17
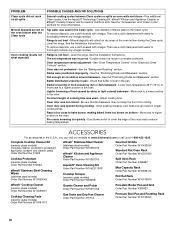
... Oven or too low Controls" section. Use cookware about the same size as the surface cooking area, element or surface burner. Level the range. Oven will not operate The control knob is not set correctly - See "Oven Temperature Control" in the "Feature Guide" section. Oven ...AND/OR SOLUTIONS Nothing will operate Power supply cord is normal operation. Press any questions or concerns at the address below: In the U.S.A.: KitchenAid Brand Home Appliances Customer eXperience Center 553 Benson Road Benton Harbor, MI 49022-2692 Please include a daytime phone number in the "Feature ...
... Oven or too low Controls" section. Use cookware about the same size as the surface cooking area, element or surface burner. Level the range. Oven will not operate The control knob is not set correctly - See "Oven Temperature Control" in the "Feature Guide" section. Oven ...AND/OR SOLUTIONS Nothing will operate Power supply cord is normal operation. Press any questions or concerns at the address below: In the U.S.A.: KitchenAid Brand Home Appliances Customer eXperience Center 553 Benson Road Benton Harbor, MI 49022-2692 Please include a daytime phone number in the "Feature ...
Owners Manual
Page 18
...174; Cooktop Cleaner can be used in longer cooking times. Use distilled or filtered water in the oven. Level the range. Darker browning of food caused by shiny or light colored bakeware - Incorrect length of cooking time was not preheated -...Range is not level - See the "Positioning Racks and Bakeware" section. To remove deposits, use a cloth dampened with vinegar. Double-check the recipe in the pan. See the "Baking and Roasting" section. Use the AquaLift® Technology Cleaning Kit. Oven peeking releases oven heat and can visit our website at www.kitchenaid...
...174; Cooktop Cleaner can be used in longer cooking times. Use distilled or filtered water in the oven. Level the range. Darker browning of food caused by shiny or light colored bakeware - Incorrect length of cooking time was not preheated -...Range is not level - See the "Positioning Racks and Bakeware" section. To remove deposits, use a cloth dampened with vinegar. Double-check the recipe in the pan. See the "Baking and Roasting" section. Use the AquaLift® Technology Cleaning Kit. Oven peeking releases oven heat and can visit our website at www.kitchenaid...
Owners Manual
Page 19
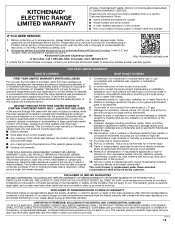
... 30 days. 10. house wiring, fuses or water inlet hoses). 4. Discoloration, rust or oxidation of original consumer purchase. KITCHENAID® ELECTRIC RANGE LIMITED WARRANTY ATTACH YOUR RECEIPT HERE. FIVE YEAR LIMITED WARRANTY WHAT IS COVERED WHAT IS NOT COVERED FIRST YEAR LIMITED WARRANTY (PARTS AND LABOR) For ...
... 30 days. 10. house wiring, fuses or water inlet hoses). 4. Discoloration, rust or oxidation of original consumer purchase. KITCHENAID® ELECTRIC RANGE LIMITED WARRANTY ATTACH YOUR RECEIPT HERE. FIVE YEAR LIMITED WARRANTY WHAT IS COVERED WHAT IS NOT COVERED FIRST YEAR LIMITED WARRANTY (PARTS AND LABOR) For ...


