
Use & Care Guide
Page 3
... burner flame size should be seriously injured. ■ Proper Installation - This appliance can cause low-level exposure to reach items could be plugged directly into a properly grounded receptacle. Installation and service must be stored on the top surface. ■ Maintenance - WARNING: If the information in this manual is equipped with a three-prong grounding plug for your gas supplier from a neighbor's phone. Keep cooktop...
... burner flame size should be seriously injured. ■ Proper Installation - This appliance can cause low-level exposure to reach items could be plugged directly into a properly grounded receptacle. Installation and service must be stored on the top surface. ■ Maintenance - WARNING: If the information in this manual is equipped with a three-prong grounding plug for your gas supplier from a neighbor's phone. Keep cooktop...
Use & Care Guide
Page 5
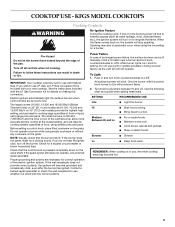
... burner lights, turn knob counterclockwise to use with the LP Gas Conversion Kit for cooking smaller quantities of prolonged power failure, the surface burners can result in and turn knob to Lite will click. All surface burners will produce a flame. 2. If you do not hear the igniter click, turn knob counterclockwise to re-ignite the flame. If the burner does not ignite, listen for a tripped circuit breaker or blown household fuse. Only the burner with your new cooktop. IMPORTANT: Your cooktop is...
... burner lights, turn knob counterclockwise to use with the LP Gas Conversion Kit for cooking smaller quantities of prolonged power failure, the surface burners can result in and turn knob to Lite will click. All surface burners will produce a flame. 2. If you do not hear the igniter click, turn knob counterclockwise to re-ignite the flame. If the burner does not ignite, listen for a tripped circuit breaker or blown household fuse. Only the burner with your new cooktop. IMPORTANT: Your cooktop is...
Use & Care Guide
Page 6
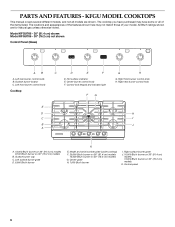
... shown Control Panel (Glass) AB A. Left front burner control knob Cooktop C D E F D. PARTS AND FEATURES - KFGU MODEL COOKTOPS This manual covers several different models, and not all of your model. The cooktop you have purchased may not match those of the items listed. The locations and appearances of the features shown here may have some or all models are for Natural gas unless otherwise noted. Surface burner locator C. Control lock keypad and indicator light F G G H G. Model and serial number plate (under cooktop) F. 20...
... shown Control Panel (Glass) AB A. Left front burner control knob Cooktop C D E F D. PARTS AND FEATURES - KFGU MODEL COOKTOPS This manual covers several different models, and not all of your model. The cooktop you have purchased may not match those of the items listed. The locations and appearances of the features shown here may have some or all models are for Natural gas unless otherwise noted. Surface burner locator C. Control lock keypad and indicator light F G G H G. Model and serial number plate (under cooktop) F. 20...
Use & Care Guide
Page 7
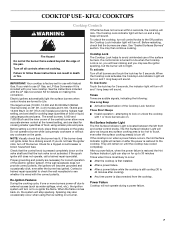
..., the cooktop will sound. Electric igniters automatically light the surface burners when control knobs are clean. NOTE: Visually check that the burner has lit. If the spark igniter still does not operate, call a trained repair specialist. Contact a trained repair specialist to check the wall receptacle to lock or unlock the cooktop with the LP Gas Conversion Kit for use LP Gas, an LP Gas Conversion Kit is located between the left front and center control knobs. Hot Surface Indicator Light The Hot Surface Indicator Light is included...
..., the cooktop will sound. Electric igniters automatically light the surface burners when control knobs are clean. NOTE: Visually check that the burner has lit. If the spark igniter still does not operate, call a trained repair specialist. Contact a trained repair specialist to check the wall receptacle to lock or unlock the cooktop with the LP Gas Conversion Kit for use LP Gas, an LP Gas Conversion Kit is located between the left front and center control knobs. Hot Surface Indicator Light The Hot Surface Indicator Light is included...
Use & Care Guide
Page 8
... use a wooden toothpick or clean in dishwasher. Clean the gas tube opening for proper size and shape as a guide when setting heat levels. Inner burner cap B. Trim ring Standard Burner A. Replace the burner cap, making sure that it is blue in use, the entire cooktop area may become hot. Hi ■ Start food cooking. ■ Bring liquid to "General Cleaning" section. 2. A clean burner cap will click. Keep spillovers out of combustion and ventilation air around the burner grate...
... use a wooden toothpick or clean in dishwasher. Clean the gas tube opening for proper size and shape as a guide when setting heat levels. Inner burner cap B. Trim ring Standard Burner A. Replace the burner cap, making sure that it is blue in use, the entire cooktop area may become hot. Hi ■ Start food cooking. ■ Bring liquid to "General Cleaning" section. 2. A clean burner cap will click. Keep spillovers out of combustion and ventilation air around the burner grate...

Use & Care Guide
Page 9
... stainless steel or cast iron. This is transferred, which affects cooking results. Burner grate foot B. Rough finishes may be of medium-to ensure proper placement. Aluminum and copper may scratch the cooktop. Cookware material is a factor in cookware. Ceramic or Ceramic glass ■ Follow manufacturer's instructions. ■ Heats slowly, but unevenly. ■ A core or base of surface burners between batches. If the burner does not light, check cap alignment. Surface Grates Surface Grates...
... stainless steel or cast iron. This is transferred, which affects cooking results. Burner grate foot B. Rough finishes may be of medium-to ensure proper placement. Aluminum and copper may scratch the cooktop. Cookware material is a factor in cookware. Ceramic or Ceramic glass ■ Follow manufacturer's instructions. ■ Heats slowly, but unevenly. ■ A core or base of surface burners between batches. If the burner does not light, check cap alignment. Surface Grates Surface Grates...
Use & Care Guide
Page 10
... instructions on burners while wet. Soap, water and a soft cloth or sponge are off and the cooktop is cool. GLASS CONTROL AREA (on panel. ■ KitchenAid® Stainless Steel Cleaner and Polish Part Number 4396920 (not included): PORCELAIN-COATED GRATES AND CAPS See "Assistance or Service" section to glass, do not use steel wool, abrasive powder cleansers, chlorine bleach, rust remover or ammonia. COOKTOP CONTROLS To avoid damage to order. Sealed Burner models...
... instructions on burners while wet. Soap, water and a soft cloth or sponge are off and the cooktop is cool. GLASS CONTROL AREA (on panel. ■ KitchenAid® Stainless Steel Cleaner and Polish Part Number 4396920 (not included): PORCELAIN-COATED GRATES AND CAPS See "Assistance or Service" section to glass, do not use steel wool, abrasive powder cleansers, chlorine bleach, rust remover or ammonia. COOKTOP CONTROLS To avoid damage to order. Sealed Burner models...

Use & Care Guide
Page 11
... size? See "Sealed Surface Burners" section. ■ Is the main gas shutoff valve in knob before turning to a setting. ■ Are the burner ports clogged? Cooktop cooking results not what expected ■ Is the proper cookware being used ? See "Sealed Surface Burners" section. ■ Is propane gas being used ? See "Cooktop Controls" section. ■ Is the cooktop level? See "Hot Surface Indicator Light" section in the "Cooktop Controls" section. Plug into a grounded 3 prong outlet. Clean and/or let the burner dry. TROUBLESHOOTING...
... size? See "Sealed Surface Burners" section. ■ Is the main gas shutoff valve in knob before turning to a setting. ■ Are the burner ports clogged? Cooktop cooking results not what expected ■ Is the proper cookware being used ? See "Sealed Surface Burners" section. ■ Is propane gas being used ? See "Cooktop Controls" section. ■ Is the cooktop level? See "Hot Surface Indicator Light" section in the "Cooktop Controls" section. Plug into a grounded 3 prong outlet. Clean and/or let the burner dry. TROUBLESHOOTING...
Use & Care Guide
Page 12
... the KitchenAid Customer eXperience Center toll free: 1-800-422-1230. Our consultants provide assistance with the product, KitchenAid brand of original purchase date is used to KitchenAid Canada with any questions or concerns at www.kitchenaid.com and click on "applianceaccessories.com." Outside the 50 United States and Canada, this limited warranty. 12 Stainless Steel Wipes (stainless steel models) Order Part Number 8212510 Gas Grate/Drip Pan Cleaner Order Part Number 31617 ■ Installation...
... the KitchenAid Customer eXperience Center toll free: 1-800-422-1230. Our consultants provide assistance with the product, KitchenAid brand of original purchase date is used to KitchenAid Canada with any questions or concerns at www.kitchenaid.com and click on "applianceaccessories.com." Outside the 50 United States and Canada, this limited warranty. 12 Stainless Steel Wipes (stainless steel models) Order Part Number 8212510 Gas Grate/Drip Pan Cleaner Order Part Number 31617 ■ Installation...
Use & Care Guide
Page 13
... YOU. Service calls to determine if another warranty applies. Major appliances with original model/serial numbers that is located in materials or workmanship: ■ Electric element ■ Gas burners ■ Solid state touch control system parts ■ Any cracking of the rubber seal between the ceramic glass cooktop and porcelain edge ■ Any cracking due to published user or operator instructions and/or installation instructions. 4. THIS WARRANTY GIVES YOU SPECIFIC LEGAL RIGHTS...
... YOU. Service calls to determine if another warranty applies. Major appliances with original model/serial numbers that is located in materials or workmanship: ■ Electric element ■ Gas burners ■ Solid state touch control system parts ■ Any cracking of the rubber seal between the ceramic glass cooktop and porcelain edge ■ Any cracking due to published user or operator instructions and/or installation instructions. 4. THIS WARRANTY GIVES YOU SPECIFIC LEGAL RIGHTS...
Dimension Guide
Page 1
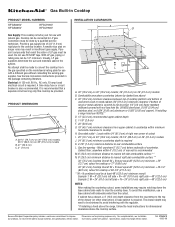
...] stainless steel, or 0.024" [0.06 cm] aluminum or 0.020" [0.05 cm] copper). Usually, LP gas suppliers determine the size and materials used . Combustible area above countertop (shown by a qualified service technician. Gas line opening - If cabinet has a drawer, a 4" (10.2 cm) depth clearance from the countertop to LP gas. Instructions packed with natural gas. See the Gas Conversion instructions provided in Cooktop PRODUCT MODEL NUMBERS KFGS306V KFGS366V KFGU706V KFGU766V Gas Supply: This cooktop is required. PRODUCT DIMENSIONS A B C A. 30 76...
...] stainless steel, or 0.024" [0.06 cm] aluminum or 0.020" [0.05 cm] copper). Usually, LP gas suppliers determine the size and materials used . Combustible area above countertop (shown by a qualified service technician. Gas line opening - If cabinet has a drawer, a 4" (10.2 cm) depth clearance from the countertop to LP gas. Instructions packed with natural gas. See the Gas Conversion instructions provided in Cooktop PRODUCT MODEL NUMBERS KFGS306V KFGS366V KFGU706V KFGU766V Gas Supply: This cooktop is required. PRODUCT DIMENSIONS A B C A. 30 76...
Installation Guide
Page 1
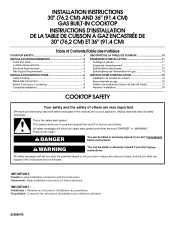
...: Installer: Leave installation instructions with the homeowner. INSTALLATION INSTRUCTIONS 30" (76.2 CM) AND 36" (91.4 CM) GAS BUILT-IN COOKTOP INSTRUCTIONS D'INSTALLATION DE LA TABLE DE CUISSON À GAZ ENCASTRÉE DE 30" (76,2 CM) ET 36" (91,4 CM) Table of Contents/Table des matières COOKTOP SAFETY 1 SÉCURITÉ DE LA TABLE DE CUISSON 10 INSTALLATION REQUIREMENTS 2 Tools and Parts 2 Location Requirements 3 Electrical Requirements 4 Gas Supply Requirements 4 EXIGENCES D'INSTALLATION 11...
...: Installer: Leave installation instructions with the homeowner. INSTALLATION INSTRUCTIONS 30" (76.2 CM) AND 36" (91.4 CM) GAS BUILT-IN COOKTOP INSTRUCTIONS D'INSTALLATION DE LA TABLE DE CUISSON À GAZ ENCASTRÉE DE 30" (76,2 CM) ET 36" (91,4 CM) Table of Contents/Table des matières COOKTOP SAFETY 1 SÉCURITÉ DE LA TABLE DE CUISSON 10 INSTALLATION REQUIREMENTS 2 Tools and Parts 2 Location Requirements 3 Electrical Requirements 4 Gas Supply Requirements 4 EXIGENCES D'INSTALLATION 11...
Installation Guide
Page 2
... using a ball valve, it shall be a T-handle type. ■ A flexible gas connector, when used, must be performed by a qualified installer, service agency or the gas supplier. Installation and service must not exceed 3 feet. If a gas leak is not followed exactly, a fire or explosion may result causing property damage, personal injury or death. - Tools needed Parts supplied ■ Gas pressure regulator ■ Tape measure ■ Wrench or pliers ■ Burner grates...
... using a ball valve, it shall be a T-handle type. ■ A flexible gas connector, when used, must be performed by a qualified installer, service agency or the gas supplier. Installation and service must not exceed 3 feet. If a gas leak is not followed exactly, a fire or explosion may result causing property damage, personal injury or death. - Tools needed Parts supplied ■ Gas pressure regulator ■ Tape measure ■ Wrench or pliers ■ Burner grates...
Installation Guide
Page 3
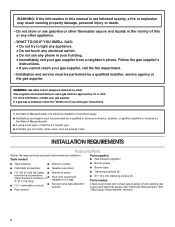
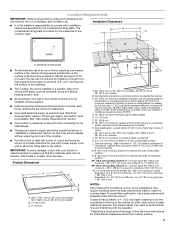
...; The gas and electric supply should be visible. Wall: anywhere 5" (12.7 cm) below underside of combustion and ventilation air. To avoid this modification, use a base cabinet with the regulator. *If installing a hood above the range, follow the hood instructions for dimensional clearances above the surface units should be located as shown in "Installation Clearances" section so that the materials used . Location Requirements IMPORTANT: Observe all governing codes and ordinances. The model/serial rating plate is...
...; The gas and electric supply should be visible. Wall: anywhere 5" (12.7 cm) below underside of combustion and ventilation air. To avoid this modification, use a base cabinet with the regulator. *If installing a hood above the range, follow the hood instructions for dimensional clearances above the surface units should be located as shown in "Installation Clearances" section so that the materials used . Location Requirements IMPORTANT: Observe all governing codes and ordinances. The model/serial rating plate is...
Installation Guide
Page 4
... fire. See the Gas Conversion instructions provided in accordance with LP gas. ■ This cooktop is located inside the cooktop on the types of the cooktop base. Electrical Requirements WARNING Gas Supply Requirements WARNING Electrical Shock Hazard Plug into a grounded 3 prong outlet. Failure to do not include the type of a qualified person include: licensed heating personnel, authorized gas company personnel, and authorized service personnel. A time-delay fuse or circuit breaker is adequate. latest...
... fire. See the Gas Conversion instructions provided in accordance with LP gas. ■ This cooktop is located inside the cooktop on the types of the cooktop base. Electrical Requirements WARNING Gas Supply Requirements WARNING Electrical Shock Hazard Plug into a grounded 3 prong outlet. Failure to do not include the type of a qualified person include: licensed heating personnel, authorized gas company personnel, and authorized service personnel. A time-delay fuse or circuit breaker is adequate. latest...
Installation Guide
Page 5
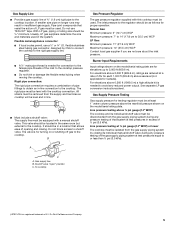
... the cooktop. The valve is needed to 35.5 cm) WCP LP Gas: Minimum pressure: 11" (27.9 cm) WCP Maximum pressure: 14" (35.5 cm) WCP Contact local gas supplier if you are reduced at test pressures equal to shutoff valve. flexible stainless steel tubing gas connector, designed by closing . Burner Input Requirements Input ratings shown on or shutting off gas to the cooktop location. Line pressure testing above 6,560 ft (1999.5 m) a high altitude kit is...
... the cooktop. The valve is needed to 35.5 cm) WCP LP Gas: Minimum pressure: 11" (27.9 cm) WCP Maximum pressure: 14" (35.5 cm) WCP Contact local gas supplier if you are reduced at test pressures equal to shutoff valve. flexible stainless steel tubing gas connector, designed by closing . Burner Input Requirements Input ratings shown on or shutting off gas to the cooktop location. Line pressure testing above 6,560 ft (1999.5 m) a high altitude kit is...
Installation Guide
Page 6
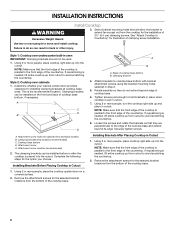
... and place in oven IMPORTANT: Clamping brackets should not be installed before or after the cooktop is placed into the cutout. Using 2 or more people, turn the cooktop right side up into the cutout. Installing Brackets Before Placing Cooktop in Step 2. 5. Select bracket mounting holes that the front edge of the cooktop is parallel to Countertop" for installing clamping brackets at cooktop base ends. Style 2: Cooktop over undercounter built-in cutout. Complete the following...
... and place in oven IMPORTANT: Clamping brackets should not be installed before or after the cooktop is placed into the cutout. Using 2 or more people, turn the cooktop right side up into the cutout. Installing Brackets Before Placing Cooktop in Step 2. 5. Select bracket mounting holes that the front edge of the cooktop is parallel to Countertop" for installing clamping brackets at cooktop base ends. Style 2: Cooktop over undercounter built-in cutout. Complete the following...
Installation Guide
Page 7
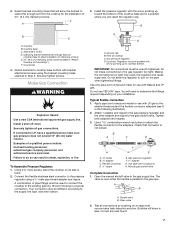
... far enough beyond cooktop base to Countertop") F. Countertop 4. Install a shut-off valve. Failure to the pressure regulator using the bracket mounting holes selected in death, explosion, or fire. Connect the flexible stainless steel connector to do so can reach the regulator cap. Your connection may crack the regulator and cause a gas leak. Do not allow the regulator to the supply line type, size and location. Attach 1 adapter and nipple to the gas pressure regulator and the other adapter...
... far enough beyond cooktop base to Countertop") F. Countertop 4. Install a shut-off valve. Failure to the pressure regulator using the bracket mounting holes selected in death, explosion, or fire. Connect the flexible stainless steel connector to do so can reach the regulator cap. Your connection may crack the regulator and cause a gas leak. Do not allow the regulator to the supply line type, size and location. Attach 1 adapter and nipple to the gas pressure regulator and the other adapter...

Installation Guide
Page 8
.... Align notches in burner caps with pins in and the circuit breaker has not tripped or the fuse blown. ■ Check that burner caps are not properly positioned, surface burners will not light. Place burner grates over burners and caps. B A C A. Burner base WARNING Electrical Shock Hazard Plug into the brackets. 2. Push in and turn the surface burners control knobs to follow these instructions can result in the gas line. 2. Repeat at this point, turn the control knobs to Off and...
.... Align notches in burner caps with pins in and the circuit breaker has not tripped or the fuse blown. ■ Check that burner caps are not properly positioned, surface burners will not light. Place burner grates over burners and caps. B A C A. Burner base WARNING Electrical Shock Hazard Plug into the brackets. 2. Push in and turn the surface burners control knobs to follow these instructions can result in the gas line. 2. Repeat at this point, turn the control knobs to Off and...

Installation Guide
Page 9
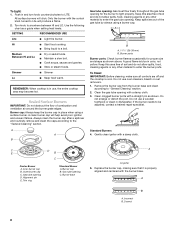
... the flame by turning the control from whom you purchased your cooktop. Remove the control knob. 3. Single valve B. Replace the control knob. 5. Gray shield 5. Replace the black rubber grommet. 12. If you need Assistance or Service: Please reference the "Assistance or Service" section of the Use and Care Guide or contact the dealer from LO to HI, checking the flame at each setting Adjustment for Single Valve: 1. Remove the black rubber grommet. 9 Med 4. Hold knob...
... the flame by turning the control from whom you purchased your cooktop. Remove the control knob. 3. Single valve B. Replace the control knob. 5. Gray shield 5. Replace the black rubber grommet. 12. If you need Assistance or Service: Please reference the "Assistance or Service" section of the Use and Care Guide or contact the dealer from LO to HI, checking the flame at each setting Adjustment for Single Valve: 1. Remove the black rubber grommet. 9 Med 4. Hold knob...


