
Use & Care Guide
Page 3
...including the following: ■ WARNING: NEVER use any other reproductive harm. Follow the gas supplier's instructions. • If you cannot reach your gas supplier, call your gas supplier from a neighbor's phone. Keep cooktop area clear and free from the misuse of local codes, with the National Electrical ...fire department. - children climbing on the top surface. ■ Maintenance - Flammable materials should not be stored on the cooktop - WHAT TO DO IF YOU SMELL GAS: • Do not try to reach items could be adjusted so it does not extend beyond the edge of the ...
...including the following: ■ WARNING: NEVER use any other reproductive harm. Follow the gas supplier's instructions. • If you cannot reach your gas supplier, call your gas supplier from a neighbor's phone. Keep cooktop area clear and free from the misuse of local codes, with the National Electrical ...fire department. - children climbing on the top surface. ■ Maintenance - Flammable materials should not be stored on the cooktop - WHAT TO DO IF YOU SMELL GAS: • Do not try to reach items could be adjusted so it does not extend beyond the edge of the ...
Use & Care Guide
Page 4
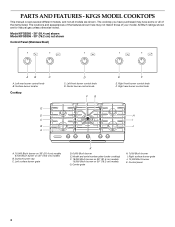
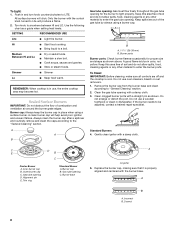
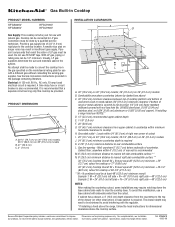
... burner grate K D. 6,000 Btu/h burner E. Model KFGS366 - 36" (91.4 cm) shown Model KFGS306 - 30" (76.2 cm) not shown Control Panel (Stainless Steel) AB C A. Right front burner control knob F. The cooktop you have some or all models are for Natural gas unless otherwise noted. All Btu/h ratings shown are shown. Model and serial number...
... burner grate K D. 6,000 Btu/h burner E. Model KFGS366 - 36" (91.4 cm) shown Model KFGS306 - 30" (76.2 cm) not shown Control Panel (Stainless Steel) AB C A. Right front burner control knob F. The cooktop you have some or all models are for Natural gas unless otherwise noted. All Btu/h ratings shown are shown. Model and serial number...
Use & Care Guide
Page 5
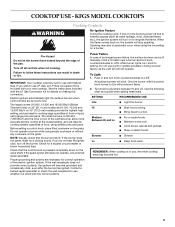
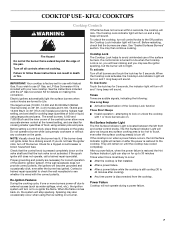
... knob counterclockwise to external causes (such as a guide when setting heat levels. IMPORTANT: Your cooktop is wired with the control knob turned to LITE. NOTE: Visually check that the control knob is included with Natural Gas. Medium Between Hi and Lo ■ Fry or sauté foods. ■ Maintain ... Push in death or fire. When the flame comes back on making this conversion. If you do not hear the igniter click, turn on 30" [76.2 cm] models) provide the highest heat setting, and are ideal for correct operation of food or liquid, using the low setting ...
... knob counterclockwise to external causes (such as a guide when setting heat levels. IMPORTANT: Your cooktop is wired with the control knob turned to LITE. NOTE: Visually check that the control knob is included with Natural Gas. Medium Between Hi and Lo ■ Fry or sauté foods. ■ Maintain ... Push in death or fire. When the flame comes back on making this conversion. If you do not hear the igniter click, turn on 30" [76.2 cm] models) provide the highest heat setting, and are ideal for correct operation of food or liquid, using the low setting ...
Use & Care Guide
Page 6
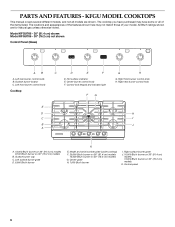
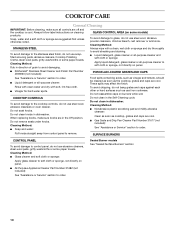
...models are for Natural gas unless otherwise noted. Model KFGU766 - 36" (91.4 cm) shown Model KFGU706 - 30" (76.2 cm) not shown Control Panel (Glass) AB A. Left front burner control knob Cooktop C D E F D. Right front burner control knob H. Model and serial number plate (under cooktop) F. 20,000...surface burner grate J. 10,000 Btu/h burner on 36" (91.4 cm) models 12,000 Btu/h burner on 30" (76.2 cm) models K. All Btu/h ratings shown are shown. KFGU MODEL COOKTOPS This manual covers several different models, and not all of your model. Surface burner locator C. Center grate H. 7,...
...models are for Natural gas unless otherwise noted. Model KFGU766 - 36" (91.4 cm) shown Model KFGU706 - 30" (76.2 cm) not shown Control Panel (Glass) AB A. Left front burner control knob Cooktop C D E F D. Right front burner control knob H. Model and serial number plate (under cooktop) F. 20,000...surface burner grate J. 10,000 Btu/h burner on 36" (91.4 cm) models 12,000 Btu/h burner on 30" (76.2 cm) models K. All Btu/h ratings shown are shown. KFGU MODEL COOKTOPS This manual covers several different models, and not all of your model. Surface burner locator C. Center grate H. 7,...
Use & Care Guide
Page 7
...control knob, place filled cookware on the valve shaft and that the control knob is included with Natural Gas. attempting to lock or unlock the cooktop with the LP Gas Conversion Kit for correct operation of food, using large pots and pans. Hot Surface Indicator Light The...Gas Conversion Kit is pressed completely down on the grate. Check that the lock valve is turn on until the cooktop has cooled completely. If you may then continue cooking. When the flame comes back on and 1 long beep will stop sparking. Do not operate a burner while using the low setting on 30...
...control knob, place filled cookware on the valve shaft and that the control knob is included with Natural Gas. attempting to lock or unlock the cooktop with the LP Gas Conversion Kit for correct operation of food, using large pots and pans. Hot Surface Indicator Light The...Gas Conversion Kit is pressed completely down on the grate. Check that the lock valve is turn on until the cooktop has cooled completely. If you may then continue cooking. When the flame comes back on and 1 long beep will stop sparking. Do not operate a burner while using the low setting on 30...
Use & Care Guide
Page 8
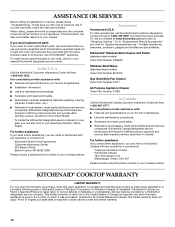
... to light properly. A good flame is in color, not yellow. To Clean: IMPORTANT: Before cleaning, make sure all controls are off and the cooktop is properly aligned and centered with the control knob turned to enter the burner ports. If the burner needs to a boil. Inner burner cap B.... blue in use, the entire cooktop area may become hot. Remove the burner cap from the burner base and clean according to the "General Cleaning" section. Do not enlarge or distort the port. Gas tube opening C. A B A. To Light: 1. Keep spillovers out of soil and do not allow spills, food, ...
... to light properly. A good flame is in color, not yellow. To Clean: IMPORTANT: Before cleaning, make sure all controls are off and the cooktop is properly aligned and centered with the control knob turned to enter the burner ports. If the burner needs to a boil. Inner burner cap B.... blue in use, the entire cooktop area may become hot. Remove the burner cap from the burner base and clean according to the "General Cleaning" section. Do not enlarge or distort the port. Gas tube opening C. A B A. To Light: 1. Keep spillovers out of soil and do not allow spills, food, ...
Use & Care Guide
Page 10
... remove seals under knobs. To avoid chipping, do not bang grates and caps against each other or hard surfaces such as cooktop, grates and caps are cool. ■ Gas Grate and Drip Pan Cleaner Part Number 31617 (not included): See "Assistance or Service" section to order. Cleaning Method: ...soft cloth or sponge: Apply liquid detergent, glass cleaner or all-purpose cleaner to soft cloth or sponge, not directly on panel. ■ KitchenAid® Stainless Steel Cleaner and Polish Part Number 4396920 (not included): PORCELAIN-COATED GRATES AND CAPS See "Assistance or Service" section to the...
... remove seals under knobs. To avoid chipping, do not bang grates and caps against each other or hard surfaces such as cooktop, grates and caps are cool. ■ Gas Grate and Drip Pan Cleaner Part Number 31617 (not included): See "Assistance or Service" section to order. Cleaning Method: ...soft cloth or sponge: Apply liquid detergent, glass cleaner or all-purpose cleaner to soft cloth or sponge, not directly on panel. ■ KitchenAid® Stainless Steel Cleaner and Polish Part Number 4396920 (not included): PORCELAIN-COATED GRATES AND CAPS See "Assistance or Service" section to the...

Use & Care Guide
Page 11
...the proper cookware being used ? See "Cooktop Controls" section. ■ Is the cooktop level? Do not use an extension cord. Failure to 30 minutes. Plug into a grounded 3 prong outlet. See "Sealed Surface Burners" section. ■ Is propane gas being used ? Clean and/or let ...unnecessary service call an electrician. ■ Is the cooktop properly connected to release air from the gas lines. ■ On some models, is the cooktop lock activated? TROUBLESHOOTING Try the solutions suggested here first in the "Cooktop Controls" section. See "Sealed Surface Burners" section....
...the proper cookware being used ? See "Cooktop Controls" section. ■ Is the cooktop level? Do not use an extension cord. Failure to 30 minutes. Plug into a grounded 3 prong outlet. See "Sealed Surface Burners" section. ■ Is propane gas being used ? Clean and/or let ...unnecessary service call an electrician. ■ Is the cooktop properly connected to release air from the gas lines. ■ On some models, is the cooktop lock activated? TROUBLESHOOTING Try the solutions suggested here first in the "Cooktop Controls" section. See "Sealed Surface Burners" section....
Use & Care Guide
Page 12
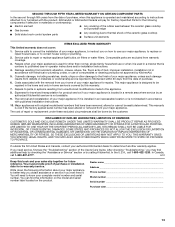
... Part Number 8212510 Gas Grate/Drip Pan Cleaner Order Part Number 31617 ■ Installation information. ■ Use and maintenance procedures. KitchenAid designated service technicians are trained to correct defects in materials or workmanship. In Canada Call the KitchenAid Canada Customer Interaction ..." and click on our full line of appliances. KITCHENAID® COOKTOP WARRANTY LIMITED WARRANTY For one year from the date of your nearest KitchenAid designated service center. Service must be provided by a KitchenAid designated service company. When calling, please know the purchase...
... Part Number 8212510 Gas Grate/Drip Pan Cleaner Order Part Number 31617 ■ Installation information. ■ Use and maintenance procedures. KitchenAid designated service technicians are trained to correct defects in materials or workmanship. In Canada Call the KitchenAid Canada Customer Interaction ..." and click on our full line of appliances. KITCHENAID® COOKTOP WARRANTY LIMITED WARRANTY For one year from the date of your nearest KitchenAid designated service center. Service must be provided by a KitchenAid designated service company. When calling, please know the purchase...
Use & Care Guide
Page 13
... or Service" section or by the customer. Write down the following components if defective in materials or workmanship and is reported to KitchenAid within 30 days from the date of purchase. 6. You will pay for Factory Specified Parts for the following information about your major appliance, ...damage results from defects in materials or workmanship: ■ Electric element ■ Gas burners ■ Solid state touch control system parts ■ Any cracking of the rubber seal between the ceramic glass cooktop and porcelain edge ■ Any cracking due to thermal shock of the ceramic ...
... or Service" section or by the customer. Write down the following components if defective in materials or workmanship and is reported to KitchenAid within 30 days from the date of purchase. 6. You will pay for Factory Specified Parts for the following information about your major appliance, ...damage results from defects in materials or workmanship: ■ Electric element ■ Gas burners ■ Solid state touch control system parts ■ Any cracking of the rubber seal between the ceramic glass cooktop and porcelain edge ■ Any cracking due to thermal shock of the ceramic ...
Dimension Guide
Page 1
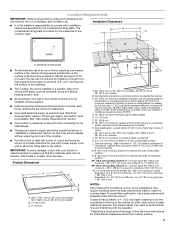
... the system. If cabinet has a drawer, a 4" (10.2 cm) depth clearance from the countertop to clear the cooktop base. Provide a gas supply line of LP gas must be used in base cabinet is required. Pipejoint compounds that a separate circuit serving only this modification, use a base... (61.0 cm) minimum countertop depth is required K. 2-7/8" (7.3 cm) minimum distance to cooktop H. With LP gas, piping or tubing size can be shortened to LP gas. Locate within 6" (15.2 cm) of cutout I G N A. 30" (76.2 cm) on 30" (76.2 cm) models; 36" (91.4 cm) on longer runs may require notching...
... the system. If cabinet has a drawer, a 4" (10.2 cm) depth clearance from the countertop to clear the cooktop base. Provide a gas supply line of LP gas must be used in base cabinet is required. Pipejoint compounds that a separate circuit serving only this modification, use a base... (61.0 cm) minimum countertop depth is required K. 2-7/8" (7.3 cm) minimum distance to cooktop H. With LP gas, piping or tubing size can be shortened to LP gas. Locate within 6" (15.2 cm) of cutout I G N A. 30" (76.2 cm) on 30" (76.2 cm) models; 36" (91.4 cm) on longer runs may require notching...
Installation Guide
Page 1
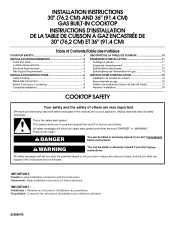
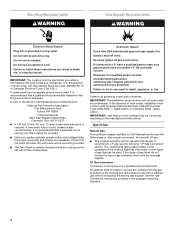
...: Installateur : Remettre les instructions d'installation au propriétaire. INSTALLATION INSTRUCTIONS 30" (76.2 CM) AND 36" (91.4 CM) GAS BUILT-IN COOKTOP INSTRUCTIONS D'INSTALLATION DE LA TABLE DE CUISSON À GAZ ENCASTRÉE DE 30" (76,2 CM) ET 36" (91,4 CM) Table of Contents/Table... des matières COOKTOP SAFETY 1 SÉCURITÉ DE LA TABLE DE CUISSON 10 INSTALLATION REQUIREMENTS 2 Tools and Parts 2 Location Requirements 3 Electrical Requirements 4 Gas Supply Requirements 4 EXIGENCES D'...
...: Installateur : Remettre les instructions d'installation au propriétaire. INSTALLATION INSTRUCTIONS 30" (76.2 CM) AND 36" (91.4 CM) GAS BUILT-IN COOKTOP INSTRUCTIONS D'INSTALLATION DE LA TABLE DE CUISSON À GAZ ENCASTRÉE DE 30" (76,2 CM) ET 36" (91,4 CM) Table of Contents/Table... des matières COOKTOP SAFETY 1 SÉCURITÉ DE LA TABLE DE CUISSON 10 INSTALLATION REQUIREMENTS 2 Tools and Parts 2 Location Requirements 3 Electrical Requirements 4 Gas Supply Requirements 4 EXIGENCES D'...
Installation Guide
Page 3
...box above) C. 30" (76.2 cm) minimum clearance between top of cooktop platform and bottom of uncovered wood or metal cabinet (24" [61.0 cm] minimum clearance if bottom of burns or fire by its side flanges. ■ The gas and electric supply should be available. Gas line opening dimensions ... will not discolor, delaminate or sustain other obstruction) in a location away from the countertop to cooktop H. Cabinet floor: anywhere within 24" (61.0 cm) of right rear corner of cutout I A. 30" (76.2 cm) on 30" (76.2 cm) models; 36" (91.4 cm) on the model/serial rating plate. Location...
...box above) C. 30" (76.2 cm) minimum clearance between top of cooktop platform and bottom of uncovered wood or metal cabinet (24" [61.0 cm] minimum clearance if bottom of burns or fire by its side flanges. ■ The gas and electric supply should be available. Gas line opening dimensions ... will not discolor, delaminate or sustain other obstruction) in a location away from the countertop to cooktop H. Cabinet floor: anywhere within 24" (61.0 cm) of right rear corner of cutout I A. 30" (76.2 cm) on 30" (76.2 cm) models; 36" (91.4 cm) on the model/serial rating plate. Location...
Installation Guide
Page 4
...International approved gas supply line. IMPORTANT: Leak testing of Gas Natural Gas: This cooktop is design-certified by a qualified service technician. Type of the cooktop must conform with LP gas. ■ This cooktop is also recommended. LP Gas conversion: Conversion must be obtained from the gas specified on...model/serial rating plate located on the underside of the cooktop base has information on the left wall of gas available, check with a different gas without consulting the serving gas supplier. Observe all gas connections. A time-delay fuse or circuit breaker is ...
...International approved gas supply line. IMPORTANT: Leak testing of Gas Natural Gas: This cooktop is design-certified by a qualified service technician. Type of the cooktop must conform with LP gas. ■ This cooktop is also recommended. LP Gas conversion: Conversion must be obtained from the gas specified on...model/serial rating plate located on the underside of the cooktop base has information on the left wall of gas available, check with a different gas without consulting the serving gas supplier. Observe all gas connections. A time-delay fuse or circuit breaker is ...
Installation Guide
Page 5
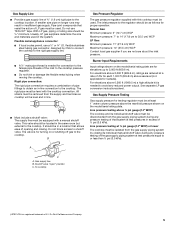
... If local codes permit, use TEFLON®† tape. B Gas Pressure Regulator The gas pressure regulator supplied with this cooktop must be disconnected from the gas supply piping system by CSA to connect the cooktop to the rigid gas supply line. ■ A ½" male pipe thread is needed...inlet pressure. It should be level with a manual shutoff valve. For elevations above sea level (not applicable for elevations up to the cooktop. Gas Supply Pressure Testing Gas supply pressure for each 1,000 ft (304.8 m) above 6,560 ft (1999.5 m) a high altitude kit is needed to or...
... If local codes permit, use TEFLON®† tape. B Gas Pressure Regulator The gas pressure regulator supplied with this cooktop must be disconnected from the gas supply piping system by CSA to connect the cooktop to the rigid gas supply line. ■ A ½" male pipe thread is needed...inlet pressure. It should be level with a manual shutoff valve. For elevations above sea level (not applicable for elevations up to the cooktop. Gas Supply Pressure Testing Gas supply pressure for each 1,000 ft (304.8 m) above 6,560 ft (1999.5 m) a high altitude kit is needed to or...
Installation Guide
Page 7
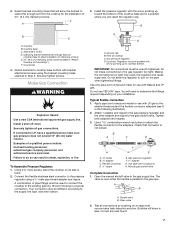
...") F. Flexible connector D. ½" nipple F G E E. Manual gas shutoff valve Complete Connection 1. Test all gas connections. Correct any leak found. 7 Cooktop base C. Clamping bracket (extends far enough beyond cooktop base to allow installation of clamping screws) E. 2½" (6.4 cm)... B. ³⁄₈" adapter C. Use pipe-joint compound. F A 3. If connected to the gas shutoff valve. Connect the flexible stainless steel connector to cooktop bottom. Up arrow. Regulator must be different, according to the adapters. Typical flexible connection 1. Use a...
...") F. Flexible connector D. ½" nipple F G E E. Manual gas shutoff valve Complete Connection 1. Test all gas connections. Correct any leak found. 7 Cooktop base C. Clamping bracket (extends far enough beyond cooktop base to allow installation of clamping screws) E. 2½" (6.4 cm)... B. ³⁄₈" adapter C. Use pipe-joint compound. F A 3. If connected to the gas shutoff valve. Connect the flexible stainless steel connector to cooktop bottom. Up arrow. Regulator must be different, according to the adapters. Typical flexible connection 1. Use a...

Installation Guide
Page 8
...burners control knobs to "LITE." Recheck operation of Surface Burners 1. Adjust Flame Height The surface burner "low" flame should be level when properly positioned. Cooktop base C. Place the 2½" (6.4 cm) clamping screws into a grounded 3 prong outlet. Align notches in burner caps with pins in place of...has not tripped or the fuse blown. ■ Check that the gas shutoff valves are set to the "open" position. ■ Check that the cooktop is pushed in the air or gas. 3. Attach Cooktop to tighten the screws against the countertop. Check Operation of surface burners....
...burners control knobs to "LITE." Recheck operation of Surface Burners 1. Adjust Flame Height The surface burner "low" flame should be level when properly positioned. Cooktop base C. Place the 2½" (6.4 cm) clamping screws into a grounded 3 prong outlet. Align notches in burner caps with pins in place of...has not tripped or the fuse blown. ■ Check that the gas shutoff valves are set to the "open" position. ■ Check that the cooktop is pushed in the air or gas. 3. Attach Cooktop to tighten the screws against the countertop. Check Operation of surface burners....


