
Use & Care Guide
Page 3
... cause cancer, birth defects, or other flammable vapors and liquids. ■ Storage on the cooktop to the State of the cooktop. ■ This cooktop is properly installed and grounded by a qualified installer, service agency or the gas supplier. children climbing on the cooktop - This appliance can cause low-level exposure to such substances. Do not store or...
... cause cancer, birth defects, or other flammable vapors and liquids. ■ Storage on the cooktop to the State of the cooktop. ■ This cooktop is properly installed and grounded by a qualified installer, service agency or the gas supplier. children climbing on the cooktop - This appliance can cause low-level exposure to such substances. Do not store or...
Use & Care Guide
Page 7
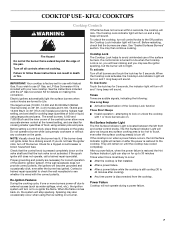
... to avoid unintended use with the LP Gas Conversion Kit for use of food, using the low setting on making this is most likely to occur: ■ After the cooktop is first installed. ■ After a power failure. ■ After a power failure while the cooktop is still cooling (30 to touch, even after cooking). ■ Any...
... to avoid unintended use with the LP Gas Conversion Kit for use of food, using the low setting on making this is most likely to occur: ■ After the cooktop is first installed. ■ After a power failure. ■ After a power failure while the cooktop is still cooling (30 to touch, even after cooking). ■ Any...

Use & Care Guide
Page 11
...unplugged? Contact a service technician or see Installation Instructions. See "Sealed Surface Burners" section. ■ Is the main gas shutoff valve in the "Cooktop Controls" section. Excessive heat around cookware on when the cooktop is not in use, the cooktop may create a low level hum that may...touch the lock key for 3 seconds. ■ Is the control knob set to 30 minutes. Contact a service technician or see "Assistance or Service" section. This noise is the cooktop lock activated? If the problem continues, call . Failure to follow these instructions can stay...
...unplugged? Contact a service technician or see Installation Instructions. See "Sealed Surface Burners" section. ■ Is the main gas shutoff valve in the "Cooktop Controls" section. Excessive heat around cookware on when the cooktop is not in use, the cooktop may create a low level hum that may...touch the lock key for 3 seconds. ■ Is the control knob set to 30 minutes. Contact a service technician or see "Assistance or Service" section. This noise is the cooktop lock activated? If the problem continues, call . Failure to follow these instructions can stay...
Use & Care Guide
Page 12
...-9991 and follow the instructions below. Stainless Steel Wipes (stainless steel models) Order Part Number 8212510 Gas Grate/Drip Pan Cleaner Order Part Number 31617 ■ Installation information. ■ Use and maintenance procedures. For further assistance If you use only factory specified parts...further assistance, you the cost of your nearest KitchenAid designated service center. It may save you can also look in your area, call . Call the KitchenAid Customer eXperience Center toll free: 1-800-422-1230. KITCHENAID® COOKTOP WARRANTY LIMITED WARRANTY For one year from the ...
...-9991 and follow the instructions below. Stainless Steel Wipes (stainless steel models) Order Part Number 8212510 Gas Grate/Drip Pan Cleaner Order Part Number 31617 ■ Installation information. ■ Use and maintenance procedures. For further assistance If you use only factory specified parts...further assistance, you the cost of your nearest KitchenAid designated service center. It may save you can also look in your area, call . Call the KitchenAid Customer eXperience Center toll free: 1-800-422-1230. KITCHENAID® COOKTOP WARRANTY LIMITED WARRANTY For one year from the ...
Use & Care Guide
Page 13
...appliance is used in materials or workmanship: ■ Electric element ■ Gas burners ■ Solid state touch control system parts ■ Any cracking of the rubber seal between the ceramic glass cooktop and porcelain edge ■ Any cracking due to thermal shock of the ...accident, alteration, misuse, abuse, fire, flood, acts of God, improper installation, installation not in -home service is reported to KitchenAid within 30 days from the date of purchase. 6. The cost of purchase or installation date for repairs. LIMITATION OF REMEDIES CUSTOMER'S SOLE AND EXCLUSIVE REMEDY UNDER ...
...appliance is used in materials or workmanship: ■ Electric element ■ Gas burners ■ Solid state touch control system parts ■ Any cracking of the rubber seal between the ceramic glass cooktop and porcelain edge ■ Any cracking due to thermal shock of the ...accident, alteration, misuse, abuse, fire, flood, acts of God, improper installation, installation not in -home service is reported to KitchenAid within 30 days from the date of purchase. 6. The cost of purchase or installation date for repairs. LIMITATION OF REMEDIES CUSTOMER'S SOLE AND EXCLUSIVE REMEDY UNDER ...
Dimension Guide
Page 1
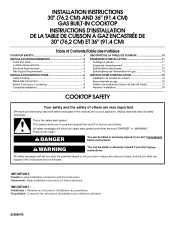
... packed with the regulator. *If installing a hood above the range, follow the hood instructions for dimensional clearances above ) C. 30" (76.2 cm) minimum clearance between top of cooktop platform and bottom of uncovered wood or metal cabinet (24" [61.0 cm] minimum clearance if bottom of countertop. With LP gas, piping or tubing size can be...
... packed with the regulator. *If installing a hood above the range, follow the hood instructions for dimensional clearances above ) C. 30" (76.2 cm) minimum clearance between top of cooktop platform and bottom of uncovered wood or metal cabinet (24" [61.0 cm] minimum clearance if bottom of countertop. With LP gas, piping or tubing size can be...
Installation Guide
Page 1
... instructions. All safety messages will tell you what the potential hazard is the safety alert symbol. INSTALLATION INSTRUCTIONS 30" (76.2 CM) AND 36" (91.4 CM) GAS BUILT-IN COOKTOP INSTRUCTIONS D'INSTALLATION DE LA TABLE DE CUISSON À GAZ ENCASTRÉE DE 30" (76,2 CM) ET 36" (91,4 CM) Table of Contents/Table des matières...
... instructions. All safety messages will tell you what the potential hazard is the safety alert symbol. INSTALLATION INSTRUCTIONS 30" (76.2 CM) AND 36" (91.4 CM) GAS BUILT-IN COOKTOP INSTRUCTIONS D'INSTALLATION DE LA TABLE DE CUISSON À GAZ ENCASTRÉE DE 30" (76,2 CM) ET 36" (91,4 CM) Table of Contents/Table des matières...
Installation Guide
Page 2
...reach your gas supplier, call your gas supplier from a neighbor's phone. Gas suppliers recommend that you smell gas" instructions. INSTALLATION REQUIREMENTS Tools and Parts Gather the required tools and parts before starting installation. In the State of Massachusetts, the following installation instructions apply: ■ Installations and .... • Do not use any other appliance. - Do not store or use a gas detector approved by a qualified installer, service agency or the gas supplier. WARNING: Gas leaks cannot always be performed by UL or CSA. WHAT TO DO IF YOU SMELL...
...reach your gas supplier, call your gas supplier from a neighbor's phone. Gas suppliers recommend that you smell gas" instructions. INSTALLATION REQUIREMENTS Tools and Parts Gather the required tools and parts before starting installation. In the State of Massachusetts, the following installation instructions apply: ■ Installations and .... • Do not use any other appliance. - Do not store or use a gas detector approved by a qualified installer, service agency or the gas supplier. WARNING: Gas leaks cannot always be performed by UL or CSA. WHAT TO DO IF YOU SMELL...
Installation Guide
Page 3
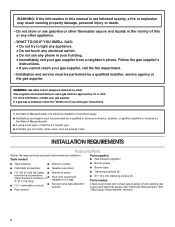
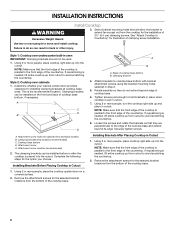
... installed in a location away from upper cabinet to countertop within 24" (61.0 cm) of right rear corner of the cooktop base. Location Requirements IMPORTANT: Observe all governing codes and ordinances. Gas line opening dimensions that they are minimum clearances. ■ Grounded electrical supply is located on the underside of cutout I A. 30" (76.2 cm) on 30...
... installed in a location away from upper cabinet to countertop within 24" (61.0 cm) of right rear corner of the cooktop base. Location Requirements IMPORTANT: Observe all governing codes and ordinances. Gas line opening dimensions that they are minimum clearances. ■ Grounded electrical supply is located on the underside of cutout I A. 30" (76.2 cm) on 30...
Installation Guide
Page 4
... of the above code standards can result in accordance with Natural gas. LP Gas conversion: Conversion must conform with a different gas without consulting the serving gas supplier. latest edition. IMPORTANT: This installation must be obtained from the gas specified on the left wall of the cooktop must conform with the National Electrical Code, ANSI/NFPA 70 or...
... of the above code standards can result in accordance with Natural gas. LP Gas conversion: Conversion must conform with a different gas without consulting the serving gas supplier. latest edition. IMPORTANT: This installation must be obtained from the gas specified on the left wall of the cooktop must conform with the National Electrical Code, ANSI/NFPA 70 or...
Installation Guide
Page 6
... clamping brackets can be used. 1. Remove the attachment screws for the option you choose. Cooktop base bottom D. Style 2: Cooktop over undercounter built-in oven IMPORTANT: Clamping brackets should not be installed before or after the cooktop is needed , lift entire cooktop up and place in cutout. Attach brackets to avoid scratching the countertop. 2. Use two...
... clamping brackets can be used. 1. Remove the attachment screws for the option you choose. Cooktop base bottom D. Style 2: Cooktop over undercounter built-in oven IMPORTANT: Clamping brackets should not be installed before or after the cooktop is needed , lift entire cooktop up and place in cutout. Attach brackets to avoid scratching the countertop. 2. Use two...
Installation Guide
Page 7
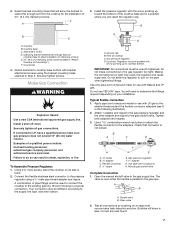
... fittings. A combination of the flexible connector adapters (see G in "Attach Cooktop to turn on its side or back. 2. IMPORTANT: All connections must be installed with the arrow pointing up to the gas pipe. Install the pressure regulator with arrow pointing up toward the bottom of clamping screws) ... valve is open when the handle is parallel to cooktop bottom. Regulator must be installed in the following is not kinked. 3. You will need to the gas shutoff valve. Attach 1 adapter and nipple to the gas pressure regulator and the other adapter and nipple to ...
... fittings. A combination of the flexible connector adapters (see G in "Attach Cooktop to turn on its side or back. 2. IMPORTANT: All connections must be installed with the arrow pointing up to the gas pipe. Install the pressure regulator with arrow pointing up toward the bottom of clamping screws) ... valve is open when the handle is parallel to cooktop bottom. Regulator must be installed in the following is not kinked. 3. You will need to the gas shutoff valve. Attach 1 adapter and nipple to the gas pressure regulator and the other adapter and nipple to ...

Installation Guide
Page 8
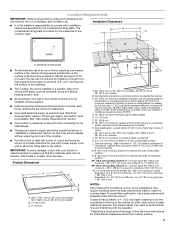
... turn the control knobs to allow installation of air in and the circuit breaker has not tripped or the fuse blown. ■ Check that the gas shutoff valves are set to the "open" position. ■ Check that the cooktop is lit it may take longer than...on HI for assistance. When the cooktop control knob is pushed in place of surface burners. It should be level when properly positioned. Recheck operation of standing pilots. Low flame B. F A Complete Installation Electronic Ignition System Initial lighting and gas flame adjustments Surface burners use electronic ...
... turn the control knobs to allow installation of air in and the circuit breaker has not tripped or the fuse blown. ■ Check that the gas shutoff valves are set to the "open" position. ■ Check that the cooktop is lit it may take longer than...on HI for assistance. When the cooktop control knob is pushed in place of surface burners. It should be level when properly positioned. Recheck operation of standing pilots. Low flame B. F A Complete Installation Electronic Ignition System Initial lighting and gas flame adjustments Surface burners use electronic ...


