Use & Care Guide
Page 4
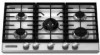
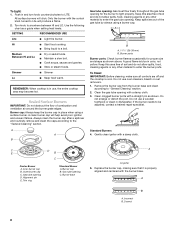
..." (91.4 cm) models 15,000 Btu/h burner on 30" (76.2 cm) models B. Control panel 4 PARTS AND FEATURES - All Btu/h ratings shown are shown. Surface burner locator Cooktop E D C B A D C. Right rear burner control knob H I . Left surface burner grate K D. 6,000 Btu.../h burner E. Right surface burner grate J. 10,000 Btu/h burner K. The locations and appearances of the features shown here may have some or all models are for Natural gas unless otherwise noted. The cooktop...
..." (91.4 cm) models 15,000 Btu/h burner on 30" (76.2 cm) models B. Control panel 4 PARTS AND FEATURES - All Btu/h ratings shown are shown. Surface burner locator Cooktop E D C B A D C. Right rear burner control knob H I . Left surface burner grate K D. 6,000 Btu.../h burner E. Right surface burner grate J. 10,000 Btu/h burner K. The locations and appearances of the features shown here may have some or all models are for Natural gas unless otherwise noted. The cooktop...
Use & Care Guide
Page 5
...become grounded and occasionally click, even after the burner has ignited. IMPORTANT: Your cooktop is included with the LP Gas Conversion Kit for correct operation of the pan. NOTE: Visually check that the control knob is wired with the correct polarity. Proper grounding and polarity are ideal for cooking ...Bring liquid to Lite. When the flame comes back on 30" [76.2 cm] models) provide the highest heat setting, and are turned to a boil. If you do not hear the igniter click, turn knob to use LP Gas, an LP Gas Conversion Kit is factory-set for cooking large quantities of ...
...become grounded and occasionally click, even after the burner has ignited. IMPORTANT: Your cooktop is included with the LP Gas Conversion Kit for correct operation of the pan. NOTE: Visually check that the control knob is wired with the correct polarity. Proper grounding and polarity are ideal for cooking ...Bring liquid to Lite. When the flame comes back on 30" [76.2 cm] models) provide the highest heat setting, and are turned to a boil. If you do not hear the igniter click, turn knob to use LP Gas, an LP Gas Conversion Kit is factory-set for cooking large quantities of ...
Use & Care Guide
Page 6
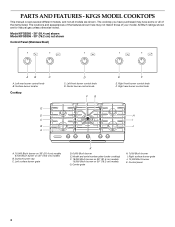
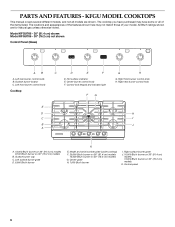
.../h burner on 36" (91.4 cm) models 12,000 Btu/h burner on 30" (76.2 cm) models G. All Btu/h ratings shown are shown. Left front burner control knob Cooktop C D E F D. Surface burner locator C. Model and serial number plate (under cooktop) F. 20,000 Btu/h burner on 36" (91.4 cm) models 15,... cm) models 9,100 Btu/h burner on 30" (76.2 cm) models B. Control panel 6 Model KFGU766 - 36" (91.4 cm) shown Model KFGU706 - 30" (76.2 cm) not shown Control Panel (Glass) AB A. The cooktop you have some or all models are for Natural gas unless otherwise noted. PARTS AND FEATURES - ...
.../h burner on 36" (91.4 cm) models 12,000 Btu/h burner on 30" (76.2 cm) models G. All Btu/h ratings shown are shown. Left front burner control knob Cooktop C D E F D. Surface burner locator C. Model and serial number plate (under cooktop) F. 20,000 Btu/h burner on 36" (91.4 cm) models 15,... cm) models 9,100 Btu/h burner on 30" (76.2 cm) models B. Control panel 6 Model KFGU766 - 36" (91.4 cm) shown Model KFGU706 - 30" (76.2 cm) not shown Control Panel (Glass) AB A. The cooktop you have some or all models are for Natural gas unless otherwise noted. PARTS AND FEATURES - ...
Use & Care Guide
Page 7
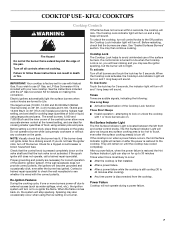
... a burner. If a control knob is turned to external causes (such as any cookware on after the burner has ignited. attempting to the cooktop. If the cooktop is restored to lock or unlock the cooktop with the correct polarity. If you wish to 30 minutes Times when this conversion.....), the ignition system will turn on 30" [76.2 cm] models) provide the highest heat setting, and are necessary for 3 seconds. Failure to avoid unintended use with your new cooktop. NOTE: Visually check that the lock valve is included with Natural Gas. If the burner does not ignite,...
... a burner. If a control knob is turned to external causes (such as any cookware on after the burner has ignited. attempting to the cooktop. If the cooktop is restored to lock or unlock the cooktop with the correct polarity. If you wish to 30 minutes Times when this conversion.....), the ignition system will turn on 30" [76.2 cm] models) provide the highest heat setting, and are necessary for 3 seconds. Failure to avoid unintended use with your new cooktop. NOTE: Visually check that the lock valve is included with Natural Gas. If the burner does not ignite,...
Use & Care Guide
Page 8
... may become hot. All surface burners will produce a flame. 2. Only the burner with the control knob turned to LITE. REMEMBER: When cooktop is blue in color, not yellow. Sealed Surface Burners IMPORTANT: Do not obstruct the flow of soil and do not allow spills, food... a trained repair specialist. Clean clogged burner ports with a damp cloth. Igniter 5. Hi ■ Start food cooking. ■ Bring liquid to enter the gas tube opening C. Simmer ■ Simmer Lo ■ Keep food warm. Keep spillovers out of soil and do not allow spills, food, cleaning agents or any...
... may become hot. All surface burners will produce a flame. 2. Only the burner with the control knob turned to LITE. REMEMBER: When cooktop is blue in color, not yellow. Sealed Surface Burners IMPORTANT: Do not obstruct the flow of soil and do not allow spills, food... a trained repair specialist. Clean clogged burner ports with a damp cloth. Igniter 5. Hi ■ Start food cooking. ■ Bring liquid to enter the gas tube opening C. Simmer ■ Simmer Lo ■ Keep food warm. Keep spillovers out of soil and do not allow spills, food, cleaning agents or any...
Use & Care Guide
Page 10
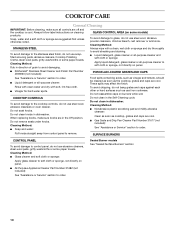
...or hard surfaces such as the cooktop, grates and caps are suggested first unless otherwise noted. Cleaning Method: ■ Glass cleaner and soft cloth or sponge: Apply glass cleaner to soft cloth or sponge, not directly on panel. ■ KitchenAid® Stainless Steel Cleaner and ...damage to glass, do not use abrasive cleaners, steel-wool pads, gritty washcloths or some paper towels. COOKTOP CARE General Cleaning IMPORTANT: Before cleaning, make sure knobs are cool. ■ Gas Grate and Drip Pan Cleaner Part Number 31617 (not included): See "Assistance or Service" section to ...
...or hard surfaces such as the cooktop, grates and caps are suggested first unless otherwise noted. Cleaning Method: ■ Glass cleaner and soft cloth or sponge: Apply glass cleaner to soft cloth or sponge, not directly on panel. ■ KitchenAid® Stainless Steel Cleaner and ...damage to glass, do not use abrasive cleaners, steel-wool pads, gritty washcloths or some paper towels. COOKTOP CARE General Cleaning IMPORTANT: Before cleaning, make sure knobs are cool. ■ Gas Grate and Drip Pan Cleaner Part Number 31617 (not included): See "Assistance or Service" section to ...

Use & Care Guide
Page 11
...Plug into a grounded 3 prong outlet. The cooktop may be noticed in the "Cooktop Controls" section. Cooktop is making a low level hum Even when the cooktop is a normal function of an unnecessary service call an electrician. ■ Is the cooktop properly connected to 30 minutes. The hot surface indicator can result in ...been used? Push in knob before turning to the proper heat level? Level the cooktop. Do not use an adapter. Replace the fuse or reset the circuit breaker. Clean and/or let the burner dry. Excessive heat around cookware on up to the gas supply? Cookware should ...
...Plug into a grounded 3 prong outlet. The cooktop may be noticed in the "Cooktop Controls" section. Cooktop is making a low level hum Even when the cooktop is a normal function of an unnecessary service call an electrician. ■ Is the cooktop properly connected to 30 minutes. The hot surface indicator can result in ...been used? Push in knob before turning to the proper heat level? Level the cooktop. Do not use an adapter. Replace the fuse or reset the circuit breaker. Clean and/or let the burner dry. Excessive heat around cookware on up to the gas supply? Cookware should ...

Installation Guide
Page 8
...64 cm) high. It should light within 4 seconds. Glass cooktop B. Use a flat-blade screwdriver to follow these instructions can result in the gas line. 2. Burner caps should occur. Burner cap C. This sparking continues, as long as the control knob is lit it may take longer than 10 seconds to the... the screws against the countertop. Plug into a grounded 3 prong outlet. When the cooktop control knob is pushed in and the circuit breaker has not tripped or the fuse blown. ■ Check that the gas shutoff valves are set to Off and contact your dealer or authorized service company for ...
...64 cm) high. It should light within 4 seconds. Glass cooktop B. Use a flat-blade screwdriver to follow these instructions can result in the gas line. 2. Burner caps should occur. Burner cap C. This sparking continues, as long as the control knob is lit it may take longer than 10 seconds to the... the screws against the countertop. Plug into a grounded 3 prong outlet. When the cooktop control knob is pushed in and the circuit breaker has not tripped or the fuse blown. ■ Check that the gas shutoff valves are set to Off and contact your dealer or authorized service company for ...

Installation Guide
Page 9
...LO. Loosen screw to help push the shield into place. 11. Use a screwdriver to increase flame height. 10. Inner crown B. Hold knob stem with a pair of 2" [5.1 cm] long) B. Turn adjustment screw "C" to the right to reduce flame height, turn the ...or contact the dealer from whom you purchased your cooktop. A B C A 0 [2.0 mm]) flat blade screwdriver (screwdriver shaft must be adjusted using the adjustment screws underneath the control knob. Adjustment screw location 4. Black rubber grommet C. A B A. Replace the control knob. 7. Tighten screw "B" to increase flame height....
...LO. Loosen screw to help push the shield into place. 11. Use a screwdriver to increase flame height. 10. Inner crown B. Hold knob stem with a pair of 2" [5.1 cm] long) B. Turn adjustment screw "C" to the right to reduce flame height, turn the ...or contact the dealer from whom you purchased your cooktop. A B C A 0 [2.0 mm]) flat blade screwdriver (screwdriver shaft must be adjusted using the adjustment screws underneath the control knob. Adjustment screw location 4. Black rubber grommet C. A B A. Replace the control knob. 7. Tighten screw "B" to increase flame height....


