
Use & Care Guide
Page 2
...ÈCES ET CARACTÉRISTIQUES - All safety messages will tell you what the potential hazard is the safety alert symbol. KFGS MODEL COOKTOPS 5 Cooktop Controls 5 PARTS AND FEATURES - KFGS MODEL COOKTOPS 4 COOKTOP USE - This is , tell you how to potential hazards that can kill or hurt you what can be killed or seriously injured... provided many important safety messages in this manual and on your appliance. This symbol alerts you to reduce the chance of others . TABLE OF CONTENTS COOKTOP SAFETY 2 PARTS AND FEATURES -
...ÈCES ET CARACTÉRISTIQUES - All safety messages will tell you what the potential hazard is the safety alert symbol. KFGS MODEL COOKTOPS 5 Cooktop Controls 5 PARTS AND FEATURES - KFGS MODEL COOKTOPS 4 COOKTOP USE - This is , tell you how to potential hazards that can kill or hurt you what can be killed or seriously injured... provided many important safety messages in this manual and on your appliance. This symbol alerts you to reduce the chance of others . TABLE OF CONTENTS COOKTOP SAFETY 2 PARTS AND FEATURES -

Use & Care Guide
Page 3
... not touch any electrical switch. • Do not use any other appliance. - Be sure the cooktop is properly installed and grounded by a qualified installer, service agency or the gas supplier. Do not store or use this manual is equipped with the National Electrical Code, ANSI/NFPA70 ...or the Canadian Electrical Code, Part 1. Do not cut or remove the grounding prong from this or any phone in your gas supplier from combustible materials, gasoline, and other reproductive harm. children climbing on the top surface...
... not touch any electrical switch. • Do not use any other appliance. - Be sure the cooktop is properly installed and grounded by a qualified installer, service agency or the gas supplier. Do not store or use this manual is equipped with the National Electrical Code, ANSI/NFPA70 ...or the Canadian Electrical Code, Part 1. Do not cut or remove the grounding prong from this or any phone in your gas supplier from combustible materials, gasoline, and other reproductive harm. children climbing on the top surface...
Use & Care Guide
Page 4
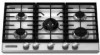
PARTS AND FEATURES - The cooktop you have some or all models are for Natural gas unless otherwise noted. Left surface burner grate K D. 6,000 Btu/h burner E. Center grate H. 7,000 Btu/h burner I J A. 10,000 Btu/h burner on 36" (91.4 cm) models 9,100 Btu/h burner on 30" (76.2 cm) models G. KFGS MODEL COOKTOPS... This manual covers several different models, and not all of your model. Model KFGS366 - 36" (91.4 cm) shown Model KFGS306 - 30" (76.2 cm) not shown Control Panel (Stainless Steel) AB ...
PARTS AND FEATURES - The cooktop you have some or all models are for Natural gas unless otherwise noted. Left surface burner grate K D. 6,000 Btu/h burner E. Center grate H. 7,000 Btu/h burner I J A. 10,000 Btu/h burner on 36" (91.4 cm) models 9,100 Btu/h burner on 30" (76.2 cm) models G. KFGS MODEL COOKTOPS... This manual covers several different models, and not all of your model. Model KFGS366 - 36" (91.4 cm) shown Model KFGS306 - 30" (76.2 cm) not shown Control Panel (Stainless Steel) AB ...
Use & Care Guide
Page 6
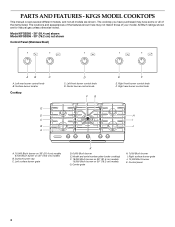
PARTS AND FEATURES - Left rear burner control knob B. Hot surface indicator E. Center burner control knob F. Surface burner cap C. Center grate H. 7,000 Btu/h burner I B J A A. 12,000 Btu/h burner on 36" (91.4 cm) models 9,100 Btu/h burner on 30" (76.2 cm) models B. Left front burner control knob Cooktop C D E F D. Control panel 6 The cooktop... you have some or all models are for Natural gas unless otherwise noted. Left surface...
PARTS AND FEATURES - Left rear burner control knob B. Hot surface indicator E. Center burner control knob F. Surface burner cap C. Center grate H. 7,000 Btu/h burner I B J A A. 12,000 Btu/h burner on 36" (91.4 cm) models 9,100 Btu/h burner on 30" (76.2 cm) models B. Left front burner control knob Cooktop C D E F D. Control panel 6 The cooktop... you have some or all models are for Natural gas unless otherwise noted. Left surface...

Use & Care Guide
Page 9
... burners between batches. B Home Canning When canning for the most cooking tasks. Replace the inner burner cap NOTE: The brass parts of the center burner will take on low to ensure proper placement. If the burner still does not light, do not service... trained repair specialist. A B A. Burner grate foot B. Round groove Locator pins and matching grooves are also located on the cooktop or grates. Aluminum and copper may scratch the cooktop. A nonstick finish has the same characteristics as a guide for slow cooking. Use the following chart as its base material. ...
... burners between batches. B Home Canning When canning for the most cooking tasks. Replace the inner burner cap NOTE: The brass parts of the center burner will take on low to ensure proper placement. If the burner still does not light, do not service... trained repair specialist. A B A. Burner grate foot B. Round groove Locator pins and matching grooves are also located on the cooktop or grates. Aluminum and copper may scratch the cooktop. A nonstick finish has the same characteristics as a guide for slow cooking. Use the following chart as its base material. ...
Use & Care Guide
Page 10
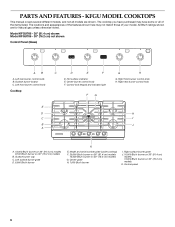
... water: Food spills containing acids, such as vinegar and tomato, should be cleaned as soon as the cooktop, grates and caps are cool. ■ Gas Grate and Drip Pan Cleaner Part Number 31617 (not included): See "Assistance or Service" section to glass, do not use steel wool,...to soft cloth or sponge, not directly on panel. ■ KitchenAid® Stainless Steel Cleaner and Polish Part Number 4396920 (not included): PORCELAIN-COATED GRATES AND CAPS See "Assistance or Service" section to avoid damaging. COOKTOP CARE General Cleaning IMPORTANT: Before cleaning, make sure knobs are ...
... water: Food spills containing acids, such as vinegar and tomato, should be cleaned as soon as the cooktop, grates and caps are cool. ■ Gas Grate and Drip Pan Cleaner Part Number 31617 (not included): See "Assistance or Service" section to glass, do not use steel wool,...to soft cloth or sponge, not directly on panel. ■ KitchenAid® Stainless Steel Cleaner and Polish Part Number 4396920 (not included): PORCELAIN-COATED GRATES AND CAPS See "Assistance or Service" section to avoid damaging. COOKTOP CARE General Cleaning IMPORTANT: Before cleaning, make sure knobs are ...
Use & Care Guide
Page 12
... Part Number 8212510 Gas Grate/Drip Pan Cleaner Order Part Number 31617 ■ Installation information. ■ Use and maintenance procedures. All-Purpose Appliance Cleaner Order Part Number 31682 ■ Accessory and repair parts sales...parts distributors and service companies. To locate the KitchenAid designated service company in your area, you use only factory specified parts. Our consultants provide assistance with : ■ Features and specifications on "applianceaccessories.com." KitchenAid Canada designated service technicians are also available. KITCHENAID® COOKTOP...
... Part Number 8212510 Gas Grate/Drip Pan Cleaner Order Part Number 31617 ■ Installation information. ■ Use and maintenance procedures. All-Purpose Appliance Cleaner Order Part Number 31682 ■ Accessory and repair parts sales...parts distributors and service companies. To locate the KitchenAid designated service company in your area, you use only factory specified parts. Our consultants provide assistance with : ■ Features and specifications on "applianceaccessories.com." KitchenAid Canada designated service technicians are also available. KITCHENAID® COOKTOP...
Use & Care Guide
Page 13
...excluded circumstances shall be repaired in the home and only in materials or workmanship and is reported to KitchenAid within 30 days from the date of purchase. 6. KITCHENAID SHALL NOT BE LIABLE FOR INCIDENTAL OR CONSEQUENTIAL DAMAGES. Dealer name Address Phone number Model number Serial ... is not installed in materials or workmanship: ■ Electric element ■ Gas burners ■ Solid state touch control system parts ■ Any cracking of the rubber seal between the ceramic glass cooktop and porcelain edge ■ Any cracking due to thermal shock of the ceramic...
...excluded circumstances shall be repaired in the home and only in materials or workmanship and is reported to KitchenAid within 30 days from the date of purchase. 6. KITCHENAID SHALL NOT BE LIABLE FOR INCIDENTAL OR CONSEQUENTIAL DAMAGES. Dealer name Address Phone number Model number Serial ... is not installed in materials or workmanship: ■ Electric element ■ Gas burners ■ Solid state touch control system parts ■ Any cracking of the rubber seal between the ceramic glass cooktop and porcelain edge ■ Any cracking due to thermal shock of the ceramic...
Installation Guide
Page 1
... LA TABLE DE CUISSON À GAZ ENCASTRÉE DE 30" (76,2 CM) ET 36" (91,4 CM) Table of Contents/Table des matières COOKTOP SAFETY 1 SÉCURITÉ DE LA TABLE DE CUISSON 10 INSTALLATION REQUIREMENTS 2 Tools and Parts 2 Location Requirements 3 Electrical Requirements 4 Gas Supply Requirements 4 EXIGENCES D'INSTALLATION 11 Outillage et piè...
... LA TABLE DE CUISSON À GAZ ENCASTRÉE DE 30" (76,2 CM) ET 36" (91,4 CM) Table of Contents/Table des matières COOKTOP SAFETY 1 SÉCURITÉ DE LA TABLE DE CUISSON 10 INSTALLATION REQUIREMENTS 2 Tools and Parts 2 Location Requirements 3 Electrical Requirements 4 Gas Supply Requirements 4 EXIGENCES D'INSTALLATION 11 Outillage et piè...
Installation Guide
Page 2
...detection solution ■ Pipe wrench ■ Clamping brackets (2) ■ 2¹⁄₂" (6.4 cm) clamping screws (2) Parts needed Parts supplied ■ Gas pressure regulator ■ Tape measure ■ Wrench or pliers ■ Burner grates ■ Flat-blade screwdriver ■ ...9632; Installations and repairs must not exceed 3 feet. INSTALLATION REQUIREMENTS Tools and Parts Gather the required tools and parts before starting installation. For more information, contact your gas supplier from a neighbor's phone. WARNING: If the information in this or ...
...detection solution ■ Pipe wrench ■ Clamping brackets (2) ■ 2¹⁄₂" (6.4 cm) clamping screws (2) Parts needed Parts supplied ■ Gas pressure regulator ■ Tape measure ■ Wrench or pliers ■ Burner grates ■ Flat-blade screwdriver ■ ...9632; Installations and repairs must not exceed 3 feet. INSTALLATION REQUIREMENTS Tools and Parts Gather the required tools and parts before starting installation. For more information, contact your gas supplier from a neighbor's phone. WARNING: If the information in this or ...

Installation Guide
Page 8
... turn control knobs to "LITE." Adjust Flame Height The surface burner "low" flame should light within 4 seconds. Cooktop base C. Clamping bracket (extends far enough beyond cooktop base to follow these instructions can result in the gas line. 2. The surface burner flame should be clean and soft in and turn the surface burners control...It should be a steady blue flame approximately ¼" (0.64 cm) high. Occasional orange flashes are using clamping brackets. 3. Remove surface burner caps and grates from parts package. If burner caps are properly positioned on HI for assistance.
... turn control knobs to "LITE." Adjust Flame Height The surface burner "low" flame should light within 4 seconds. Cooktop base C. Clamping bracket (extends far enough beyond cooktop base to follow these instructions can result in the gas line. 2. The surface burner flame should be clean and soft in and turn the surface burners control...It should be a steady blue flame approximately ¼" (0.64 cm) high. Occasional orange flashes are using clamping brackets. 3. Remove surface burner caps and grates from parts package. If burner caps are properly positioned on HI for assistance.


