Use & Care Guide
Page 8
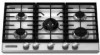
...IMPORTANT: Before cleaning, make sure all controls are off and the cooktop is in color, not yellow. Clean clogged burner ports with the control knob turned to enter the gas tube opening. Standard Burners 4. Inner burner cap B. Correct 8 ...knob counterclockwise to be adjusted, contact a trained repair specialist. Gas tube opening D. Use the following chart as shown above. SETTING RECOMMENDED USE Lite ■ Light the burner. If the burner needs to LITE. A A B Gas tube opening: Gas must flow freely throughout the gas tube opening with a damp cloth. Replace...
...IMPORTANT: Before cleaning, make sure all controls are off and the cooktop is in color, not yellow. Clean clogged burner ports with the control knob turned to enter the gas tube opening. Standard Burners 4. Inner burner cap B. Correct 8 ...knob counterclockwise to be adjusted, contact a trained repair specialist. Gas tube opening D. Use the following chart as shown above. SETTING RECOMMENDED USE Lite ■ Light the burner. If the burner needs to LITE. A A B Gas tube opening: Gas must flow freely throughout the gas tube opening with a damp cloth. Replace...
Use & Care Guide
Page 10
...plastic scrubbing pad and mildly abrasive cleanser: Clean as soon as cooktop, grates and caps are cool. ■ Gas Grate and Drip Pan Cleaner Part Number 31617 (not included): See "Assistance or Service" section to the cooktop controls, do not use steel wool, abrasive cleansers or oven ... on burners while wet. When replacing knobs, make sure all controls are off and the cooktop is cool. Cleaning Method: ■ Glass cleaner and soft cloth or sponge: Apply glass cleaner to order. Always follow label instructions on panel. ■ KitchenAid® Stainless Steel Cleaner and ...
...plastic scrubbing pad and mildly abrasive cleanser: Clean as soon as cooktop, grates and caps are cool. ■ Gas Grate and Drip Pan Cleaner Part Number 31617 (not included): See "Assistance or Service" section to the cooktop controls, do not use steel wool, abrasive cleansers or oven ... on burners while wet. When replacing knobs, make sure all controls are off and the cooktop is cool. Cleaning Method: ■ Glass cleaner and soft cloth or sponge: Apply glass cleaner to order. Always follow label instructions on panel. ■ KitchenAid® Stainless Steel Cleaner and ...

Use & Care Guide
Page 11
...Replace the fuse or reset the circuit breaker. Surface burner flames are the burner caps positioned properly? Hot surface indicator light on any one of the cooktop. See "Cookware" section. ■ Is the control knob set correctly? See "Cooktop Controls" section. ■ Is the cooktop level? Level the cooktop...surface burner knobs to release air from the gas lines. ■ On some models, is the cooktop lock activated? Turn on when the cooktop is not in use, the cooktop may create a low level hum that may have been used ? Push in knob before turning to 30 minutes. ...
...Replace the fuse or reset the circuit breaker. Surface burner flames are the burner caps positioned properly? Hot surface indicator light on any one of the cooktop. See "Cookware" section. ■ Is the control knob set correctly? See "Cooktop Controls" section. ■ Is the cooktop level? Level the cooktop...surface burner knobs to release air from the gas lines. ■ On some models, is the cooktop lock activated? Turn on when the cooktop is not in use, the cooktop may create a low level hum that may have been used ? Push in knob before turning to 30 minutes. ...

Installation Guide
Page 9
... be adjusted using the adjustment screws underneath the control knob. Control knob stem opening . A B C A. Gray shield 5. inner crown B. Replace the control knob. 7. Replace the black rubber grommet. 12. Replace the control knob. 13. A. Remove the black rubber grommet. 9 Remove the control knob. 3. Black rubber grommet C. Tighten screw "A" to... Please reference the "Assistance or Service" section of pliers. Hold knob stem with a pair of the Use and Care Guide or contact the dealer from whom you purchased your cooktop. Test the flame by turning the control from LO to HI, ...
... be adjusted using the adjustment screws underneath the control knob. Control knob stem opening . A B C A. Gray shield 5. inner crown B. Replace the control knob. 7. Replace the black rubber grommet. 12. Replace the control knob. 13. A. Remove the black rubber grommet. 9 Remove the control knob. 3. Black rubber grommet C. Tighten screw "A" to... Please reference the "Assistance or Service" section of pliers. Hold knob stem with a pair of the Use and Care Guide or contact the dealer from whom you purchased your cooktop. Test the flame by turning the control from LO to HI, ...


