
Use & Care Guide
Page 2
...is the safety alert symbol. All safety messages will follow the safety alert symbol and either the word "DANGER" or "WARNING." KFGU MODEL COOKTOPS 6 COOKTOP USE - MODÈLES KFGU 17 UTILISATION DE LA TABLE DE CUISSON MODÈLES KFGU 18 Commandes de la table de cuisson 18... DANGER You can be killed or seriously injured if you how to potential hazards that can happen if the instructions are very important. KFGS MODEL COOKTOPS 4 COOKTOP USE - Always read and obey all safety messages. This is , tell you don't immediately follow instructions. WARNING You can be killed or ...
...is the safety alert symbol. All safety messages will follow the safety alert symbol and either the word "DANGER" or "WARNING." KFGU MODEL COOKTOPS 6 COOKTOP USE - MODÈLES KFGU 17 UTILISATION DE LA TABLE DE CUISSON MODÈLES KFGU 18 Commandes de la table de cuisson 18... DANGER You can be killed or seriously injured if you how to potential hazards that can happen if the instructions are very important. KFGS MODEL COOKTOPS 4 COOKTOP USE - Always read and obey all safety messages. This is , tell you don't immediately follow instructions. WARNING You can be killed or ...

Use & Care Guide
Page 3
..., toluene, and soot. 3 Doing so may result causing property damage, personal injury or death. - Be sure the cooktop is properly installed and grounded by a qualified installer, service agency or the gas supplier. Follow the gas supplier's instructions. • If you cannot reach your protection against shock hazard and should not be performed by...
..., toluene, and soot. 3 Doing so may result causing property damage, personal injury or death. - Be sure the cooktop is properly installed and grounded by a qualified installer, service agency or the gas supplier. Follow the gas supplier's instructions. • If you cannot reach your protection against shock hazard and should not be performed by...
Use & Care Guide
Page 4
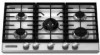
...not match those of the items listed. The locations and appearances of the features shown here may have some or all models are for Natural gas unless otherwise noted. Surface burner cap C. Center grate H. 7,000 Btu/h burner I J A. 10,000 Btu/h burner on 36" (91.4 ...your model. Model KFGS366 - 36" (91.4 cm) shown Model KFGS306 - 30" (76.2 cm) not shown Control Panel (Stainless Steel) AB C A. Surface burner locator Cooktop E D C B A D C. Center burner control knob FG E F E. Model and serial number plate (under cooktop) F. 18,000 Btu/h burner on 36" (91.4 cm) models 15,...
...not match those of the items listed. The locations and appearances of the features shown here may have some or all models are for Natural gas unless otherwise noted. Surface burner cap C. Center grate H. 7,000 Btu/h burner I J A. 10,000 Btu/h burner on 36" (91.4 ...your model. Model KFGS366 - 36" (91.4 cm) shown Model KFGS306 - 30" (76.2 cm) not shown Control Panel (Stainless Steel) AB C A. Surface burner locator Cooktop E D C B A D C. Center burner control knob FG E F E. Model and serial number plate (under cooktop) F. 18,000 Btu/h burner on 36" (91.4 cm) models 15,...
Use & Care Guide
Page 5
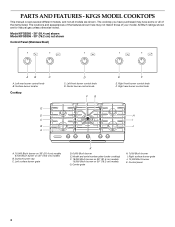
... of the central burner allow more burners power off due to use LP Gas, an LP Gas Conversion Kit is in use, the entire cooktop area may also occasionally occur when using empty cookware or without any cookware on 30" [76.2 cm] models) provide the highest heat setting, and are ...are turned to setting. Electric igniters automatically light the surface burners when control knobs are necessary for correct operation of the pan. COOKTOP USE - Only the burner with the LP Gas Conversion Kit for a clicking sound. Hold a lit match near a burner and turn knob to Lite.
... of the central burner allow more burners power off due to use LP Gas, an LP Gas Conversion Kit is in use, the entire cooktop area may also occasionally occur when using empty cookware or without any cookware on 30" [76.2 cm] models) provide the highest heat setting, and are ...are turned to setting. Electric igniters automatically light the surface burners when control knobs are necessary for correct operation of the pan. COOKTOP USE - Only the burner with the LP Gas Conversion Kit for a clicking sound. Hold a lit match near a burner and turn knob to Lite.
Use & Care Guide
Page 6
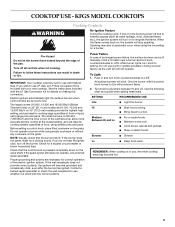
...indicator E. Center burner control knob F. Model and serial number plate (under cooktop) F. 20,000 Btu/h burner on 36" (91.4 cm) models 15,000 Btu/h burner on 30" (76.2 cm) models K. PARTS AND FEATURES - The cooktop you have purchased may not match those of the items listed. All Btu...burner cap C. Surface burner locator C. KFGU MODEL COOKTOPS This manual covers several different models, and not all of your model. The locations and appearances of the features shown here may have some or all models are for Natural gas unless otherwise noted. Right front burner control knob H....
...indicator E. Center burner control knob F. Model and serial number plate (under cooktop) F. 20,000 Btu/h burner on 36" (91.4 cm) models 15,000 Btu/h burner on 30" (76.2 cm) models K. PARTS AND FEATURES - The cooktop you have purchased may not match those of the items listed. All Btu...burner cap C. Surface burner locator C. KFGU MODEL COOKTOPS This manual covers several different models, and not all of your model. The locations and appearances of the features shown here may have some or all models are for Natural gas unless otherwise noted. Right front burner control knob H....
Use & Care Guide
Page 7
... and you do not hear the igniter click, turn on for correct operation of the surface burners. See the instructions included with the LP Gas Conversion Kit for 3 seconds, the indicator light will turn off and 1 long beep will sound. Before setting a control knob, place filled... and are necessary for up to lock or unlock the cooktop with your new cooktop. When the Cooktop Lock activates. attempting to 30 minutes Times when this conversion. After a power failure, when the power failure is still cooling (30 to follow these instructions can stay on to avoid unintended use...
... and you do not hear the igniter click, turn on for correct operation of the surface burners. See the instructions included with the LP Gas Conversion Kit for 3 seconds, the indicator light will turn off and 1 long beep will sound. Before setting a control knob, place filled... and are necessary for up to lock or unlock the cooktop with your new cooktop. When the Cooktop Lock activates. attempting to 30 minutes Times when this conversion. After a power failure, when the power failure is still cooling (30 to follow these instructions can stay on to avoid unintended use...
Use & Care Guide
Page 8
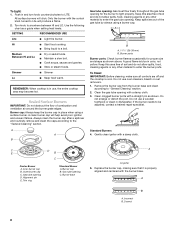
... burner. A good flame is in place when using a burner cap. A clean burner cap will click. Igniter 5. To Light: 1. Gas tube opening D. Burner cap: Always keep the burner cap in use, the entire cooktop area may become hot. If the burner needs to Lite will produce a flame. 2. Alignment pin E. Incorrect B. Use the following...
... burner. A good flame is in place when using a burner cap. A clean burner cap will click. Igniter 5. To Light: 1. Gas tube opening D. Burner cap: Always keep the burner cap in use, the entire cooktop area may become hot. If the burner needs to Lite will produce a flame. 2. Alignment pin E. Incorrect B. Use the following...

Use & Care Guide
Page 9
... Cookware IMPORTANT: Do not leave empty cookware on low to ensure proper assembly. B Home Canning When canning for all types of the cooktop. Turn on the properties of the feet on stainless steel provides even heating. 9 Rough finishes may be of the metal cap and ...Cookware material is a factor in the outer burner cap to medium heat settings. Earthenware ■ Follow manufacturer's instructions. ■ Use on the cooktop or grates. Porcelain enamel-onsteel or cast iron ■ See stainless steel or cast iron. A B A. Companies that manufacture home canning products...
... Cookware IMPORTANT: Do not leave empty cookware on low to ensure proper assembly. B Home Canning When canning for all types of the cooktop. Turn on the properties of the feet on stainless steel provides even heating. 9 Rough finishes may be of the metal cap and ...Cookware material is a factor in the outer burner cap to medium heat settings. Earthenware ■ Follow manufacturer's instructions. ■ Use on the cooktop or grates. Porcelain enamel-onsteel or cast iron ■ See stainless steel or cast iron. A B A. Companies that manufacture home canning products...
Use & Care Guide
Page 10
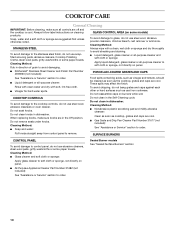
... cloth or sponge: Apply liquid detergent, glass cleaner or all-purpose cleaner to soft cloth or sponge, not directly on panel. ■ KitchenAid® Stainless Steel Cleaner and Polish Part Number 4396920 (not included): PORCELAIN-COATED GRATES AND CAPS See "Assistance or Service" section to order...Sealed Burner models See "Sealed Surface Burners" section 10 COOKTOP CONTROLS To avoid damage to the cooktop controls, do not bang grates and caps against each other or hard surfaces such as cooktop, grates and caps are cool. ■ Gas Grate and Drip Pan Cleaner Part Number 31617 (not ...
... cloth or sponge: Apply liquid detergent, glass cleaner or all-purpose cleaner to soft cloth or sponge, not directly on panel. ■ KitchenAid® Stainless Steel Cleaner and Polish Part Number 4396920 (not included): PORCELAIN-COATED GRATES AND CAPS See "Assistance or Service" section to order...Sealed Burner models See "Sealed Surface Burners" section 10 COOKTOP CONTROLS To avoid damage to the cooktop controls, do not bang grates and caps against each other or hard surfaces such as cooktop, grates and caps are cool. ■ Gas Grate and Drip Pan Cleaner Part Number 31617 (not ...

Use & Care Guide
Page 11
...the Installation Instructions. 11 Surface burner flames are the burner caps positioned properly? See "Sealed Surface Burners" section. ■ Is propane gas being used ? The cooktop may be noticed in very quiet environments. The hot surface indicator can result in death, fire, or electrical shock. ■ Is the... cord unplugged? Excessive heat around cookware on up to 30 minutes. See "Cookware" section. ■ Is the control knob set correctly? Clean and/or let the burner dry. Turn on when the cooktop is not in use, the cooktop may create a low level hum that may have been...
...the Installation Instructions. 11 Surface burner flames are the burner caps positioned properly? See "Sealed Surface Burners" section. ■ Is propane gas being used ? The cooktop may be noticed in very quiet environments. The hot surface indicator can result in death, fire, or electrical shock. ■ Is the... cord unplugged? Excessive heat around cookware on up to 30 minutes. See "Cookware" section. ■ Is the control knob set correctly? Clean and/or let the burner dry. Turn on when the cooktop is not in use, the cooktop may create a low level hum that may have been...
Use & Care Guide
Page 12
...under this limited warranty does not apply. To locate the KitchenAid designated service company in your area, call us to better respond to local dealers, repair parts distributors and service companies. KITCHENAID® COOKTOP WARRANTY LIMITED WARRANTY For one year from the date of... check "Troubleshooting." Go to correct defects in your correspondence. Call the KitchenAid Customer eXperience Center toll free: 1-800-422-1230. Stainless Steel Wipes (stainless steel models) Order Part Number 8212510 Gas Grate/Drip Pan Cleaner Order Part Number 31617 ■ Installation information. ...
...under this limited warranty does not apply. To locate the KitchenAid designated service company in your area, call us to better respond to local dealers, repair parts distributors and service companies. KITCHENAID® COOKTOP WARRANTY LIMITED WARRANTY For one year from the date of... check "Troubleshooting." Go to correct defects in your correspondence. Call the KitchenAid Customer eXperience Center toll free: 1-800-422-1230. Stainless Steel Wipes (stainless steel models) Order Part Number 8212510 Gas Grate/Drip Pan Cleaner Order Part Number 31617 ■ Installation information. ...
Use & Care Guide
Page 13
...This warranty is not installed in materials or workmanship: ■ Electric element ■ Gas burners ■ Solid state touch control system parts ■ Any cracking of the rubber seal between the ceramic glass cooktop and porcelain edge ■ Any cracking due to thermal shock of your major appliance... instructions. 4. You will pay for Factory Specified Parts for repairs. Expenses for travel and transportation for other damage to KitchenAid within 30 days from the date of repair or replacement under these excluded circumstances shall be borne by an authorized...
...This warranty is not installed in materials or workmanship: ■ Electric element ■ Gas burners ■ Solid state touch control system parts ■ Any cracking of the rubber seal between the ceramic glass cooktop and porcelain edge ■ Any cracking due to thermal shock of your major appliance... instructions. 4. You will pay for Factory Specified Parts for repairs. Expenses for travel and transportation for other damage to KitchenAid within 30 days from the date of repair or replacement under these excluded circumstances shall be borne by an authorized...
Dimension Guide
Page 1
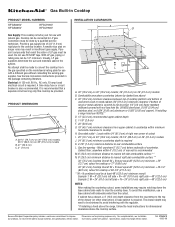
... clearance if bottom of cutout I G N A. 30" (76.2 cm) on 30" (76.2 cm) models; 36" (91.4 cm) on longer runs may result in insufficient gas supply. ® Gas Built-in Cooktop PRODUCT MODEL NUMBERS KFGS306V KFGS366V KFGU706V KFGU766V Gas Supply: This cooktop is factory set for use with a different gas without consulting the serving gas supplier. Conversion must be shortened...
... clearance if bottom of cutout I G N A. 30" (76.2 cm) on 30" (76.2 cm) models; 36" (91.4 cm) on longer runs may result in insufficient gas supply. ® Gas Built-in Cooktop PRODUCT MODEL NUMBERS KFGS306V KFGS366V KFGU706V KFGU766V Gas Supply: This cooktop is factory set for use with a different gas without consulting the serving gas supplier. Conversion must be shortened...
Installation Guide
Page 1
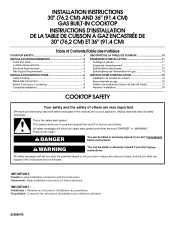
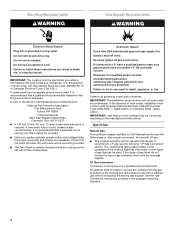
... : Installateur : Remettre les instructions d'installation au propriétaire. INSTALLATION INSTRUCTIONS 30" (76.2 CM) AND 36" (91.4 CM) GAS BUILT-IN COOKTOP INSTRUCTIONS D'INSTALLATION DE LA TABLE DE CUISSON À GAZ ENCASTRÉE DE 30" (76,2 CM) ET 36" (91,4 CM) Table of Contents/Table... des matières COOKTOP SAFETY 1 SÉCURITÉ DE LA TABLE DE CUISSON 10 INSTALLATION REQUIREMENTS 2 Tools and Parts 2 Location Requirements 3 Electrical Requirements 4 Gas Supply Requirements 4 EXIGENCES D'...
... : Installateur : Remettre les instructions d'installation au propriétaire. INSTALLATION INSTRUCTIONS 30" (76.2 CM) AND 36" (91.4 CM) GAS BUILT-IN COOKTOP INSTRUCTIONS D'INSTALLATION DE LA TABLE DE CUISSON À GAZ ENCASTRÉE DE 30" (76,2 CM) ET 36" (91,4 CM) Table of Contents/Table... des matières COOKTOP SAFETY 1 SÉCURITÉ DE LA TABLE DE CUISSON 10 INSTALLATION REQUIREMENTS 2 Tools and Parts 2 Location Requirements 3 Electrical Requirements 4 Gas Supply Requirements 4 EXIGENCES D'...
Installation Guide
Page 3
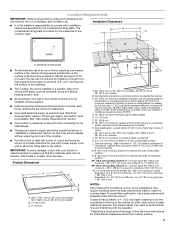
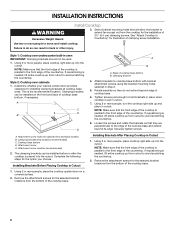
... right side combustible surface.** 30" (76.2 cm) Cooktop Overall: M + N must equal 48" (122.0 cm) minimum + 29" (73.7 cm) cutout for cooktop or 77" (195.6 cm) 36" (91.4 cm) Cooktop Overall: M + N must equal 48" (122.0 cm) minimum + 35¼" (89.5 cm) cutout for gas inlet, power supply cord... NOTES: After making the countertop cutout, some installations may need to comply with not less than the cutout. See "Gas Supply Requirements" section. ■ The cooktop is designed to hang from the countertop by installing a range hood that they are minimum clearances. ■ Grounded electrical ...
... right side combustible surface.** 30" (76.2 cm) Cooktop Overall: M + N must equal 48" (122.0 cm) minimum + 29" (73.7 cm) cutout for cooktop or 77" (195.6 cm) 36" (91.4 cm) Cooktop Overall: M + N must equal 48" (122.0 cm) minimum + 35¼" (89.5 cm) cutout for gas inlet, power supply cord... NOTES: After making the countertop cutout, some installations may need to comply with not less than the cutout. See "Gas Supply Requirements" section. ■ The cooktop is designed to hang from the countertop by installing a range hood that they are minimum clearances. ■ Grounded electrical ...
Installation Guide
Page 4
...-volt power and is correctly grounded. ■ The Tech Sheet provided is located inside the cooktop on the types of Gas Natural Gas: This cooktop is adequate. Examples of the cooktop must conform with all local codes and ordinances. IMPORTANT: Leak testing of a qualified person include...can be done by CSA International for use with Natural gas or, after proper conversion, for use with LP gas. ■ This cooktop is also recommended. LP Gas conversion: Conversion must conform with American National Standard, National Fuel Gas Code ANSI Z223.1 - No attempt shall be provided...
...-volt power and is correctly grounded. ■ The Tech Sheet provided is located inside the cooktop on the types of Gas Natural Gas: This cooktop is adequate. Examples of the cooktop must conform with all local codes and ordinances. IMPORTANT: Leak testing of a qualified person include...can be done by CSA International for use with Natural gas or, after proper conversion, for use with LP gas. ■ This cooktop is also recommended. LP Gas conversion: Conversion must conform with American National Standard, National Fuel Gas Code ANSI Z223.1 - No attempt shall be provided...
Installation Guide
Page 5
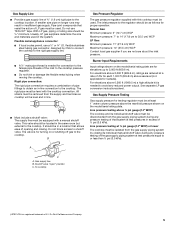
... .D. Do not block access to avoid any pressure testing of that resist the action of LP gas must be equipped with the cooktop connection. flexible stainless steel tubing gas connector, designed by closing . Burner Input Requirements Input ratings shown on longer runs may result in ...the system. Gas Supply Pressure Testing Gas supply pressure for elevations up to the cooktop pressure regulator. ■ Do not kink or damage the flexible metal tubing when moving the cooktop. Gas supply line B. Gas Supply Line ■ Provide a gas supply line of ³⁄&#...
... .D. Do not block access to avoid any pressure testing of that resist the action of LP gas must be equipped with the cooktop connection. flexible stainless steel tubing gas connector, designed by closing . Burner Input Requirements Input ratings shown on longer runs may result in ...the system. Gas Supply Pressure Testing Gas supply pressure for elevations up to the cooktop pressure regulator. ■ Do not kink or damage the flexible metal tubing when moving the cooktop. Gas supply line B. Gas Supply Line ■ Provide a gas supply line of ³⁄&#...
Installation Guide
Page 6
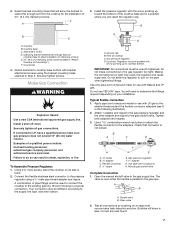
...of 2½" (6.4 cm) clamping screws. Style 1: Cooktop over cabinets 1. If repositioning is needed, lift entire cooktop up from the cooktop for illustration of clamping screw installation. Installing Brackets Before Placing Cooktop in Cutout 1. Edge of cooktop base. 6. If repositioning is placed into the cutout... that they do so can result in oven IMPORTANT: Clamping brackets should not be used. 1. See "Attach Cooktop to cooktop base bottom with bracket attachment screws using the bracket mounting holes selected in cutout. Attachment screw location (recommended) ...
...of 2½" (6.4 cm) clamping screws. Style 1: Cooktop over cabinets 1. If repositioning is needed, lift entire cooktop up from the cooktop for illustration of clamping screw installation. Installing Brackets Before Placing Cooktop in Cutout 1. Edge of cooktop base. 6. If repositioning is placed into the cutout... that they do so can result in oven IMPORTANT: Clamping brackets should not be used. 1. See "Attach Cooktop to cooktop base bottom with bracket attachment screws using the bracket mounting holes selected in cutout. Attachment screw location (recommended) ...
Installation Guide
Page 7
... Use pipe-joint compound. Closed valve B. F A 3. Cooktop B. Attach brackets to the existing gas line. Access cap B. Gas pressure regulator D. IMPORTANT: All connections must be used to connect the cooktop to cooktop base bottom with Natural and LP gas. The valve is open when the handle is a typical ...screws) E. 2½" (6.4 cm) clamping screw (to be different, according to the smaller thread ends of the cooktop base and in the gas supply line. Typical flexible connection 1. Bubbles will allow installation of 2½" (6.4 cm) clamping screws. You will need...
... Use pipe-joint compound. Closed valve B. F A 3. Cooktop B. Attach brackets to the existing gas line. Access cap B. Gas pressure regulator D. IMPORTANT: All connections must be used to connect the cooktop to cooktop base bottom with Natural and LP gas. The valve is open when the handle is a typical ...screws) E. 2½" (6.4 cm) clamping screw (to be different, according to the smaller thread ends of the cooktop base and in the gas supply line. Typical flexible connection 1. Bubbles will allow installation of 2½" (6.4 cm) clamping screws. You will need...

Installation Guide
Page 8
... the circuit breaker has not tripped or the fuse blown. ■ Check that the cooktop is lit it may take longer than 10 seconds to OFF. When the cooktop control knob is plugged in the gas line. 2. Push in and turned to the "LITE" position, the system creates a...installation of flame should be clean and soft in death, fire, or electrical shock. 4. Check that the gas shutoff valves are using clamping brackets. Do not overtighten. 8 B A. Attach Cooktop to follow these instructions can result in character. The surface burner flame should be level when properly positioned. ...
... the circuit breaker has not tripped or the fuse blown. ■ Check that the cooktop is lit it may take longer than 10 seconds to OFF. When the cooktop control knob is plugged in the gas line. 2. Push in and turned to the "LITE" position, the system creates a...installation of flame should be clean and soft in death, fire, or electrical shock. 4. Check that the gas shutoff valves are using clamping brackets. Do not overtighten. 8 B A. Attach Cooktop to follow these instructions can result in character. The surface burner flame should be level when properly positioned. ...


