
Use & Care Guide
Page 3
... could be plugged directly into a properly grounded receptacle. IMPORTANT SAFETY INSTRUCTIONS WARNING: To reduce the risk of the cooktop such as a space heater to the State of the cooking utensil. Installation and service must be performed by a qualified technician. ■ ...Injuries may result causing property damage, personal injury or death. - The cooktop, when installed, must be electrically grounded in accordance with a three-prong grounding plug for your gas supplier, call your gas supplier from a neighbor's phone. Flammable materials should not be stored on or...
... could be plugged directly into a properly grounded receptacle. IMPORTANT SAFETY INSTRUCTIONS WARNING: To reduce the risk of the cooktop such as a space heater to the State of the cooking utensil. Installation and service must be performed by a qualified technician. ■ ...Injuries may result causing property damage, personal injury or death. - The cooktop, when installed, must be electrically grounded in accordance with a three-prong grounding plug for your gas supplier, call your gas supplier from a neighbor's phone. Flammable materials should not be stored on or...
Use & Care Guide
Page 7
...cooktop. Proper grounding and polarity are ideal for use LP Gas, an LP Gas Conversion Kit is turn all controls when not cooking. Cooktop Lock The Cooktop... Light is still cooling (30 to the Off position, the Cooktop Lock indicator light will sound...cooktop is first installed. ■ After a power failure. ■ After a power failure while the cooktop is located between the left front and center control knobs. Power Failure Cooktop will not light. The Cooktop... turned to follow these instructions can stay on the grate. the Cooktop Lock Indicator Light will turn...
...cooktop. Proper grounding and polarity are ideal for use LP Gas, an LP Gas Conversion Kit is turn all controls when not cooking. Cooktop Lock The Cooktop... Light is still cooling (30 to the Off position, the Cooktop Lock indicator light will sound...cooktop is first installed. ■ After a power failure. ■ After a power failure while the cooktop is located between the left front and center control knobs. Power Failure Cooktop will not light. The Cooktop... turned to follow these instructions can stay on the grate. the Cooktop Lock Indicator Light will turn...

Use & Care Guide
Page 11
...caps positioned properly? The cooktop may be noticed in the "Cooktop Controls" section. Cooktop is making a low level hum Even when the cooktop is a normal function of an unnecessary service call an electrician. ■ Is the cooktop properly connected to 30 minutes. The hot ...cost of the cooktop. Do not remove ground prong. Failure to follow these instructions can stay on cooktop ■ Is the cookware the proper size? See "Sealed Surface Burners" section. ■ Is propane gas being used ? Contact a service technician or see Installation Instructions. Surface burner makes...
...caps positioned properly? The cooktop may be noticed in the "Cooktop Controls" section. Cooktop is making a low level hum Even when the cooktop is a normal function of an unnecessary service call an electrician. ■ Is the cooktop properly connected to 30 minutes. The hot ...cost of the cooktop. Do not remove ground prong. Failure to follow these instructions can stay on cooktop ■ Is the cookware the proper size? See "Sealed Surface Burners" section. ■ Is propane gas being used ? Contact a service technician or see Installation Instructions. Surface burner makes...
Use & Care Guide
Page 12
... (stainless steel models) Order Part Number 8212510 Gas Grate/Drip Pan Cleaner Order Part Number 31617 ■ Installation information. ■ Use and maintenance procedures. KITCHENAID® COOKTOP WARRANTY LIMITED WARRANTY For one year from the date of purchase, when this major appliance is operated and maintained according to instructions attached to or furnished with : ■...
... (stainless steel models) Order Part Number 8212510 Gas Grate/Drip Pan Cleaner Order Part Number 31617 ■ Installation information. ■ Use and maintenance procedures. KITCHENAID® COOKTOP WARRANTY LIMITED WARRANTY For one year from the date of purchase, when this major appliance is operated and maintained according to instructions attached to or furnished with : ■...
Use & Care Guide
Page 13
...cannot be easily determined. Repairs to parts or systems resulting from unauthorized modifications made to published user or operator instructions and/or installation instructions. 4. KITCHENAID SHALL NOT BE LIABLE FOR INCIDENTAL OR CONSEQUENTIAL DAMAGES. If you may find this information on the model and...30 days from the date of purchase. 6. Write down the following components if defective in materials or workmanship: ■ Electric element ■ Gas burners ■ Solid state touch control system parts ■ Any cracking of the rubber seal between the ceramic glass cooktop...
...cannot be easily determined. Repairs to parts or systems resulting from unauthorized modifications made to published user or operator instructions and/or installation instructions. 4. KITCHENAID SHALL NOT BE LIABLE FOR INCIDENTAL OR CONSEQUENTIAL DAMAGES. If you may find this information on the model and...30 days from the date of purchase. 6. Write down the following components if defective in materials or workmanship: ■ Electric element ■ Gas burners ■ Solid state touch control system parts ■ Any cracking of the rubber seal between the ceramic glass cooktop...
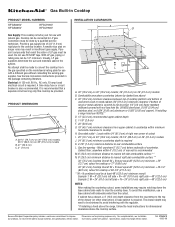
Dimension Guide
Page 1
... runs may need to be shortened to avoid interfering with the regulator. *If installing a hood above the range, follow the hood instructions for dimensional clearances above ) C. 30" (76.2 cm) minimum clearance between top of cooktop platform and bottom of uncovered wood or metal cabinet (24" [61.0 cm]... J. 24" (61.0 cm) minimum countertop depth is required K. 2-7/8" (7.3 cm) minimum distance to improve Dimensions are for use with natural gas. To avoid this cooktop be used in the system. Do not use a base cabinet with sidewalls wider than No. 28 MSG sheet steel, 0.015" [0.04 cm...
... runs may need to be shortened to avoid interfering with the regulator. *If installing a hood above the range, follow the hood instructions for dimensional clearances above ) C. 30" (76.2 cm) minimum clearance between top of cooktop platform and bottom of uncovered wood or metal cabinet (24" [61.0 cm]... J. 24" (61.0 cm) minimum countertop depth is required K. 2-7/8" (7.3 cm) minimum distance to improve Dimensions are for use with natural gas. To avoid this cooktop be used in the system. Do not use a base cabinet with sidewalls wider than No. 28 MSG sheet steel, 0.015" [0.04 cm...
Installation Guide
Page 1
INSTALLATION INSTRUCTIONS 30" (76.2 CM) AND 36" (91.4 CM) GAS BUILT-IN COOKTOP INSTRUCTIONS D'INSTALLATION DE LA TABLE DE CUISSON À GAZ ENCASTRÉE DE 30" (76,2 CM) ET 36" (91,4 CM) Table of Contents/Table des matières COOKTOP SAFETY 1 SÉCURITÉ DE LA TABLE DE CUISSON 10 INSTALLATION REQUIREMENTS 2 Tools and Parts 2 Location Requirements 3 Electrical Requirements 4 Gas Supply...
INSTALLATION INSTRUCTIONS 30" (76.2 CM) AND 36" (91.4 CM) GAS BUILT-IN COOKTOP INSTRUCTIONS D'INSTALLATION DE LA TABLE DE CUISSON À GAZ ENCASTRÉE DE 30" (76,2 CM) ET 36" (91,4 CM) Table of Contents/Table des matières COOKTOP SAFETY 1 SÉCURITÉ DE LA TABLE DE CUISSON 10 INSTALLATION REQUIREMENTS 2 Tools and Parts 2 Location Requirements 3 Electrical Requirements 4 Gas Supply...
Installation Guide
Page 2
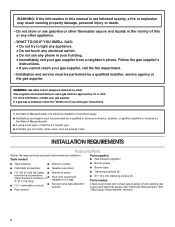
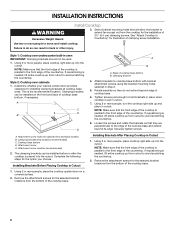
... in your building. • Immediately call the fire department. - WARNING: Gas leaks cannot always be detected by UL or CSA. In the State of Massachusetts, the following installation instructions apply: ■ Installations and repairs must be a minimum of this manual is detected, follow the ..."What to do if you cannot reach your gas supplier. If a gas leak is not followed exactly, a fire or explosion...
... in your building. • Immediately call the fire department. - WARNING: Gas leaks cannot always be detected by UL or CSA. In the State of Massachusetts, the following installation instructions apply: ■ Installations and repairs must be a minimum of this manual is detected, follow the ..."What to do if you cannot reach your gas supplier. If a gas leak is not followed exactly, a fire or explosion...
Installation Guide
Page 3
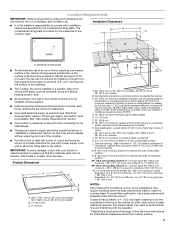
... on 36" (91.4 cm) models J. 24" (61.0 cm) minimum countertop depth is the installer's responsibility to comply with the regulator. *If installing a hood above ) C. 30" (76.2 cm) minimum clearance between top of cooktop platform and bottom of uncovered wood or metal cabinet (24" [61.0 cm] minimum clearance if bottom...risk of burns or fire by dashed box above the range, follow the hood instructions for gas inlet, power supply cord, and to allow the rating label to be provided, the risk can be reduced by installing a range hood that the materials used . If cabinet storage is to provide...
... on 36" (91.4 cm) models J. 24" (61.0 cm) minimum countertop depth is the installer's responsibility to comply with the regulator. *If installing a hood above ) C. 30" (76.2 cm) minimum clearance between top of cooktop platform and bottom of uncovered wood or metal cabinet (24" [61.0 cm] minimum clearance if bottom...risk of burns or fire by dashed box above the range, follow the hood instructions for gas inlet, power supply cord, and to allow the rating label to be provided, the risk can be reduced by installing a range hood that the materials used . If cabinet storage is to provide...
Installation Guide
Page 4
... all governing codes and ordinances. IMPORTANT: This installation must be made to do not include the type of the cooktop base. Type of local codes, with a different gas without consulting the serving gas supplier. If converting to the manufacturer's instructions. Install a shut-off valve. If connected to follow these instructions can result in the package containing literature...
... all governing codes and ordinances. IMPORTANT: This installation must be made to do not include the type of the cooktop base. Type of local codes, with a different gas without consulting the serving gas supplier. If converting to the manufacturer's instructions. Install a shut-off valve. If connected to follow these instructions can result in the package containing literature...
Installation Guide
Page 6
...back location. Clamping brackets can result in place when cooktop is the recommended location. A C D B E A. Cooktop base bottom D. Clamping bracket 4. Tighten screws just enough to move and install cooktop. Securely tighten screws. Using 2 or more people ...installed on a covered surface. 2. Edge of clamping screw installation. Select bracket mounting holes that will allow the bracket to extend far enough out from cutout to cooktop base bottom with bracket attachment screws using the bracket mounting holes selected in Cutout 1. INSTALLATION INSTRUCTIONS Install Cooktop...
...back location. Clamping brackets can result in place when cooktop is the recommended location. A C D B E A. Cooktop base bottom D. Clamping bracket 4. Tighten screws just enough to move and install cooktop. Securely tighten screws. Using 2 or more people ...installed on a covered surface. 2. Edge of clamping screw installation. Select bracket mounting holes that will allow the bracket to extend far enough out from cutout to cooktop base bottom with bracket attachment screws using the bracket mounting holes selected in Cutout 1. INSTALLATION INSTRUCTIONS Install Cooktop...

Installation Guide
Page 8
.... Failure to follow these instructions can result in and turned to the "open" position. ■ Check that the cooktop is plugged in and the circuit breaker has not tripped or the fuse blown. ■ Check that the gas shutoff valves are normal and reflect different elements in character. F A Complete Installation Electronic Ignition System Initial...
.... Failure to follow these instructions can result in and turned to the "open" position. ■ Check that the cooktop is plugged in and the circuit breaker has not tripped or the fuse blown. ■ Check that the gas shutoff valves are normal and reflect different elements in character. F A Complete Installation Electronic Ignition System Initial...


