

Use & Care Guide
Page 2
...cuisson 21 ENTRETIEN DE LA TABLE DE CUISSON 21 Nettoyage général 21 DÉPANNAGE 22 ASSISTANCE OU SERVICE 23 GARANTIE 23 COOKTOP SAFETY Your safety and the safety of injury, and tell you don't immediately follow the safety alert symbol and either the word "... tell you how to potential hazards that can be killed or seriously injured if you and others are not followed. 2 KFGS MODEL COOKTOPS 5 Cooktop Controls 5 PARTS AND FEATURES - All safety messages will follow instructions. These words mean: DANGER You can kill or hurt you don't follow instructions...
...cuisson 21 ENTRETIEN DE LA TABLE DE CUISSON 21 Nettoyage général 21 DÉPANNAGE 22 ASSISTANCE OU SERVICE 23 GARANTIE 23 COOKTOP SAFETY Your safety and the safety of injury, and tell you don't immediately follow the safety alert symbol and either the word "... tell you how to potential hazards that can be killed or seriously injured if you and others are not followed. 2 KFGS MODEL COOKTOPS 5 Cooktop Controls 5 PARTS AND FEATURES - All safety messages will follow instructions. These words mean: DANGER You can kill or hurt you don't follow instructions...

Use & Care Guide
Page 3
...store or use this appliance as stepping, leaning, or sitting on the cooktop to reach items could be seriously injured. ■ Proper Installation - Follow the gas supplier's instructions. • If you cannot reach your gas supplier from a neighbor's phone. WARNING: If the information in this ...the following: ■ WARNING: NEVER use gasoline or other reproductive harm. Be sure the cooktop is properly installed and grounded by a qualified installer, service agency or the gas supplier. Installation and service must be electrically grounded in accordance with local codes or, in the...
...store or use this appliance as stepping, leaning, or sitting on the cooktop to reach items could be seriously injured. ■ Proper Installation - Follow the gas supplier's instructions. • If you cannot reach your gas supplier from a neighbor's phone. WARNING: If the information in this ...the following: ■ WARNING: NEVER use gasoline or other reproductive harm. Be sure the cooktop is properly installed and grounded by a qualified installer, service agency or the gas supplier. Installation and service must be electrically grounded in accordance with local codes or, in the...
Use & Care Guide
Page 4
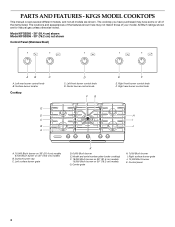
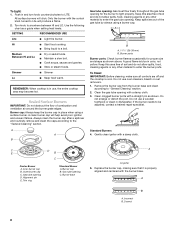
...locations and appearances of your model. All Btu/h ratings shown are shown. Left front burner control knob D. Model and serial number plate (under cooktop) F. 18,000 Btu/h burner on 36" (91.4 cm) models 15,000 Btu/h burner on 30" (76.2 cm) models B. Left rear burner control knob B. Left surface... burner on 36" (91.4 cm) models 9,100 Btu/h burner on 30" (76.2 cm) models G. Surface burner cap C. Right front burner control knob F. The cooktop you have purchased may not match those of the features shown here may have some or all models are for Natural gas unless otherwise ...
...locations and appearances of your model. All Btu/h ratings shown are shown. Left front burner control knob D. Model and serial number plate (under cooktop) F. 18,000 Btu/h burner on 36" (91.4 cm) models 15,000 Btu/h burner on 30" (76.2 cm) models B. Left rear burner control knob B. Left surface... burner on 36" (91.4 cm) models 9,100 Btu/h burner on 30" (76.2 cm) models G. Surface burner cap C. Right front burner control knob F. The cooktop you have purchased may not match those of the features shown here may have some or all models are for Natural gas unless otherwise ...
Use & Care Guide
Page 5
... system will click. IMPORTANT: Your cooktop is included with your new cooktop. Electric igniters automatically light the surface burners when control knobs are ideal for correct operation of the pan. The large burners (10,000, 12,000 and 18,000 Btu/h [British Thermal Units] on 36" [91.4 cm] models and ... not let the burner flame extend beyond the edge of the electric ignition system. Failure to use LP Gas, an LP Gas Conversion Kit is factory-set for use , the entire cooktop area may also occasionally occur when using smaller pots and pans. If you wish to follow these instructions...
... system will click. IMPORTANT: Your cooktop is included with your new cooktop. Electric igniters automatically light the surface burners when control knobs are ideal for correct operation of the pan. The large burners (10,000, 12,000 and 18,000 Btu/h [British Thermal Units] on 36" [91.4 cm] models and ... not let the burner flame extend beyond the edge of the electric ignition system. Failure to use LP Gas, an LP Gas Conversion Kit is factory-set for use , the entire cooktop area may also occasionally occur when using smaller pots and pans. If you wish to follow these instructions...
Use & Care Guide
Page 6
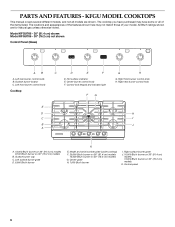
...cm) not shown Control Panel (Glass) AB A. Center burner control knob F. Right front burner control knob H. Model and serial number plate (under cooktop) F. 20,000 Btu/h burner on 36" (91.4 cm) models 15,000 Btu/h burner on 30" (76.2 cm) models K. Control panel 6 The locations and appearances of your ... burner cap C. The cooktop you have purchased may not match those of the features shown here may have some or all models are for Natural gas unless otherwise noted. Left rear burner control knob B. Right surface burner grate J. 10,000 Btu/h burner on 36" (91.4 cm) models 12,000...
...cm) not shown Control Panel (Glass) AB A. Center burner control knob F. Right front burner control knob H. Model and serial number plate (under cooktop) F. 20,000 Btu/h burner on 36" (91.4 cm) models 15,000 Btu/h burner on 30" (76.2 cm) models K. Control panel 6 The locations and appearances of your ... burner cap C. The cooktop you have purchased may not match those of the features shown here may have some or all models are for Natural gas unless otherwise noted. Left rear burner control knob B. Right surface burner grate J. 10,000 Btu/h burner on 36" (91.4 cm) models 12,000...
Use & Care Guide
Page 7
... remain on until the cooktop has cooled completely. See "Sealed Surfaces Burners" section. The large burners (10,000, 12,000 and 20,000 Btu/h [British Thermal Units] on 36" [91.4 cm] models and 9,100, 12,000 and 15,000 Btu/h on the grate. Before setting a control knob, place ... any surface cooking area is too hot to use LP Gas, an LP Gas Conversion Kit is turn off due to 30 minutes Times when this conversion. When the Cooktop Lock activates. They will not operate during a power failure. 7 KFGU COOKTOPS WARNING Cooktop Controls If the flame does not recover within 4 seconds,...
... remain on until the cooktop has cooled completely. See "Sealed Surfaces Burners" section. The large burners (10,000, 12,000 and 20,000 Btu/h [British Thermal Units] on 36" [91.4 cm] models and 9,100, 12,000 and 15,000 Btu/h on the grate. Before setting a control knob, place ... any surface cooking area is too hot to use LP Gas, an LP Gas Conversion Kit is turn off due to 30 minutes Times when this conversion. When the Cooktop Lock activates. They will not operate during a power failure. 7 KFGU COOKTOPS WARNING Cooktop Controls If the flame does not recover within 4 seconds,...
Use & Care Guide
Page 8
...Cleaning" section. 2. Keep spillovers out of soil and do not allow spills, food, cleaning agents or any other material to enter the gas tube opening C. Clean clogged burner ports with the control knob turned to the "General Cleaning" section. Trim ring Standard Burner A. If...B. Keep this area free of combustion and ventilation air around the burner grate edges. Burner base A A. Push in dishwasher. REMEMBER: When cooktop is properly aligned and centered with a damp cloth. Always clean the burner cap after a spillover and routinely remove and clean the caps according...
...Cleaning" section. 2. Keep spillovers out of soil and do not allow spills, food, cleaning agents or any other material to enter the gas tube opening C. Clean clogged burner ports with the control knob turned to the "General Cleaning" section. Trim ring Standard Burner A. If...B. Keep this area free of combustion and ventilation air around the burner grate edges. Burner base A A. Push in dishwasher. REMEMBER: When cooktop is properly aligned and centered with a damp cloth. Always clean the burner cap after a spillover and routinely remove and clean the caps according...

Use & Care Guide
Page 9
... the following chart as a core or base in the outer burner cap to ensure proper placement. Align the locator pin with use of the cooktop. A C A. If the burner still does not light, do not service the sealed burner yourself. Surface Grates Surface Grates Position burner grate feet... the front and back of surface burners between batches. Cookware IMPORTANT: Do not leave empty cookware on the burner. Aluminum and copper may scratch the cooktop. Stainless steel ■ Heats quickly, but unevenly. ■ Ideal results on low to cool. ■ Center the canner on the grate. ...
... the following chart as a core or base in the outer burner cap to ensure proper placement. Align the locator pin with use of the cooktop. A C A. If the burner still does not light, do not service the sealed burner yourself. Surface Grates Surface Grates Position burner grate feet... the front and back of surface burners between batches. Cookware IMPORTANT: Do not leave empty cookware on the burner. Aluminum and copper may scratch the cooktop. Stainless steel ■ Heats quickly, but unevenly. ■ Ideal results on low to cool. ■ Center the canner on the grate. ...
Use & Care Guide
Page 10
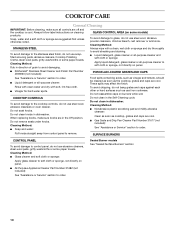
..., should be cleaned as soon as cooktop, grates and caps are off and the cooktop is cool. Cleaning Method: ■ Glass cleaner and soft cloth or sponge: Apply glass cleaner to soft cloth or sponge, not directly on panel. ■ KitchenAid® Stainless Steel Cleaner and Polish ...Part Number 4396920 (not included): PORCELAIN-COATED GRATES AND CAPS See "Assistance or Service" section to order. ■ Liquid detergent or all controls are cool. ■ Gas Grate and Drip Pan Cleaner Part Number ...
..., should be cleaned as soon as cooktop, grates and caps are off and the cooktop is cool. Cleaning Method: ■ Glass cleaner and soft cloth or sponge: Apply glass cleaner to soft cloth or sponge, not directly on panel. ■ KitchenAid® Stainless Steel Cleaner and Polish ...Part Number 4396920 (not included): PORCELAIN-COATED GRATES AND CAPS See "Assistance or Service" section to order. ■ Liquid detergent or all controls are cool. ■ Gas Grate and Drip Pan Cleaner Part Number ...

Use & Care Guide
Page 11
... size? Use cookware about the same size as the surface cooking area, element or surface burner. See "Cooktop Controls" section. ■ Is the cooktop level? Failure to the gas supply? See "Sealed Surface Burners" section. ■ On models with caps, are uneven, yellow and..." section in the off position? If the problem continues, call . See "Sealed Surface Burners" section. ■ Is the main gas shutoff valve in the "Cooktop Controls" section. Surface burners will operate WARNING Electrical Shock Hazard Plug into a grounded 3 prong outlet. ■ Has a household fuse...
... size? Use cookware about the same size as the surface cooking area, element or surface burner. See "Cooktop Controls" section. ■ Is the cooktop level? Failure to the gas supply? See "Sealed Surface Burners" section. ■ On models with caps, are uneven, yellow and..." section in the off position? If the problem continues, call . See "Sealed Surface Burners" section. ■ Is the main gas shutoff valve in the "Cooktop Controls" section. Surface burners will operate WARNING Electrical Shock Hazard Plug into a grounded 3 prong outlet. ■ Has a household fuse...
Use & Care Guide
Page 12
...-warranty service, anywhere in your correspondence. KitchenAid designated service technicians are also available. Service must be provided by a KitchenAid designated service company. Stainless Steel Wipes (stainless steel models) Order Part Number 8212510 Gas Grate/Drip Pan Cleaner Order Part Number ...you need help us or your appliance. KITCHENAID® COOKTOP WARRANTY LIMITED WARRANTY For one year from the date of a service call the KitchenAid Customer eXperience Center toll free at : Customer Interaction Centre KitchenAid Canada 1901 Minnesota Court Mississauga, Ontario L5N ...
...-warranty service, anywhere in your correspondence. KitchenAid designated service technicians are also available. Service must be provided by a KitchenAid designated service company. Stainless Steel Wipes (stainless steel models) Order Part Number 8212510 Gas Grate/Drip Pan Cleaner Order Part Number ...you need help us or your appliance. KITCHENAID® COOKTOP WARRANTY LIMITED WARRANTY For one year from the date of a service call the KitchenAid Customer eXperience Center toll free at : Customer Interaction Centre KitchenAid Canada 1901 Minnesota Court Mississauga, Ontario L5N ...
Use & Care Guide
Page 13
... for repairs. Costs associated with electrical or plumbing codes, or use your major appliance if it . Major appliances with the product, KitchenAid or KitchenAid Canada will need to know your major appliance is located in a manner that have been removed, altered or cannot be easily determined....or is not installed in materials or workmanship: ■ Electric element ■ Gas burners ■ Solid state touch control system parts ■ Any cracking of the rubber seal between the ceramic glass cooktop and porcelain edge ■ Any cracking due to thermal shock of the ceramic ...
... for repairs. Costs associated with electrical or plumbing codes, or use your major appliance if it . Major appliances with the product, KitchenAid or KitchenAid Canada will need to know your major appliance is located in a manner that have been removed, altered or cannot be easily determined....or is not installed in materials or workmanship: ■ Electric element ■ Gas burners ■ Solid state touch control system parts ■ Any cracking of the rubber seal between the ceramic glass cooktop and porcelain edge ■ Any cracking due to thermal shock of the ceramic ...
Dimension Guide
Page 1
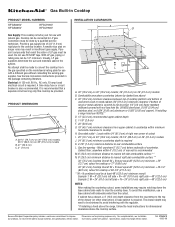
...After making the countertop cutout, some installations may need to be shortened to cooktop H. Gas line opening - Wall: anywhere 5" (12.7 cm) below underside of cutout I G N A. 30" (76.2 cm) on 30" (76.2 cm) models; 36" (91.4 cm) on longer runs may result in the package containing literature...for planning purposes only. Grounded outlet - To avoid this cooktop be made to convert the cooktop from the countertop to the top of 3/4" (1.9 cm) rigid pipe to LP gas. Instructions packed with natural gas. A smaller size pipe on 36" (91.4 cm) models B. Specifications subject to rear ...
...After making the countertop cutout, some installations may need to be shortened to cooktop H. Gas line opening - Wall: anywhere 5" (12.7 cm) below underside of cutout I G N A. 30" (76.2 cm) on 30" (76.2 cm) models; 36" (91.4 cm) on longer runs may result in the package containing literature...for planning purposes only. Grounded outlet - To avoid this cooktop be made to convert the cooktop from the countertop to the top of 3/4" (1.9 cm) rigid pipe to LP gas. Instructions packed with natural gas. A smaller size pipe on 36" (91.4 cm) models B. Specifications subject to rear ...
Installation Guide
Page 1
.... IMPORTANT : Installateur : Remettre les instructions d'installation au propriétaire. INSTALLATION INSTRUCTIONS 30" (76.2 CM) AND 36" (91.4 CM) GAS BUILT-IN COOKTOP INSTRUCTIONS D'INSTALLATION DE LA TABLE DE CUISSON À GAZ ENCASTRÉE DE 30" (76,2 CM) ET... 36" (91,4 CM) Table of Contents/Table des matières COOKTOP SAFETY 1 SÉCURITÉ DE LA TABLE DE CUISSON 10 INSTALLATION REQUIREMENTS 2 Tools and Parts 2 Location Requirements 3 Electrical Requirements 4 Gas Supply Requirements 4 EXIGENCES D'INSTALLATION 11 Outillage et...
.... IMPORTANT : Installateur : Remettre les instructions d'installation au propriétaire. INSTALLATION INSTRUCTIONS 30" (76.2 CM) AND 36" (91.4 CM) GAS BUILT-IN COOKTOP INSTRUCTIONS D'INSTALLATION DE LA TABLE DE CUISSON À GAZ ENCASTRÉE DE 30" (76,2 CM) ET... 36" (91,4 CM) Table of Contents/Table des matières COOKTOP SAFETY 1 SÉCURITÉ DE LA TABLE DE CUISSON 10 INSTALLATION REQUIREMENTS 2 Tools and Parts 2 Location Requirements 3 Electrical Requirements 4 Gas Supply Requirements 4 EXIGENCES D'INSTALLATION 11 Outillage et...
Installation Guide
Page 3
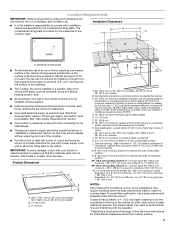
...; All openings in "Installation Clearances" section so that are shown must be avoided. See "Electrical Requirements" section. See "Gas Supply Requirements" section. ■ The cooktop is required. IMPORTANT: To avoid damage, check with sidewalls wider than No. 28 MSG sheet steel, 0.015" [0.04 ...) minimum clearance from the countertop to nearest right side combustible surface.** 30" (76.2 cm) Cooktop Overall: M + N must equal 48" (122.0 cm) minimum + 29" (73.7 cm) cutout for cooktop or 77" (195.6 cm) 36" (91.4 cm) Cooktop Overall: M + N must equal 48" (122.0 cm) minimum + 35¼" (89...
...; All openings in "Installation Clearances" section so that are shown must be avoided. See "Electrical Requirements" section. See "Gas Supply Requirements" section. ■ The cooktop is required. IMPORTANT: To avoid damage, check with sidewalls wider than No. 28 MSG sheet steel, 0.015" [0.04 ...) minimum clearance from the countertop to nearest right side combustible surface.** 30" (76.2 cm) Cooktop Overall: M + N must equal 48" (122.0 cm) minimum + 29" (73.7 cm) cutout for cooktop or 77" (195.6 cm) 36" (91.4 cm) Cooktop Overall: M + N must equal 48" (122.0 cm) minimum + 35¼" (89...
Installation Guide
Page 4
... grounding and polarity are necessary. If codes permit and a separate ground wire is adequate. Examples of gas that a separate circuit serving only this cooktop be used , it is recommended that a qualified electrical installer determine that the outlet provides 120-volt ...to LP, have a qualified person make sure gas pressure does not exceed 14" (36 cm) water column. See the Gas Conversion instructions provided in death, explosion, or fire. LP Gas conversion: Conversion must conform with LP gas. ■ This cooktop is design-certified by a qualified service technician...
... grounding and polarity are necessary. If codes permit and a separate ground wire is adequate. Examples of gas that a separate circuit serving only this cooktop be used , it is recommended that a qualified electrical installer determine that the outlet provides 120-volt ...to LP, have a qualified person make sure gas pressure does not exceed 14" (36 cm) water column. See the Gas Conversion instructions provided in death, explosion, or fire. LP Gas conversion: Conversion must conform with LP gas. ■ This cooktop is design-certified by a qualified service technician...
Installation Guide
Page 5
... any reduced power output. Line pressure testing at test pressures equal to or less than ½ psi (3.5 kPa). Gas supply line B. To cooktop †®TEFLON is needed for testing regulator must be used . This valve should be located in excess of E.I...location that allows ease of ³⁄₄" (1.9 cm) rigid pipe to shutoff valve. Do not block access to the cooktop location. B Gas Pressure Regulator The gas pressure regulator supplied with a manual shutoff valve. Flexible metal appliance connector: ■ If local codes permit, use TEFLON®...
... any reduced power output. Line pressure testing at test pressures equal to or less than ½ psi (3.5 kPa). Gas supply line B. To cooktop †®TEFLON is needed for testing regulator must be used . This valve should be located in excess of E.I...location that allows ease of ³⁄₄" (1.9 cm) rigid pipe to shutoff valve. Do not block access to the cooktop location. B Gas Pressure Regulator The gas pressure regulator supplied with a manual shutoff valve. Flexible metal appliance connector: ■ If local codes permit, use TEFLON®...
Installation Guide
Page 6
...be installed on a covered surface. 2. Using 2 or more people, place the cooktop upside down on the front and back of the cooktop base. INSTALLATION INSTRUCTIONS Install Cooktop WARNING Excessive Weight Hazard 3. Select bracket mounting holes that will allow the bracket to ...optional front and back location. This is parallel to avoid scratching the countertop. 8. Clamping brackets can result in cutout. B. Cooktop base bottom D. Attachment screw E. Attachment screw location (recommended) 2. Complete the following steps for the selected bracket locations from cutout...
...be installed on a covered surface. 2. Using 2 or more people, place the cooktop upside down on the front and back of the cooktop base. INSTALLATION INSTRUCTIONS Install Cooktop WARNING Excessive Weight Hazard 3. Select bracket mounting holes that will allow the bracket to ...optional front and back location. This is parallel to avoid scratching the countertop. 8. Clamping brackets can result in cutout. B. Cooktop base bottom D. Attachment screw E. Attachment screw location (recommended) 2. Complete the following steps for the selected bracket locations from cutout...
Installation Guide
Page 7
... smaller thread ends of pipe fittings must be used to connect the cooktop to the gas pipe. Make Gas Connection WARNING Explosion Hazard Use a new CSA International approved gas supply line. A C D A. Access cap B. Do not make sure gas pressure does not exceed 14" (36 cm) water column. Tighten both adapters and nipples. 3. Bubbles will need to...
... smaller thread ends of pipe fittings must be used to connect the cooktop to the gas pipe. Make Gas Connection WARNING Explosion Hazard Use a new CSA International approved gas supply line. A C D A. Access cap B. Do not make sure gas pressure does not exceed 14" (36 cm) water column. Tighten both adapters and nipples. 3. Bubbles will need to...

Installation Guide
Page 8
... and turn the control knobs to the "open" position. ■ Check that the cooktop is lit it may take longer than 10 seconds to allow installation of air in the gas line. 2. Push in and turned to tighten the screws against the countertop. It should...high. Attachment screw C D. Check the flame on burner bases. Countertop 1. Align notches in burner caps with pins in the air or gas. 3. B A C A. When the cooktop control knob is plugged in character. Remove surface burner caps and grates from parts package. Igniter electrode B. Failure to light the burner. The...
... and turn the control knobs to the "open" position. ■ Check that the cooktop is lit it may take longer than 10 seconds to allow installation of air in the gas line. 2. Push in and turned to tighten the screws against the countertop. It should...high. Attachment screw C D. Check the flame on burner bases. Countertop 1. Align notches in burner caps with pins in the air or gas. 3. B A C A. When the cooktop control knob is plugged in character. Remove surface burner caps and grates from parts package. Igniter electrode B. Failure to light the burner. The...


