Owners Manual
Page 3
... the work bowl 9 Attaching the work bowl cover 10 Installing the adjustable slicing disc 10 Adjusting the slicing thickness 10 Installing the reversible shredding disc 11 Installing the multipurpose blade or dough blade 11 Installing the mini-bowl and mini-blade 12 OPERATING THE FOOD PROCESSOR Using the Food Processor 13 Using the 3-in-1 feed tube 14 Removing processed foods 15 TIPS FOR GREAT RESULTS Using the multipurpose blade 16 Using a slicing or shredding disc 17 Using the dough blade 17 Helpful hints...18 CARE AND CLEANING Cleaning the Food Processor 19 TROUBLESHOOTING 20...
... the work bowl 9 Attaching the work bowl cover 10 Installing the adjustable slicing disc 10 Adjusting the slicing thickness 10 Installing the reversible shredding disc 11 Installing the multipurpose blade or dough blade 11 Installing the mini-bowl and mini-blade 12 OPERATING THE FOOD PROCESSOR Using the Food Processor 13 Using the 3-in-1 feed tube 14 Removing processed foods 15 TIPS FOR GREAT RESULTS Using the multipurpose blade 16 Using a slicing or shredding disc 17 Using the dough blade 17 Helpful hints...18 CARE AND CLEANING Cleaning the Food Processor 19 TROUBLESHOOTING 20...
Owners Manual
Page 4
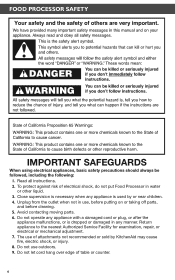
... shock, do not put Food Processor in use of attachments not recommended or sold by or near children. 4. To protect against risk of table or counter. 4 Avoid contacting moving parts. 6. Read all instructions. 2. Unplug from the outlet when not in water or other liquid. 3. Return appliance to the nearest Authorized Service Facility for examination, repair, or electrical or...
... shock, do not put Food Processor in use of attachments not recommended or sold by or near children. 4. To protect against risk of table or counter. 4 Avoid contacting moving parts. 6. Read all instructions. 2. Unplug from the outlet when not in water or other liquid. 3. Return appliance to the nearest Authorized Service Facility for examination, repair, or electrical or...
Owners Manual
Page 5
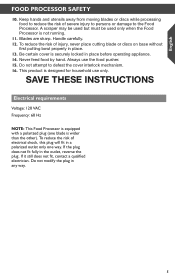
... use the food pusher. 15. This product is securely locked in a polarized outlet only one blade is not running. 11. Always use only. Do not modify the plug in the outlet, reverse the plug. If the plug does not fit fully in any way. 5 Blades are sharp. Handle carefully. 12. Keep hands and utensils away from moving blades or discs while processing food...
... use the food pusher. 15. This product is securely locked in a polarized outlet only one blade is not running. 11. Always use only. Do not modify the plug in the outlet, reverse the plug. If the plug does not fit fully in any way. 5 Blades are sharp. Handle carefully. 12. Keep hands and utensils away from moving blades or discs while processing food...
Owners Manual
Page 6
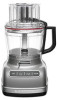
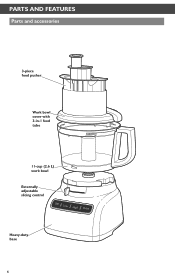
CPAMRDTS+ASNHDIFTFECALTICUKRETSO CHANGE COPY Parts and accessories 3-piece food pusher Work bowl cover with 3-in-1 feed tube 11-cup (2.6 L) work bowl Externally adjustable slicing control Heavy-duty base 6
CPAMRDTS+ASNHDIFTFECALTICUKRETSO CHANGE COPY Parts and accessories 3-piece food pusher Work bowl cover with 3-in-1 feed tube 11-cup (2.6 L) work bowl Externally adjustable slicing control Heavy-duty base 6

Owners Manual
Page 7
English CPAMRDTS+ASNHDIFTFECALTICUKRETSO CHANGE COPY Externally adjustable slicing disc (thin to thick) Multipurpose stainless steel blade Reversible (2mm-4mm) shredding disc Reversible shredding disc adapter Dough blade Storage case Mini-bowl and Mini-blade 7
English CPAMRDTS+ASNHDIFTFECALTICUKRETSO CHANGE COPY Externally adjustable slicing disc (thin to thick) Multipurpose stainless steel blade Reversible (2mm-4mm) shredding disc Reversible shredding disc adapter Dough blade Storage case Mini-bowl and Mini-blade 7
Owners Manual
Page 8
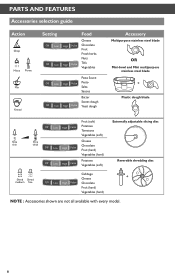
CPAMRDTS+ASNHDIFTFECALTICUKRETSO CHANGE COPY Accessories selection guide Action Chop Setting Mince Puree Mix Knead Food Cheese Chocolate Fruit Fresh herbs Nuts Tofu Vegetables Pasta Sauce Pesto Salsa Sauces Batter Sweet dough Yeast dough Accessory Multipurpose stainless steel blade OR Mini-bowl and Mini multipurpose stainless steel blade + Plastic dough blade Slice Slice thin thick Fruit (soft) Potatoes Tomatoes Vegetables (soft) Cheese Chocolate Fruit (hard) Vegetables (hard) Potatoes Vegetables (soft...
CPAMRDTS+ASNHDIFTFECALTICUKRETSO CHANGE COPY Accessories selection guide Action Chop Setting Mince Puree Mix Knead Food Cheese Chocolate Fruit Fresh herbs Nuts Tofu Vegetables Pasta Sauce Pesto Salsa Sauces Batter Sweet dough Yeast dough Accessory Multipurpose stainless steel blade OR Mini-bowl and Mini multipurpose stainless steel blade + Plastic dough blade Slice Slice thin thick Fruit (soft) Potatoes Tomatoes Vegetables (soft) Cheese Chocolate Fruit (hard) Vegetables (hard) Potatoes Vegetables (soft...
Owners Manual
Page 9
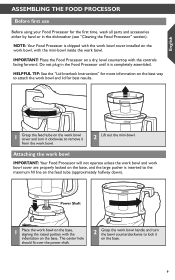
... the power shaft. 2 Grasp the work bowl handle and turn it clockwise to remove it from the work bowl. 2 Lift out the mini-bowl. HELPFUL TIP: See the "Lid Interlock Instructions" for more information on the best way to attach the work bowl and lid for the first time, wash all parts and accessories either by hand or in the Food Processor until it is shipped with the work bowl cover installed on the work bowl, with...
... the power shaft. 2 Grasp the work bowl handle and turn it clockwise to remove it from the work bowl. 2 Lift out the mini-bowl. HELPFUL TIP: See the "Lid Interlock Instructions" for more information on the best way to attach the work bowl and lid for the first time, wash all parts and accessories either by hand or in the Food Processor until it is shipped with the work bowl cover installed on the work bowl, with...
Owners Manual
Page 10
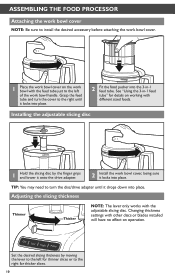
... Installing the adjustable slicing disc 1 Hold the slicing disc by moving the lever to the right until it locks into place. Adjusting the slicing thickness Thinner Thicker NOTE: The lever only works with other discs or blades installed will have no effect on working with different sized foods. See "Using the 3-in -1 feed tube. Changing thickness settings with the adjustable slicing disc. TIP: You may need to turn the cover to the left of the work bowl cover...
... Installing the adjustable slicing disc 1 Hold the slicing disc by moving the lever to the right until it locks into place. Adjusting the slicing thickness Thinner Thicker NOTE: The lever only works with other discs or blades installed will have no effect on working with different sized foods. See "Using the 3-in -1 feed tube. Changing thickness settings with the adjustable slicing disc. TIP: You may need to turn the cover to the left of the work bowl cover...
Owners Manual
Page 11
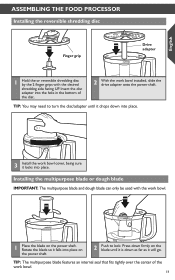
... dough blade can only be used with the desired shredding side facing UP. Insert the disc adapter into place on the power shaft. 2 Push to turn the disc/adapter until it is down into place. 3 Install the work bowl cover, being sure it locks into place. TIP: The multipurpose blade features an internal seal that fits tightly over the center of the disc. 2 With the work bowl installed, slide the drive adapter onto the power shaft...
... dough blade can only be used with the desired shredding side facing UP. Insert the disc adapter into place on the power shaft. 2 Push to turn the disc/adapter until it is down into place. 3 Install the work bowl cover, being sure it locks into place. TIP: The multipurpose blade features an internal seal that fits tightly over the center of the disc. 2 With the work bowl installed, slide the drive adapter onto the power shaft...
Owners Manual
Page 12
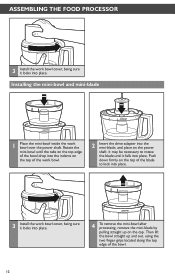
... on the top edge of the bowl drop into the indents on the power shaft. Rotate the mini-bowl until it locks into the mini-blade, and place on the top of the work bowl. 2 Insert the drive adapter into place. Installing the mini-bowl and mini-blade 1 Place the mini-bowl inside the work bowl cover, being sure it falls into place. It may be necessary to lock into place. 3 Install the work bowl over the power shaft.
... on the top edge of the bowl drop into the indents on the power shaft. Rotate the mini-bowl until it locks into the mini-blade, and place on the top of the work bowl. 2 Insert the drive adapter into place. Installing the mini-bowl and mini-blade 1 Place the mini-bowl inside the work bowl cover, being sure it falls into place. It may be necessary to lock into place. 3 Install the work bowl over the power shaft.

Owners Manual
Page 13
... the work bowl, blades, and work bowl indicates the maximum level of openings. Keep ngers out of liquid that can result in amputation or cuts. The indicator light will go out and the blade or disc will glow. 2 When finished, press the OFF button. Keep away from children. English COMPEDR+ATSINHIGFTTHCELIFCOKOTDOPCRHOACNEGSSEOCROPY Using the Food Processor Before operating the Food Processor, be processed by the Food Processor. 1 To turn...
... the work bowl, blades, and work bowl indicates the maximum level of openings. Keep ngers out of liquid that can result in amputation or cuts. The indicator light will go out and the blade or disc will glow. 2 When finished, press the OFF button. Keep away from children. English COMPEDR+ATSINHIGFTTHCELIFCOKOTDOPCRHOACNEGSSEOCROPY Using the Food Processor Before operating the Food Processor, be processed by the Food Processor. 1 To turn...

Owners Manual
Page 14
... it to operate, make sure the work bowl and cover are properly locked on the base (see "Assembling the Food Processor" section). Be sure to a complete stop . COMPEDR+ATSINHIGFTTHCELIFCOKOTDOPCRHOACNEGSSEOCROPY 3 Wait until the blade or disc comes to turn off the Food Processor before removing the work bowl cover, or before removing the work bowl cover. Using the 3-in-1 feed tube 1 Use the entire feed tube and the large food pusher to process large items. 2 Use the medium food pusher in the feed tube to process smaller items. 3 Use the small food pusher to slice or shred the...
... it to operate, make sure the work bowl and cover are properly locked on the base (see "Assembling the Food Processor" section). Be sure to a complete stop . COMPEDR+ATSINHIGFTTHCELIFCOKOTDOPCRHOACNEGSSEOCROPY 3 Wait until the blade or disc comes to turn off the Food Processor before removing the work bowl cover, or before removing the work bowl cover. Using the 3-in-1 feed tube 1 Use the entire feed tube and the large food pusher to process large items. 2 Use the medium food pusher in the feed tube to process smaller items. 3 Use the small food pusher to slice or shred the...

Owners Manual
Page 15
COMPEDR+ATSINHIGFTTHCELIFCOKOTDOPCRHOACNEGSSEOCROPY Removing processed foods English 1 Press the OFF Button and unplug the Food Processor before disassembling. 2 Turn the work bowl cover to the left to unlock it before the contents are emptied. Then remove food from the work bowl to remove. 6 The multipurpose blade can be removed from the bowl and blade with a spatula. 15 Lift to the left and remove. 3 If using the finger grips located along the top edge...
COMPEDR+ATSINHIGFTTHCELIFCOKOTDOPCRHOACNEGSSEOCROPY Removing processed foods English 1 Press the OFF Button and unplug the Food Processor before disassembling. 2 Turn the work bowl cover to the left to unlock it before the contents are emptied. Then remove food from the work bowl to remove. 6 The multipurpose blade can be removed from the bowl and blade with a spatula. 15 Lift to the left and remove. 3 If using the finger grips located along the top edge...

Owners Manual
Page 16
... membrane) from recipe. To chop nuts or make nut butters: Process up to 1 pound (455 g) at a time to desired size, using Low speed. To make sure work bowl. You can also be very cold. Then process continuously until finely chopped. To prepare mashed potatoes: Shred hot cooked potatoes using short pulses, until fine. Process up to 3 cups (710 ml) of cheese can use the multi-purpose blade to grate hard...
... membrane) from recipe. To chop nuts or make nut butters: Process up to 1 pound (455 g) at a time to desired size, using Low speed. To make sure work bowl. You can also be very cold. Then process continuously until finely chopped. To prepare mashed potatoes: Shred hot cooked potatoes using short pulses, until fine. Process up to 3 cups (710 ml) of cheese can use the multi-purpose blade to grate hard...

Owners Manual
Page 17
... knead recipes which use the small feed tube in the 3-piece food pusher. Or use the small food pusher to 15 minutes before processing. Process using even pressure with soft cheeses, such as stir-fry meats: Cut or roll food to fit feed tube. Check to keep food positioned properly. Roll up and stand up in feed tube. English CTIMPDS F+OSRHGIFRTEACTLIRCEKSTUOLTCSHANGE COPY Using a slicing or shredding disc Rotating Blade Hazard Always use the small food pusher to fit feed tube. Position food vertically...
... knead recipes which use the small feed tube in the 3-piece food pusher. Or use the small food pusher to 15 minutes before processing. Process using even pressure with soft cheeses, such as stir-fry meats: Cut or roll food to fit feed tube. Check to keep food positioned properly. Roll up and stand up in feed tube. English CTIMPDS F+OSRHGIFRTEACTLIRCEKSTUOLTCSHANGE COPY Using a slicing or shredding disc Rotating Blade Hazard Always use the small food pusher to fit feed tube. Position food vertically...
Owners Manual
Page 18
..., fill work bowl cover, place it cannot be chopped through the feed tube while the processor is not designed to 2/3 full. This allows the blade a full rotation before liquid ingredients. • To clean ingredients from the multipurpose blade easily, just empty the work bowl. Grind bones or other ingredients. Process nuts and fruits, using a spatula. • When food quantity reaches the bottom of a slicing or shredding disc, remove the food...
..., fill work bowl cover, place it cannot be chopped through the feed tube while the processor is not designed to 2/3 full. This allows the blade a full rotation before liquid ingredients. • To clean ingredients from the multipurpose blade easily, just empty the work bowl. Grind bones or other ingredients. Process nuts and fruits, using a spatula. • When food quantity reaches the bottom of a slicing or shredding disc, remove the food...
Owners Manual
Page 19
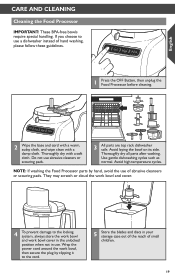
... the work bowl and cover. 4 To prevent damage to the locking system, always store the work bowl and work bowl, then secure the plug by hand, avoid the use . NOTE: If washing the Food Processor parts by clipping it to use abrasive cleaners or scouring pads. 3 All parts are top rack dishwasher safe. English CMARDE+ANSHDIFCTLECALNICIKNGTO CHANGE COPY Cleaning the Food Processor IMPORTANT: These BPA-free bowls require special handling. Do not use...
... the work bowl and cover. 4 To prevent damage to the locking system, always store the work bowl and work bowl, then secure the plug by hand, avoid the use . NOTE: If washing the Food Processor parts by clipping it to use abrasive cleaners or scouring pads. 3 All parts are top rack dishwasher safe. English CMARDE+ANSHDIFCTLECALNICIKNGTO CHANGE COPY Cleaning the Food Processor IMPORTANT: These BPA-free bowls require special handling. Do not use...
Owners Manual
Page 20
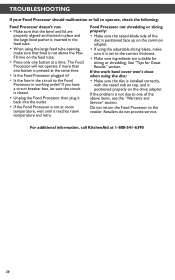
... provide service. CTRMODU+BLSEHSIHFTOOCLTIICNKGTO CHANGE COPY If your Food Processor should malfunction or fail to operate, check the following: Food Processor doesn't run: • Make sure that food is positioned properly on the drive adapter. See "Tips for slicing or shredding. If the work bowl cover won't close when using the disc: • Make sure the disc is installed correctly, with the raised nub on the common adapter. • If using the large feed tube opening, make...
... provide service. CTRMODU+BLSEHSIHFTOOCLTIICNKGTO CHANGE COPY If your Food Processor should malfunction or fail to operate, check the following: Food Processor doesn't run: • Make sure that food is positioned properly on the drive adapter. See "Tips for slicing or shredding. If the work bowl cover won't close when using the disc: • Make sure the disc is installed correctly, with the raised nub on the common adapter. • If using the large feed tube opening, make...
Owners Manual
Page 21
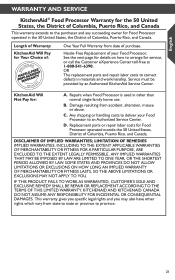
... COPY KitchenAid® Food Processor Warranty for the 50 United States, the District of Columbia, Puerto Rico, and Canada This warranty extends to the purchaser and any succeeding owner for Food Processor operated outside the 50 United States, District of Columbia, Puerto Rico, and Canada. C. Any shipping or handling costs to deliver your Food Processor. Replacement parts or repair labor costs for Food Processor operated in...
... COPY KitchenAid® Food Processor Warranty for the 50 United States, the District of Columbia, Puerto Rico, and Canada This warranty extends to the purchaser and any succeeding owner for Food Processor operated outside the 50 United States, District of Columbia, Puerto Rico, and Canada. C. Any shipping or handling costs to deliver your Food Processor. Replacement parts or repair labor costs for Food Processor operated in...

Owners Manual
Page 22
....). If you purchased the Food Processor for Service after the Warranty Expires, or Ordering Accessories and Replacement Parts In the United States and Puerto Rico: For service information, or to order accessories or replacement parts, call tollfree at 1-800-807-6777. Box 218, St. Please follow these instructions to obtain service. Proof of ownership, KitchenAid Canada will also be covered by our one year limited...
....). If you purchased the Food Processor for Service after the Warranty Expires, or Ordering Accessories and Replacement Parts In the United States and Puerto Rico: For service information, or to order accessories or replacement parts, call tollfree at 1-800-807-6777. Box 218, St. Please follow these instructions to obtain service. Proof of ownership, KitchenAid Canada will also be covered by our one year limited...


