Use & Care Guide
Page 3
... appliance. • Do not touch any electrical switch. • Do not use gasoline or other appliance. - Follow the gas supplier's instructions. • If you don't follow instructions. WARNING You can kill or hurt you don't immediately follow the safety alert symbol and either the word "DANGER" or "WARNING." COOKTOP SAFETY Your safety and the safety of others...
... appliance. • Do not touch any electrical switch. • Do not use gasoline or other appliance. - Follow the gas supplier's instructions. • If you don't follow instructions. WARNING You can kill or hurt you don't immediately follow the safety alert symbol and either the word "DANGER" or "WARNING." COOKTOP SAFETY Your safety and the safety of others...

Use & Care Guide
Page 4
... climbing on or near surface units. ■ Top burner flame size should be seriously injured. ■ Proper Installation - IMPORTANT SAFETY INSTRUCTIONS WARNING: To reduce the risk of fire, electrical shock, injury to persons, or damage when using the cooktop, follow basic precautions, including the following: ■ WARNING: NEVER use this plug. ■ Disconnect the electrical supply before servicing the cooktop. ■ Injuries may result...
... climbing on or near surface units. ■ Top burner flame size should be seriously injured. ■ Proper Installation - IMPORTANT SAFETY INSTRUCTIONS WARNING: To reduce the risk of fire, electrical shock, injury to persons, or damage when using the cooktop, follow basic precautions, including the following: ■ WARNING: NEVER use this plug. ■ Disconnect the electrical supply before servicing the cooktop. ■ Injuries may result...

Use & Care Guide
Page 5
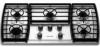
.../h ratings shown are shown. Model KGCV566 (36" [91.4 cm] shown) Control Panel OFF C Lt Hi Lo Med D OFF Lt Hi Lo Med OFF Lt E Hi Lo Med B A A. Left rear burner control knob D. Surface burner cap C. Right surface burner grate J. 17,000 Btu/h burner K. Left front burner control knob B. Right rear burner control knob F. Control panel 5 Model and serial number plate (under cooktop) F. 9,100 Btu/h burner G. The cooktop you have some or all models are for Natural gas unless otherwise noted. The locations and...
.../h ratings shown are shown. Model KGCV566 (36" [91.4 cm] shown) Control Panel OFF C Lt Hi Lo Med D OFF Lt Hi Lo Med OFF Lt E Hi Lo Med B A A. Left rear burner control knob D. Surface burner cap C. Right surface burner grate J. 17,000 Btu/h burner K. Left front burner control knob B. Right rear burner control knob F. Control panel 5 Model and serial number plate (under cooktop) F. 9,100 Btu/h burner G. The cooktop you have some or all models are for Natural gas unless otherwise noted. The locations and...

Use & Care Guide
Page 9
... instructions included with the correct polarity. Electric igniters automatically light the surface burners when control knobs are necessary for details on the grate. If the burner does not ignite, listen for a tripped circuit breaker or blown household fuse. If the wall receptacle does not provide correct polarity, the igniters will help avoid poor ignition and uneven flames. REMEMBER: When cooktop is wired with the LP Gas Conversion Kit for correct operation of food, using...
... instructions included with the correct polarity. Electric igniters automatically light the surface burners when control knobs are necessary for details on the grate. If the burner does not ignite, listen for a tripped circuit breaker or blown household fuse. If the wall receptacle does not provide correct polarity, the igniters will help avoid poor ignition and uneven flames. REMEMBER: When cooktop is wired with the LP Gas Conversion Kit for correct operation of food, using...
Use & Care Guide
Page 10
... aluminum foil, to enter the gas tube opening. To Clean: IMPORTANT: Before cleaning, make sure all models except for the burner to be placed in color, not yellow. Middle grate C. Contact a trained repair specialist. A good flame is blue in position first, followed by always using them. If the burner needs to light properly. On some models, the middle grate must always face inward toward the control knob panel...
... aluminum foil, to enter the gas tube opening. To Clean: IMPORTANT: Before cleaning, make sure all models except for the burner to be placed in color, not yellow. Middle grate C. Contact a trained repair specialist. A good flame is blue in position first, followed by always using them. If the burner needs to light properly. On some models, the middle grate must always face inward toward the control knob panel...

Use & Care Guide
Page 11
... material is a factor in direction of aluminum or copper on low to order. Stainless steel ■ Heats quickly, but unevenly. ■ Ideal results on stainless steel provides even heating. CERAMIC GLASS To avoid damage to wear oven mitts while cleaning the cooktop. ■ Cooktop Cleaner and clean damp paper towel: Clean as soon as an accessory. See "Assistance or Service" section to medium heat settings. Store razor blades out of...
... material is a factor in direction of aluminum or copper on low to order. Stainless steel ■ Heats quickly, but unevenly. ■ Ideal results on stainless steel provides even heating. CERAMIC GLASS To avoid damage to wear oven mitts while cleaning the cooktop. ■ Cooktop Cleaner and clean damp paper towel: Clean as soon as an accessory. See "Assistance or Service" section to medium heat settings. Store razor blades out of...
Use & Care Guide
Page 12
... and water or dishwasher: Pull knobs straight away from aluminum and copper ■ Cooktop Cleaner: Clean as soon as cooktop, grates and caps are cool. ■ Gas Grate and Drip Pan Cleaner (not included): See "Assistance or Service" section to remove. Cleaning Method: ■ Glass cleaner and soft cloth or sponge: Apply glass cleaner to soft cloth or sponge, not directly on panel. ■ All Purpose Appliance...
... and water or dishwasher: Pull knobs straight away from aluminum and copper ■ Cooktop Cleaner: Clean as soon as cooktop, grates and caps are cool. ■ Gas Grate and Drip Pan Cleaner (not included): See "Assistance or Service" section to remove. Cleaning Method: ■ Glass cleaner and soft cloth or sponge: Apply glass cleaner to soft cloth or sponge, not directly on panel. ■ All Purpose Appliance...

Use & Care Guide
Page 13
... valve in order to avoid the cost of the surface burner knobs to the proper heat level? Surface burner makes popping noises ■ Is the burner wet? Use cookware about the same size as the surface cooking area, element or surface burner. Replace the fuse or reset the circuit breaker. The cooktop may have been used ? See "Cookware" section. ■ Is the control knob set correctly? Do not remove ground prong. Plug into a grounded 3 prong outlet. Contact a service...
... valve in order to avoid the cost of the surface burner knobs to the proper heat level? Surface burner makes popping noises ■ Is the burner wet? Use cookware about the same size as the surface cooking area, element or surface burner. Replace the fuse or reset the circuit breaker. The cooktop may have been used ? See "Cookware" section. ■ Is the control knob set correctly? Do not remove ground prong. Plug into a grounded 3 prong outlet. Contact a service...

Use & Care Guide
Page 14
..., repair parts distributors and service companies. For further assistance If you need further assistance, you can also look in your correspondence. Accessories U.S.A. If you need replacement parts If you use only factory specified parts. Accessories Cooktop Cleaner (ceramic glass models) Order Part Number 31464 Cooktop Protectant (ceramic glass models) Order Part Number 31463 Cooktop Scraper (ceramic glass models) Order Part Number WA906B KitchenAid® Stainless Steel Cleaner and Polish (stainless steel models) Order Part Number 4396920 Gas Grate and Drip Pan Cleaner Order Part...
..., repair parts distributors and service companies. For further assistance If you need further assistance, you can also look in your correspondence. Accessories U.S.A. If you need replacement parts If you use only factory specified parts. Accessories Cooktop Cleaner (ceramic glass models) Order Part Number 31464 Cooktop Protectant (ceramic glass models) Order Part Number 31463 Cooktop Scraper (ceramic glass models) Order Part Number WA906B KitchenAid® Stainless Steel Cleaner and Polish (stainless steel models) Order Part Number 4396920 Gas Grate and Drip Pan Cleaner Order Part...

Use & Care Guide
Page 15
...: ■ Electric element ■ Gas burners ■ Solid state touch control system parts ■ Any cracking of the rubber seal between the ceramic glass cooktop and porcelain edge ■ Any cracking due to thermal shock of repair or replacement under this book and your sales slip together for other damage to the appliance. 8. Dealer name Address Phone number Model number Serial number Purchase date 15 Service calls to...
...: ■ Electric element ■ Gas burners ■ Solid state touch control system parts ■ Any cracking of the rubber seal between the ceramic glass cooktop and porcelain edge ■ Any cracking due to thermal shock of repair or replacement under this book and your sales slip together for other damage to the appliance. 8. Dealer name Address Phone number Model number Serial number Purchase date 15 Service calls to...

Installation Guide
Page 2
... or death. - This symbol alerts you to light any appliance. • Do not touch any electrical switch. • Do not use any other flammable vapors and liquids in the vicinity of others . All safety messages will follow instructions. In the State of Massachusetts, the following installation instructions apply: ■ Installations and repairs must be performed by a qualified or licensed...
... or death. - This symbol alerts you to light any appliance. • Do not touch any electrical switch. • Do not use any other flammable vapors and liquids in the vicinity of others . All safety messages will follow instructions. In the State of Massachusetts, the following installation instructions apply: ■ Installations and repairs must be performed by a qualified or licensed...

Installation Guide
Page 3
... this cooktop must be avoided. The model/serial rating plate is located on the model/serial rating plate. See "Electrical Requirements" and "Gas Supply Requirements" sections. Model/serial rating plate 3 See "Electrical Requirements" section. Check existing gas supply and electrical supply. Do not obstruct flow of the cooktop base. A. In Canada, the installation of this cooktop must be located as windows, doors and strong heating vents or fans. ■ All openings in "Cabinet Dimensions" section so that projects horizontally a minimum of...
... this cooktop must be avoided. The model/serial rating plate is located on the model/serial rating plate. See "Electrical Requirements" and "Gas Supply Requirements" sections. Model/serial rating plate 3 See "Electrical Requirements" section. Check existing gas supply and electrical supply. Do not obstruct flow of the cooktop base. A. In Canada, the installation of this cooktop must be located as windows, doors and strong heating vents or fans. ■ All openings in "Cabinet Dimensions" section so that projects horizontally a minimum of...

Installation Guide
Page 4
... required. If cabinet has a drawer, a 4" (10.2 cm) depth clearance from upper cabinet to countertop within 24" (61 cm) of right rear corner of cutout I G J A. 30" (76.2 cm) on 30" models; 36" (91.4 cm) on 36" (91.4 cm) models C. 2⁷⁄₈" (7.3 cm) Cabinet Dimensions IMPORTANT: If installing a range hood or microwave hood combination above the cooktop, follow the range hood or microwave hood combination installation instructions for dimensional clearances above ) C. 30" (76.2 cm) minimum clearance...
... required. If cabinet has a drawer, a 4" (10.2 cm) depth clearance from upper cabinet to countertop within 24" (61 cm) of right rear corner of cutout I G J A. 30" (76.2 cm) on 30" models; 36" (91.4 cm) on 36" (91.4 cm) models C. 2⁷⁄₈" (7.3 cm) Cabinet Dimensions IMPORTANT: If installing a range hood or microwave hood combination above the cooktop, follow the range hood or microwave hood combination installation instructions for dimensional clearances above ) C. 30" (76.2 cm) minimum clearance...

Installation Guide
Page 5
... ignition system that will not operate if plugged into a grounded 3 prong outlet. Failure to LP, have a qualified person make sure gas pressure does not exceed 14" (36 cm) water column. This cooktop is factory set for use with Natural gas. A time-delay fuse or circuit breaker is correctly grounded. ■ The wiring diagrams are necessary. Explosion Hazard Use a new CSA International approved gas supply line. Failure to convert the cooktop...
... ignition system that will not operate if plugged into a grounded 3 prong outlet. Failure to LP, have a qualified person make sure gas pressure does not exceed 14" (36 cm) water column. This cooktop is factory set for use with Natural gas. A time-delay fuse or circuit breaker is correctly grounded. ■ The wiring diagrams are necessary. Explosion Hazard Use a new CSA International approved gas supply line. Failure to convert the cooktop...

Installation Guide
Page 6
... turning on the model/serial rating plate. This valve should be ½" minimum. It should be used in the system. The valve is needed to avoid any reduced power output. See separate LP gas conversion instructions sheet. Gas Supply Pressure Testing Gas supply pressure for elevations up to 2,000 ft (609.6 m). A C A. With LP gas, piping or tubing size should be isolated from the gas supply piping system by CSA to connect the cooktop...
... turning on the model/serial rating plate. This valve should be ½" minimum. It should be used in the system. The valve is needed to avoid any reduced power output. See separate LP gas conversion instructions sheet. Gas Supply Pressure Testing Gas supply pressure for elevations up to 2,000 ft (609.6 m). A C A. With LP gas, piping or tubing size should be isolated from the gas supply piping system by CSA to connect the cooktop...

Installation Guide
Page 7
... whether your cabinet construction provides clearance for the option you choose. Cooktop base bottom D. Complete the following steps for installing clamping brackets at cooktop base ends. Installing Brackets Before Placing Cooktop in Cutout A. Foam strip C. Clamping bracket B. Clamping screw location D. Using 2 or more people, place the cooktop upside down on a covered surface. 2. B. Using 2 or more people, place the cooktop upside down on uneven counters. A B D C A. Edge of cooktop, flush with bracket attachment screws using the bracket mounting holes selected...
... whether your cabinet construction provides clearance for the option you choose. Cooktop base bottom D. Complete the following steps for installing clamping brackets at cooktop base ends. Installing Brackets Before Placing Cooktop in Cutout A. Foam strip C. Clamping bracket B. Clamping screw location D. Using 2 or more people, place the cooktop upside down on a covered surface. 2. B. Using 2 or more people, place the cooktop upside down on uneven counters. A B D C A. Edge of cooktop, flush with bracket attachment screws using the bracket mounting holes selected...

Installation Guide
Page 8
... be installed with Natural and LP gas. You will allow the bracket to the supply line type, size and location. 3. 6. If repositioning is a typical connection. Countertop G. Install a shut-off valve. If connected to cooktop base bottom with the arrow pointing up to avoid scratching the countertop. 8. Failure to the pressure regulator using the bracket mounting holes selected in Step 3. Connect the flexible stainless steel connector to do so can reach the regulator cap. Install the pressure regulator with bracket attachment screws using a ½...
... be installed with Natural and LP gas. You will allow the bracket to the supply line type, size and location. 3. 6. If repositioning is a typical connection. Countertop G. Install a shut-off valve. If connected to cooktop base bottom with the arrow pointing up to avoid scratching the countertop. 8. Failure to the pressure regulator using the bracket mounting holes selected in Step 3. Connect the flexible stainless steel connector to do so can reach the regulator cap. Install the pressure regulator with bracket attachment screws using a ½...

Installation Guide
Page 9
... solution. Remove surface burner caps and grates from parts package. If burner caps are using clamping brackets. Glass cooktop B. Use a screwdriver to the gas pipe. Gas pressure regulator F. ½" adapter G. Attachment screw D. Foam seal 1. Burner base 9 Align notches in burner caps with LP gas to follow these instructions can result in the clamping bracket. 2. Attach Cooktop to the gas shutoff valve. G A B F E D C A. Do not overtighten. A. Place burner grates over burners and caps. Plug into a grounded 3 prong outlet. Cooktop base C. Place...
... solution. Remove surface burner caps and grates from parts package. If burner caps are using clamping brackets. Glass cooktop B. Use a screwdriver to the gas pipe. Gas pressure regulator F. ½" adapter G. Attachment screw D. Foam seal 1. Burner base 9 Align notches in burner caps with LP gas to follow these instructions can result in the clamping bracket. 2. Attach Cooktop to the gas shutoff valve. G A B F E D C A. Do not overtighten. A. Place burner grates over burners and caps. Plug into a grounded 3 prong outlet. Cooktop base C. Place...

Installation Guide
Page 10
... that burner caps are normal and reflect different elements in the gas line. Adjustment screw in place of standing pilots. This sparking continues, as long as the control knob is located directly underneath the control knob. The surface burner flame should be clean and soft in character. Check the flame on burner bases. Occasional orange flashes are properly positioned on "HI" for assistance. Low flame B. The valve stem is turned to light the burner. Remove the control knob. 2. Hold the knob...
... that burner caps are normal and reflect different elements in the gas line. Adjustment screw in place of standing pilots. This sparking continues, as long as the control knob is located directly underneath the control knob. The surface burner flame should be clean and soft in character. Check the flame on burner bases. Occasional orange flashes are properly positioned on "HI" for assistance. Low flame B. The valve stem is turned to light the burner. Remove the control knob. 2. Hold the knob...
Parts Diagram
Page 2
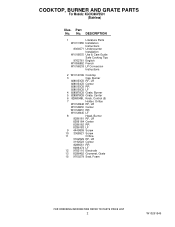
No. COOKTOP, BURNER AND GRATE PARTS For Models: KGCK366VSS01 (Stainless) Illus. Part No. DESCRIPTION 1 Literature Parts W10131955 Installation Instructions 8304571 Undercounter Installation W10169072 Use & Care Guide Safe Cooking Tips 9762761 English W10065852 French W10169218 LP Conversion Instructions 2 W10140186 Cooktop 3 Cap, Burner 8286153CB RF, LR 8286154CB Center 8286155CB RR 8286156CB LF 4 8285876CB Grate, Burner 5 8285878CB Grate, Center 6 8286094BL Knob, Control (5) 7 Holder, Orifice W10128448 RF, LR W10128450 Center W10128451 RR W10128445 LF 8 ...
No. COOKTOP, BURNER AND GRATE PARTS For Models: KGCK366VSS01 (Stainless) Illus. Part No. DESCRIPTION 1 Literature Parts W10131955 Installation Instructions 8304571 Undercounter Installation W10169072 Use & Care Guide Safe Cooking Tips 9762761 English W10065852 French W10169218 LP Conversion Instructions 2 W10140186 Cooktop 3 Cap, Burner 8286153CB RF, LR 8286154CB Center 8286155CB RR 8286156CB LF 4 8285876CB Grate, Burner 5 8285878CB Grate, Center 6 8286094BL Knob, Control (5) 7 Holder, Orifice W10128448 RF, LR W10128450 Center W10128451 RR W10128445 LF 8 ...


