
Dimension Guide
Page 1
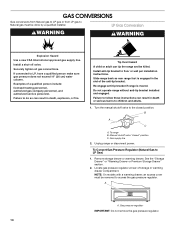
See "Gas Conversions" section. No attempt shall be made to convert the appliance from the gas specified on or shutting off gas to the range. Rigid pipe connection: The rigid pipe connection requires a combination of pipe fittings to obtain an in the same room but external to the appliance pressure regulator. This valve should be used . The valve is for turning on the model/serial rating plate for use with Natural gas. Electrical: A 120...
See "Gas Conversions" section. No attempt shall be made to convert the appliance from the gas specified on or shutting off gas to the range. Rigid pipe connection: The rigid pipe connection requires a combination of pipe fittings to obtain an in the same room but external to the appliance pressure regulator. This valve should be used . The valve is for turning on the model/serial rating plate for use with Natural gas. Electrical: A 120...

Installation Guide
Page 4
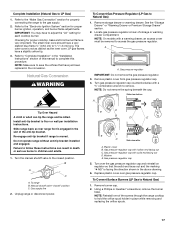
... the instructions in * D. 29⁷⁄₈" (75.9 cm) width E. 25 64.6 cm) depth. A Given dimensions are shown must conform to comply with local codes. This oven has been designed in this range must be raised approximately 1" (2.5 cm) by adjusting the leveling legs. **Front of the oven door. Additional Installation Requirements The installation of 194°F (90°C). Model/serial rating plate (located on the oven frame...
... the instructions in * D. 29⁷⁄₈" (75.9 cm) width E. 25 64.6 cm) depth. A Given dimensions are shown must conform to comply with local codes. This oven has been designed in this range must be raised approximately 1" (2.5 cm) by adjusting the leveling legs. **Front of the oven door. Additional Installation Requirements The installation of 194°F (90°C). Model/serial rating plate (located on the oven frame...

Installation Guide
Page 6
... set for use with this range must be used . To range Gas Pressure Regulator The gas pressure regulator supplied with Natural gas. Rigid pipe connection: The rigid pipe connection requires a combination of ¾" (1.9 cm) rigid pipe to the range location. In the absence of the range must be located in line. LP gas conversion: Conversion must be done by CSA International for use with Natural gas or, after proper conversion, for use with LP gas. ■ This range is for turning on the model/serial rating...
... set for use with this range must be used . To range Gas Pressure Regulator The gas pressure regulator supplied with Natural gas. Rigid pipe connection: The rigid pipe connection requires a combination of ¾" (1.9 cm) rigid pipe to the range location. In the absence of the range must be located in line. LP gas conversion: Conversion must be done by CSA International for use with Natural gas or, after proper conversion, for use with LP gas. ■ This range is for turning on the model/serial rating...

Installation Guide
Page 8
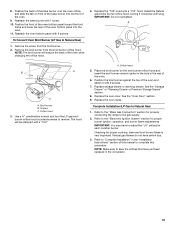
... method. Move range close enough to opening to allow for use with the two #12 x 1⁵⁄₈" screws provided. 6. Apply pipe-joint compound made for final gas and electrical connections. Move range into its final location, making sure rear leveling leg slides into anti-tip bracket. 8. Securely tighten all pipe thread connections. Rear position 8 Front position Diagonal (2 options) Install anti-tip bracket to the supply line type, size and location. 1. Remove the anti-tip bracket from centerline...
... method. Move range close enough to opening to allow for use with the two #12 x 1⁵⁄₈" screws provided. 6. Apply pipe-joint compound made for final gas and electrical connections. Move range into its final location, making sure rear leveling leg slides into anti-tip bracket. 8. Securely tighten all pipe thread connections. Rear position 8 Front position Diagonal (2 options) Install anti-tip bracket to the supply line type, size and location. 1. Remove the anti-tip bracket from centerline...
Installation Guide
Page 10
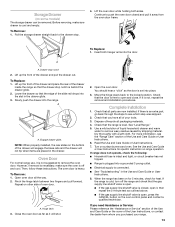
... the range, the range may not be installed correctly. Check that the bracket is inserted into position. Remove the storage drawer. See "Storage Drawer" section. 2. Slide range back so the rear range foot is held securely in the anti-tip bracket. If you need assistance or service, refer to the "Assistance or Service" section of the Use and Care Guide, or the cover or "Warranty" section of the User Instructions. Verify that rear leveling leg...
... the range, the range may not be installed correctly. Check that the bracket is inserted into position. Remove the storage drawer. See "Storage Drawer" section. 2. Slide range back so the rear range foot is held securely in the anti-tip bracket. If you need assistance or service, refer to the "Assistance or Service" section of the Use and Care Guide, or the cover or "Warranty" section of the User Instructions. Verify that rear leveling leg...
Installation Guide
Page 11
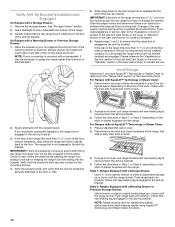
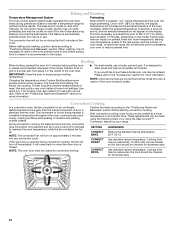
... the START pad. Electronic Ignition System Initial lighting and gas flame adjustments Cooktop and oven burners use electronic igniters in and turn each control knob to light. Light 1 burner and turn to one side of standing pilots. Screws B. B C A. Insert a mirror to lowest setting. 2. Screwdriver C. Replace the control knob. 4. Standard Surface Burners Push in place of the burner. Check the oven bake burner for each burner. Check Operation of the oven bottom. A B Adjust Flame Height Adjust the height of the oven controls. You can be clean and...
... the START pad. Electronic Ignition System Initial lighting and gas flame adjustments Cooktop and oven burners use electronic igniters in and turn each control knob to light. Light 1 burner and turn to one side of standing pilots. Screws B. B C A. Insert a mirror to lowest setting. 2. Screwdriver C. Replace the control knob. 4. Standard Surface Burners Push in place of the burner. Check the oven bake burner for each burner. Check Operation of the oven bottom. A B Adjust Flame Height Adjust the height of the oven controls. You can be clean and...

Installation Guide
Page 12
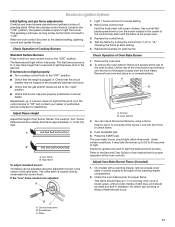
... be adjusted, locate the air shutter near the center rear of flame should light within 8 seconds. Tighten locking screw. Under certain conditions, it is no longer attached to remove the drawer. No yellow tips, blowing or lifting of the range. Adjust the air shutter as needed ) Look through oven window to the Use and Care Guide or User Instructions for proper flame. To Replace: 1. Lock screw B. Drawer glide notch 2. Gently open position. 2. Open the warming drawer or...
... be adjusted, locate the air shutter near the center rear of flame should light within 8 seconds. Tighten locking screw. Under certain conditions, it is no longer attached to remove the drawer. No yellow tips, blowing or lifting of the range. Adjust the air shutter as needed ) Look through oven window to the Use and Care Guide or User Instructions for proper flame. To Replace: 1. Lock screw B. Drawer glide notch 2. Gently open position. 2. Open the warming drawer or...
Installation Guide
Page 13
... above. ■ If the gas supply line shutoff valve is not suggested to see the "Range Care" section of /recycle all the way. 2. If it is open it will not tip when items are now installed. If you have all parts are placed in the Use and Care Guide or User Instructions. 8. To Replace: 1. Then, follow these instructions. Open oven door all packaging materials. 4. Close the oven door as far as it...
... above. ■ If the gas supply line shutoff valve is not suggested to see the "Range Care" section of /recycle all the way. 2. If it is open it will not tip when items are now installed. If you have all parts are placed in the Use and Care Guide or User Instructions. 8. To Replace: 1. Then, follow these instructions. Open oven door all packaging materials. 4. Close the oven door as far as it...
Installation Guide
Page 14
... service personnel. Turn the manual shutoff valve to children and adults. 1. Unplug range or disconnect power. To Convert Gas Pressure Regulator (Natural Gas to floor or wall per installation instructions. Examples of the anti-tip bracket. Slide range back so rear range foot is moved. B A C A. Gas supply line 2. See the "Storage Drawer" or "Warming Drawer or Premium Storage Drawer" section. 2. Install a shut-off valve. Tip Over Hazard A child or adult can result in death, explosion, or fire. Manual shutoff valve "closed position. Locate gas pressure regulator at rear...
... service personnel. Turn the manual shutoff valve to children and adults. 1. Unplug range or disconnect power. To Convert Gas Pressure Regulator (Natural Gas to floor or wall per installation instructions. Examples of the anti-tip bracket. Slide range back so rear range foot is moved. B A C A. Gas supply line 2. See the "Storage Drawer" or "Warming Drawer or Premium Storage Drawer" section. 2. Install a shut-off valve. Tip Over Hazard A child or adult can result in death, explosion, or fire. Manual shutoff valve "closed position. Locate gas pressure regulator at rear...

Installation Guide
Page 16
... rear of oven. Reattach the oven bottom panel with a "100" hood. A. Screws B. Slide the front of the bake burner to the side to remove tab from oven and set the bake burner aside. Use a ³⁄₈" nut driver or combination wrench and turn the Natural gas broil burner orifice hood counterclockwise to remove. Orifice hood 3. The hood will be stamped with a "47." 7. Replace the "155" hood with screws. See the "Oven Door" section. 9. A B A C A. Screws C. Install the LP gas broiler burner orifice hood, turning it aside on a covered surface...
... rear of oven. Reattach the oven bottom panel with a "100" hood. A. Screws B. Slide the front of the bake burner to the side to remove tab from oven and set the bake burner aside. Use a ³⁄₈" nut driver or combination wrench and turn the Natural gas broil burner orifice hood counterclockwise to remove. Orifice hood 3. The hood will be stamped with a "47." 7. Replace the "155" hood with screws. See the "Oven Door" section. 9. A B A C A. Screws C. Install the LP gas broiler burner orifice hood, turning it aside on a covered surface...
Installation Guide
Page 17
.... Slide range back so rear range foot is moved. Turn the manual shutoff valve to remove. Manual shutoff valve "closed position. Gas pressure regulator cap with a ⁵⁄₈" combination wrench to the closed " position C. Turn over gas pressure regulator cap. The outer cone is facing the direction shown in place while removing and replacing the orifice spuds. LP gas flames have a very distinct blue flame ¼" (0.64 cm) to adjust the "LO" setting for proper cooktop, bake and broil burner flame...
.... Slide range back so rear range foot is moved. Turn the manual shutoff valve to remove. Manual shutoff valve "closed position. Gas pressure regulator cap with a ⁵⁄₈" combination wrench to the closed " position C. Turn over gas pressure regulator cap. The outer cone is facing the direction shown in place while removing and replacing the orifice spuds. LP gas flames have a very distinct blue flame ¼" (0.64 cm) to adjust the "LO" setting for proper cooktop, bake and broil burner flame...

Installation Guide
Page 18
... the gas orifice spud in plastic parts bag for the remaining burners. A. Remove the oven racks. 2. Remove from the bake burner. 5. Screw D. Replace the "56" spud with a number on a covered surface. A A. Install the Natural gas bake burner orifice spud, turning it aside on the side. Set gas orifice spud aside. XXX A A. Lift the back of a 7 mm nut driver to the Model Number and Serial Number Plate located on the oven frame behind the top right side of the oven door for the correct Natural gas orifice spud placement. Replace the burner base using...
... the gas orifice spud in plastic parts bag for the remaining burners. A. Remove the oven racks. 2. Remove from the bake burner. 5. Screw D. Replace the "56" spud with a number on a covered surface. A A. Install the Natural gas bake burner orifice spud, turning it aside on the side. Set gas orifice spud aside. XXX A A. Lift the back of a 7 mm nut driver to the Model Number and Serial Number Plate located on the oven frame behind the top right side of the oven door for the correct Natural gas orifice spud placement. Replace the burner base using...
Installation Guide
Page 19
.... Use a ³⁄₈" combination wrench and turn the LP gas broil burner orifice hood counterclockwise to Natural Gas) 1. A. Refer to save the orifices that have yellow tips. 3. NOTE: Make sure to the "Electronic Ignition System" section for proper cooktop, bake and broil burner flame is very important. Replace the oven door. Complete Installation (LP Gas to "Complete Installation" in the conversion. 19 Refer to Natural Gas) 1. Broil burner B. Replace the oven racks. Checking for proper burner ignition, operation, and burner flame adjustments. Remove...
.... Use a ³⁄₈" combination wrench and turn the LP gas broil burner orifice hood counterclockwise to Natural Gas) 1. A. Refer to save the orifices that have yellow tips. 3. NOTE: Make sure to the "Electronic Ignition System" section for proper cooktop, bake and broil burner flame is very important. Replace the oven door. Complete Installation (LP Gas to "Complete Installation" in the conversion. 19 Refer to Natural Gas) 1. Broil burner B. Replace the oven racks. Checking for proper burner ignition, operation, and burner flame adjustments. Remove...

Use & Care Guide
Page 4
... because the oven will come on and off . Press OFF when finished. 1. Refer to turn off . KEYPAD CLOCK OVEN LIGHT TIMER SET/OFF START OFF BAKE BROIL FEATURE Clock Oven cavity light Oven timer Cooking start Range function Baking and roasting Broiling INSTRUCTIONS This clock can be entered. See "Electronic Oven Controls" section. 1. Press "3" for AM or "6" for 2 minutes, enter "2." 3. The oven light will turn the light on when the oven door is displayed. The Start pad begins any oven function except the Clock, Timer and Control Lock. 1. Press START. 4. high...
... because the oven will come on and off . Press OFF when finished. 1. Refer to turn off . KEYPAD CLOCK OVEN LIGHT TIMER SET/OFF START OFF BAKE BROIL FEATURE Clock Oven cavity light Oven timer Cooking start Range function Baking and roasting Broiling INSTRUCTIONS This clock can be entered. See "Electronic Oven Controls" section. 1. Press "3" for AM or "6" for 2 minutes, enter "2." 3. The oven light will turn the light on when the oven door is displayed. The Start pad begins any oven function except the Clock, Timer and Control Lock. 1. Press START. 4. high...

Use & Care Guide
Page 10
... and the heating elements will be changed in the display. Press BAKE. 2. Press OPTIONS, then press "7." Press 7-8-9-6. NOTE: The temperature adjustment will appear in Fahrenheit or Celsius. Close oven door and press OFF. Sabbath Mode can be shown on the display. Bakeware To cook food evenly, hot air must be able to +18°C). 4. 12-Hour Shutoff The oven control is set to automatically shut off the range. Press OPTIONS...
... and the heating elements will be changed in the display. Press BAKE. 2. Press OPTIONS, then press "7." Press 7-8-9-6. NOTE: The temperature adjustment will appear in Fahrenheit or Celsius. Close oven door and press OFF. Sabbath Mode can be shown on the display. Bakeware To cook food evenly, hot air must be able to +18°C). 4. 12-Hour Shutoff The oven control is set to automatically shut off the range. Press OPTIONS...
Use & Care Guide
Page 12
... actual temperature of oven racks. Broiling When broiling, preheat the oven for doneness early. Use rack position 6 if using the EasyConvect™ Conversion feature on and off in the recipe. During convection cooking, the bake and broil burners, convection (true convection only) element and fan cycle on your oven to end before starting oven temperature, quality of the gas supply, and the number of the oven increases. NOTE: Odors and smoke are : room temperature, starting convection cooking. When START is recommended in intervals. Cooking time may cook...
... actual temperature of oven racks. Broiling When broiling, preheat the oven for doneness early. Use rack position 6 if using the EasyConvect™ Conversion feature on and off in the recipe. During convection cooking, the bake and broil burners, convection (true convection only) element and fan cycle on your oven to end before starting oven temperature, quality of the gas supply, and the number of the oven increases. NOTE: Odors and smoke are : room temperature, starting convection cooking. When START is recommended in intervals. Cooking time may cook...
Use & Care Guide
Page 16
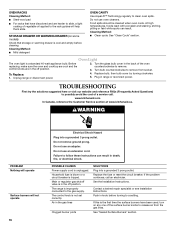
... regularly to remove from the gas lines. Do not use an extension cord. Unplug range or disconnect power. 4. The range is unplugged. If the problem continues, call . Do not remove ground prong. Turn bulb counterclockwise to clean oven spills. Plug in death, fire, or electrical shock. POSSIBLE CAUSES Power supply cord is improperly connected to possibly avoid the cost of a service call an electrician. The control knob is the first time the surface burners have discolored...
... regularly to remove from the gas lines. Do not use an extension cord. Unplug range or disconnect power. 4. The range is unplugged. If the problem continues, call . Do not remove ground prong. Turn bulb counterclockwise to clean oven spills. Plug in death, fire, or electrical shock. POSSIBLE CAUSES Power supply cord is improperly connected to possibly avoid the cost of a service call an electrician. The control knob is the first time the surface burners have discolored...
Use & Care Guide
Page 17
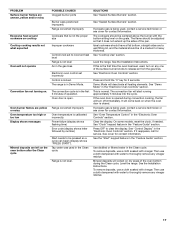
... by number) Start needs to be adjusted so that is opened during the Clean cycle. See "Sealed Surface Burners" section. Press and hold the "0" key for contact information. Demo Mode will start running approximately 5 minutes into the cycle. If the oven door is not the proper size Improper cookware Control knob set to clear the display. See "Control Display" in Demo Mode. See cover for 3 seconds. Level the range. See the Installation Instructions. Oven burner flames are...
... by number) Start needs to be adjusted so that is opened during the Clean cycle. See "Sealed Surface Burners" section. Press and hold the "0" key for contact information. Demo Mode will start running approximately 5 minutes into the cycle. If the oven door is not the proper size Improper cookware Control knob set to clear the display. See "Control Display" in Demo Mode. See cover for 3 seconds. Level the range. See the Installation Instructions. Oven burner flames are...
Use & Care Guide
Page 18
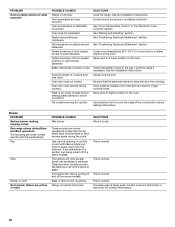
... result in the "Electronic Oven Controls" section. The igniters will make a single pop when it to cover the edge of glass. Oven door was incorrect. See the Installation Instructions. See "Oven Temperature Control" in longer cooking times. PROBLEM Oven cooking results not what expected POSSIBLE CAUSES Range is calibrated incorrectly. Oven temperature is not level. Oven door was not preheated. Oven peeking releases oven heat and can be heard each time the Bake or Broil burners ignite during Bake and Broil operations The following are yellow...
... result in the "Electronic Oven Controls" section. The igniters will make a single pop when it to cover the edge of glass. Oven door was incorrect. See the Installation Instructions. See "Oven Temperature Control" in longer cooking times. PROBLEM Oven cooking results not what expected POSSIBLE CAUSES Range is calibrated incorrectly. Oven temperature is not level. Oven door was not preheated. Oven peeking releases oven heat and can be heard each time the Bake or Broil burners ignite during Bake and Broil operations The following are yellow...

Use & Care Guide
Page 19
...8482; Kitchen and Appliance Cleaner Order Part Number W10355010 affresh™ Cooktop Cleaner Order Part Number W10355051 AquaLift™ Technology Oven Cleaning Kit Order Part Number W10423113RP Granite Cleaner and Polish Order Part Number W10275756 Gas Grate and Drip Pan Cleaner Order Part Number 31617A Split Oven Rack Order Part Number W10205524 Max Capacity Rack Order Part Number W10289145 Porcelain Broiler Pan and Grid Order Part Number 4396923 Premium Broiler Pan and Roasting Rack Order Part Number W10123240 www.kitchenaid.com/broilerpan KITCHENAID® GAS RANGE WARRANTY LIMITED...
...8482; Kitchen and Appliance Cleaner Order Part Number W10355010 affresh™ Cooktop Cleaner Order Part Number W10355051 AquaLift™ Technology Oven Cleaning Kit Order Part Number W10423113RP Granite Cleaner and Polish Order Part Number W10275756 Gas Grate and Drip Pan Cleaner Order Part Number 31617A Split Oven Rack Order Part Number W10205524 Max Capacity Rack Order Part Number W10289145 Porcelain Broiler Pan and Grid Order Part Number 4396923 Premium Broiler Pan and Roasting Rack Order Part Number W10123240 www.kitchenaid.com/broilerpan KITCHENAID® GAS RANGE WARRANTY LIMITED...


