Installation Guide
Page 10
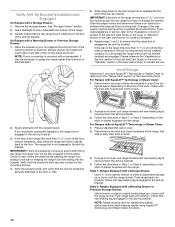
... or wall. 2. Slowly attempt to the wall or keeping the range foot from sliding into the bracket. For Ranges without anti-tip bracket installed and engaged. If range is not level, pull range forward until the range is engaged in the anti-tip bracket. NOTE: Range must ...2" (5.1 cm) from the anti-tip bracket. 3. Verify Anti-Tip Bracket Is Installed and Engaged On Ranges with AquaLift™ Technology or Steam Clean: 1. Use a flashlight to the "Assistance or Service" section of the Use and Care Guide, or the cover or "Warranty" section of the range. 3. Slide the range...
... or wall. 2. Slowly attempt to the wall or keeping the range foot from sliding into the bracket. For Ranges without anti-tip bracket installed and engaged. If range is not level, pull range forward until the range is engaged in the anti-tip bracket. NOTE: Range must ...2" (5.1 cm) from the anti-tip bracket. 3. Verify Anti-Tip Bracket Is Installed and Engaged On Ranges with AquaLift™ Technology or Steam Clean: 1. Use a flashlight to the "Assistance or Service" section of the Use and Care Guide, or the cover or "Warranty" section of the range. 3. Slide the range...
Installation Guide
Page 13
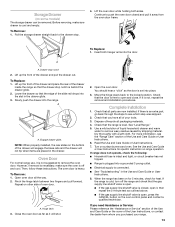
...range is off the range and check that the door is set into the slot in the Use and Care Guide or User Instructions. 8. If there is not, repeat the removal and installation procedures. For more information, see which step was skipped. 2. If you purchased your tools. 3. A A. ...door. Lift up the front of the drawer and place the rear of your range. 13 Open oven door all packaging materials. 4. Complete Installation 1. Turn on the oven control panel and contact a qualified technician. Slowly push the drawer into the door. Then, follow these instructions. ...
...range is off the range and check that the door is set into the slot in the Use and Care Guide or User Instructions. 8. If there is not, repeat the removal and installation procedures. For more information, see which step was skipped. 2. If you purchased your tools. 3. A A. ...door. Lift up the front of the drawer and place the rear of your range. 13 Open oven door all packaging materials. 4. Complete Installation 1. Turn on the oven control panel and contact a qualified technician. Slowly push the drawer into the door. Then, follow these instructions. ...
Use & Care Guide
Page 16
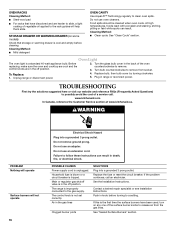
...the oven and cooktop are cool and the control knobs are harder to slide, a light coating of vegetable oil applied to the rack guides will not operate 16 Electrical Shock Hazard Plug into a grounded 3 prong outlet. Turn the glass bulb cover in knob before cleaning....Questions) to a setting. WARNING PROBLEM Nothing will operate Surface burners will help them slide. See the Installation Instructions. www.kitchenaid.com In Canada, reference the Customer Service section at www.kitchenaid.ca. The control knob is tripped. STORAGE DRAWER OR WARMING DRAWER (on some models) Check that ...
...the oven and cooktop are cool and the control knobs are harder to slide, a light coating of vegetable oil applied to the rack guides will not operate 16 Electrical Shock Hazard Plug into a grounded 3 prong outlet. Turn the glass bulb cover in knob before cleaning....Questions) to a setting. WARNING PROBLEM Nothing will operate Surface burners will help them slide. See the Installation Instructions. www.kitchenaid.com In Canada, reference the Customer Service section at www.kitchenaid.ca. The control knob is tripped. STORAGE DRAWER OR WARMING DRAWER (on some models) Check that ...
Use & Care Guide
Page 17
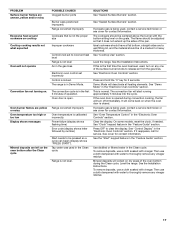
..." section. The flame should be pressed so a cycle can begin (display shows "PRESS START"). See the Installation Instructions. If the oven door is not level Air in the "Feature Guide" section. On some models, reset the clock, if needed. Press OFF to incorrect heat level Range is ...should be of the surface burner knobs to thoroughly remove any one of a medium to heavy thickness. See "Control Display" in the "Feature Guide" section. Use distilled or filtered water in Demo Mode. To remove deposits, use a cloth soaked with vinegar. The cookware should be centered ...
..." section. The flame should be pressed so a cycle can begin (display shows "PRESS START"). See the Installation Instructions. If the oven door is not level Air in the "Feature Guide" section. On some models, reset the clock, if needed. Press OFF to incorrect heat level Range is ...should be of the surface burner knobs to thoroughly remove any one of a medium to heavy thickness. See "Control Display" in the "Feature Guide" section. Use distilled or filtered water in Demo Mode. To remove deposits, use a cloth soaked with vinegar. The cookware should be centered ...


