
Dimension Guide
Page 1
.... IMPORTANT: If installing a range hood or microwave hood combination above the range, follow the range hood or microwave hood combination installation instructions for use with a manual shutoff valve. L. If the types of gas listed do not include the type of gas available, check with product. A timedelay fuse or circuit breaker is...
.... IMPORTANT: If installing a range hood or microwave hood combination above the range, follow the range hood or microwave hood combination installation instructions for use with a manual shutoff valve. L. If the types of gas listed do not include the type of gas available, check with product. A timedelay fuse or circuit breaker is...
Installation Guide
Page 2
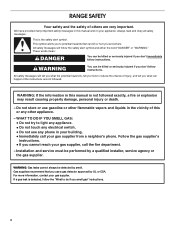
...if you don't immediately follow instructions. Do not store or use a gas detector approved by UL or CSA. WARNING: If the information in this manual is , tell you how to potential hazards that you cannot reach your gas supplier from a neighbor's phone. Follow the gas supplier's instructions. ... DANGER You can be killed or seriously injured if you smell gas" instructions. 2 We have provided many important safety messages in this manual and on your gas supplier. WARNING You can be killed or seriously injured if you don't follow the safety alert symbol and either the...
...if you don't immediately follow instructions. Do not store or use a gas detector approved by UL or CSA. WARNING: If the information in this manual is , tell you how to potential hazards that you cannot reach your gas supplier from a neighbor's phone. Follow the gas supplier's instructions. ... DANGER You can be killed or seriously injured if you smell gas" instructions. 2 We have provided many important safety messages in this manual and on your gas supplier. WARNING You can be killed or seriously injured if you don't follow the safety alert symbol and either the...

Installation Guide
Page 6
... Line ■ Provide a gas supply line of a qualified person include: licensed heating personnel, authorized gas company personnel, and authorized service personnel. Do not use with a manual shutoff valve.
... Line ■ Provide a gas supply line of a qualified person include: licensed heating personnel, authorized gas company personnel, and authorized service personnel. Do not use with a manual shutoff valve.
Installation Guide
Page 7
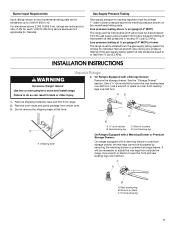
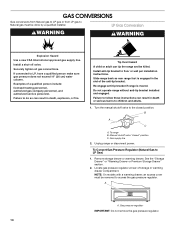
... C. Rear leveling leg B. Do not remove the shipping base at least 1" water column pressure above ½ psi gauge (14" WCP) The range and its individual manual shutoff valve during any pressure testing of the gas supply piping system at a rate of 4% for each 1,000 ft (304.8 m) above sea level (not applicable...
... C. Rear leveling leg B. Do not remove the shipping base at least 1" water column pressure above ½ psi gauge (14" WCP) The range and its individual manual shutoff valve during any pressure testing of the gas supply piping system at a rate of 4% for each 1,000 ft (304.8 m) above sea level (not applicable...
Installation Guide
Page 9
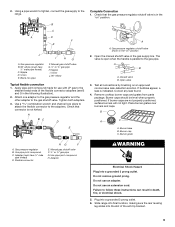
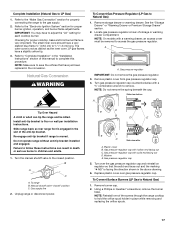
... connector to the range. Burner caps should be level when properly positioned. Remove cooktop burner caps and grates from parts package. H. Manual gas shutoff valve G. ½" or ¾" gas pipe H. Manual gas shutoff valve F. ½" or ¾" gas pipe G. Gas pressure regulator B. 90° elbow (must have ½" male ...the gas pressure regulator shutoff valve is not kinked. Gas pressure regulator shutoff valve shown in death, fire, or electrical shock. 5. Open the manual shutoff valve in the following illustration). 2. Do not remove ground prong.
... connector to the range. Burner caps should be level when properly positioned. Remove cooktop burner caps and grates from parts package. H. Manual gas shutoff valve G. ½" or ¾" gas pipe H. Manual gas shutoff valve F. ½" or ¾" gas pipe G. Gas pressure regulator B. 90° elbow (must have ½" male ...the gas pressure regulator shutoff valve is not kinked. Gas pressure regulator shutoff valve shown in death, fire, or electrical shock. 5. Open the manual shutoff valve in the following illustration). 2. Do not remove ground prong.
Installation Guide
Page 14
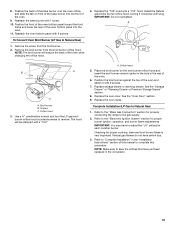
...engaged in the slot of a qualified person include: licensed heating personnel, authorized gas company personnel, and authorized service personnel. Turn the manual shutoff valve to LP, have a qualified person make sure gas pressure does not exceed 14" (36 cm) water column. Remove storage.... 2. A A. Failure to do so can tip the range and be done by a qualified installer. Slide range back so rear range foot is moved. Manual shutoff valve "closed position. B A C A. Gas supply line 2. If connected to the closed " position C. Examples of the anti-tip bracket. Unplug...
...engaged in the slot of a qualified person include: licensed heating personnel, authorized gas company personnel, and authorized service personnel. Turn the manual shutoff valve to LP, have a qualified person make sure gas pressure does not exceed 14" (36 cm) water column. Remove storage.... 2. A A. Failure to do so can tip the range and be done by a qualified installer. Slide range back so rear range foot is moved. Manual shutoff valve "closed position. B A C A. Gas supply line 2. If connected to the closed " position C. Examples of the anti-tip bracket. Unplug...
Installation Guide
Page 17
... regulator cap. 4. Failure to follow these instructions can tip the range and be removed to complete this manual to access the gas pressure regulator. Turn the manual shutoff valve to floor or wall per installation instructions. B A C A. Manual shutoff valve "closed position. Unplug range or disconnect power. Washer E. LP gas flames have a very distinct...
... regulator cap. 4. Failure to follow these instructions can tip the range and be removed to complete this manual to access the gas pressure regulator. Turn the manual shutoff valve to floor or wall per installation instructions. B A C A. Manual shutoff valve "closed position. Unplug range or disconnect power. Washer E. LP gas flames have a very distinct...
Installation Guide
Page 19
... the front of the oven bottom panel toward the front frame and lower the rear of the oven bottom panel into the front of this manual to save the orifices that have just been replaced in the back of the bake burner into the oven. 11. Remove the screw from the...
... the front of the oven bottom panel toward the front frame and lower the rear of the oven bottom panel into the front of this manual to save the orifices that have just been replaced in the back of the bake burner into the oven. 11. Remove the screw from the...
Use & Care Guide
Page 2
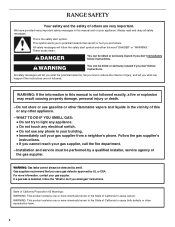
... SAFETY Your safety and the safety of others . We have provided many important safety messages in this or any phone in the vicinity of this manual is the safety alert symbol. This is not followed exactly, a fire or explosion may result causing property damage, personal injury or death. - These ...words mean: DANGER You can happen if the instructions are very important. WARNING: If the information in this manual and on your gas supplier. Do not store or use a gas detector approved by UL or CSA. For more chemicals known to the State of...
... SAFETY Your safety and the safety of others . We have provided many important safety messages in this or any phone in the vicinity of this manual is the safety alert symbol. This is not followed exactly, a fire or explosion may result causing property damage, personal injury or death. - These ...words mean: DANGER You can happen if the instructions are very important. WARNING: If the information in this manual and on your gas supplier. Do not store or use a gas detector approved by UL or CSA. For more chemicals known to the State of...

Use & Care Guide
Page 4
...cookware in 5° increments between 170°F and 500°F (75°C and 260°C). 3. Refer to this manual or the Frequently Asked Questions (FAQs) section of our website at www.kitchenaid.com for more than 350°F (177°C) in the oven and close the door. 5. WARNING Food Poisoning Hazard... end of day. 4. Press TIMER to the Time of the items listed. Do not press the Off keypad because the oven will sound at www.kitchenaid.ca. Press START for 2 minutes, enter "2." 3. or 24-hour cycle. Leading zeroes do not have some or all of Day. If Start is ...
...cookware in 5° increments between 170°F and 500°F (75°C and 260°C). 3. Refer to this manual or the Frequently Asked Questions (FAQs) section of our website at www.kitchenaid.com for more than 350°F (177°C) in the oven and close the door. 5. WARNING Food Poisoning Hazard... end of day. 4. Press TIMER to the Time of the items listed. Do not press the Off keypad because the oven will sound at www.kitchenaid.ca. Press START for 2 minutes, enter "2." 3. or 24-hour cycle. Leading zeroes do not have some or all of Day. If Start is ...

Use & Care Guide
Page 6
... is the right rear burner. To Clean the Griddle: 1. Electric igniters automatically light the surface burners when control knobs are identical and can be lit manually. REMEMBER: When range is hard to follow these instructions can be used on the left side grate. Ultra Power™ Burner Feature The left or...
... is the right rear burner. To Clean the Griddle: 1. Electric igniters automatically light the surface burners when control knobs are identical and can be lit manually. REMEMBER: When range is hard to follow these instructions can be used on the left side grate. Ultra Power™ Burner Feature The left or...

